

RISPERDAL CONSTA, 37,5 mg POLVO Y DISOLVENTE PARA SUSPENSION DE LIBERACION PROLONGADA PARA INYECCION INTRAMUSCULAR


Cómo usar RISPERDAL CONSTA, 37,5 mg POLVO Y DISOLVENTE PARA SUSPENSION DE LIBERACION PROLONGADA PARA INYECCION INTRAMUSCULAR
Traducción generada por IA
Este contenido ha sido traducido automáticamente y se ofrece solo con fines informativos. No sustituye la consulta con un profesional sanitario.
Ver originalContenido del prospecto
Introducción
Prospecto: información para el usuario
Risperdal Consta 37,5 mg polvo y disolvente para suspensión de liberación prolongada para inyección
risperidona
Lea todo el prospecto detenidamente antes de empezar a usar este medicamento, porque contiene información importante para usted.
- Conserve este prospecto, ya que puede tener que volver a leerlo.
- Si tiene alguna duda, consulte a su médico o farmacéutico.
- Este medicamento se le ha recetado solamente a usted, y no debe dárselo a otras personas aunque tengan los mismos síntomas que usted, ya que puede perjudicarles.
- Si experimenta efectos adversos, consulte a su médico o farmacéutico, incluso si se trata de efectos adversos que no aparecen en este prospecto. Ver sección 4.
Contenido del prospecto
- Qué es Risperdal Consta y para qué se utiliza
- Qué necesita saber antes de empezar a usar Risperdal Consta
- Cómo usar Risperdal Consta
- Posibles efectos adversos
- Conservación de Risperdal Consta
- Contenido del envase e información adicional

1. Qué es Risperdal Consta y para qué se utiliza
Risperdal Consta pertenece a un grupo de medicamentos llamados “antipsicóticos”.
Risperdal Consta se utiliza en el tratamiento de mantenimiento de la esquizofrenia, que se caracteriza por ver, oír o sentir cosas que no están presentes, creer en algo que no es cierto o inusualmente sentir desconfianza o confusión.
Risperdal Consta está destinado a los pacientes que actualmente están tratados con antipsicóticos vía oral (p.ej., comprimidos, cápsulas).
Risperdal Consta puede ayudar a disminuir los síntomas de su enfermedad y a evitar que vuelvan a aparecer.
2. Qué necesita saber antes de empezar a usar Risperdal Consta
No use Risperdal Consta
- Si es alérgico a risperidona o a cualquiera de los demás componentes de este medicamento (incluidos en la sección 6).
Advertencias y precauciones
- Si nunca ha tomado Risperdal en ninguna de sus formas, debe comenzar con Risperdal oral antes de empezar con Risperdal Consta.
Consulte a su médico o farmacéutico antes de usar Risperdal Consta si:
- Tiene un problema de corazón. Por ejemplo un ritmo irregular del corazón, o si es propenso a tener la tensión arterial baja o si está utilizando medicinas para la tensión arterial. Risperdal Consta puede disminuir la tensión arterial. Puede que su dosis tenga que ser ajustada
- Sabe que tiene algún factor que le hace propenso a tener un ataque cerebral, como la tensión arterial alta (hipertensión), trastornos cardiovasculares o trastornos de la circulación cerebral
- Ha presentado alguna vez movimientos involuntarios de la lengua, boca y cara
- Ha presentado alguna vez síntomas que incluyen fiebre, rigidez muscular, sudoración o una disminución del nivel de consciencia (también conocido como Síndrome Neuroléptico Maligno)
- Tiene enfermedad de Parkinson o demencia
- Si ha tenido en el pasado niveles bajos de células blancas de la sangre (que puede o no haber sido causado por otros medicamentos)
- Es diabético
- Tiene epilepsia
- Es varón y ha tenido alguna vez una erección prolongada o dolorosa
- Tiene dificultad para controlar la temperatura corporal o siente calor excesivo
- Tiene problemas de riñón
- Tiene problemas de hígado
- Tiene en sangre un nivel anormalmente alto de la hormona llamada prolactina o si tiene un tumor, que posiblemente sea dependiente de la prolactina
- Usted o alguien de su familia tiene problemas de coágulos en la sangre dado que medicamentos como éste se han asociado con la formación de coágulos en la sangre.
Si tiene dudas sobre si lo leído anteriormente le afecta, hable con su médico o farmacéutico antes de utilizar Risperdal o Risperdal Consta.
Debido a que en muy raras ocasiones se ha observado en pacientes tratados con Risperdal Consta un número peligrosamente bajo de un tipo de células blancas necesarias para combatir las infecciones en la sangre, su médico puede comprobar el número de células blancas.
Raramente tienen lugar reacciones alérgicas después de recibir inyecciones de Risperdal Consta, incluso si usted ha tolerado previamente risperidona oral. Busque atención médica inmediatamente si experimenta urticaria, hinchazón de garganta, picazón o problemas al respirar ya que pueden ser síntomas de una reacción alérgica grave.
Risperdal Consta puede hacerle aumentar de peso. Un aumento significativo de peso puede afectar desfavorablemente su salud. Su médico realizará regularmente un seguimiento de su peso.
Debido a que se ha visto diabetes mellitus o un empeoramiento de diabetes mellitus preexistente en pacientes que toman Risperdal, su médico debe comprobar los signos de una elevación de azúcar en sangre. En pacientes con diabetes mellitus preexistente, se debe monitorizar el azúcar en sangre regularmente.
Risperdal Consta aumenta frecuentemente los niveles de una hormona llamada “prolactina”. Esto puede causar efectos adversos como trastornos del periodo menstrual o problemas de fertilidad en mujeres o hinchazón de las mamas en hombres (ver Posibles efectos adversos). Si aparecen estos efectos adversos, se recomienda la evaluación de los niveles de prolactina en sangre.
Durante la intervención en el ojo por turbidez de las lentes (cataratas), la pupila (el círculo negro situado en medio del ojo), puede no aumentar de tamaño como se necesita. Además, el iris (la parte coloreada del ojo) se puede poner flácido durante la cirugía y esto puede causar daño en el ojo. Si usted está pensando en operarse de los ojos, asegúrese de informar a su oftalmólogo que está usando este medicamento.
Pacientes de edad avanzada con demencia
Risperdal Consta no se utiliza en personas de edad avanzada con demencia.
Si usted o su cuidador observan un cambio súbito de su estado mental o la aparición repentina de debilidad o entumecimiento de la cara, los brazos o las piernas, sobre todo en un lado, o habla confusa, aunque sea por poco tiempo, busque tratamiento médico inmediatamente. Puede ser signo de un ataque cerebral.
Personas con problemas de riñón o de hígado
Aunque se ha estudiado risperidona oral, Risperdal Consta no se ha estudiado en pacientes con problemas de riñon o de hígado. Risperdal Consta se debe administrar con precaución en este grupo de pacientes.
Uso de Risperdal Consta con otros medicamentos
Informe a su médico o farmacéutico si está utilizando o ha utilizado recientemente o podría tener que utilizar cualquier otro medicamento.
Es especialmente importante que hable con su médico o farmacéutico si toma cualquiera de los siguientes
- Medicamentos que actúan sobre el cerebro utilizados para calmarse (benzodiazepinas) o algunos medicamentos para el dolor (opioides), medicamentos para la alergia (algunos antihistamínicos), ya que risperidona puede aumentar el efecto sedante de todos éstos
- Medicamentos capaces de modificar la actividad eléctrica de su corazón, como los utilizados para la malaria, los problemas del ritmo del corazón, alergias (antihistamínicos), algunos antidepresivos u otros medicamentos para problemas mentales
- Medicamentos que pueden causar disminución de los latidos del corazón
- Medicamentos que pueden causar disminución del potasio en sangre (como ciertos diuréticos)
- Medicamentos para la enfermedad de Parkinson (como la levodopa)
- Medicamentos que aumentan la actividad del sistema nervioso central (psicoestimulantes, tales como metilfenidato)
- Medicamentos para el tratamiento de la tensión arterial alta. Risperdal Consta puede disminuir la tensión arterial
- Diuréticos que se utilizan para los problemas cardíacos o para tratar la hinchazón de algunas partes del cuerpo debido a una retención de líquidos (como furosemida o clorotiazida). Risperdal Consta, tomado sólo o con furosemida, puede aumentar el riesgo de ataque cerebral o de muerte en personas de edad avanzada con demencia.
Los siguientes medicamentos pueden reducir el efecto de la risperidona
- Rifampicina (un medicamento que se utiliza para el tratamiento de algunas infecciones)
- Carbamazepina, fenitoína (medicamentos que se usan para el tratamiento de la epilepsia)
- Fenobarbital.
Si empieza o deja de tomar estas medicinas, puede necesitar una dosis diferente de risperidona.
Los siguientes medicamentos pueden aumentar el efecto de la risperidona
- Quinidina (un medicamento que se utiliza para el tratamiento de ciertos tipos de problemas cardíacos)
- Antidepresivos como paroxetina, fluoxetina, antidepresivos tricíclicos
- Medicamentos conocidos como betabloqueantes (utilizados para el tratamiento de la tensión arterial alta)
- Fenotiazinas (como los medicamentos que se utilizan para el tratamiento de psicosis o para tranquilizar)
- Cimetidina, ranitidina (medicamentos que se utilizan para el tratamiento de la acidez de estómago)
- Itraconazol y ketoconazol (medicamentos que se utilizan para el tratamiento de las infecciones fúngicas)
- Algunos medicamentos que se utilizan para el tratamiento del VIH/SIDA, como ritonavir
- Verapamilo, medicamento que se utiliza para el tratamiento de la presión sanguínea elevada y/o para el ritmo cardíaco anormal
- Sertralina y fluvoxamina, medicamentos que se utilizan para el tratamiento de la depresión y otros trastornos psiquiátricos.
Si empieza o deja de tomar estas medicinas puede necesitar una dosis diferente de risperidona.
Si tiene dudas sobre si lo leído anteriormente le afecta, hable con su médico o farmacéutico antes de utilizar Risperdal Consta.
Uso de Risperdal Consta con alimentos, bebidas y alcohol
Debe evitar consumir alcohol mientras usa Risperdal Consta.
Embarazo, lactancia y fertilidad
- Si está embarazada o en periodo de lactancia, cree que podría estar embarazada o tiene intención de quedarse embarazada, consulte a su médico o farmacéutico antes de utilizar este medicamento. Su médico decidirá si puede usarlo.
- Se pueden producir los siguientes síntomas en bebés recién nacidos, de madres que han sido tratadas con Risperdal Consta en el último trimestre de embarazo (últimos tres meses de su embarazo): temblor, rigidez y/o debilidad muscular, somnolencia, agitación, problemas al respirar, y dificultad en la alimentación. Si su bebé desarrolla cualquiera de estos síntomas se debe poner en contacto con su médico
- Risperdal Consta puede aumentar los niveles de una hormona llamada “prolactina” que podría afectar a su fertilidad (ver Posibles efectos adversos).
Conducción y uso de máquinas
Se ha observado mareo, cansancio y problemas de visión durante el tratamiento con Risperdal Consta. No conduzca ni utilice herramientas o maquinaria sin consultarlo antes con su médico.
Risperdal Constacontiene sodio
Este medicamento contiene menos de 23 mg de sodio (1 mmol) por dosis; esto es, esencialmente “exento de sodio”.

3. Cómo usar Risperdal Consta
Siga exactamente las instrucciones de administración de este medicamento indicadas por su médico. En caso de duda, consulte de nuevo a su médico o farmacéutico.
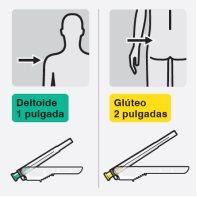
Risperdal Consta se administra mediante inyección intramuscular en el brazo o en el glúteo cada dos semanas, por un profesional sanitario. Las inyecciones se deben alternar entre el lado izquierdo y el lado derecho y no se deben administrar por vía intravenosa.
La dosis recomendada es la siguiente:
Adultos
Dosis inicial
Si su dosis diaria de risperidona oral (p.ej., comprimidos) fuera 4 miligramos o menos durante las dos semanas anteriores, su dosis de inicio debe ser 25 miligramos de Risperdal Consta.
Si su dosis diaria de risperidona oral (p.ej., comprimidos) fuera más de 4 miligramos durante las dos semanas anteriores, pueden darle la dosis de 37,5 miligramos de Risperdal Consta como dosis de inicio.
Si en la actualidad está en tratamiento con otro antipsicótico oral que no sea risperidona, su dosis de inicio de Risperdal Consta dependerá de su tratamiento actual. Su médico elegirá Risperdal Consta 25 mg o 37,5 mg.
Su médico decidirá si esta dosis de Risperdal Consta es la adecuada para usted.
Dosis de mantenimiento
- La dosis habitual es una inyección de 25 miligramos cada dos semanas
- Puede ser necesaria una dosis más alta de 37,5 ó 50 mg. Su médico decidirá cuál es la dosis de Risperdal Consta más adecuada para usted
- Su médico puede recetarle Risperdal oral durante las tres primeras semanas después de la primera inyección.
Si usa más Risperdal Consta del que debe
- Personas que han usado más Risperdal Consta del que debían, han experimentado los siguientes síntomas: somnolencia, cansancio, movimientos corporales anómalos, problemas para mantenerse de pie y caminar, sensación de mareo por la disminución de la tensión arterial y latidos anómalos del corazón. Se han notificado casos de anomalías en la conducción eléctrica del corazón y convulsiones
- Consulte inmediatamente a su médico, farmacéutico o llame al Servicio de Información Toxicológica, teléfono 91.562.04.20, indicando el medicamento y la cantidad tomada.
Se recomienda llevar el envase y el prospecto del medicamento al profesional sanitario.
Si interrumpe el tratamiento con Risperdal Consta
Se perderán los efectos de este medicamento. No debe dejar de usar este medicamento a menos que se lo haya dicho su médico ya que puede volver a experimentar los síntomas. Asegúrese de recibir sus inyecciones cada dos semanas. Si no puede acudir a sus citas, contacte con su médico inmediatamente para concertar otra cita cuando pueda. Si tiene cualquier otra duda sobre el uso de este medicamento, pregunte a su médico o farmacéutico.
Uso en niños y adolescentes
Los niños y adolescentes menores de 18 años no deben recibir Risperdal Consta.
4. Posibles efectos adversos
Al igual que todos los medicamentos, este medicamento puede producir efectos adversos, aunque no todas las personas los sufran.
Informe inmediatamente a su médico si presenta algunos de los siguientes efectos adversos poco frecuentes (pueden afectar hasta 1 de cada 100 pacientes):
- Tiene demencia y presenta un cambio repentino de su estado mental o debilidad repentina o entumecimiento de la cara, brazos o piernas especialmente en uno de los lados, o le cuesta hablar incluso durante un periodo corto de tiempo. Pueden ser signos de un infarto cerebral
- Presenta discinesia tardía (espasmos o movimientos espasmódicos que no se pueden controlar en la cara, lengua u otras partes del cuerpo). Informe a su médico inmediatamente si experimenta movimientos rítmicos involuntarios de la lengua, boca y cara. Puede ser necesaria la retirada de Risperdal Consta
Informe inmediatamente a su médico si presenta algunos de los siguientes efectos adversos raros (pueden afectar hasta 1 de cada 1.000 pacientes):
- Presenta coágulos sanguíneos en las venas, especialmente en las piernas (los síntomas incluyen hinchazón, dolor y enrojecimiento de la pierna), que pueden circular a través de los vasos sanguíneos a los pulmones causando dolor en el pecho y dificultad al respirar. Si usted nota alguno de estos síntomas pida consejo médico inmediatamente
- Presenta fiebre, rigidez muscular, sudoración o una disminución del nivel de consciencia (trastorno conocido como “Síndrome Neuroléptico Maligno”). Puede necesitar tratamiento médico inmediato
- Es hombre y presenta una erección prolongada o dolorosa. Se conoce como priapismo. Puede necesitar tratamiento médico inmediato
- Presenta una reacción alérgica grave caracterizada por fiebre, hinchazón de la boca, cara, labios o lengua, dificultad para respirar, picor, erupción de la piel o bajada de la tensión arterial. Incluso aunque usted previamente ha tolerado risperidona oral, en raras ocasiones pueden aparecer reacciones alérgicas después de recibir inyecciones de Risperdal Consta.
También pueden aparecer los siguientes efectos adversos:
Efectos adversosmuy frecuentes (pueden afectar a más de 1 de cada 10 personas)
- Síntomas de resfriado común
- Dificultad para quedarse o permanecer dormido
- Depresión, ansiedad
- Parkinsonismo: Esta enfermedad puede incluir: movimiento lento o alterado, sensación de rigidez o tirantez de los músculos (haciendo movimientos bruscos) y algunas veces una sensación de “congelación” del movimiento que después se reinicia. Otros signos del parkinsonismo incluyen caminar despacio arrastrando los pies, temblor en reposo, aumento de la saliva y/o babeo y pérdida de expresividad de la cara.
- Dolor de cabeza.
Efectos adversosfrecuentes (pueden afectar hasta a 1 de cada 10 personas)
- Neumonía, infección de pecho (bronquitis), sinusitis
- Infección del tracto urinario, sentir como si tuviese gripe, anemia
- Aumento de los niveles de una hormona llamada “prolactina” que se detecta en los análisis de sangre (lo cual puede o no causar síntomas). Los síntomas del aumento de la prolactina aparecen raramente y en hombres pueden incluir hinchazón de los pechos, dificultad en tener o mantener erecciones, disminución del deseo sexual u otras disfunciones sexuales. En mujeres pueden incluir malestar de las mamas, secreción de leche por las mamas, pérdida de períodos menstruales u otros problemas con el ciclo o problemas de fertilidad
- Aumento del azúcar en sangre, aumento de peso, aumento del apetito, pérdida de peso, disminución del apetito
- Trastorno del sueño, irritabilidad, disminución del deseo sexual, inquietud, sentirse somnoliento o menos atento
- Distonía: Es una enfermedad que implica contracción involuntaria lenta o continua de los músculos. Aunque puede estar afectada cualquier parte del cuerpo (y puede originar posturas anormales), la distonía afecta con frecuencia a los músculos de la cara, incluyendo movimientos anormales de los ojos, boca, lengua o mandíbula
- Mareos
- Discinesia: Esta enfermedad implica movimientos musculares involuntarios y puede incluir movimientos repetitivos, espasmódicos o de retorcimiento, o espasmos
- Temblor (agitación)
- Visión borrosa
- Latido rápido del corazón
- Disminución de la presión arterial, dolor de pecho, aumento de la presión arterial
- Respiración entrecortada, dolor de garganta, tos, congestión nasal
- Dolor abdominal, malestar abdominal, vómitos, náuseas, infección de estómago o de intestino, estreñimiento, diarrea, indigestión, sequedad de boca, dolor de muelas
- Erupción en la piel
- Espasmos musculares, dolor de los huesos o músculos, dolor de espalda, dolor de las articulaciones
- Incontinencia (pérdida de control) urinaria
- Disfunción eréctil
- Pérdida de los períodos menstruales
- Pérdida de leche por las mamas
- Hinchazón del cuerpo, brazos o piernas, fiebre, debilidad, fatiga (cansancio)
- Dolor
- Una reacción en el lugar de la inyección, incluyendo picor, dolor o hinchazón
- Aumento de las transaminasas del hígado en la sangre, aumento de la GGT (una enzima del hígado llamada gamma-glutamiltransferasa) en sangre
- Caídas.
Efectos adversospoco frecuentes (pueden afectar hasta a 1 de cada 100 personas)
- Infección de las vías respiratorias, infección de la vejiga, infección de oídos, infección de ojos, amigdalitis, infección de las uñas por hongos, infección de la piel, infección localizada en una única zona de la piel o parte del cuerpo, infección vírica, inflamación de la piel causada por ácaros, absceso bajo la piel
- Disminución del número de células blancas de la sangre, disminución de las plaquetas (células de la sangre que ayudan a detener las hemorragias), disminución de las células rojas de la sangre
- Reacción alérgica
- Azúcar en la orina, diabetes o empeoramiento de la diabetes
- Pérdida de apetito que causa malnutrición y disminución del peso corporal
- Aumento de los triglicéridos en la sangre (grasa), aumento del colesterol en sangre
- Euforia (manía), confusión, incapacidad para alcanzar el orgasmo, nerviosismo, pesadillas
- Pérdida de consciencia, convulsiones (crisis epilépticas), desmayos
- Una inquietud que provoca el movimiento de partes del cuerpo, trastorno del equilibrio, coordinación anormal, mareos al ponerse de pie, alteración de la atención, problemas con el habla, pérdida o alteraciones del gusto, disminución de la sensibilidad de la piel al dolor o al tacto, sensación de hormigueo, pinchazos o entumecimiento de la piel
- Infección de ojos u “ojo rojo”, sequedad de ojos, aumento del lagrimeo, enrojecimiento de los ojos
- Sensación de que todo gira (vértigo), pitidos en los oídos, dolor de oído
- Fibrilación auricular (ritmo cardíaco anormal), interrupción de la conducción entre las partes superiores e inferiores del corazón, anomalía en la actividad eléctrica del corazón, prolongación del intervalo QT en el corazón, latido lento del corazón, anomalía en la conducción eléctrica del corazón (electrocardiograma o ECG), sensación de aleteo o de golpeteo en el pecho (palpitaciones)
- Disminución de la presión arterial al ponerse de pie (como consecuencia, algunas personas que usan Risperdal Consta pueden sentir debilidad, mareo o pérdida del conocimiento al levantarse o sentarse de forma repentina)
- Respiración rápida, superficial, congestión de las vías respiratorias, jadeo, sangrados nasales
- Incontinencia fecal, dificultad para tragar, exceso de gas o flatulencia
- Picor, pérdida de pelo, eccema, sequedad de la piel, enrojecimiento de la piel, decoloración de la piel, acné, piel o cuero cabelludo escamoso o con picor
- Aumento de la CPK (creatina fosfoquinasa) en sangre, una enzima que algunas veces se libera con la degradación muscular
- Rigidez de las articulaciones, hinchazón de las articulaciones, debilidad muscular, dolor de cuello
- Orinar con frecuencia, incapacidad para orinar, dolor al orinar
- Trastorno de la eyaculación, retraso de la menstruación, pérdida de períodos menstruales u otros problemas con el ciclo (mujeres), desarrollo de mamas en hombres, disfunción sexual, dolor de las mamas, malestar de las mamas, secreción vaginal
- Hinchazón de la cara, boca, ojos o labios
- Escalofríos, aumento de la temperatura corporal
- Cambio en la forma de andar
- Sensación de sed, sensación de malestar, malestar de pecho, sentirse “indispuesto”
- Endurecimiento de la piel
- Aumento de las enzimas del hígado en sangre
- Dolor debido al procedimiento.
Efectos adversos raros (pueden afectar hasta a 1 de cada 1.000 personas)
- Disminución de un tipo de células blancas de la sangre que ayudan a combatir las infecciones
- Secreción inadecuada de una hormona que controla el volumen de orina
- Nivel de azúcar bajo en sangre
- Ingesta excesiva de agua
- Sonambulismo
- Trastorno alimentario relacionado con el sueño
- Falta de movimiento o de respuesta estando despierto (catatonía)
- Ausencia de emociones
- Disminución del nivel de consciencia
- Agitación de la cabeza
- Problemas con el movimiento de los ojos, giro de los ojos, hipersensibilidad de los ojos a la luz
- Problemas oculares durante la cirugía de cataratas. Durante la cirugía de cataratas puede darse una alteración llamada síndrome del iris flácido intraoperatorio (IFIS) si está tomando o ha tomado Risperdal Consta. Si necesita someterse a cirugía de cataratas asegúrese de informar a su oftalmólogo si está tomando o ha tomado este medicamento
- Latido irregular del corazón
- Número peligrosamente bajo de un tipo de células blancas necesarias para combatir las infecciones en la sangre, aumento de eosinófilos (un tipo de célula blanca) en la sangre
- Dificultad respiratoria durante el sueño (apnea del sueño)
- Neumonía causada por aspiración de alimentos, congestión de los pulmones, ruidos crepitantes de los pulmones, trastorno de la voz, trastorno de las vías respiratorias
- Inflamación del páncreas, obstrucción intestinal
- Heces muy duras
- Erupción en la piel relacionada con el medicamento
- Ronchas (o “urticaria”), engrosamiento de la piel, caspa, trastorno de la piel, lesión de la piel
- Rotura de las fibras musculares y dolor muscular (rabdomiólisis)
- Anomalía en la postura
- Aumento de las mamas, secreción por las mamas
- Disminución de la temperatura corporal, malestar
- Color amarillo de la piel y de los ojos (ictericia)
- Ingesta de agua peligrosamente excesiva
- Aumento de insulina (una hormona que controla los niveles de azúcar en la sangre) en sangre
- Problemas de los vasos sanguíneos en el cerebro
- No respuesta a estímulos
- Coma debido a diabetes incontrolada
- Pérdida repentina de la vista o ceguera
- Glaucoma (aumento de la presión del globo ocular), costras en el borde del párpado
- Rubor, hinchazón de la lengua
- Labios agrietados
- Aumento de las glándulas mamarias
- Disminución de la temperatura corporal, frialdad en los brazos y piernas
- Síntomas de abstinencia a medicamentos.
Efectos adversos muy raros (pueden afectar hasta a 1 de cada 10.000 personas)
- Complicaciones de la diabetes no controlada, con peligro para la vida
- Reacción alérgica grave con hinchazón, que puede afectar a la garganta causando dificultad respiratoria
- Falta de movimiento de los músculos del intestino que causa obstrucción.
Frecuencia no conocida: no puede estimarse a partir de los datos disponibles
- Erupción grave o mortal con ampollas y descamación de la piel que puede comenzar alrededor de la boca, nariz, ojos, genitales y extenderse a otras zonas del cuerpo (Síndrome de Stevens Johnson o necrólisis epidérmica tóxica).
El siguiente efecto adverso ha aparecido con el uso de otro medicamento llamado paliperidona que es muy similar a risperidona, por tanto, también se espera que aparezca con Risperdal Consta: Latido rápido del corazón al ponerse de pie.
Comunicación de efectos adversos
Si experimenta cualquier tipo de efecto adverso, consulte a su médico o farmacéutico, incluso si se trata de posibles efectos adversos que no aparecen en este prospecto. También puede comunicarlos directamente a través del Sistema Español de Farmacovigilancia de medicamentos de Uso Humano: https://www.notificaram.es. Mediante la comunicación de efectos adversos usted puede contribuir a proporcionar más información sobre la seguridad de este medicamento.
5. Conservación de Risperdal Consta
Mantener este medicamento fuera de la vista y del alcance de los niños.
No utilice este medicamento después de la fecha de caducidad que aparece en el envase. La fecha de caducidad es el último día del mes que se indica.
Conservar en nevera (entre 2ºC y 8ºC). Si no se dispone de refrigeración, el envase se puede almacenar por debajo de 25ºC durante 7 días como máximo antes de su administración. Administrar dentro de las 6 horas posteriores a la reconstitución (si se conserva a 25ºC o menos).
Conservar en el embalaje original para protegerlo de la luz.
Los medicamentos no se deben tirar por los desagües ni a la basura. Deposite los envases y los medicamentos que no necesita en el punto SIGRE de la farmacia. En caso de duda pregunte a su farmacéutico cómo deshacerse de los envases y de los medicamentos que no necesita. De esta forma ayudará a proteger el medio ambiente.
6. Contenido del envase e información adicional
Composición de Risperdal Consta
El principio activo es risperidona.
Cada Risperdal Consta polvo y disolvente para suspensión de liberación prolongada para inyección contiene 37,5 miligramos de risperidona.
Los demás componentes son:
Polvo
poli‑(d,l‑láctido‑co‑glicólido).
Disolvente (solución):
Polisorbato 20, Carmelosa sódica, Fosfato hidrogenado disódico dihidratado, Ácido cítrico anhidro, Cloruro de sodio, Hidróxido de sodio, Agua para inyección.
Aspecto de Risperdal Consta y contenido del envase
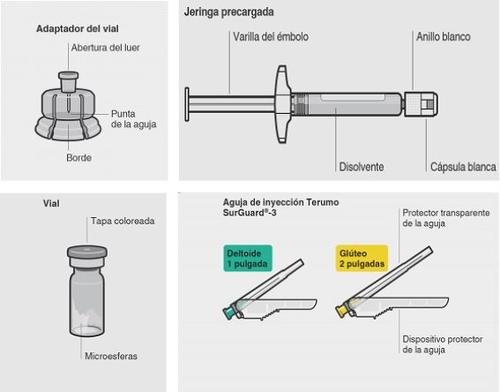
- Un frasco pequeño que contiene el polvo (en este polvo se encuentra el principio activo, risperidona). Una jeringa precargada que contiene 2 ml de líquido transparente e incoloro que se añade al polvo para suspensión de liberación prolongada para inyección.
- Un adaptador del vial para la reconstitución
- Dos agujas Terumo SurGuard® 3 para inyección intramuscular (una aguja de seguridad 21G UTW de 1 pulgada (0,8 mm × 25 mm) con dispositivo de seguridad protector para la aguja para la administración en el deltoides y una aguja de seguridad 20G TW de 2 pulgadas (0,9 mm × 51 mm) con dispositivo de seguridad protector para la aguja para la administración en el glúteo).
Risperdal Consta está disponible en packs que contienen de 1 a 5 envases agrupados.
Puede que solamente estén comercializados algunos tamaños de envases.
Titular de la autorización de comercialización y responsable de la fabricación
Titular de la autorización de comercialización
Janssen-Cilag, S.A.
Paseo del Club Deportivo 1, Edificio 16
28223 Pozuelo de Alarcón (Madrid)
España
Responsable de la fabricación
Janssen Pharmaceutica, N.V
Turnhoutseweg, 30
B-2340, Beerse
Bélgica
Este medicamento ha sido autorizado en los estados miembros del EEE con los siguientes nombres:
Austria: RISPERDAL CONSTA
Bélgica: RISPERDAL CONSTA
Chipre: RISPERDAL CONSTA
República Checa: RISPERDAL CONSTA
Dinamarca: RISPERDAL CONSTA
Estonia: RISPOLEPT CONSTA
Finlandia: RISPERDAL CONSTA
Francia: RISPERDAL CONSTA LP
Alemania: RISPERDAL CONSTA 25mg, 37,5mg, 50mg
Grecia: RISPERDAL CONSTA
Hungría: RISPERDAL CONSTA
Islandia: RISPERDAL CONSTA
Irlanda: RISPERDAL CONSTA
Italia: RISPERDAL
Lituania: RISPOLEPT CONSTA
Letonia: RISPOLEPT CONSTA
Liechtenstein: RISPERDAL CONSTA
Luxemburgo: RISPERDAL CONSTA
Malta: RISPERDAL CONSTA
Países Bajos: RISPERDAL CONSTA
Noruega: RISPERDAL CONSTA
Polonia: RISPOLEPT CONSTA
Portugal: RISPERDAL CONSTA
Rumanía: RISPOLEPT CONSTA
Eslovaquia: RISPERDAL CONSTA
Eslovenia: RISPERDAL CONSTA
España: RISPERDAL CONSTA
Suecia: RISPERDAL CONSTA
Reino Unido: RISPERDAL CONSTA
Este prospecto ha sido revisado por última vez en:abril 2021.
La información detallada y actualizada de este medicamento está disponible en la página Web de la Agencia Española del Medicamento y Productos Sanitarios (AEMPS) http://www.aemps.gob.esINFORMACIÓN IMPORTANTE PARA EL PROFESIONAL SANITARIO
Información importante
RISPERDAL CONSTA requiere una atención detallada en cada paso de las “Instrucciones de Uso” para ayudar a asegurar una administración exitosa.
Uso de los componentes proporcionados
Los componentes del envase están específicamente diseñados para el uso con RISPERDAL CONSTA. RISPERDAL CONSTA debe ser reconstituido solo con el disolvente suministrado en el envase.
Nosustituir NINGUNO de los componentes del envase.
No guardar la suspensión después de la reconstitución
Administrar la dosis lo antes posible después de la reconstitución para evitar la sedimentación.
Dosis adecuada
Todo el contenido del vial debe ser administrado para asegurar que se administra la dosis adecuada de RISPERDAL CONSTA.

No reutilizar.Los dispositivos médicos requieren materiales de características específicas para funcionar adecuadamente. Estas características se han verificado para un solo uso. Cualquier intento de volver a procesar el dispositivo para su posterior reutilización puede afectar negativamente la integridad del dispositivo o llevar a un deterioro del funcionamiento.
Componentes del envase
Paso 1 | Montar los componentes | ||
Sacar el envase de la dosis | Conectar el adaptador del vial al vial | ||
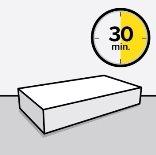
Esperar 30 minutos Sacar el envase de la dosis del frigorífico y dejar que alcance la temperatura ambiente durante al menos 30 minutosantes de reconstituir. No calentarde ninguna otra forma. |
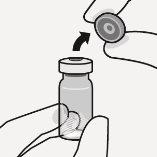
Retirar la tapa del vial Retire la tapa coloreada del vial. Limpie la parte superior del tapón gris con un algodón con alcoholDeje secar al aire. Noquitar el tapón gris de goma. |
Preparar el adaptador del vial Sujetar el blíster estéril como se muestra. Retirar el soporte de papel. Noquitar el adaptador del vial del blíster. Notocar la punta del punzón en ningún momento. Esto puede dar lugar a contaminación. |
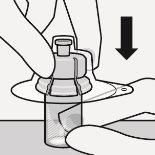
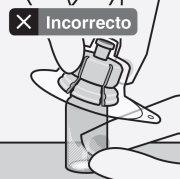
Acoplar el adaptador del vial al vial Coloque el vial en una superficie dura y sujételo por la base. Centre el adaptador del vial sobre el tapón gris de goma. Presione el adaptador del vial recto hacia abajo hasta que encaje con seguridad en el vial. Nocolocar el adaptador del vial en ángulo, ya que puede perder disolvente en la transferencia al vial
|

Acoplar la jeringa precargada al adaptador del vial
Retirar el blíster estéril
Mantener el vial vertical para prevenir pérdidas. Sujetar la base del vial y tirar de blíster estéril para quitarlo. Noagitar. Notocar el luer (cono) expuesto, abierto en el adaptador del vial. Esto puede dar lugar a contaminación. |
Sujetar por el anillo blanco de la punta de la jeringa. Nosujetar la jeringa por el vidrio durante el ensamblaje.
|
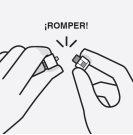
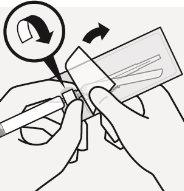
Retirar la cápsula Sujetando el anillo blanco, rompa la cápsula blanca. Nogirar o cortar la cápsula blanca. Notocar la punta de la jeringa. Esto puede dar lugar a contaminación.
|
Acoplar la jeringa al adaptador del vial Sujete el adaptador del vial por el borde para mantenerlo fijo. Sujete la jeringa por el anillo blancoy después inserte la punta en la abertura del luer (cono) del adaptador del vial. Nosujete la jeringa por el cilindro de vidrio. Esto puede causar que el anillo blanco se afloje o desprenda. Conecte la jeringa al adaptador del vial con un movimiento firme derotación en sentido de las agujas del relojhasta que esté ajustado. Nopresionar en exceso. Presionar en exceso puede causar que la punta de la jeringa se rompa. |
Paso 2 | Reconstituir las microesferas | ||
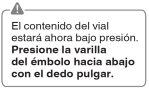
Inyectar disolvente Inyectar en el vial toda la cantidad de disolvente de la jeringa.
|
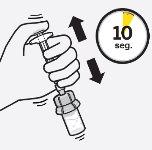
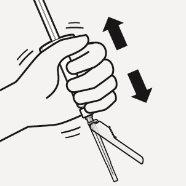
Suspender las microesferas en el disolvente Continúe presionando hacia abajo el émbolo con el pulgar, agiteenérgicamente,como se muestra, durante al menos 10 segundos. Revise la suspensión. Cuando esté correctamente mezclado, la suspensión tendrá un aspecto uniforme, denso y de color lechoso. Las microesferas serán visibles en el líquido. Inmediatamente proceda con el siguiente paso para evitar que la suspensión sedimente. |
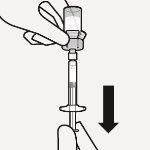
Transferir la suspensión a la jeringa Invertir el vial por completo. Tire lentamente de la varilla del émbolo hacia abajo para que pase todo el contenido del vial a la jeringa. |
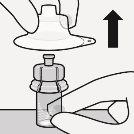
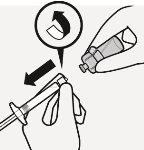
Retirar el adaptador del vial Sujete la jeringa por el anillo blanco y desenrósquelo del adaptador del vial. Corte la etiqueta del vial por la zona perforada. Coloque la etiqueta despegada en la jeringa para identificarla. Deseche adecuadamente tanto el vial como el adaptador del vial (ver sección 5 de este prospecto). |
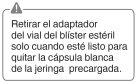
 Utilizar la zona de sujeción adecuada
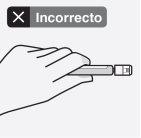
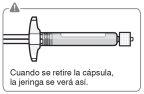 La cápsula rota se puede desechar.
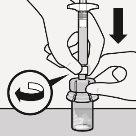

Paso 3 | Colocar la aguja | |||
Seleccionar la aguja apropiada Seleccione la aguja según la zona de inyección (glúteo o deltoides). |
Colocar la aguja Abra la bolsa del blíster por la zona parcialmente despegada y utilícela para coger la base de la aguja, como se muestra.Sujetando el anillo blanco de la jeringa, acople la jeringa al luer (cono) de la aguja con un movimiento firme de rotación en sentido de las agujas del relojhasta que esté ajustado. Notocar la abertura del luer (cono) de la aguja. Esto puede dar lugar a contaminación. |
Resuspender las microesferas Retirar completamente la bolsa del blíster. Justo antes de la inyección, agite de nuevo enérgicamente la jeringa, por si se ha producido alguna sedimentación. | ||
Paso 4 | Inyectar la dosis | |||
Retirar el protector transparente de la aguja Mueva el dispositivo de seguridad de la aguja hacia la jeringa, como se muestra. Después, sujete el anillo blanco de la jeringa y quite cuidadosamente el protector transparente de la aguja.Notorcer el protector transparente de la aguja, ya que la conexión del luer (cono) se puede perder |
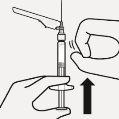
Eliminar las burbujas de aire Sujetar la jeringa hacia arriba y golpear suavemente para hacer que las burbujas de aire alcancen la parte superior.Lenta y cuidadosamente, presione la varilla del émbolo para eliminar el aire. |
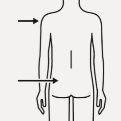
Inyectar Inyectar inmediatamente todo el contenido de la jeringa intramuscularmente (IM) en el glúteo o en el músculo deltoides del paciente. La inyección gluteal se debe hacer en el cuadrante superior externo del glúteo.No administrar por vía intravenosa. |
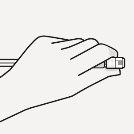
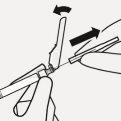
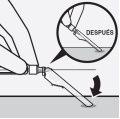
Proteger la aguja en el dispositivo de seguridad Usando una mano, colocar el dispositivo de seguridad de la aguja con un ángulo de 45 grados, sobre una superficie plana y dura. Presionar hacia abajo, con un movimiento firme y rápido, hasta que la aguja se encuentre completamente dentro del dispositivo de seguridad. Para evitar un pinchazo con la aguja: Nousar dos manos. Nodesenganchar o manipular mal deliberadamente el dispositivo de seguridad de la aguja. Notrate de enderezar la aguja o acoplar el dispositivo de seguridad si la aguja está doblada o dañada. |
Desechar las agujas de forma apropiada Comprobar que el dispositivo de seguridad de la aguja está completamente acoplado. Deséchelo en un contenedor para agujas usadas.Deseche también la aguja proporcionada en el envase de la dosis que no ha usado (ver sección 5 de este prospecto). |

- País de registro
- Precio medio en farmacia103.7 EUR
- Principio activo
- Requiere recetaSí
- Fabricante
- Esta información es de carácter general y no sustituye la consulta con un profesional sanitario.
- Alternativas a RISPERDAL CONSTA, 37,5 mg POLVO Y DISOLVENTE PARA SUSPENSION DE LIBERACION PROLONGADA PARA INYECCION INTRAMUSCULARForma farmacéutica: COMPRIMIDO, 1 mgPrincipio activo: RisperidonaFabricante: Neuraxpharm Spain S.L.Requiere recetaForma farmacéutica: COMPRIMIDO, 3 mgPrincipio activo: RisperidonaFabricante: Neuraxpharm Spain S.L.Requiere recetaForma farmacéutica: COMPRIMIDO, 6 mgPrincipio activo: RisperidonaFabricante: Neuraxpharm Spain S.L.Requiere receta
Médicos online para RISPERDAL CONSTA, 37,5 mg POLVO Y DISOLVENTE PARA SUSPENSION DE LIBERACION PROLONGADA PARA INYECCION INTRAMUSCULAR
Comenta la dosis, los posibles efectos secundarios, interacciones, contraindicaciones o la revisión de receta de RISPERDAL CONSTA, 37,5 mg POLVO Y DISOLVENTE PARA SUSPENSION DE LIBERACION PROLONGADA PARA INYECCION INTRAMUSCULAR, sujeto a valoración médica y a la normativa local.


Preguntas frecuentes
