

PELMEG 6 MG SOLUCION INYECTABLE EN JERINGA PRECARGADA


Cómo usar PELMEG 6 MG SOLUCION INYECTABLE EN JERINGA PRECARGADA
Traducción generada por IA
Este contenido ha sido traducido automáticamente y se ofrece solo con fines informativos. No sustituye la consulta con un profesional sanitario.
Ver originalContenido del prospecto
Introducción
Prospecto: información para el usuario
Pelmeg 6 mg solución inyectable en jeringa precargada
pegfilgrastim
Lea todo el prospecto detenidamente antes de empezar a usar este medicamento, porque contiene información importante para usted.
- Conserve este prospecto, ya que puede tener que volver a leerlo.
- Si tiene alguna duda, consulte a su médico, farmacéutico o enfermero.
- Este medicamento se le ha recetado solamente a usted, y no debe dárselo a otras personas aunque tengan los mismos síntomas que usted, ya que puede perjudicarles.
- Si experimenta efectos adversos, consulte a su médico, farmacéutico o enfermero, incluso si se trata de efectos adversos que no aparecen en este prospecto. Ver sección 4.
Contenido del prospecto
- Qué es Pelmeg y para qué se utiliza
- Qué necesita saber antes de empezar a usar Pelmeg
- Cómo usar Pelmeg
- Posibles efectos adversos
- Conservación de Pelmeg
- Contenido del envase e información adicional
1. Qué es Pelmeg y para qué se utiliza
Pelmeg contiene el principio activo pegfilgrastim. Pegfilgrastim es una proteína producida por biotecnología en la bacteria E. coli. Pegfilgrastim pertenece a un grupo de proteínas llamadas citocinas, y es muy similar a una proteína natural (factor estimulador de colonias de granulocitos) producida por nuestro organismo.
Pelmeg se usa en pacientes adultos para reducir la duración de la neutropenia (recuento bajo de glóbulos blancos) y la incidencia de la neutropenia febril (recuento bajo de glóbulos blancos y fiebre) que puede producirse por la quimioterapia citotóxica (medicamentos que destruyen las células que se dividen rápidamente). Los glóbulos blancos son células importantes porque contribuyen a combatir las infecciones. Estas células son sensibles a los efectos de la quimioterapia, lo que puede hacer que su número descienda. Si el número de glóbulos blancos baja mucho, puede que no haya suficientes para combatir las bacterias, lo que implica un riesgo mayor de contraer una infección.
Su médico le ha recetado Pelmeg para estimular su médula ósea (la parte del hueso donde se producen las células de la sangre) para que produzca más glóbulos blancos que le ayuden a combatir las infecciones.

2. Qué necesita saber antes de empezar a usar Pelmeg
No use Pelmeg
- si es alérgico al pegfilgrastim, al filgrastim, a las proteínas producidas en E. colio a alguno de los demás componentes de este medicamento.
Advertencias y precauciones
Consulte a su médico, farmacéutico o enfermero antes de empezar a usar Pelmeg:
- si experimenta una reacción alérgica que incluye debilidad, disminución de la tensión arterial, dificultad para respirar, hinchazón de la cara (anafilaxia), enrojecimiento y rubor, erupción de la piel y picor en áreas de la piel.
- si experimenta tos, fiebre y dificultad para respirar. Esto puede ser un signo del síndrome de distrés respiratorio agudo (SDRA).
- si experimenta alguno o una combinación de los siguientes efectos adversos:
- hinchazón que puede estar asociada con orinar con una menor frecuencia, dificultad para respirar, hinchazón abdominal y sensación de plenitud y una sensación general de cansancio.
Estos pueden ser síntomas de una enfermedad llamada “síndrome de fuga capilar” que hace que la sangre se escape de los vasos sanguíneos pequeños hacia otros lugares de su cuerpo. Ver sección 4.
- si tiene dolor en la parte superior izquierda abdominal o dolor en el extremo del hombro. Esto puede ser un signo de un problema con el bazo (esplenomegalia).
- si recientemente tuvo una infección pulmonar grave (neumonía), líquido en los pulmones (edema pulmonar), inflamación de los pulmones (enfermedad pulmonar intersticial) o un resultado anormal en las radiografías de pecho (infiltración pulmonar).
- si es consciente de alguna alteración del recuento de células sanguíneas (por ejemplo, aumento del número de glóbulos blancos o anemia) o una disminución del recuento de plaquetas sanguíneas, que puede reducir la capacidad de la sangre para coagular (trombocitopenia). Su médico puede querer realizarle un seguimiento mayor.
- si tiene anemia de células falciformes. Su médico puede supervisar su enfermedad más estrechamente.
- si es paciente de cáncer de mama o cáncer de pulmón, el tratamiento combinado de Pelmeg con quimioterapia y/o radioterapia puede aumentar el riesgo de desarrollar una enfermedad hematológica precancerosa denominada síndrome mielodisplásico (SMD) o una neoplasia hemática denominada leucemia mieloide aguda (LMA). Los síntomas pueden incluir cansancio, fiebre, aparición de cardenales con facilidad o sangrado.
- si tiene signos repentinos de alergia, tales como erupción, picor o urticaria en la piel, hinchazón de la cara, labios, lengua u otras partes del cuerpo, falta de aliento, sibilancias o dificultad para respirar. Pueden ser signos de una reacción alérgica grave.
- si tiene síntomas de inflamación de la aorta (el vaso sanguíneo grande que transporta sangre desde el corazón hasta el resto del cuerpo), esto rara vez se ha notificado en pacientes con cáncer y en donantes sanos. Los síntomas pueden incluir fiebre, dolor abdominal, malestar general, dolor de espalda y marcadores inflamatorios aumentados. Informe a su médico si presenta estos síntomas.
Su médico le realizará análisis de sangre y orina de forma regular dado que Pelmeg puede dañar los pequeños filtros dentro de los riñones (glomerulonefritis).
Con el uso de Pelmeg, se han notificado reacciones cutáneas graves (síndrome de Stevens-Johnson). Deje de usar Pelmeg y busque atención médica de inmediato si observa alguno de los síntomas descritos en la sección 4.
Debe consultar con su médico el riesgo de desarrollar cáncer de la sangre. En el caso de que desarrolle o pueda desarrollar cáncer de la sangre, no debe utilizar Pelmeg, excepto si su médico lo aconseja.
Pérdida de respuesta a pegfilgrastim
Si experimenta una pérdida de respuesta o si no se consigue mantener la respuesta al tratamiento con pegfilgrastim, su médico investigará las causas, entre ellas si ha desarrollado anticuerpos que neutralicen la actividad de pegfilgrastim.
Otros medicamentos y Pelmeg
Informe a su médico o farmacéutico si está utilizando, ha utilizado recientemente o pudiera tener que utilizar cualquier otro medicamento.
Embarazo y lactancia
Consulte a su médico o farmacéutico antes de utilizar cualquier medicamento. Pelmeg no se ha estudiado en mujeres embarazadas. Es importante que informe a su médico si:
- está embarazada;
- cree que podría estar embarazada; o
- tiene intención de quedarse embarazada.
Si se queda embarazada durante el tratamiento con Pelmeg, informe a su médico.
A menos que su médico le indique lo contrario, debe interrumpir la lactancia materna si usa Pelmeg.
Conducción y uso de máquinas
La influencia de Pelmeg sobre la capacidad para conducir y utilizar máquinas es nula o insignificante.
Pelmeg contiene sorbitol (E 420) y acetato de sodio
Este medicamento contiene 30 mg de sorbitol en cada jeringa precargada equivalente a 50 mg/ml.
Este medicamento contiene menos de 1 mmol de sodio (23 mg) por 6 mg; esto es, esencialmente “exento de sodio”.
3. Cómo usar Pelmeg
Pelmeg está indicado en adultos de 18 años o mayores.
Siga exactamente las instrucciones de administración de este medicamento indicadas por su médico. En caso de duda, consulte de nuevo a su médico o farmacéutico. La dosis habitual es una inyección subcutánea de 6 mg (debajo de la piel) utilizando una jeringa precargada, que debe administrarse al final de cada ciclo de quimioterapia al menos 24 horas después de su última dosis de quimioterapia.
No agite fuertemente Pelmeg ya que podría afectar a su actividad.
Autoinyección de Pelmeg
Su médico puede considerar más conveniente que se inyecte Pelmeg usted mismo. Su médico o enfermero le enseñarán cómo hacerlo. No lo intente si no le han enseñado.
Para más indicaciones sobre cómo inyectarse Pelmeg usted mismo, lea la sección al final de este prospecto.
Si usa más Pelmeg del que debe
Si usa más Pelmeg del que debe, debe informar a su médico, farmacéutico o enfermero.
Si olvidó inyectarse Pelmeg
Si ha olvidado administrarse una dosis de Pelmeg, contacte con su médico para decidir cuándo debe inyectarse la próxima dosis.
Si tiene cualquier otra duda sobre el uso de este medicamento, pregunte a su médico, farmacéutico o enfermero.

4. Posibles efectos adversos
Al igual que todos los medicamentos, este medicamento puede producir efectos adversos, aunque no todas las personas los sufran.
Informe inmediatamente a su médico si experimenta alguno o una combinación de los siguientes efectos adversos:
- hinchazón que puede estar asociada con orinar con una menor frecuencia, dificultad para respirar, hinchazón abdominal y sensación de plenitud y una sensación general de cansancio. Estos síntomas generalmente se desarrollan rápidamente.
Estos pueden ser síntomas de una enfermedad que ocurre de forma poco frecuente (que puede afectar hasta 1 de cada 100 personas) llamada “síndrome de fuga capilar” que hace que la sangre se escape de los vasos sanguíneos pequeños hacia otros lugares de su cuerpo y necesite atención médica urgente.
Efectos adversos muy frecuentes(pueden afectar a más de 1 de cada 10 pacientes):
- dolor de huesos. Su médico le informará sobre qué puede tomar para calmar el dolor;
- náuseas y dolor de cabeza.
Efectos adversos frecuentes(pueden afectar hasta 1 de cada 10 pacientes):
- dolor en el lugar de la inyección;
- dolor general y dolor en las articulaciones y músculos;
- pueden tener lugar algunos cambios en su sangre, que serán detectados mediante análisis de sangre periódicos. Puede aumentar el número de glóbulos blancos durante un corto periodo de tiempo. Puede disminuir el número de plaquetas, lo que puede provocar la aparición de moratones.
Efectos adversos poco frecuentes(pueden afectar hasta 1 de cada 100 pacientes):
- reacciones de tipo alérgico, que incluyen enrojecimiento y rubor/sofocos, aparición de sarpullidos, e inflamación cutánea con picor;
- reacciones alérgicas graves, que incluyen anafilaxia (debilidad, caída de la tensión arterial, dificultad para respirar, hinchazón facial);
- aumento del tamaño del bazo;
- ruptura del bazo. Algunos casos de ruptura del bazo fueron mortales. Es importante que contacte con su médico inmediatamente si nota dolor en la parte superior izquierda del abdomen o en el hombro izquierdo ya que podrían tener relación con un problema en su bazo;
- problemas respiratorios. Si usted tiene tos, fiebre y dificultad para respirar, consulte con su médico. Se han producido casos de síndrome de Sweet (lesiones dolorosas, inflamadas, de coloración violácea en las extremidades y en algunas ocasiones en la cara y cuello, acompañadas de fiebre), pero podrían estar relacionados con otros factores;
- vasculitis cutánea (inflamación de los vasos sanguíneos cutáneos);
- daño en los pequeños filtros dentro de los riñones (glomerulonefritis);
- enrojecimiento en el lugar de la inyección;
- tos con sangre (hemoptisis).
- trastornos hematológicos (síndrome mielodisplásico [SMD] o leucemia mieloide aguda [LMA]).
Efectos adversos raros(pueden afectar hasta 1 de cada 1 000 pacientes):
- inflamación de la aorta (el vaso sanguíneo grande que transporta sangre desde el corazón hasta el resto del cuerpo), ver sección 2;
- sangrado en los pulmones (hemorragia pulmonar).
- síndrome de Stevens-Johnson, que puede aparecer como manchas rojizas concéntricas o circulares a menudo con ampollas centrales en el tronco, exfoliación, úlceras en la boca, garganta, nariz, genitales y ojos; y puede venir precedido de fiebre y síntomas tipo gripal. Deje de usar Pelmeg si desarrolla estos síntomas y contacte con su médico o busque atención médica de inmediato. Ver sección 2.
Comunicación de efectos adversos
Si experimenta cualquier tipo de efecto adverso, consulte a su médico, farmacéutico o enfermero, incluso si se trata de posibles efectos adversos que no aparecen en este prospecto. También puede comunicarlos directamente a través del sistema nacional de notificación incluido en el Apéndice V. Mediante la comunicación de efectos adversos usted puede contribuir a proporcionar más información sobre la seguridad de este medicamento.
5. Conservación de Pelmeg
Mantener este medicamento fuera de la vista y del alcance de los niños.
No utilice este medicamento después de la fecha de caducidad que aparece en la caja y en la etiqueta de la jeringa después de CAD. La fecha de caducidad es el último día del mes que se indica.
Conservar en nevera (entre 2°C y 8°C).
Pelmeg puede estar fuera de la nevera a temperatura ambiente (siempre que no supere los 30°C) durante un máximo de 4 días. Una vez que una jeringa se ha sacado de la nevera y ha alcanzado la temperatura ambiente (que no supere los 30°C), debe ser utilizada en 4 días o desechada.
No congelar. Pelmeg se puede utilizar si se congela accidentalmente durante dos periodos inferiores a 72 horas cada uno.
Conservar el envase en el embalaje exterior para protegerlo de la luz.
No utilice este medicamento si observa que la solución está turbia o contiene partículas.
Los medicamentos no se deben tirar por los desagües ni a la basura. Pregunte a su farmacéutico cómo deshacerse de los envases y de los medicamentos que ya no necesita. De esta forma, ayudará a proteger el medio ambiente.
6. Contenido del envase e información adicional
Composición de Pelmeg
- El principio activo es pegfilgrastim. Cada jeringa precargada contiene 6 mg de pegfilgrastim en 0,6 ml de solución.
- Los demás componentes son acetato sódico, sorbitol (E 420), polisorbato 20 y agua para preparaciones inyectables. Ver sección 2.
Aspecto del producto y contenido del envase
Pelmeg es una solución inyectable transparente e incolora en jeringa precargada (6 mg/0,6 ml).
Cada envase contiene 1 jeringa de vidrio precargada con una aguja de acero inoxidable y un capuchón de la aguja. La jeringa se suministra con protector automático de la aguja.
Titular de la autorización de comercialización
Mundipharma Corporation (Ireland) Limited,
United Drug House Magna Drive, Magna Business Park,
Citywest Road, Dublin 24,
Irlanda
Responsable de la fabricación
PharmaKorell GmbH
Georges-Köhler-Str. 2,
79539 Lörrach
Alemania
Pueden solicitar más información respecto a este medicamento dirigiéndose al representante local del titular de la autorización de comercialización:
België/Belgique/Belgien Mundipharma BV Tél/Tel: +32 2 358 54 68 | Lietuva EGIS Pharmaceuticals PLC atstovybe Tel.:+ 370 5 231 4658 |
| Luxembourg/Luxemburg Mundipharma BV Tél/Tel: +32 2 358 54 68 [email protected] |
Ceská republika Mundipharma Gesellschaft m.b.H., organizacní složka Tel: + 420 296 188 338 | Magyarország Medis Hungary Kft Tel.: +36 23 801 028 |
Danmark Mundipharma A/S Tlf: + 45 45 17 48 00 | Malta Mundipharma Corporation (Ireland) Limited Tel: +353 1 206 3800 |
Deutschland Mundipharma GmbH Tel: + 49 (0) 69 506029-000 | Nederland Mundipharma Pharmaceuticals B.V. Tel: + 31 (0)33 450 82 70 [email protected] |
Eesti Medis Pharma Lithuania UAB Tel: +370 68735006 | Norge Mundipharma AS Tlf: + 47 67 51 89 00 |
Ελλ?δα Mundipharma Corporation (Ireland) Limited Τηλ: + 353 1 206 3800 | Österreich Mundipharma Gesellschaft m.b.H. Tel: +43 (0)1 523 25 05 [email protected] |
España Mundipharma Pharmaceuticals, S.L. Tel: +34 91 3821870 | Polska Mundipharma Polska Sp. z o.o. Tel.: + (48 22) 3824850 |
France MUNDIPHARMA SAS Tél: +33 1 40 65 29 29 | Portugal Mundipharma Farmacêutica Lda Tel: +351 21 901 31 62 [email protected] |
Hrvatska Medis Adria d.o.o Tel: + 385 (0) 1 230 34 46 | România Medis RO S.R.L. Tel: +40 744 777 258 |
Ireland Mundipharma Pharmaceuticals Limited Tel: +353 1 206 3800 | Slovenija Medis, d.o.o. Tel: +386 158969 00 |
Ísland Icepharma hf. Sími: + 354 540 8000 | Slovenská republika Mundipharma Ges.m.b.H.-o.z. Tel: + 4212 6381 1611 [email protected] |
Italia Mundipharma Pharmaceuticals Srl Tel: +39 02 3182881 | Suomi/Finland Mundipharma Oy Puh/Tel: + 358 (0)9 8520 2065 |
Κ?προς Mundipharma Pharmaceuticals Ltd Τηλ: +357 22 815656 | Sverige Mundipharma AB Tel: + 46 (0)31 773 75 30 |
Latvija Medis Pharma Lithuania UAB Tel: + 370 68735006 |

Fecha de la última revisión de este prospecto:
Otras fuentes de información
La información detallada de este medicamento está disponible en la página web de la Agencia Europea de Medicamentos: http://www.ema.europa.eu/.

Importante |
Lea esta información importante antes de usar la jeringa precargada de Pelmeg con protector automático de la aguja:
(inyección subcutánea). Noretire el capuchón de la aguja de la jeringa precargada hasta que esté preparado para la inyección. Noutilice la jeringa precargada si se ha caído sobre una superficie dura. Utilice una jeringa precargada nueva y contacte con su médico o profesional sanitario. Nointente activar la jeringa precargada antes de la inyección. Nointente quitar el protector de seguridad trasparente de la jeringa precargada. Nointente quitar la etiqueta de la jeringa del cilindro de la jeringa precargada antes de administrarse la inyección. Si tiene alguna duda, contacte con su médico o profesional sanitario. |
Paso 1: Preparación | |
A | Retire el envase de la jeringa precargada que hay en el interior de la caja y coja los materiales que necesite para su inyección: toallitas impregnadas en alcohol, algodón o gasas, tiritas y un contenedor de objetos punzantes (no incluido). |
Para una inyección menos molesta, deje la jeringa precargada a temperatura ambiente durante aproximadamente 30 minutos antes de la inyección. Lávese las manos cuidadosamente con agua y jabón. Coloque la jeringa precargada nueva y los otros materiales sobre una superficie limpia y bien iluminada. Nointente calentar la jeringa utilizando una fuente de calor como el agua caliente o el microondas. Nodeje la jeringa precargada expuesta a la luz solar directa. Noagite la jeringa precargada. Mantenga las jeringas precargadas fuera de la vista y del alcance de los niños. |
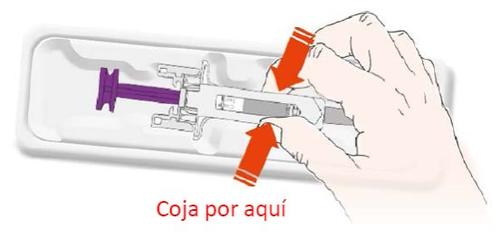
B | Abra el envase, retirando la cubierta. Coja la jeringa precargada por el protector de seguridad para sacarla de la bandeja. |
Por motivos de seguridad: Nola coja por el émbolo. Nola coja por el capuchón de la aguja. |
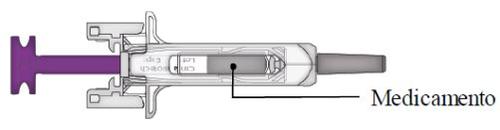
C | Examine el medicamento y la jeringa precargada. |
| |
Noutilice la jeringa precargada si:
En cualquiera de estos casos, contacte con su médico o profesional sanitario. |
Paso 2: Prepárese | |
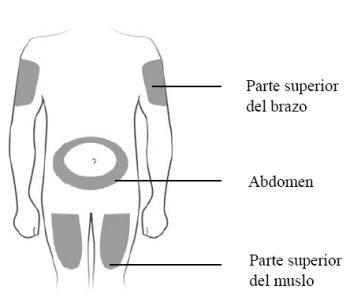
A | Lávese las manos cuidadosamente. Prepare y limpie el lugar de la inyección. |
| |
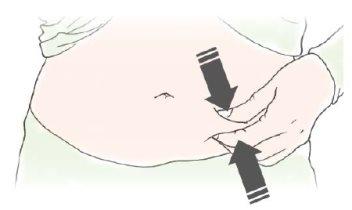
Puede inyectarse el medicamento en:
Limpie el lugar de la inyección con una gasa con alcohol. Deje que la piel se seque. Notoque el lugar de la inyección antes de inyectarse. Nose inyecte en áreas donde la piel esté sensible, contusionada, enrojecida o con durezas. Evite inyectarse en áreas con cicatrices o estrías. |
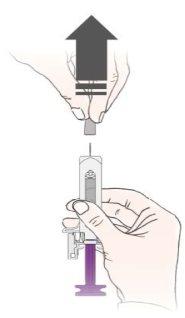
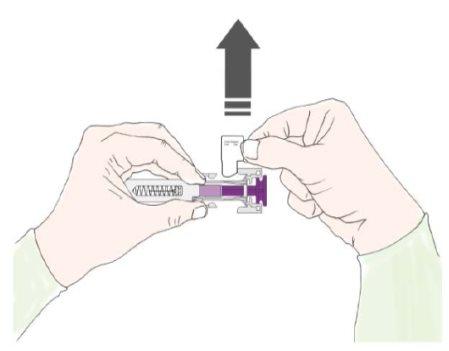
B | Tire cuidadosamente del capuchón de la aguja en línea recta manteniendo la jeringa separada de su cuerpo. |
|
C | Pellizque el lugar de la inyección para crear una superficie firme. |
Es importante mantener la piel pellizcada cuando se inyecte. |
Paso 3: Inyecte | |
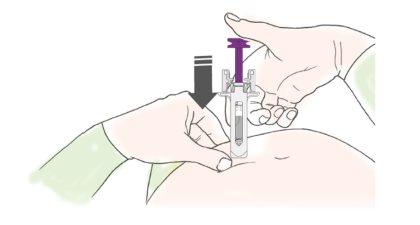
A | Mantenga la piel pellizcada. INTRODUZCA la aguja en la piel. |
Notoque el área limpia de la piel. |
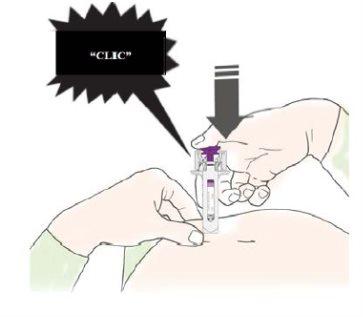
B | PRESIONE el émbolo con una presión ligera y constante hasta que sienta o escuche un “clic”. Empuje completamente hacia abajo hasta oír el “clic”. |
Es importante presionar hacia abajo hasta oír el “clic” para recibir toda su dosis. |
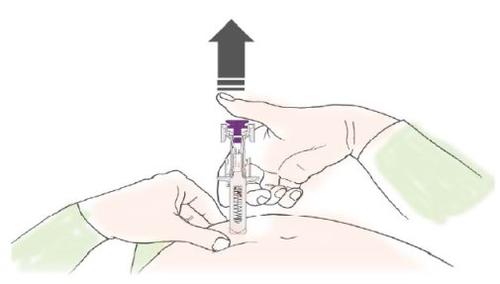
C | DEJE DE PRESIONAR el émbolo. A continuación, SEPARE la jeringa de la piel. |
Tras soltar el émbolo, el protector de seguridad de la jeringa precargada cubrirá de forma segura la aguja. Novuelva a poner el capuchón de la aguja en la jeringa precargada usada. |
Solo para profesionalessanitarios El nombre comercial y el número de lote del medicamento administrado deben estar claramente registrados en la historia clínica del paciente. |
Retire y guarde la etiqueta de la jeringa precargada.
Gire el émbolo para mover la etiqueta de la jeringa a una posición donde usted pueda retirarla. |
Paso 4: Final | |
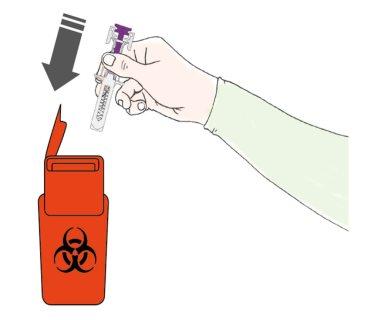
A | Deseche la jeringa precargada usada y otros materiales en un contenedor para desechar objetos punzantes. |
Los medicamentos deben ser eliminados de acuerdo con la normativa local. Pregunte a su farmacéutico cómo deshacerse de los medicamentos que ya no necesita. De esta forma ayudará a proteger el medio ambiente. Mantenga la jeringa y el contenedor de objetos punzantes fuera de la vista y del alcance de los niños. Noreutilice la jeringa precargada. Norecicle las jeringas precargadas ni las tire a la basura. |
B | Examine el lugar de la inyección. |
Si observa sangre, presione con un algodón o una gasa en el lugar de la inyección. Nofrote el lugar de la inyección. Si es necesario, póngase una tirita. |
- País de registro
- Principio activo
- Requiere recetaSí
- Fabricante
- Esta información es de carácter general y no sustituye la consulta con un profesional sanitario.
- Alternativas a PELMEG 6 MG SOLUCION INYECTABLE EN JERINGA PRECARGADAForma farmacéutica: INYECTABLE, 6 mgPrincipio activo: PegfilgrastimFabricante: Biosimilar Collaborations Ireland LimitedRequiere recetaForma farmacéutica: INYECTABLE, 6 mg de pegfilgrastim (10mg/ml)Principio activo: PegfilgrastimFabricante: Amgen Europe B.V.Requiere recetaForma farmacéutica: INYECTABLE, 6 mgPrincipio activo: PegfilgrastimFabricante: Amgen Europe B.V.Requiere receta
Médicos online para PELMEG 6 MG SOLUCION INYECTABLE EN JERINGA PRECARGADA
Comenta la dosis, los posibles efectos secundarios, interacciones, contraindicaciones o la revisión de receta de PELMEG 6 MG SOLUCION INYECTABLE EN JERINGA PRECARGADA, sujeto a valoración médica y a la normativa local.

Preguntas frecuentes
