

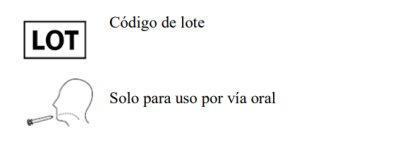
XARELTO 1 mg/ml GRANULADO PARA SUSPENSION ORAL


Cómo usar XARELTO 1 mg/ml GRANULADO PARA SUSPENSION ORAL
Traducción generada por IA
Este contenido ha sido traducido automáticamente y se ofrece solo con fines informativos. No sustituye la consulta con un profesional sanitario.
Ver originalContenido del prospecto
Introducción
Prospecto: información para el usuario
Xarelto 1mg/ml granulado para suspensión oral
rivaroxabán
Lea todo el prospecto detenidamente antes de empezar a tomar este medicamento, porque contiene información importante. Este prospecto ha sido escrito para el paciente (“usted”) y para el progenitor o cuidador que le administrará este medicamento al niño.
- Conserve este prospecto, ya que puede tener que volver a leerlo.
- Si tiene alguna duda, consulte a su médico o farmacéutico.
- Este medicamento se le ha recetado solamente a usted o al niño, y no debe dárselo a otras personas aunque tengan los mismos síntomas, ya que puede perjudicarles.
- Si usted o el niño experimenta efectos adversos, consulte a su médico o farmacéutico incluso si se trata de efectos adversos que no aparecen en este prospecto. Ver sección 4.
Contenido del prospecto
- Qué es Xarelto y para qué se utiliza
- Qué necesita saber antes de empezar a tomar o a administrar Xarelto
- Cómo tomar o administrar Xarelto
- Posibles efectos adversos
- Conservación de Xarelto
- Contenido del envase e información adicional
1. Qué es Xarelto y para qué se utiliza
Xarelto contiene el principio activo rivaroxabán.
Xarelto pertenece a un grupo de medicamentos llamados agentes antitrombóticos. Actúa bloqueando un factor de la coagulación (factor Xa) y por lo tanto, reduciendo la tendencia de la sangre a formar coágulos.
Xarelto se utiliza en recién nacidos a término, lactantes, niños y adolescentes menores de 18 años para:
- tratar los coágulos de sangre y prevenir la reaparición de estos coágulos de sangre en las venas o en los vasos sanguíneos de los pulmones, tras un tratamiento inicial de al menos 5 días con medicamentos inyectables utilizados para tratar los coágulos de sangre.
Lea y siga las Instrucciones de uso que se proporcionan con este medicamento, ya que le mostrarán cómo preparar y tomar o administrar Xarelto suspensión oral.

2. Qué necesita saber antes de empezar a tomar o administrar Xarelto
No tome ni administre Xareltosi ustedo el niño
- es alérgico a rivaroxabán o a alguno de los demás componentes de este medicamento (incluidos en la sección 6)
- sangra excesivamente
- padece una enfermedad o problemas en un órgano del cuerpo que aumente el riesgo de sangrado grave (por ejemplo, úlcera de estómago, lesión o hemorragia en el cerebro o una intervención quirúrgica reciente en el cerebro o en los ojos)
- está tomando medicamentos para prevenir la formación de coágulos en la sangre (p. ej., warfarina, dabigatran, apixaban o heparina), excepto
- cuando esté cambiando de medicamento para evitar los coágulos en la sangre o
- mientras se le esté administrando heparina a través de una vía venosa o arterial, para que ésta no se obstruya
- padece una enfermedad del hígado asociada a un aumento del riesgo de sangrado
- está embarazada o está en período de lactancia.
No tome ni administre Xarelto e informe a su médicosi alguna de estas circunstancias se aplica a su caso o al niño.
Advertencias y precauciones
Consulte a su médico o farmacéutico antes de empezar a usar Xarelto si:
- usted o el niño presenta un riesgo aumentado de sangrado. Esto puede suceder en las siguientes situaciones:
- insuficiencia renal moderada o grave, ya que el funcionamiento de los riñones puede afectar a la cantidad de medicamento que actúa en el organismo
- si usted o el niño está tomando otros medicamentos para prevenir la formación de coágulos de sangre (por ejemplo, warfarina, dabigatran, apixaban o heparina), si estos son absolutamente necesarios (ver sección “No tome ni administre Xarelto”)
- enfermedad hemorrágica
- presión arterial muy alta, no controlada por tratamiento médico
- enfermedades del estómago o del intestino que puedan causar una hemorragia, como por ejemplo, inflamación intestinal o del estómago, inflamación del esófago debido a una enfermedad en la que el ácido del estómago asciende hacia arriba en el esófago, o tumores localizados en el estómago, los intestinos, el tracto genital o el tracto urinario
- un problema en los vasos sanguíneos de la parte posterior de los ojos (retinopatía)
- una enfermedad pulmonar en la que los bronquios están dilatados y llenos de pus (bronquiectasia) o bien, hemorragia previa de los pulmones
- usted o el niño lleva una prótesis valvular cardiaca
- usted o el niño padece una enfermedad denominada síndrome antifosfolipídico (un trastorno del sistema inmunitario que aumenta el riesgo de que se formen coágulos de sangre)
- su presión arterial o la del niño es inestable
- tiene previsto recibir otro tratamiento o ser sometido a un procedimiento quirúrgico para extraer un coágulo de sangre de los pulmones
Informe a su médicosi usted o el niño presenta alguna de estas situaciones antes de tomar o administrar Xarelto. El médico decidirá si usted o el niño debe ser tratado con este medicamento y mantenerse bajo observación más estrecha.
No administreXarelto a niños menores de 6 meses de edad que
- hayan nacido antes de la semana 37 de gestación, o
- pesen menos de 2,6 kg, o
- hayan tomado el pecho o recibido alimentación por fórmula durante menos de 10 días
En estos casos, la dosificación de Xarelto no se puede determinar de manera fiable y no se ha estudiado en estos niños.
Si usted o el niño necesita una intervención quirúrgica
- Es muy importante tomar o administrar Xarelto antes y después de la cirugía, exactamente a las horas que su médico le ha indicado.
- Si la operación requiere la colocación de un catéter o inyección en la columna vertebral (por ejemplo, para anestesia epidural o espinal, o reducción del dolor):
- es muy importante tomar o administrar Xarelto, antes y después de la inyección o de la extracción del catéter, exactamente a las horas que su médico le ha indicado.
- informe a su médico inmediatamente si usted o el niño presenta adormecimiento o debilidad en las piernas o problemas en el intestino o en la vejiga al final de la anestesia. En este caso, es necesaria una atención urgente.
Niños y adolescentes
Xarelto suspensión oral se debe usar en pacientes menores de 18 años para tratar los coágulos de sangre y prevenir la reaparición de estos coágulos de sangre en las venas o en los vasos sanguíneos de los pulmones. No se dispone de suficiente información sobre su uso en niños y adolescentes para otras indicaciones.
Otros medicamentos y Xarelto
Informe a su médico o farmacéutico si usted o el niño está utilizando, ha utilizado recientemente o podría tener que utilizar cualquier otro medicamento, incluso los adquiridos sin receta.
- Si usted o el niño están tomando:
- algún medicamento para una infección por hongos (p. ej., fluconazol, itraconazol, voriconazol, posaconazol), salvo si sólo se aplican en la piel
- comprimidos con ketoconazol (se usan para tratar el síndrome de Cushing, en el que el cuerpo produce un exceso de cortisol)
- algún medicamento para infecciones bacterianas (p. ej., claritromicina, eritromicina)
- algún medicamento para el VIH/SIDA (p. ej., ritonavir)
- otros medicamentos para reducir la coagulación de la sangre (p. ej., enoxaparina, clopidogrel o antagonistas de la vitamina K, como la warfarina o el acenocumarol)
- medicamentos para aliviar la inflamación y el dolor (p. ej., naproxeno o ácido acetilsalicílico)
- dronedarona, un medicamento para el tratamiento del latido cardiaco irregular
- algunos medicamentos para tratar la depresión (inhibidores selectivos de la recaptación de serotonina (ISRS) o inhibidores de la recaptación de serotonina y norepinefrina (IRSN))
Si alguna de las circunstancias anteriores le aplica a usted o al niño, informe a su médicoantes de tomar o administrar Xarelto, porque el efecto de Xarelto podría verse aumentado. Su médico decidirá si usted o el niño debe ser tratado con este medicamento y mantenerse bajo observación más estrecha.
Si el médico considera que usted o el niño tiene un mayor riesgo de desarrollar una úlcera gástrica o intestinal, podría ser necesario un tratamiento preventivo.
- Si usted o el niño están tomando:
- algún medicamento para tratar la epilepsia(fenitoína, carbamazepina, fenobarbital)
- hierba de San Juan (Hypericum perforatum),una planta medicinal para el tratamiento de la depresión
- rifampicina,un antibiótico.
Si alguna de las circunstancias anteriores le aplica a usted o al niño, informe a su médicoantes de tomar o administrar Xarelto, porque el efecto de Xarelto podría verse reducido. El médico decidirá si usted o el niño debe ser tratado con este medicamento y mantenerse bajo observación más estrecha.
Embarazo y lactancia
- Si usted o la adolescente está embarazada o en periodo de lactancia, no tome ni administre Xarelto.
- Si hay alguna posibilidadde que usted o la adolescente se quede embarazada, se debe utilizar un anticonceptivofiable mientras se tome Xarelto.
- Si usted o la adolescente se queda embarazada mientras toma este medicamento, informe a su médico inmediatamente, quien decidirá cómo deberá continuar el tratamiento.
Conducción y uso de máquinas
Xarelto puede causar mareos o desvanecimientos. Ni usted ni el niño deberá conducir, montar en bicicleta ni utilizar herramientas o máquinas si está afectado por estos síntomas.
Xarelto contiene benzoato de sodio y sodio
Este medicamento contiene 1,8 mg de benzoato de sodio (E 211) en cada ml de suspensión oral. El benzoato de sodio (E 211) puede aumentar el riesgo de ictericia (coloración amarillenta de la piel y los ojos) en los recién nacidos (hasta de 4 semanas de edad).
Este medicamento contiene menos de 1 mmol de sodio (23 mg) por mililitro; esto es, esencialmente “exento de sodio”.
3. Cómo tomar o administrar Xarelto
Siga exactamente las instrucciones de administración de este medicamento indicadas por su médico para usted o el niño. En caso de duda, consulte de nuevo a su médico o farmacéutico.
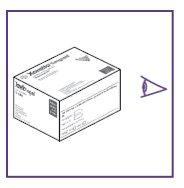
Asegúrese de que la información correcta sobre cuánto y con qué frecuencia tomar o administrar Xarelto está escrita en el área designada de la caja. Si no es así, pídale a su farmacéutico o médico que le proporcione la información pertinente.
Instrucciones de uso
Para saber cómo preparar y tomar o administrar la suspensión oral de Xarelto:
- Consulte el folleto de las Instrucciones de uso que se incluye en la caja y
- Mire el video educativo al que puede acceder a través del código QR que aparece en la tarjeta de información para el paciente que se proporciona con este medicamento.
Cómo tomar o administrar
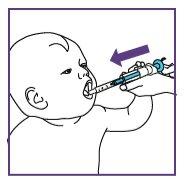
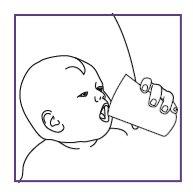
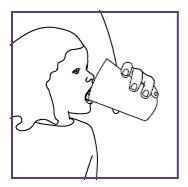
Tome o administre Xarelto suspensión oral con la alimentación (leche materna o de fórmula) o con una comida. Cada dosis de Xarelto debe tragarse junto con una cantidad normal de líquido (por ejemplo, 20 ml en niños de 6 meses hasta 240 ml en adolescentes). Esta cantidad normal puede incluir una cantidad usual de bebida utilizada para la alimentación (por ejemplo, leche materna, fórmula infantil, bebida nutritiva).
Su médico puede administrar la suspensión oral también a través de una sonda introducida en el estómago.
Qué cantidad tomar o administrar
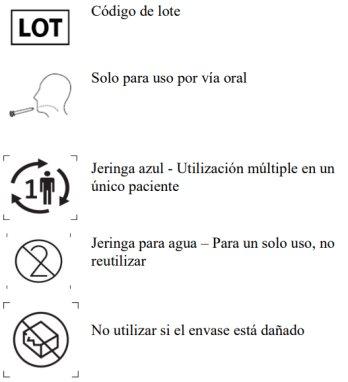
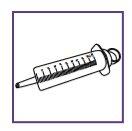
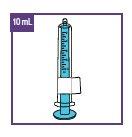
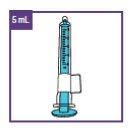
La dosis de Xarelto depende del peso corporal del paciente. El médico la calculará como una cantidad (volumen) en mililitros (ml) de la suspensión oral. Esto debe medirse utilizando la jeringa azul (ya sea la jeringa de 1 ml o 5 ml o 10 ml, ver tabla 1) que se suministra con este medicamento. Su médico le prescribirá el volumen necesario incluyendo la jeringa concreta que debe usar.
Su médico le dirá qué cantidad de la suspensión oral debe tomar usted o el niño.
A continuación, se encuentra la tabla que su médico utilizará. No ajuste la dosis por su cuenta.
Todos los materiales para preparar y administrar la suspensión oral se suministran con el medicamento (excepto el agua potable). Utilice solo agua sin gas para evitar burbujas. Utilice únicamente la jeringa suministradapara administrar Xarelto a fin de asegurar la dosificación exacta. No utilice ningún otro método para administrar la solución, como, por ejemplo, una jeringa alternativa, una cuchara, etc.
Dado que la dosis de Xarelto se basa en el peso corporal, es importante acudir a las visitas programadas con el médico, ya que puede ser necesario ajustar la dosis a medida que cambia el peso, especialmente en el caso de los niños de menos de 12 kg. Esto asegura que el niño reciba la dosis correcta de Xarelto.
Tabla1: Dosis recomendada de Xarelto en niños
Peso corporal [kg] | Dosis individual* | Frecuencia diaria de toma | Dosis diaria total* | Jeringa azul adecuada |
2,6 a menos de 3 | 0,8 ml | 3 veces | 2,4 ml | 1 ml |
3 a menos de 4 | 0,9 ml | 2,7 ml | ||
4 a menos de 5 | 1,4 ml | 4,2 ml | 5 ml | |
5 a menos de 7 | 1,6 ml | 4,8 ml | ||
7 a menos de 8 | 1,8 ml | 5,4 ml | ||
8 a menos de 9 | 2,4 ml | 7,2 ml | ||
9 a menos de 10 | 2,8 ml | 8,4 ml | ||
10 a menos de 12 | 3,0 ml | 9,0 ml | ||
12 a menos de 30 | 5,0 ml | 2 veces | 10,0 ml | 5 ml o 10 ml |
30 a menos de 50 | 15,0 ml | una vez | 15,0 ml | 10 ml |
50 o más | 20,0 ml | 20,0 ml | ||
|
Su médico también puede recetarle comprimidos si usted o el niño son capaces de tragar el comprimido y pesan al menos 30 kg.
Cuándo tomar o administrar Xarelto
Tome o administre la suspensión oral como se le ha indicado todos los días hasta que el médico le indique que deje de hacerlo.
Tome o administre la suspensión oral a la misma hora todos los días para ayudarle a recordarlo. Considere la posibilidad de poner una alarma para acordarse.
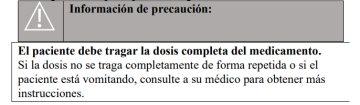
Por favor, observe al niño para asegurarse de que se toma toda la dosis.
Si el médico le ha indicado que tome o administre la dosis de Xarelto:
- una vez al día, hágalo con aproximadamente 24 horas de diferencia
- dos veces al día, hágalo con aproximadamente 12 horas de diferencia
- tres veces al día, hágalo con aproximadamente 8 horas de diferencia
Su médico decidirá cuánto tiempo usted o el niño debe continuar el tratamiento.
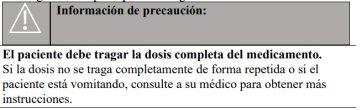
Si usted o el niño escupe la dosis o vomita
- menos de 30 minutos después de la ingesta de Xarelto, tome o administre una nueva dosis.
- más de 30 minutos después de la ingesta de Xarelto, notome o administre una nueva dosis. Continúe tomando o administrando la siguiente dosis de Xarelto a la siguiente hora programada.
Llame a su médico si usted o el niño escupe repetidamente la dosis o vomita después de tomar Xarelto.
Si olvidó tomar o administrar Xarelto
- Si está tomando o administrando Xarelto una vez al día, tome o administre la dosis olvidada de Xarelto tan pronto como lo recuerde en el mismo día. Si esto no es posible, sáltese esa dosis. Después tome o administre la siguiente dosis de Xarelto al día siguiente. No tome ni administre más de una dosis por día.
- Si está tomando o administrando Xarelto dos veces al día:
- Dosis de la mañana olvidada: tome o administre la dosis olvidada tan pronto como lo recuerde. Puede tomarla o administrarla junto con la dosis de la noche.
- Dosis de la noche olvidada: puede tomar o administrar la dosis olvidada solo en la misma noche. No tome o administre dos dosis a la mañana siguiente.
- Si está tomando o administrando Xarelto tres veces al día, no reponga la dosis olvidada. Continúe con la siguiente dosis programada (administrada cada 8 horas).
Al día siguiente de la dosis olvidada, continúe según lo prescrito por el médico una, dos o tres veces al día.
Si toma o administra más Xarelto del que debe
Llame inmediatamente a su médico si ha tomado o administrado demasiado Xarelto suspensión oral. Tomar o administrar demasiado Xarelto aumenta el riesgo de sangrado.
Si interrumpe el tratamiento con Xarelto
No interrumpa el tratamiento con Xarelto sin consultar primero con su médico, porque Xarelto trata y previene afecciones graves.
Si tiene cualquier otra duda sobre el uso de este medicamento, pregunte a su médico o farmacéutico.

4. Posibles efectos adversos
Al igual que todos los medicamentos, este medicamento puede producir efectos adversos, aunque no todas las personas los sufran.
Al igual que otros medicamentos similares para reducir la formación de coágulos de sangre, Xarelto puede causar sangrados que pueden poner en peligro la vida del paciente. Un sangrado excesivo puede causar una caída repentina de la presión arterial (shock). En algunos casos el sangrado puede no ser evidente.
Avise inmediatamente a su médicosi usted o el niño experimenta cualquiera de los siguientes efectos adversos:
- Signos de sangrado
- sangrado en el cerebro o en el interior del cráneo (los síntomas pueden incluir dolor de cabeza, debilidad en un lado del cuerpo, vómitos, convulsiones, disminución del nivel de conciencia y rigidez en el cuello. Se trata de una emergencia médica grave. ¡Acuda inmediatamente al médico!)
- sangrado prolongado o excesivo
- debilidad excepcional, cansancio, palidez, mareos, dolor de cabeza, hinchazón inexplicable, dificultad para respirar, dolor en el pecho o angina de pecho
Su médico puede decidir mantenerle a usted o al niño bajo una observación más estrecha o cambiar el tratamiento.
- Signos de reacciones graves en la piel
- erupciones cutáneas intensas que se extienden, ampollas o lesiones en las mucosas, p.ej., en la boca o en los ojos (síndrome de Stevens-Johnson/necrolisis epidérmica tóxica)
- reacción a medicamentos que causa erupción, fiebre, inflamación de los órganos internos, anormalidades en la sangre y enfermedad sistémica (síndrome DRESS).
La frecuencia de estos efectos adversos es muy rara (hasta 1 de cada 10.000 personas).
- Signos de reacciones alérgicas graves
- hinchazón de la cara, labios, boca, lengua o garganta; dificultad para tragar; ronchas y dificultad para respirar; bajada repentina de la presión arterial.
Las frecuencias de las reacciones alérgicas graves son muy raras (reacciones anafilácticas, que incluyen shock anafiláctico; pueden afectar hasta 1 de cada 10.000 personas) y poco frecuentes (angioedema y edema alérgico; pueden afectar hasta 1 de cada 100 personas).
Lista general de posibles efectos adversos encontrados en adultos y en niños y adolescentes:
Frecuentes(pueden afectar hasta 1 de cada 10personas)
- disminución de los glóbulos rojos que puede causar palidez y debilidad o dificultad para respirar
- sangrado del estómago o del intestino, hemorragia urogenital (incluyendo sangre en la orina y sangrado menstrual abundante), hemorragia nasal, sangrado de las encías
- sangrado en el ojo (incluyendo sangrado en la parte blanca del ojo)
- sangrado hacia un tejido o cavidad del organismo (hematoma, cardenales)
- tos con sangre
- sangrado de la piel o debajo la piel
- sangrado después de una operación
- supuración de sangre o líquido de una herida quirúrgica
- hinchazón de las extremidades
- dolor de las extremidades
- alteración de la función de los riñones (puede verse en los análisis realizados por el médico)
- fiebre
- dolor de estómago, indigestión, mareo o sensación de mareo, estreñimiento, diarrea
- presión arterial baja (los síntomas pueden ser sensación de mareo o desvanecimiento al ponerse de pie)
- disminución general de la fuerza y la energía (debilidad, cansancio), dolor de cabeza, mareos,
- sarpullido, picor de la piel
- los análisis de sangre pueden mostrar un aumento de algunas enzimas hepáticas
Poco frecuentes(pueden afectar hasta 1 de cada 100 personas)
- sangrado en el cerebro o en el interior del cráneo (ver arriba, posibles efectos adversos que pueden ser un signo de sangrado)
- sangrado en una articulación, que causa dolor e hinchazón.
- trombocitopenia (número bajo de plaquetas, células que ayudan a la coagulación de la sangre)
- reacción alérgica, incluyendo reacción alérgica de la piel
- alteración de la función del hígado (puede verse en los análisis realizados por el médico)
- los análisis de sangre pueden mostrar un aumento de la bilirrubina, de algunas enzimas pancreáticas o hepáticas, o del número de plaquetas
- desvanecimiento
- sensación de malestar
- aumento de la frecuencia cardiaca
- sequedad de boca
- ronchas
Raros(pueden afectar hasta 1 de cada 1.000 personas)
- sangrado en un músculo
- colestasis (disminución del flujo de la bilis), hepatitis, que incluye lesión traumática hepatocelular (inflamación o daño hepático)coloración amarillenta de la piel y en los ojos (ictericia)
- hinchazón localizada
- acumulación de sangre (hematoma) en la ingle después de una complicación en una cirugía cardíaca en la que se introduce un catéter en la arteria de la pierna (pseudoaneurisma)
Muy raros(pueden afectar hasta 1 de cada 10.000 personas)
- acumulación de eosinófilos, un tipo de glóbulos blancos granulocíticos que causan inflamación en el pulmón (neumonía eosinofílica).
Frecuencia no conocida(la frecuencia no puede estimarse a partir de los datos disponibles)
- insuficiencia renal después de una hemorragia grave
- sangrado en el riñón, a veces con presencia de sangre en la orina, lo que provoca la incapacidad de los riñones para funcionar correctamente (nefropatía relacionada con anticoagulantes)
- aumento de la presión en los músculos de las piernas o de los brazos después de una hemorragia, que causa dolor, hinchazón, alteración de la sensibilidad, adormecimiento o parálisis (síndrome compartimental después de una hemorragia)
Efectos adversos en niños y adolescentes
En general, los efectos adversos observados en los niños y adolescentes tratados con Xarelto fueron de tipo similar a los observados en los adultos y su gravedad fue principalmente de leve a moderada.
Efectos adversos que se observaron con mayor frecuencia en niños y adolescentes:
Muy frecuentes(pueden afectar a más de 1 de cada 10 personas)
- dolor de cabeza
- fiebre
- hemorragia nasal
- vómitos
Frecuentes(pueden afectar hasta 1 de cada 10 personas)
- aceleración de los latidos cardiacos
- los análisis de sangre pueden mostrar un aumento de la bilirrubina (pigmento de la bilis)
- trombocitopenia (número bajo de plaquetas, células que ayudan a la coagulación de la sangre)
- sangrado menstrual abundante
Poco frecuentes(pueden afectar hasta 1 de cada 100 personas)
- los análisis de sangre pueden mostrar un aumento en una subcategoría de la bilirrubina (bilirrubina directa, pigmento de la bilis)
Comunicación de efectos adversos
Si usted o el niño experimenta cualquier tipo de efecto adverso, consulte a su médico o farmacéutico, incluso si se trata de posibles efectos adversos que no aparecen en este prospecto. También puede comunicarlos directamente a través del sistema nacional de notificación incluido en el Apéndice V. Mediante la comunicación de efectos adversos usted puede contribuir a proporcionar más información sobre la seguridad de este medicamento.
5. Conservación de Xarelto
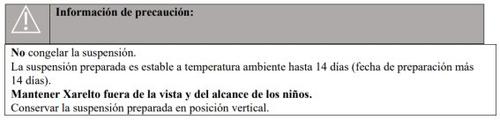
Mantener este medicamento fuera de la vista y del alcance de los niños.
No utilice este medicamento después de la fecha de caducidad que aparece en el envase y en el frasco después de “CAD” o “EXP”.
La fecha de caducidad es el último día del mes que se indica.
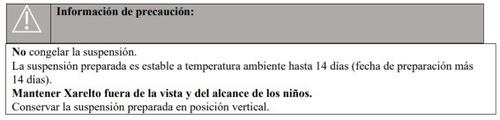
Tras la preparación, el periodo de validez de la suspensión es de 14 días a temperatura ambiente.
No conservar a temperatura superior a 30 °C.
No congelar. Conservar la suspensión preparada en posición vertical.
Los medicamentos no se deben tirar por los desagües ni a la basura. Pregunte a su farmacéutico cómo deshacerse de los envases y de los medicamentos que ya no necesita. De esta forma, ayudará a proteger el medio ambiente.
6. Contenido del envase e información adicional
Composición de Xarelto
- El principio activo es rivaroxabán. Un frasco de vidrio contiene
- 51,7 mg de rivaroxabán, para la adición de 50 ml de agua,
- o bien 103,4 mg de rivaroxabán, para la adición de 100 ml de agua.
Tras la preparación, cada ml de la suspensión oral contiene 1 mg de rivaroxabán.
- Los demás componentes son:
- Ácido cítrico, anhidro (E 330), hipromelosa (2910), manitol (E 421), celulosa microcristalina, carboximetilcelulosa sódica, benzoato de sodio (E 211) (ver sección 2 “Xarelto contiene benzoato de sodio y sodio”), sucralosa (E 955), goma xantana (E 415), sabor dulce y cremoso (constituido por sustancias aromatizantes, maltodextrina [maíz], propilenglicol [E 1520] y goma de acacia (E 414)).
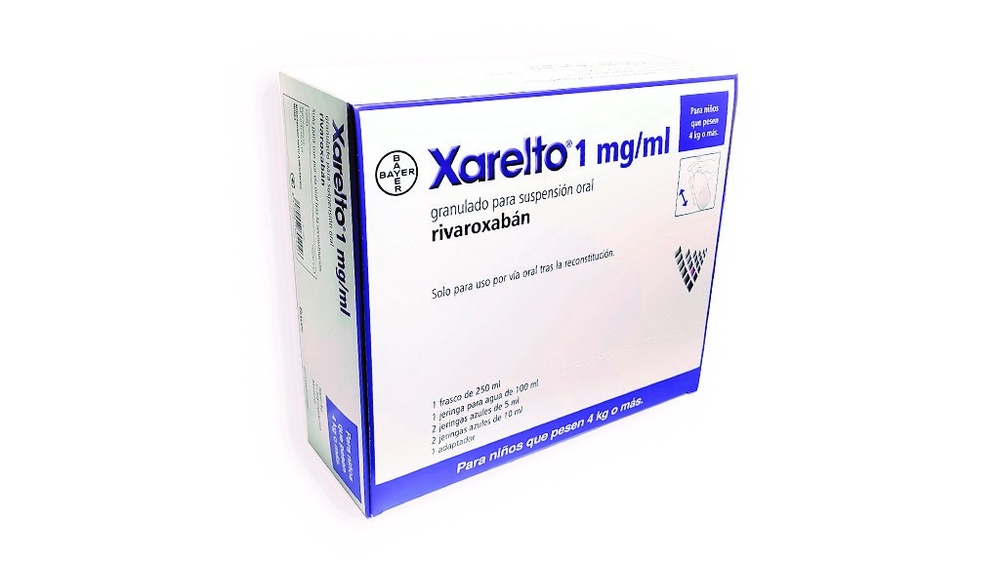
Aspecto del producto y contenido del envase
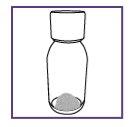
Xarelto granulado para suspensión oral es un granulado blanco en un frasco de vidrio con cápsula de cierre de rosca a prueba de niños.
Tamaños de envases
- Para niños que pesen menos de 4kg:
Caja plegable con un frasco de vidrio de color marrón que contiene 2,625 g de granulado (equivalentes a 51,7 mg de rivaroxabán), dos jeringas azules de 1 ml, una jeringa para agua de 50 ml y un adaptador.
- Para niños que pesen 4kg o más:
Caja plegable con un frasco de vidrio de color marrón que contiene 5,25 g de granulado (equivalentes a 103,4 mg de rivaroxabán), dos jeringas azules de 5 ml y dos jeringas azules de 10 ml, una jeringa para agua de 100 ml y un adaptador.
Puede que solamente estén comercializados algunos tamaños de envases.
El volumen y la frecuencia de la dosis ajustada en función del peso individual deben ser especificados por el médico prescriptor. Deben estar escritos en la caja exterior cuando se proporcione a los padres, cuidadores o pacientes.
Siga cuidadosamente el folleto de Instrucciones de uso que se suministra con cada envase.
Mire el video educativo al que puede acceder a través del código QR que aparece en la tarjeta de información para el paciente que se proporciona con el medicamento.
Titular de la autorización de comercialización y responsable de la fabricación
Bayer AG
51368 Leverkusen
Alemania
Pueden solicitar más información respecto a este medicamento dirigiéndose al representante local del titular de la autorización de comercialización:
België / Belgique / Belgien Bayer SA-NV Tél/Tel: +32-(0)2-535 63 11 | Lietuva UAB Bayer Tel: +370-5-233 68 68 |
| Luxembourg / Luxemburg Bayer SA-NV Tél/Tel: +32-(0)2-535 63 11 |
Ceskárepublika Bayer s.r.o. Tel: +420-266 101 111 | Magyarország Bayer Hungária KFT Tel: +36-1-487 4100 |
Danmark Bayer A/S Tlf: +45-45 235 000 | Malta Alfred Gera and Sons Ltd. Tel: +356-21 44 62 05 |
Deutschland Bayer Vital GmbH Tel: +49-(0)214-30 513 48 | Nederland Bayer B.V. Tel: +31–(0)297-28 06 66 |
Eesti Bayer OÜ Tel: +372-655 85 65 | Norge Bayer AS Tlf: +47-23 13 05 00 |
Ελλ?δα Bayer Ελλ?ς ΑΒΕΕ Τηλ: +30-210-618 75 00 | Österreich Bayer Austria Ges. m. b. H. Tel: +43-(0)1-711 460 |
España Bayer Hispania S.L. Tel: +34-93-495 65 00 | Polska Bayer Sp. z o.o. Tel: +48-22-572 35 00 |
France Bayer HealthCare Tél (N° vert): +33-(0) 800 87 54 54 | Portugal Bayer Portugal, Lda. Tel: +351-21-416 42 00 |
Hrvatska Bayer d.o.o. Tel: + 385-(0)1-6599 900 | România SC Bayer SRL Tel: +40-(0)21-528 59 00 |
Ireland Bayer Limited Tel: +353 1 216 3300 | Slovenija Bayer d. o. o. Tel: +386-(0)1-58 14 400 |
Ísland Icepharma hf. Sími: +354-540 80 00 | Slovenská republika Bayer, spol. s r.o. Tel: +421-(0)2-59 21 31 11 |
Italia Bayer S.p.A. Tel: +39-02-3978 1 | Suomi/Finland Bayer Oy Puh/Tel: +358-(0)20-78521 |
Κ?προς NOVAGEM Limited Τηλ: +357-22-48 38 58 | Sverige Bayer AB Tel: +46-(0)8-580 223 00 |
Latvija SIA Bayer Tel: +371-67 84 55 63 | United Kingdom Bayer plc Tel: +44-(0)118 206 3000 |
Fecha de la última revisión de este prospecto:
La información detallada de este medicamento está disponible en la página web de la Agencia Europea de Medicamentos http://www.ema.europa.eu.
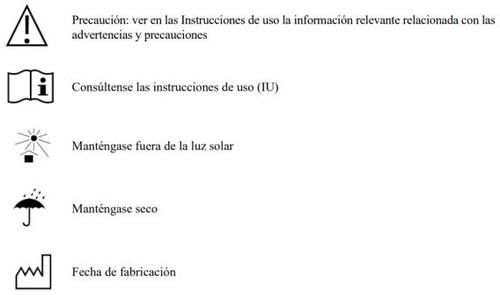
Instrucciones de uso (IU)
Instrucciones de uso
Xarelto 1mg/ml
Frasco de 100ml con 2,625g de granulado para la preparación de una suspensión oral
Ingrediente farmacéutico activo: rivaroxabán
Preparación y administración de la suspensión oral (mezcla de granulado y agua)
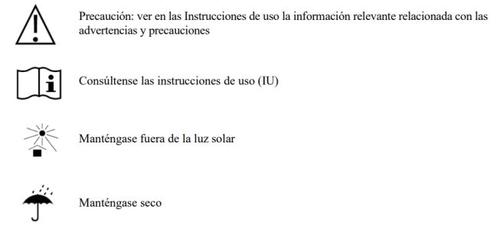
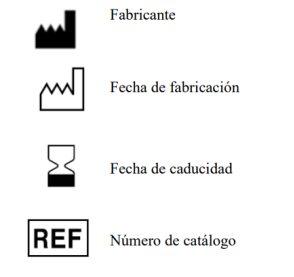
Glosario y símbolos
- Granulado: polvo (suministrado en el frasco) que contiene el ingrediente farmacéutico activo.
- Jeringa para agua: jeringa de 50 ml usada para medir y añadir 50 ml de agua al frasco que contiene el granulado de Xarelto.
- Suspensión: mezcla de granulado y agua (para uso oral).
- Jeringa azul: jeringa con émbolo azul para extraer y administrar oralmente Xarelto.
Antes de comenzar
- Lea detenidamente todas las secciones de estas Instrucciones de uso antes de usar Xarelto por primera vez y antes de administrar cada dosis.
- Mire el video educativo al que puede acceder a través del código QR incluido en la tarjeta de información para el paciente proporcionada con el medicamento.
- Asegúrese de entender las instrucciones antes de comenzar. Si no es así, llame a su médico.
- Para más información acerca de Xarelto, consulte el prospecto.
Contenido del envase
Cada caja de Xarelto contiene los siguientes componentes:
| 1frasco con una cápsula de cierre de rosca a prueba de niñosque contiene el granulado de Xarelto |
| 1jeringa de agua de 50ml envasada(para un solo uso) |
| 1adaptador para frasco envasado |
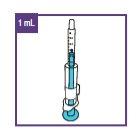
| 2jeringas azules de 1ml envasadas |
| 1copia de las Instrucciones de uso (IU)(este documento) |
| 1prospecto Proporciona información importante sobre Xarelto. |
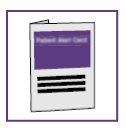
| 1tarjeta de información para el paciente Información importante en caso de emergencia. El paciente debe llevarla en todo momento y presentarla a cada médico o dentista antes del tratamiento. |


Advertencias y precauciones
- Use soloagua potable sin gas para preparar la suspensión para evitar la formación de burbujas. Esto significa que puede utilizar
- agua corriente del grifo o
- agua mineral no carbonatada (sin gas)
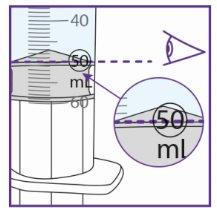
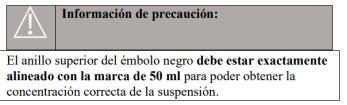
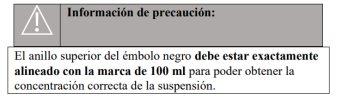
- Es muy importante añadir la cantidad exacta de agua al granulado del frasco para asegurar la correcta concentración de Xarelto.
- Use la jeringa para agua para medir 50 ml de agua, ver más adelante para más información.
- Mida con mucho cuidado la cantidad de agua que va a proporcionar al frasco.
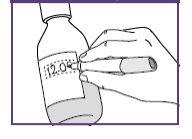
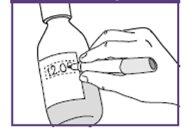
- Tras la preparación, la suspensión puede usarse durante 14 días si se conserva a temperatura ambiente.Asegúrese de escribir la fecha de caducidad de la suspensión (fecha de preparación más 14 días) en el campo para tal fin en la etiqueta del frasco.
- Noconservar la suspensión a una temperatura superior a 30 °C. Nocongelar.Si la suspensión ha sido conservada en nevera, deje que la suspensión alcance la temperatura ambiente antes de extraer la dosis correspondiente.
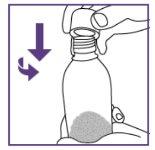
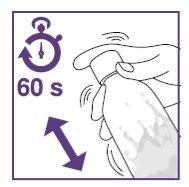
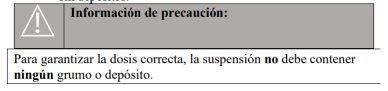
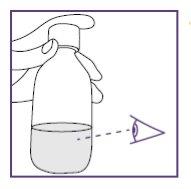
- Agite la suspensión para la preparación inicial durante al menos 60segundos.
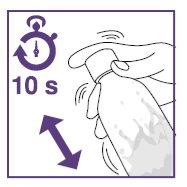
- Agite la suspensión en el frasco durante al menos 10segundosantes de cada administración.
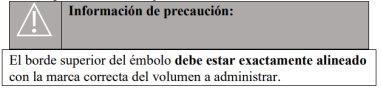
- Es muy importante que se administre el volumen de la dosis prescrita de Xarelto.
- Asegúrese de conocer la dosis prescrita y la frecuencia de administración. Pregunte a su médico o farmacéutico si no conoce la dosis prescrita y su frecuencia.
- Ajuste cuidadosamente la jeringa azul según el volumen prescrito.
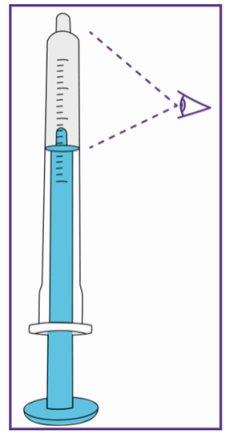
- Administre la dosis prescrita utilizando la jeringa azul. Siga las instrucciones de su médico sobre la frecuencia diaria con la que debe administrar la dosis prescrita.
- Compruebe que no haya burbujas de aire en la jeringa azul antes de administrar la suspensión oral.
- Si su hijo no toma repetidamente toda la dosis requerida o escupe parte de ella, llame al médico de su hijo para saber qué hacer.
- Entre las dosis, mantenga la suspensión oral fuera de la vista y del alcance de los niños.
- Guarde las Instrucciones de uso para poder consultarlas más adelante durante el uso de Xarelto.
Uso de Xarelto
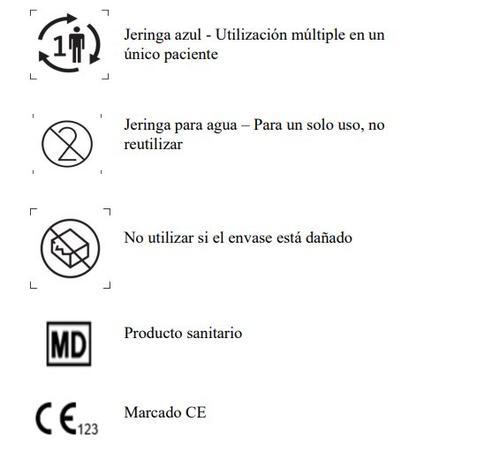
- La suspensión de Xarelto es solo para uso por vía oral.
- El volumen y la frecuencia de la administración de Xarelto dependen del peso de su hijo, por lo que cambiarán con el tiempo si su hijo recibe Xarelto de forma prolongada.
- El médico de su hijo le indicará el volumen de la dosis correcta.
- No cambie la dosis por su cuenta.
- Utilice siempreel volumen prescrito por el médico de su hijo y tenga la dosis de administración correcta escrita en el campo designado en el exterior de la caja.
Si no está escrito en dicho campo, pida al médico de su hijo o a su farmacéutico que le proporcione la información pertinente.
- Siga las Instrucciones de uso detalladas que figuran en los apartados siguientes.
Tenga cuidado de cumplir las instrucciones relativas a la administración (ver prospecto) :
- Preparación de la suspensión oral
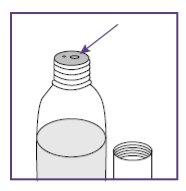
Paso1.1: Preparación – Todo listo
La preparación de la suspensión se hace una vez con cada nuevo envase.
Antes de preparar la suspensión:
|
|
|
Noutilizar el medicamento si ya ha caducado. |
| |
|

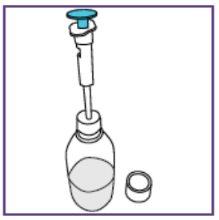
Paso1.2: Llenado del volumen de agua requerido
Cada vez que empiece un nuevo envase, use solo los materiales nuevos incluidos en el nuevo envase.
|
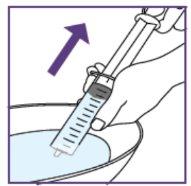
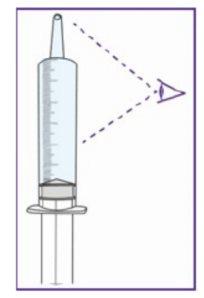
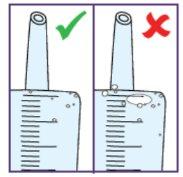
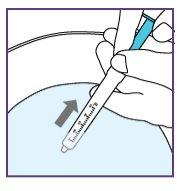
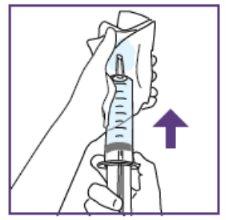
Para ello, tirar del vástago del émbolo hacia ustedy asegurar que la abertura de la jeringa para agua permanece debajo de la superficie del agua todo el tiempo. Esto evitará burbujas de aire en la jeringa.
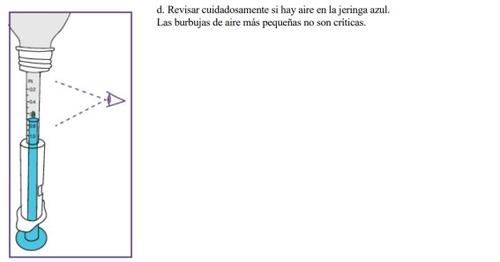
Dar golpecitos con los dedos para que las burbujas de aire se muevan aún más hacia la parte superior.
Las pequeñas burbujas de aire no son críticas, pero las grande son críticas. Para más información sobre qué hacer, ver más adelante.
|
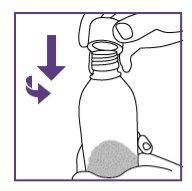
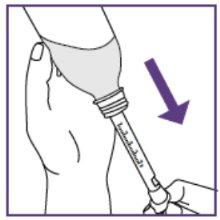
Paso1.3: Adición de agua al granulado
|
|
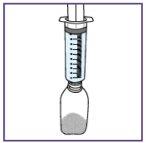
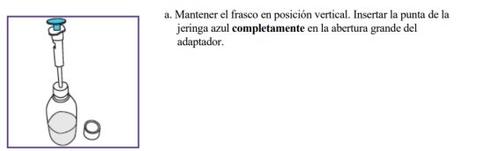
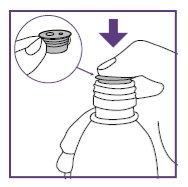
Paso1.4: Colocación del adaptador y mezcla de la suspensión oral
El adaptador se utiliza para llenar la jeringa azul con la suspensión.
| |
|
|
|
|
|
|
|
|
No añada más agua al frasco. La suspensión tiene un periodo de validez de 14 días a temperatura ambiente. | |
|
Fecha de preparación+14días El pictograma mostrado es solo un ejemplo. |


- Ajuste de la dosis prescrita con cada nueva jeringa azul
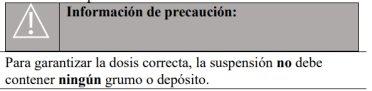
Para evitar la sobredosificación o la infradosificación se requiere una dosis exacta de suspensión.
Antes de tomar la primera dosis del frasco, la jeringa azul adjunta debe prepararse de acuerdo con la dosis prescrita por el médico de su hijo. Esta información se puede encontrar en el área de la caja dedicada a tal efecto. Si no se ha introducido ninguna información aquí, consulte con el médico o farmacéutico del niño.
Después de establecer la dosis, la misma jeringa azul se puede usar para todas las administraciones a realizar desde el frasco de suspensión preparado en el paso 1.
Una vez que la dosis ha sido fijada en la jeringa azul, ya no se puede cambiar.
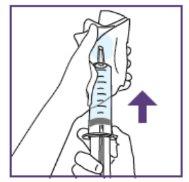
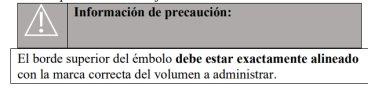
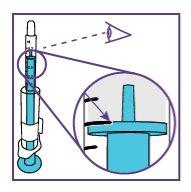
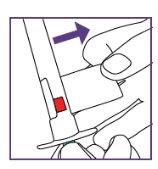
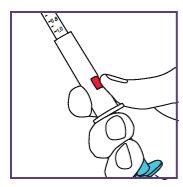
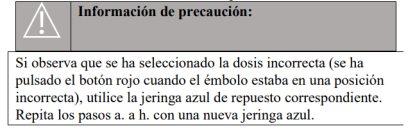
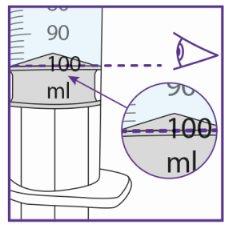
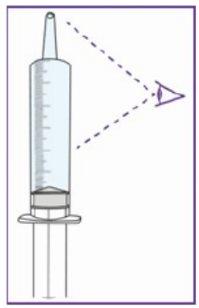
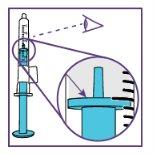
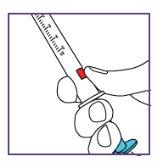
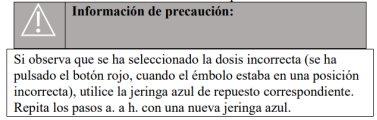
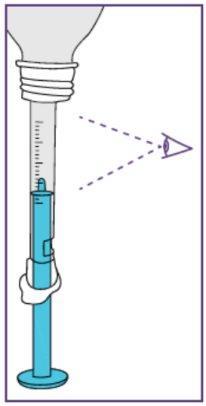
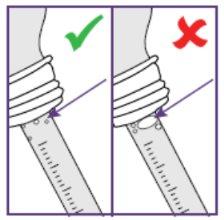
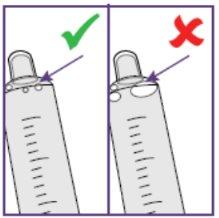
La jeringa azul tiene una escala (ml). La escala de la jeringa azul de 1 ml comienza con 0,2 ml. Las marcas de graduación están en incrementos de 0,1 ml. Nota: No retire la etiqueta despegable hasta que se le indique en las Instrucciones de uso. La jeringa azul tiene un botón rojopara ajustar el volumen. Este botón está cubierto inicialmente por una etiqueta desplegable. El volumen de la jeringa se fija presionando el botón rojo fijado, lo que se puede realizar solo una vez. Nopresione el botón rojohasta que se le indique en las Instrucciones de uso. Una vez que se ha presionado el botón rojo, el volumen ya no se puede ajustar. | |
|
|
Pida a su farmacéutico o médico que se la proporcione. | |
| |
|
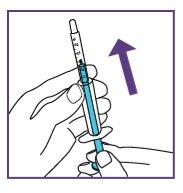
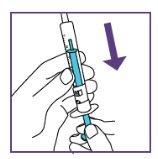
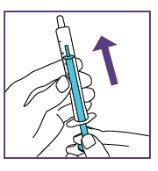
Cuando mueva el vástago del émbolo, podrá oír un “clic” para cada paso de volumen ajustable.
El pictograma mostrado es solo un ejemplo. Su volumen puede ser diferente. Tenga cuidado, notire del émbolo más allá del volumen a administrar. Tenga cuidado, nopresione la etiqueta al tirar del émbolo. |
| |
|
Ajustarla de forma acorde. |
|
El sonido de clic no será audible después.
|
|
La jeringa azul ya puede utilizarse. |

- Administración de la suspensión oral
Siga los pasos que se describen a continuación para cada administración necesaria.
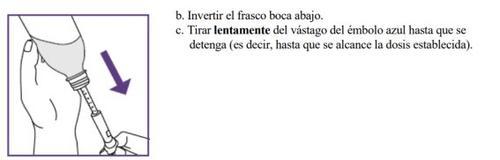
Paso3.1: Mezcla de la suspensión oral

|
|
|
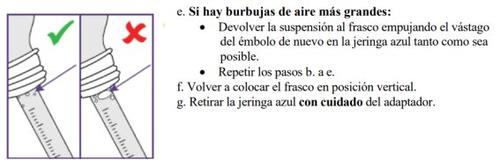
Repetir los pasos a y b. |
Dejar reposar el frasco hasta que la espuma se disuelva. | |
|
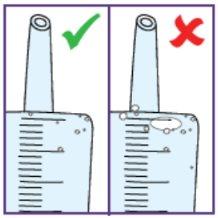
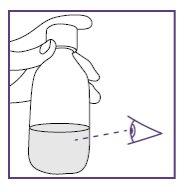
Nota: La abertura más grande visible en el adaptador se utiliza para conectar la jeringa azul. La superficie del adaptador del frasco debe estar libre de líquido.
Retirar el líquido con un pañuelo de papel limpio. |


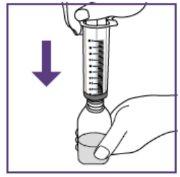
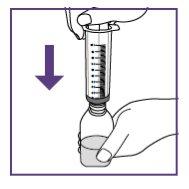
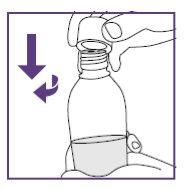
Paso3.2: Extracción de la dosis necesaria
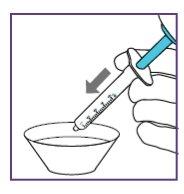
Paso3.3: Administración de la dosis prescrita
|
|
|
|
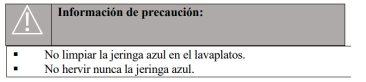
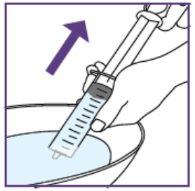
- Limpieza y almacenamiento
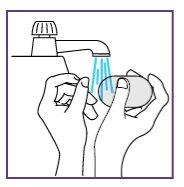
La jeringa azul debe ser limpiada después de cada aplicación.
Siga los pasos que se indican a continuación para limpiar el dispositivo. En total, se necesitan tresciclos de limpieza para asegurar una limpieza adecuada.
Antes de comenzar, necesitará los siguientes materiales para el paso 4.1:
|
Paso4.1: Limpieza
|
|
|
|
| |
|
Paso4.2: Conservación
Conservar la jeringa azul en un lugar limpio y seco hasta su próximo uso, p.ej. guardarla en la caja de Xarelto que se le ha proporcionado.
Mantener alejada de la luz solar.

Conservar la suspensión por debajo de 30 °C.
- Eliminación
La eliminación del medicamento no utilizado y de todos los materiales que hayan estado en contacto con él se realizará de acuerdo con la normativa local.
- Daños/Mal funcionamiento
Cualquier incidente grave que ocurra en relación con el producto debe ser notificado al fabricante y a la autoridad pertinente de su país.
Instrucciones de uso (IU)
Instrucciones de uso
Xarelto 1mg/ml
Frasco de 250ml con 5,25g de granulado para la preparación de una suspensión oral
Ingrediente farmacéutico activo: rivaroxabán
Preparación y administración de la suspensión oral (mezcla de granulado y agua)
Glosario y símbolos
- Granulado: polvo (suministrado en el frasco) que contiene el ingrediente farmacéutico activo.
- Jeringa para agua: jeringa de 100 ml usada para medir y añadir 100 ml de agua al frasco que contiene el granulado de Xarelto.
- Suspensión: mezcla de granulado y agua (para uso oral).
- Jeringa azul: jeringa con émbolo azul para extraer y administrar oralmente Xarleto.

Antes de comenzar
- Lea detenidamente todas las secciones de estas Instrucciones de uso antes de usar Xarelto por primera vez y antes de administrar cada dosis.
- Mire el video educativo al que puede acceder a través del código QRD incluido en la tarjeta de información para el paciente proporcionada con el medicamento.
- Asegúrese de entender las instrucciones antes de comenzar. Si no es así, llame a su médico.
- Para más información acerca de Xarelto, consulte el prospecto.
Contenido del envase
Cada caja de Xarelto contiene los siguientes componentes:
| 1frasco con una cápsula de cierre de rosca a prueba de niñosque contiene el granulado de Xarelto |
| 1jeringa de agua envasada(para un solo uso) |
| 1adaptador para frasco envasado |
| 2jeringas azules de 5ml envasadas 2jeringas azules de 10ml envasadas |
| 1copia de las Instrucciones de uso (IU)(este documento) |
| 1prospecto Proporciona información importante sobre Xarelto. |
| 1tarjeta de información para el paciente Información importante en caso de emergencia. El paciente debe llevarla en todo momento y presentarla a cada médico o dentista antes del tratamiento. |


Advertencias y precauciones
- Use soloagua potable sin gas para preparar la suspensión para evitar la formación de burbujas. Esto significa que puede utilizar
- agua corriente del grifo o
- agua mineral no carbonatada (sin gas)
- Es muy importante añadir la cantidad exacta de agua al granulado del frasco para asegurar la correcta concentración de Xarelto.
- Use la jeringa para agua para medir 100 ml de agua, ver más adelante para más información.
- Mida con mucho cuidado la cantidad de agua que va a proporcionar al frasco.
- Tras la preparación, la suspensión puede usarse durante 14 días si se conserva a temperatura ambiente.Asegúrese de escribir la fecha de caducidad de la suspensión (fecha de preparación más 14 días) en el campo para tal fin en la etiqueta del frasco.
- Noconservar la suspensión a una temperatura superior a 30 °C. Nocongelar.Si la suspensión ha sido conservada en nevera, deje que la suspensión alcance la temperatura ambiente antes de extraer la dosis correspondiente.
- Agite la suspensión para la preparación inicial durante al menos 60segundos.
- Agite la suspensión en el frasco durante al menos 10segundosantes de cada administración.
- Es muy importante que se administre el volumen de la dosis prescrita de Xarelto.
- Asegúrese de conocer la dosis prescrita y la frecuencia de administración. Pregunte a su médico o farmacéutico si no conoce la dosis prescrita y su frecuencia.
- Ajuste cuidadosamente la jeringa azul según el volumen prescrito.
- Administre la dosis prescrita utilizando la jeringa azul. Siga las instrucciones de su médico sobre la frecuencia diaria con la que debe administrar la dosis prescrita.
- Compruebe que no haya burbujas de aire en la jeringa azul antes de administrar la suspensión oral.
- Si su hijo no toma repetidamente toda la dosis requerida o escupe parte de ella, llame al médico de su hijo para saber qué hacer.
- Entre las dosis, mantenga la suspensión oral fuera de la vista y del alcance de los niños.
- Guarde las Instrucciones de uso para poder consultarlas más adelante durante el uso de Xarelto.
Uso de Xarelto
- La suspensión de Xarelto es solo para uso por vía oral.
- El volumen y la frecuencia de la administración de Xarelto dependen del peso de su hijo, por lo que cambiarán con el tiempo si su hijo recibe Xarelto de forma prolongada.
- El médico de su hijo le indicará el volumen de la dosis correcta y la frecuencia de administración.
- No cambie la dosis por su cuenta.
- Utilice siempreel volumen prescrito por el médico de su hijo y tenga la dosis y frecuencia de administración correctas escritas en el campo designado en el exterior de la caja.
Si no está escrito en dicho campo, pida al médico de su hijo o a su farmacéutico que le proporcione la información pertinente.
- Siga las Instrucciones de uso detalladas que figuran en los apartados siguientes.
- Tenga cuidado de cumplir las instrucciones relativas a la administración:
- Preparación de la suspensión oral
Paso1.1: Preparación – Todo listo
La preparación de la suspensión se hace una vez con cada nuevo envase.
Antes de preparar la suspensión:
|
|
|
Noutilizar el medicamento si ya ha caducado. |
| |
|

Paso1.2: Llenado del volumen de agua requerido
Cada vez que empiece un nuevo envase, use solo los materiales nuevos incluidos en el nuevo envase.
|
Para ello, tirar del vástago del émbolo hacia usted y asegurar que la abertura de la jeringa para agua permanece debajo de la superficie de agua todo el tiempo. Esto evitará las burbujas de aire en la jeringa.
Las pequeñas burbujas de aire no son críticas, pero las grandes son críticas. Para más información sobre qué hacer, ver más adelante.
|
Paso1.3: Adición de agua al granulado
| |
|
|
|
|
|
Se debe transferir al frasco todo el volumen de agua.
|
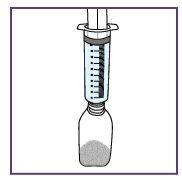
Paso1.4: Colocación del adaptador y mezcla de la suspensión oral
El adaptador se utiliza para llenar la jeringa azul con la suspensión.
| |
|
|
|
|
|
|
|
|
No añada más agua al frasco. La suspensión tiene un periodo de validez de 14 días a temperatura ambiente. | |
|
Fecha de preparación+14días El pictograma mostrado es solo un ejemplo. |

- Ajuste de la dosis prescrita con cada nueva jeringa azul
Para evitar la sobredosficación o la infradosificación se requiere una dosis exacta de suspensión.
Antes de tomar la primera dosis del frasco, la jeringa azul adjunta debe prepararse de acuerdo con la dosis prescrita por el médico de su hijo. Esta información se puede encontrar en el área de la caja dedicada a tal efecto. Si no se ha introducido ninguna información aquí, consulte con el médico o farmacéutico del niño.
Después de establecer la dosis, la misma jeringa azul se puede usar para todas las administraciones a realizar desde el frasco de suspensión preparado en el paso 1.
Una vez que la dosis ha sido fijada en la jeringa azul, ya no se puede cambiar.
Paso2.1: Selección de una jeringa azul adecuada
En este envase se incluyen dispositivos de dosificación de diferentes capacidades:
jeringas azules de 5mlpara dosis de 1mla 5ml | |
jeringas azules de 10mlpara dosis de 5mla 10ml | |
Las demás jeringas azules no son necesarias.
Nota: No retire la etiqueta despegable hasta que se le indique en las Instrucciones de uso. La jeringa azul tiene un botón rojopara ajustar el volumen. Este botón está cubierto inicialmente por una etiqueta desplegable. El volumen de la jeringa se fija presionando el botón rojo, lo que se puede realizar solo una vez. Nopresione el botón rojohasta que se le indique en las Instrucciones de uso. Una vez que se ha presionado el botón rojo, el volumen ya no se puede ajustar. | |
Paso2.2: Ajuste de la dosis necesaria en la nueva jeringa azul La jeringa azul tiene una escala (ml). La escala de la jeringa azul de 5 ml comienza con 1 ml. Las marcas de graduación están en incrementos de 0,2 ml. La escala de la jeringa azul de 10 ml comienza con 2 ml. Las marcas de graduación están en incrementos de 0,5 ml. | |
|
Nota: Utilice la jeringa azul de 10 ml para las dosis prescritas superiores a 10 ml de la siguiente manera: Dosis de 15 ml: 2 x 7,5 ml de la jeringa azul Dosis de 20 ml: 2 x 10 ml de la jeringa azul |
Pida a su farmacéutico o médico que se la proporcione. | |
| |
|
El pictograma mostrado es solo un ejemplo. Su volumen puede ser diferente. Tenga cuidado, notire del émbolo más allá del volumen a administrar. Tenga cuidado, nopresione la etiqueta al tirar del émbolo. |
| |
|
Ajustarla de forma acorde. |
|
El sonido de clic no será audible después.
|
|
La jeringa azul ya puede utilizarse. |


- Administración de la suspensión oral
Siga los pasos que se describen a continuación para cada administración necesaria.
Paso3.1: Mezcla de la suspensión oral

|
|
|
Repetir los pasos a. y b. |
Dejar reposar el frasco hasta que la espuma se disuelva. | |
|
Nota: La abertura más grande visible en el adaptador se utiliza para conectar la jeringa azul. La superficie del adaptador del frasco debe estar libre de líquido.
Retirar el líquido con un pañuelo de papel limpio. |

Paso3.2: Extracción de la dosis necesaria
|
|
Paso3.3: Administración de la dosis prescrita
|
|
|
|

- Limpieza y almacenamiento
La jeringa azul debe ser limpiada después de cada aplicación.
Siga los pasos que se indican a continuación para limpiar el dispositivo. En total, se necesitan tresciclos de limpieza para asegurar una limpieza adecuada.
Antes de comenzar, necesitará los siguientes materiales para el paso 4.1:
|
Paso4.1: Limpieza
|
|
|
|
| |
|


Paso4.2: Conservación
Conservar la jeringa azul en un lugar limpio y seco hasta su próximo uso, p.ej. guardarla en la caja de Xarelto que se le ha proporcionado.
Mantener alejada de la luz solar.

Conservar la suspensión por debajo de 30 °C.
- Eliminación
La eliminación del medicamento no utilizado y de todos los materiales que hayan estado en contacto con él se realizará de acuerdo con la normativa local.
- País de registro
- Principio activo
- Requiere recetaSí
- Fabricante
- Esta información es de carácter general y no sustituye la consulta con un profesional sanitario.
- Alternativas a XARELTO 1 mg/ml GRANULADO PARA SUSPENSION ORALForma farmacéutica: COMPRIMIDO, 15 mgPrincipio activo: RivaroxabanFabricante: Egis Pharmaceuticals Plc.Requiere recetaForma farmacéutica: COMPRIMIDO, 20 mgPrincipio activo: RivaroxabanFabricante: Egis Pharmaceuticals Plc.Requiere recetaForma farmacéutica: COMPRIMIDO, 10 mgPrincipio activo: RivaroxabanFabricante: Towa Pharmaceutical Europe S.L.Requiere receta
Médicos online para XARELTO 1 mg/ml GRANULADO PARA SUSPENSION ORAL
Comenta la dosis, los posibles efectos secundarios, interacciones, contraindicaciones o la revisión de receta de XARELTO 1 mg/ml GRANULADO PARA SUSPENSION ORAL, sujeto a valoración médica y a la normativa local.


Preguntas frecuentes
