


Cómo usar OZEMPIC 0,5 MG SOLUCION INYECTABLE EN PLUMA PRECARGADA
Traducción generada por IA
Este contenido ha sido traducido automáticamente y se ofrece solo con fines informativos. No sustituye la consulta con un profesional sanitario.
Ver originalContenido del prospecto
Introducción
Prospecto: información para el paciente
Ozempic 0,5mg solución inyectable en pluma precargada
semaglutida
Lea todo el prospecto detenidamente antes de empezar a usar este medicamento, porque contiene información importante para usted.
- Conserve este prospecto, ya que puede tener que volver a leerlo.
- Si tiene alguna duda, consulte a su médico, farmacéutico o enfermero.
- Este medicamento se le ha recetado solamente a usted, y no debe dárselo a otras personas aunque tengan los mismos síntomas que usted, ya que puede perjudicarles.
- Si experimenta efectos adversos, consulte a su médico, farmacéutico o enfermero, incluso si se trata de efectos adversos que no aparecen en este prospecto. Ver sección 4.
Contenido del prospecto
- Qué es Ozempic y para qué se utiliza
- Qué necesita saber antes de empezar a usar Ozempic
- Cómo usar Ozempic
- Posibles efectos adversos
- Conservación de Ozempic
- Contenido del envase e información adicional
1. Qué es Ozempic y para qué se utiliza
Ozempic contiene el principio activo semaglutida. Ayuda a su cuerpo a reducir el nivel de azúcar en sangre únicamente cuando este nivel de azúcar está demasiado elevado y puede ayudar a prevenir una enfermedad cardiaca en pacientes con diabetes mellitus tipo 2 (DMT2). También ayuda a ralentizar el deterioro de la función renal en pacientes con DMT2 mediante un mecanismo aparte de la reducción de la glucemia.
Ozempic se usa para tratar a adultos (a partir de los 18 años de edad) con DMT2 cuando la dieta y el ejercicio no son suficientes:
- como única medicación antidiabética cuando no puede utilizar metformina (otro medicamento para la diabetes) o
- con otros medicamentos para la diabetes: cuando estos no son suficientes para controlar sus niveles de azúcar en sangre. Estos pueden ser medicamentos que se toman por vía oral o se inyectan, como la insulina.
Es importante que continúe con la dieta y el plan de ejercicio que le haya indicado su médico, farmacéutico o enfermero.

2. Qué necesita saber antes de empezar a usar Ozempic
No use Ozempic
- si es alérgico a semaglutida o a alguno de los demás componentes de este medicamento (incluidos en la sección 6).
Advertencias y precauciones
Consulte a su médico, farmacéutico o enfermero antes de empezar a usar este medicamento.
Este medicamento no es lo mismo que la insulina y no debe usarlo si:
- padece diabetes tipo 1, una enfermedad en la que el cuerpo no produce nada de insulina
- desarrolla cetoacidosis diabética, una complicación de la diabetes que se caracteriza por un alto nivel de azúcar en sangre, dificultad para respirar, confusión, sed excesiva, aliento de olor dulce o sabor dulce o metálico en la boca.
Ozempic no es una insulina y por lo tanto no se debe usar como un sustituto de insulina.
Si sabe que va a someterse a una intervención quirúrgica en la que se someterá a anestesia (estado de sueño), informe a su médico de que está tomando Ozempic.
Efectos en el sistema digestivo
Durante el tratamiento con este medicamento, es posible que tenga náuseas, vómitos o diarrea. Estos efectos adversos pueden causar deshidratación (pérdida de líquidos). Es importante que beba mucho líquido a fin de evitar la deshidratación. Esto es especialmente importante si tiene problemas renales. Si tiene alguna duda, consulte a su médico.
Dolor de estómago intenso y continuo que se puede deber a pancreatitis aguda
Si tiene un dolor intenso y continuo en la zona del estómago acuda al médico de inmediato, ya que podría ser un síntoma de pancreatitis aguda (inflamación del páncreas). Consulte la sección 4 para conocer los síntomas de aviso de la inflamación del páncreas.
Bajo nivel de azúcar en sangre (hipoglucemia)
La combinación de una sulfonilurea o insulina con este medicamento puede aumentar el riesgo de experimentar bajos niveles de azúcar en sangre (hipoglucemia). Consulte la sección 4 para conocer los síntomas de aviso de un bajo nivel de azúcar en sangre. Es posible que su médico le pida que mida sus niveles de azúcar en sangre. Esto ayudará a su médico a decidir si es necesario cambiar la dosis de sulfonilurea o insulina para reducir el riesgo de bajo nivel de azúcar en sangre.
Enfermedad ocular diabética (retinopatía)
Si tiene una enfermedad ocular diabética y está usando insulina, este medicamento puede provocar un empeoramiento de su visión por lo cual podría necesitar tratamiento. Informe a su médico si padece enfermedad ocular diabética o experimenta problemas oculares durante el tratamiento con este medicamento. En el caso de que tenga enfermedad ocular diabética potencialmente inestable, no se recomienda el uso de Ozempic 2 mg.
Niños y adolescentes
Este medicamento no está recomendado en niños y adolescentes menores de 18 años de edad ya que la seguridad y eficacia no se han establecido todavía en estos grupos de edad.
Otros medicamentos y Ozempic
Informe a su médico, farmacéutico o enfermero si está tomando, ha tomado recientemente o pudiera tener que tomar cualquier otro medicamento, incluidos los medicamentos a base de plantas u otros medicamentos adquiridos sin receta.
En particular, informe a su médico, farmacéutico o enfermero si está utilizando medicamentos que contengan alguno de los siguientes componentes:
- Warfarina u otros medicamentos similares orales para reducir la coagulación de la sangre (anticoagulantes orales). Puede necesitar análisis de sangre frecuentes para comprobar cómo de rápido se coagula su sangre.
- Si está utilizando insulina, su médico le informará cómo reducir la dosis de insulina y le recomendará hacer seguimiento de sus niveles de azúcar en sangre de manera más frecuente, con el fin de evitar una hiperglucemia (alto nivel de azúcar en sangre) y cetoacidosis diabética (una complicación de la diabetes que ocurre cuando el cuerpo no puede descomponer la glucosa porque no hay suficiente insulina).
Embarazo y lactancia
Si está embarazada o en periodo de lactancia, cree que podría estar embarazada o tiene intención de quedarse embarazada, consulte a su médico antes de utilizar este medicamento.
Este medicamento no se debe utilizar durante el embarazo porque se desconoce si afecta al feto. Por tanto, el uso de métodos anticonceptivos está recomendado durante el uso de este medicamento. Si desea quedarse embarazada, consulte con su médico cómo cambiar su tratamiento, ya que debe interrumpir el uso de este medicamento al menos con 2 meses de antelación. Si se queda embarazada mientras usa este medicamento, consulte con su médico inmediatamente, ya que será necesario cambiarle el tratamiento.
No utilice este medicamento durante el periodo de lactancia, pues se desconoce si pasa a la leche materna.
Conducción y uso de máquinas
Es poco probable que Ozempic afecte a su capacidad para conducir y utilizar máquinas. Si utiliza este medicamento en combinación con una sulfonilurea o una insulina, es posible que experimente un bajo nivel de azúcar en sangre (hipoglucemia) lo que a su vez puede reducir su capacidad de concentración. No conduzca o use máquinas si experimenta algún síntoma de bajo nivel de azúcar en sangre. Consulte la sección 2, “Advertencias y precauciones” para obtener información sobre el aumento del riesgo de experimentar un bajo nivel de azúcar en sangre y la sección 4 para conocer los síntomas de aviso de un bajo nivel de azúcar en sangre. Consulte a su médico para más información.
Contenido de sodio
Este medicamento contiene menos de 1 mmol de sodio (23 mg) por dosis; esto es, esencialmente “exento de sodio”.
3. Cómo usar Ozempic
Siga exactamente las instrucciones de administración de este medicamento indicadas por su médico. En caso de duda, consulte de nuevo a su médico, farmacéutico o enfermero.
Cuánto usar
- La dosis inicial es 0,25 mg una vez a la semana durante cuatro semanas.
- Después de cuatro semanas, su médico aumentará la dosis a 0,5 mg una vez a la semana.
- Es posible que su médico aumente la dosis a 1 mg una vez a la semana si su nivel de azúcar en sangre no se controla adecuadamente con una dosis de 0,5 mg una vez a la semana.
- Es posible que su médico aumente la dosis a 2 mg una vez a la semana si su nivel de azúcar en sangre no se controla adecuadamente con una dosis de 1 mg una vez a la semana.
No cambie su dosis a menos que su médico se lo indique.
Cómo administrar Ozempic
Ozempic se administra como una inyección bajo la piel (inyección subcutánea). No se inyecte en una vena ni en un músculo.
- Las mejores zonas para la inyección son la parte frontal del muslo, la parte frontal de su cintura (abdomen) o la parte superior del brazo.
- Antes de utilizar la pluma por primera vez, su médico o enfermero le mostrarán cómo utilizarla.
En la otra cara de este prospecto encontrará instrucciones detalladas sobre su uso.
Cuándo usar Ozempic
- Debe usar este medicamento una vez a la semana, el mismo día de la semana a ser posible.
- Se puede poner la inyección en cualquier momento del día, con independencia de las comidas.
Para ayudarle a recordar que se inyecte este medicamento solo una vez a la semana, es conveniente que anote en la caja el día de la semana elegido (por ejemplo, miércoles), así como la fecha de cada vez que se lo inyecte.
En caso necesario, puede cambiar el día de la inyección semanal de este medicamento, siempre que hayan transcurrido al menos 3 días desde la última inyección. Una vez seleccionado el nuevo día de administración, debe proseguir con el esquema de dosificación semanal.
Si usa más Ozempic del que debe
Si usa más Ozempic del que debe, consulte con su médico inmediatamente. Es posible que experimente efectos adversos como náuseas.
Si olvidó usar Ozempic
Si olvidó inyectarse una dosis y:
- han pasado 5 días o menos desde que debería haber usado Ozempic, úselo tan pronto como se acuerde. Después, adminístrese la siguiente dosis como de costumbre, en el día programado.
- han pasado más de 5 días desde que debería haber usado Ozempic, sáltese la dosis olvidada. Después, adminístrese la siguiente dosis como de costumbre, en el día programado.
No use una dosis doble para compensar la dosis olvidada.
Si interrumpe el tratamiento con Ozempic
No interrumpa el tratamiento con este medicamento sin consultar con su médico. Si lo interrumpe, puede que aumenten sus niveles de azúcar en sangre.
Si tiene cualquier otra duda sobre el uso de este medicamento, pregunte a su médico, farmacéutico o enfermero.

4. Posibles efectos adversos
Al igual que todos los medicamentos, este medicamento puede producir efectos adversos, aunque no todas las personas los sufran.
Efectos adversos graves
Frecuentes(pueden afectar hasta 1 de cada 10 personas)
- complicaciones de la enfermedad ocular diabética (retinopatía); si tiene problemas oculares, como cambios en la visión durante el tratamiento con este medicamento, debe comunicárselo a su médico.
Poco frecuentes(pueden afectar hasta 1 de cada 100 personas)
- Páncreas inflamado (pancreatitis aguda) que puede causar un dolor intenso que no desaparece en el estómago y en la espalda. Si presenta tales síntomas acuda inmediatamente a ver a su médico.
Raros(pueden afectar hasta 1 de cada 1 000 personas)
- reacciones alérgicas graves (reacciones anafilácticas, angioedema). Debe obtener ayuda médica e informar a su médico inmediatamente si experimenta síntomas tales como problemas respiratorios, hinchazón de la cara, labios, lengua y/o la garganta con dificultad para tragar y palpitaciones.
Frecuencia no conocida(no puede estimarse a partir de los datos disponibles)
- Obstrucción intestinal. Una forma grave de estreñimiento con otros síntomas como dolor de estómago, hinchazón abdominal, vómitos, etc.
Otros efectos adversos
Muy frecuentes(pueden afectar a más de 1 de cada 10 personas)
- náuseas; este efecto desaparece normalmente con el tiempo
- diarrea; este efecto desaparece normalmente con el tiempo
- bajo nivel de azúcar en sangre (hipoglucemia) cuando este medicamento se usa con medicamentos que contienen sulfonilurea o insulina
Frecuentes(pueden afectar hasta 1 de cada 10 personas)
- vómitos
- bajo nivel de azúcar en sangre (hipoglucemia), cuando este medicamento se usa con medicamentos orales para la diabetes que no sean sulfonilureas o insulina
Los síntomas de aviso de un bajo nivel de azúcar en sangre pueden aparecer repentinamente. Algunos de estos síntomas son: sudor frío, piel fría y pálida, dolor de cabeza, palpitaciones, náuseas o apetito excesivo, cambios en la visión, somnolencia o sensación de debilidad, nerviosismo, ansiedad o confusión, dificultad de concentración o temblores.
Su médico le indicará cómo tratar el bajo nivel de azúcar en sangre y qué tiene que hacer en el caso de que observe estos síntomas de aviso.
Este bajo nivel de azúcar en sangre es más probable que suceda si también utiliza una sulfonilurea o una insulina. Puede que su médico reduzca la dosis de estos medicamentos antes de que empiece a usar este medicamento.
- indigestión
- estómago inflamado (gastritis); los síntomas incluyen dolor de estómago, náuseas o vómitos
- reflujo o ardor de estómago; también se denomina “enfermedad de reflujo gastroesofágico” (ERGE)
- dolor de estómago
- hinchazón de estómago
- estreñimiento
- eructos
- piedras en la vesícula
- mareo
- cansancio
- pérdida de peso
- disminución del apetito
- gases (flatulencia)
- aumento de las enzimas pancreáticas (como lipasa y amilasa)
- dolor de cabeza.
Poco frecuentes(pueden afectar hasta 1 de cada 100 personas)
- cambios en el sabor de las comidas y bebidas
- pulso rápido
- reacciones en el lugar de la inyección, como hematomas, dolor, irritación, picor y sarpullido
- reacciones alérgicas como sarpullido, picor o urticaria
- un retraso en el vaciamiento del estómago.
Comunicación de efectos adversos
Si experimenta cualquier tipo de efecto adverso, consulte a su médico, farmacéutico o enfermero, incluso si se trata de posibles efectos adversos que no aparecen en este prospecto. También puede comunicarlos directamente a través del sistema nacional de notificación incluido en el Apéndice V. Mediante la comunicación de efectos adversos usted puede contribuir a proporcionar más información sobre la seguridad de este medicamento.
5. Conservación de Ozempic
Mantener este medicamento fuera de la vista y del alcance de los niños.
No utilice este medicamento después de la fecha de caducidad que aparece en la etiqueta de la pluma y en el envase después de CAD. La fecha de caducidad es el último día del mes que se indica.
Antes de abrir:
Conservar en nevera (entre 2 °C y 8 °C). No congelar. Mantener alejado del componente de enfriamiento de la nevera. Conservar la pluma con el capuchón puesto para protegerla de la luz.
Después de la primera apertura:
Ozempic 0,5 mg (pluma de 4 dosis)
- Puede conservar la pluma durante 6 semanas si se almacena por debajo de 30 °C o en nevera (entre 2 °C y 8 °C), alejada del componente de enfriamiento de la nevera. No congelar Ozempic y no utilizarlo si se ha congelado.
Ozempic 0,5 mg (pluma de 8 dosis)
- Puede conservar la pluma durante 8 semanas si se almacena por debajo de 30 °C o en nevera (entre 2 °C y 8 °C), alejada del componente de enfriamiento de la nevera. No congelar Ozempic y no utilizarlo si se ha congelado.
- Cuando no se utilice, conservar la pluma con el capuchón puesto para protegerla de la luz.
No utilice este medicamento si observa que la solución no es transparente e incolora o casi incolora.
Los medicamentos no se deben tirar por los desagües ni a la basura. Pregunte a su farmacéutico cómo deshacerse de los envases y de los medicamentos que ya no necesita. De esta forma, ayudará a proteger el medio ambiente.
6. Contenido del envase e información adicional
Composición de Ozempic
- El principio activo es semaglutida.
- 1,5 ml: Un ml de solución inyectable contiene 1,34 mg de semaglutida. Una pluma precargada contiene 2 mg de semaglutida en 1,5 ml de solución. Cada dosis contiene 0,5 mg de semaglutida en 0,37 ml.
- 3 ml: Un ml de solución inyectable contiene 0,68 mg de semaglutida. Una pluma precargada contiene 2 mg de semaglutida en 3 ml de solución. Cada dosis contiene 0,5 mg de semaglutida en 0,74 ml.
- 3 ml: Un ml de solución inyectable contiene 1,34 mg de semaglutida. Una pluma precargada contiene 4 mg de semaglutida en 3 ml de solución. Cada dosis contiene 0,5 mg de semaglutida en 0,37 ml
- Los demás componentes son: fosfato disódico dihidrato, propilenglicol, fenol, agua para preparaciones inyectables, hidróxido de sodio/ácido clorhídrico (para ajuste del pH). Consulte también la sección 2 “Contenido de sodio”.
Aspecto del producto y contenido del envase
Ozempic es una solución inyectable transparente e incolora o casi incolora en una pluma precargada.
1,5 ml: Cada pluma precargada contiene 1,5 ml de solución, pudiendo administrar 4 dosis de 0,5 mg.
3 ml: Cada pluma precargada contiene 3 ml de solución, pudiendo administrar 4 dosis de 0,5 mg.
3 ml: Cada pluma precargada contiene 3 ml de solución, pudiendo administrar 8 dosis de 0,5 mg.
Ozempic 0,5 mg solución inyectable está disponible en los siguientes tamaños de envase:
1 pluma y 4 agujas desechables NovoFine Plus.
1 pluma y 8 agujas desechables NovoFine Plus.
3 plumas y 12 agujas desechables NovoFine Plus.
Puede que solamente estén comercializados algunos tamaños de envases.
Titular de la autorización de comercialización y responsable de la fabricación
Novo Nordisk A/S
Novo Allé
DK-2880 Bagsværd
Dinamarca
Fecha de la última revisión de este prospecto:
Otras fuentes de información
La información detallada de este medicamento está disponible en la página web de la Agencia Europea de Medicamentos: http://www.ema.europa.eu.
Instrucciones de uso
Ozempic 0,5mg solución inyectable en pluma precargada pudiendo administrar 4 dosissemaglutida
Instrucciones de uso de Ozempic 0,5mg solución inyectable en pluma precargada | |
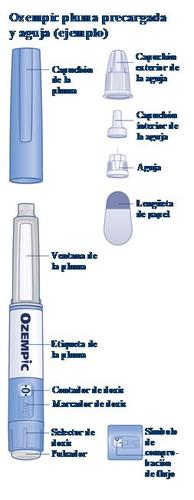
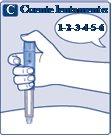
Lea atentamente estas instruccionesantes de utilizar su pluma precargada Ozempic. Pregunte a su médico, enfermero o farmacéutico cómo inyectarse Ozempic correctamente. Empiece comprobando la pluma para asegurarse de que contiene Ozempic0,5mgy después observe las siguientes imágenes para familiarizarse con las distintas partes de la pluma y la aguja. Si es usted invidente o tiene visión reducida y no puede leer el contador de dosis de la pluma, no utilice esta pluma sin ayuda.Busque ayuda de una persona que vea bien y sepa cómo usar la pluma precargada Ozempic. Su pluma es una pluma precargada dosificadora. Contiene 2 mg de semaglutida y puede seleccionar únicamente dosis de 0,5 mg. Una pluma sin usar contiene cuatro dosis de 0,5 mg. Utilice la tabla que se encuentra dentro de la tapa de la caja para llevar un registro de cuántas inyecciones se ha puesto y cuándo se las ha puesto. La pluma está diseñada para ser utilizada con agujas desechables de 30G, 31G y 32G de hasta 8 mm de longitud. El envase incluye agujas NovoFine Plus. Por favor, tenga en cuenta: El tamaño de la pluma puede ser diferente al de la pluma mostrada en la imagen. Estas instrucciones son aplicables a todas las plumas de Ozempic 0,5 mg. |
|
Información importante Preste especial atención a estas notas, ya que son importantes para el uso seguro de la pluma. | |
| |
|
|
|
|
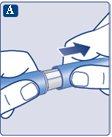
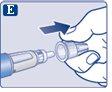
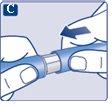
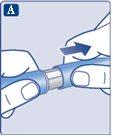
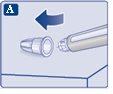
Compruebe que la lengüeta de papel y el capuchón exterior de la aguja no presentan daños que puedan afectar a la esterilidad. Si observa cualquier daño use una aguja nueva.
|
|
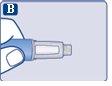
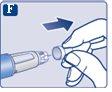
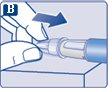
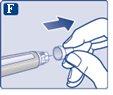
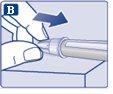
Asegúrese de colocar la aguja correctamente.
|
|
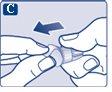
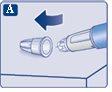
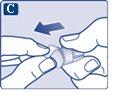
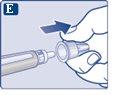
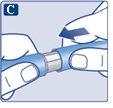
La aguja está cubierta por dos capuchones. Debe quitar ambos capuchones.Si olvida quitar ambos capuchones, noinyectará solución.
|
|
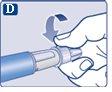
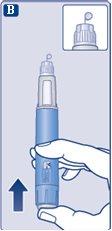
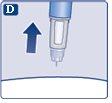
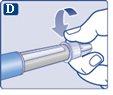
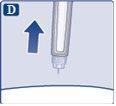
Puede aparecer una gota de solución en la punta de la aguja. Esto es normal, pero a pesar de ello debe comprobar el flujo si se trata de una pluma nueva y es la primera vez que la utiliza. Consulte el paso 2 “Comprobación del flujo con cada pluma nueva”. No coloque una aguja nuevaen la pluma hasta que esté listo para ponerse la inyección. |
|
Así se puede evitar que las agujas se atasquen, contaminación, infección y dosificación inexacta. | |
Nunca utilice una aguja doblada ni dañada. | |
| |
|
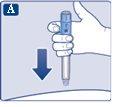
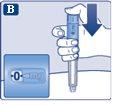
|
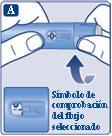
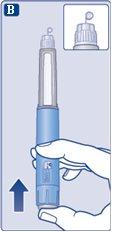
Presione y mantenga presionado el pulsadorhasta que el contador de dosis vuelva a ‘0’. El ‘0’ debe quedar alineado con el marcador de dosis. Una gota de solución debe aparecer en la punta de la aguja. |
|
Puede que una pequeña gota se quede en la punta de la aguja, pero no se inyectará. Si no aparece ninguna gota,repita el paso 2 “Comprobación del flujo con cada pluma nueva” un máximo de 6 veces. Si aún no se ve ninguna gota, cambie la aguja y repita el paso 2 “Comprobación del flujo con cada pluma nueva” una vez más. Deseche la pluma y utilice una nueva si, a pesar de todo, no aparece ninguna gota de solución. | |
Si no aparece ninguna gota, nose inyectará medicamento, aunque el contador de dosis se mueva. Esto puede indicar que la aguja está obstruida o dañada. Si no comprueba el flujo antes de la primera inyección con cada nueva pluma, es posible que no reciba la dosis prescrita ni logre el efecto previsto de Ozempic. | |
| |
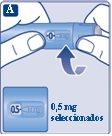
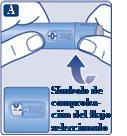
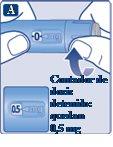
Continúe girando hasta que el contador de dosis se detenga y muestre 0,5 mg. |
|
Solamente el contador de dosis y el marcador de dosis mostrarán que se han seleccionado 0,5 mg. Usted solo puede seleccionar 0,5 mg por dosis. Cuando su pluma contenga menos de 0,5 mg, el contador de dosis se detendrá antes de que se muestre un 0,5. El selector de dosis emite un clic diferente cuando se gira hacia delante, hacia atrás o supera 0,5 mg. No cuente los clics de la pluma. | |
Antes de inyectarse este medicamento, utilice siempre el contador de dosis y el marcador de dosis para ver que ha seleccionado 0,5mg. No cuente los clics de la pluma. Se deben seleccionar solamente dosis de 0,5mg con el selector de dosis.0,5 mg tiene que estar alineado de manera exacta con el marcador de dosis para asegurar que recibe la dosis correcta. | |
Cuánta solución queda | |
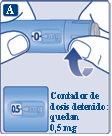
Si muestra 0,5, quedan al menos 0,5mgen la pluma. Si el contador de dosis se detiene antes de 0,5mg,no queda suficiente solución para una dosis completa de 0,5 mg. |
|
Si no queda suficiente solución en la pluma para una dosis completa, no la utilice. En su lugar, utilice una nueva pluma Ozempic. | |
| |
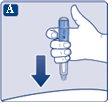
|
|
|
|
|
|
Si aparece sangre en el lugar de inyección, presione ligeramente. |
|
Puede aparecer una gota de solución en la punta de la aguja después de la inyección. Esto es normal y no afecta a su dosis. | |
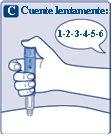
Observe siempre el contador de dosis para saber cuántos mg se inyecta.Mantenga presionado el pulsador hasta que el contador de dosis vuelva a ‘0’. Cómo detectar si la aguja está obstruida o dañada
Qué hacer si la aguja está obstruida Cambie la aguja tal como se describe en el paso 5 “Después de la inyección” y repita todos los pasos desde el paso 1 “Preparación de la pluma con una aguja nueva”. Asegúrese de seleccionar la dosis completa que necesita. No toque nunca el contador de dosis durante la inyección.Esto puede interrumpir la inyección. | |
| |
Deseche siempre la aguja después de cada inyecciónpara garantizar que las inyecciones se administran correctamente y evitar que las agujas se atasquen. Si la aguja está obstruida, nose inyectará nada de medicamento.
|
|
|
|
|
|
Cuando la pluma esté vacía, deséchela sinla aguja puesta, siguiendo las instrucciones de su médico, enfermero, farmacéutico o de las autoridades locales. | |
No intente volver a poner nunca el capuchón interior en la aguja.Se podría pinchar con la aguja. Retire siempre la aguja de la pluma inmediatamente después de cada inyección. Así se puede evitar que las agujas se atasquen, contaminación, infección, pérdida de solución y dosificación inexacta. | |
Otra información importante | |
| |
Mantenimiento de su pluma | |
Trate la pluma con cuidado. La manipulación brusca o el uso indebido pueden causar una dosificación inexacta. Si esto sucede, es posible que no logre el efecto previsto de este medicamento. | |
|


Instrucciones de uso
Ozempic 0,5mg solución inyectable en pluma precargada pudiendo administrar 8 dosissemaglutida
Instrucciones de uso de Ozempic 0,5mg solución inyectable en pluma precargada | |
Lea atentamente estas instruccionesantes de utilizar su pluma precargada Ozempic. Pregunte a su médico, enfermero o farmacéutico cómo inyectarse Ozempic correctamente. Empiece comprobando la pluma para asegurarse de que contiene Ozempic0,5mgy después observe las siguientes imágenes para familiarizarse con las distintas partes de la pluma y la aguja. Si es usted invidente o tiene visión reducida y no puede leer el contador de dosis de la pluma, no utilice esta pluma sin ayuda.Busque ayuda de una persona que vea bien y sepa cómo usar la pluma precargada Ozempic. Su pluma es una pluma precargada dosificadora. Contiene 4 mg de semaglutida y puede seleccionar únicamente dosis de 0,5 mg. Una pluma sin usar contiene ocho dosis de 0,5 mg. Tras haberse inyectado las dosis previstas, aún quedará solución en la pluma. La pluma se debe desechar. Utilice la tabla que se encuentra dentro de la tapa de la caja para llevar un registro de cuántas inyecciones se ha puesto y cuándo se las ha puesto. La pluma está diseñada para ser utilizada con agujas desechables de 30G, 31G y 32G de hasta 8 mm de longitud. El envase incluye agujas NovoFine Plus. |
|
Información importante Preste especial atención a estas notas, ya que son importantes para el uso seguro de la pluma. | |
| |
|
|
|
|
Compruebe que la lengüeta de papel y el capuchón exterior de la aguja no presentan daños que puedan afectar a la esterilidad. Si observa cualquier daño use una aguja nueva.
|
|
Asegúrese de colocar la aguja correctamente.
|
|
La aguja está cubierta por dos capuchones. Debe quitar ambos capuchones.Si olvida quitar ambos capuchones, noinyectará solución.
|
|
Puede aparecer una gota de solución en la punta de la aguja. Esto es normal, pero a pesar de ello debe comprobar el flujo si se trata de una pluma nueva y es la primera vez que la utiliza. Consulte el paso 2 “Comprobación del flujo con cada pluma nueva”. No coloque una aguja nuevaen la pluma hasta que esté listo para ponerse la inyección. |
|
Utilice siempre una aguja nueva para cada inyección. Así se puede evitar que las agujas se atasquen, contaminación, infección y dosificación inexacta. | |
Nunca utilice una aguja doblada ni dañada. | |
| |
|
|
Presione y mantenga presionado el pulsadorhasta que el contador de dosis vuelva a ‘0’. El ‘0’ debe quedar alineado con el marcador de dosis. Una gota de solución debe aparecer en la punta de la aguja. |
|
Puede que una pequeña gota se quede en la punta de la aguja, pero no se inyectará. Si no aparece ninguna gota,repita el paso 2 “Comprobación del flujo con cada pluma nueva” un máximo de 6 veces. Si aún no se ve ninguna gota, cambie la aguja y repita el paso 2 “Comprobación del flujo con cada pluma nueva” una vez más. Deseche la pluma y utilice una nueva si, a pesar de todo, no aparece ninguna gota de solución. | |
Asegúrese siempre de que aparezca una gotaen la punta de la aguja antes de utilizar una pluma nueva por primera vez. Así se asegura de que la solución fluye. Si no aparece ninguna gota, nose inyectará medicamento, aunque el contador de dosis se mueva. Esto puede indicar que la aguja está obstruida o dañada. Si no comprueba el flujo antes de la primera inyección con cada nueva pluma, es posible que no reciba la dosis prescrita ni logre el efecto previsto de Ozempic. | |
| |
Continúe girando hasta que el contador de dosis se detenga y muestre 0,5 mg. |
|
Solamente el contador de dosis y el marcador de dosis mostrarán que se han seleccionado 0,5 mg. Usted solo puede seleccionar 0,5 mg por dosis. Cuando su pluma contenga menos de 0,5 mg, el contador de dosis se detendrá antes de que se muestre un 0,5. El selector de dosis emite un clic diferente cuando se gira hacia delante, hacia atrás o supera 0,5 mg. No cuente los clics de la pluma. | |
Antes de inyectarse este medicamento, utilice siempre el contador de dosis y el marcador de dosis para ver que ha seleccionado 0,5mg. No cuente los clics de la pluma. Se deben seleccionar solamente dosis de 0,5mg con el selector de dosis.0,5 mg tiene que estar alineado de manera exacta con el marcador de dosis para asegurar que recibe la dosis correcta. | |
Cuánta solución queda | |
Si muestra 0,5, quedan al menos 0,5mgen la pluma. Si el contador de dosis se detiene antes de 0,5mg,no queda suficiente solución para una dosis completa de 0,5 mg. |
|
Si no queda suficiente solución en la pluma para una dosis completa, no la utilice. En su lugar, utilice una nueva pluma Ozempic. | |
| |
|
|
|
|
|
|
Si aparece sangre en el lugar de inyección, presione ligeramente. |
|
Puede aparecer una gota de solución en la punta de la aguja después de la inyección. Esto es normal y no afecta a su dosis. | |
Observe siempre el contador de dosis para saber cuántos mg se inyecta.Mantenga presionado el pulsador hasta que el contador de dosis vuelva a ‘0’. Cómo detectar si la aguja está obstruida o dañada
Qué hacer si la aguja está obstruida Cambie la aguja tal como se describe en el paso 5 “Después de la inyección” y repita todos los pasos desde el paso 1 “Preparación de la pluma con una aguja nueva”. Asegúrese de seleccionar la dosis completa que necesita. No toque nunca el contador de dosis durante la inyección.Esto puede interrumpir la inyección. | |
| |
Deseche siempre la aguja después de cada inyecciónpara garantizar que las inyecciones se administran correctamente y evitar que las agujas se atasquen. Si la aguja está obstruida, nose inyectará nada de medicamento.
|
|
|
|
|
|
Cuando la pluma esté vacía, deséchela sinla aguja puesta, siguiendo las instrucciones de su médico, enfermero, farmacéutico o de las autoridades locales. | |
No intente volver a poner nunca el capuchón interior en la aguja.Se podría pinchar con la aguja.
Así se puede evitar que las agujas se atasquen, contaminación, infección, pérdida de solución y dosificación inexacta. | |
Otra información importante | |
| |
Mantenimiento de su pluma | |
Trate la pluma con cuidado. La manipulación brusca o el uso indebido pueden causar una dosificación inexacta. Si esto sucede, es posible que no logre el efecto previsto de este medicamento. | |
|


-

- País de registro
- Forma farmacéuticaINYECTABLE, 0.5 mg
- Código ATCA10BJ06
- Precio medio en farmacia128.15 EUR
- Principio activo
- Requiere recetaSí
- Fabricante
- Esta información es de carácter general y no sustituye la consulta con un profesional sanitario.
- Alternativas a OZEMPIC 0,5 MG SOLUCION INYECTABLE EN PLUMA PRECARGADAForma farmacéutica: INYECTABLE, 0,25 mgPrincipio activo: SemaglutidaFabricante: Novo Nordisk A/SRequiere recetaForma farmacéutica: INYECTABLE, 1 mgPrincipio activo: SemaglutidaFabricante: Novo Nordisk A/SRequiere recetaForma farmacéutica: COMPRIMIDO, 1,5 mgPrincipio activo: SemaglutidaFabricante: Novo Nordisk A/SRequiere receta
Médicos online para OZEMPIC 0,5 MG SOLUCION INYECTABLE EN PLUMA PRECARGADA
Comenta la dosis, los posibles efectos secundarios, interacciones, contraindicaciones o la revisión de receta de OZEMPIC 0,5 MG SOLUCION INYECTABLE EN PLUMA PRECARGADA, sujeto a valoración médica y a la normativa local.


Obtén una receta de OZEMPIC 0,5 MG SOLUCION INYECTABLE EN PLUMA PRECARGADA online
Rellena un formulario de 2 minutos
Cuéntanos tus síntomas, historial y el medicamento que necesitas.
Elige un médico o nosotros te asignamos uno
Escoge un especialista o te conectamos con el próximo médico disponible.
El médico revisa tu caso
Normalmente en 30 minutos. Puede hacerte preguntas adicionales por chat.
Recógela en cualquier farmacia
Receta electrónica enviada a tu correo, válida en toda España.
Preguntas frecuentes
OZEMPIC 0,5 MG SOLUCION INYECTABLE EN PLUMA PRECARGADA requires receta en España. Puedes confirmarlo con un médico online según tu caso.
El principio activo de OZEMPIC 0,5 MG SOLUCION INYECTABLE EN PLUMA PRECARGADA es Semaglutida. Esta información ayuda a identificar medicamentos con la misma composición pero con diferentes nombres comerciales.
El precio medio en farmacia de OZEMPIC 0,5 MG SOLUCION INYECTABLE EN PLUMA PRECARGADA es de aproximadamente 128.15 EUR. Puede variar según el fabricante y la forma farmacéutica.
OZEMPIC 0,5 MG SOLUCION INYECTABLE EN PLUMA PRECARGADA es fabricado por Novo Nordisk A/S. La marca y el envase pueden variar según el distribuidor.
Los Médicos de familia, Psiquiatras, Dermatólogos, Cardiólogos, Endocrinólogos, Gastroenterólogos, Neumólogos, Nefrólogos, Reumatólogos, Hematólogos, Infectólogos, Alergólogos, Geriatras, Pediatras, Oncólogos pueden valorar la prescripción de OZEMPIC 0,5 MG SOLUCION INYECTABLE EN PLUMA PRECARGADA cuando esté clínicamente indicado. Puedes reservar una videoconsulta para comentar tu caso y las opciones de tratamiento.
España cuenta con una infraestructura sanitaria bien desarrollada en ciudades principales como Madrid, Barcelona, Valencia y Sevilla. Las farmacias están ampliamente disponibles y operan bajo estrictas regulaciones, garantizando el acceso a medicamentos con receta.
Puedes comprar OZEMPIC 0,5 MG SOLUCION INYECTABLE EN PLUMA PRECARGADA en Madrid, Barcelona, Sevilla o Valencia en cualquier farmacia local con una receta válida.
Para obtener una receta, puedes utilizar Oladoctor:
Otros medicamentos con el mismo principio activo (Semaglutida) incluyen OZEMPIC 0,25 MG SOLUCION INYECTABLE EN PLUMA PRECARGADA, OZEMPIC 1 MG SOLUCION INYECTABLE EN PLUMA PRECARGADA, RYBELSUS 1,5 MG COMPRIMIDOS. Pueden tener diferentes nombres comerciales o formulaciones, pero contienen el mismo componente terapéutico. Consulta siempre con un médico antes de cambiar o iniciar un nuevo medicamento.
