

NEORECORMON 6000 UI SOLUCION INYECTABLE EN JERINGA PRECARGADA


Cómo usar NEORECORMON 6000 UI SOLUCION INYECTABLE EN JERINGA PRECARGADA
Traducción generada por IA
Este contenido ha sido traducido automáticamente y se ofrece solo con fines informativos. No sustituye la consulta con un profesional sanitario.
Ver originalContenido del prospecto
Introducción
Prospecto: información para el usuario
NeoRecormon500UI
NeoRecormon2.000UI
NeoRecormon3.000UI
NeoRecormon4.000UI
NeoRecormon5.000UI
NeoRecormon6.000UI
NeoRecormon10.000UI
NeoRecormon20.000UI
NeoRecormon30.000UI
solución inyectable en jeringa precargada
epoetina beta
Lea todo el prospecto detenidamente antes de empezar a usar este medicamento, porque contiene información importante para usted.
- Conserve este prospecto, ya que puede tener que volver a leerlo.
- Si tiene alguna duda, consulte a su médico o farmacéutico.
- Este medicamento se le ha recetado solamente a usted, y no debe dárselo a otras personas aunque tengan los mismos síntomas que usted, ya que puede perjudicarles.
- Si experimenta efectos adversos, consulte a su médico o farmacéutico, incluso si se trata de efectos adversos que no aparecen en este prospecto.Versección 4.
Contenido del prospecto
- Qué es NeoRecormon y para qué se utiliza
- Qué necesita saber antes de empezar a usar NeoRecormon
- Cómo usar NeoRecormon
- Posibles efectos adversos
- Conservación de NeoRecormon
- Contenido del envase e información adicional
1. Qué es NeoRecormon y para qué se utiliza
NeoRecormon es una solución clara, incolora para inyectar debajo de la piel (subcutáneamente) o en la vena (intravenosamente). Contiene epoetina beta, una hormona que estimula la producción de glóbulos rojos. Epoetina beta se produce por tecnología genética especializada y funciona exactamente de la misma forma que la hormona eritropoyetina natural humana.
Debe consultar a su médico si empeora o si no mejora.
NeoRecormon está indicado para:
- Tratamiento de la anemia sintomática provocada por enfermedad renal crónica(anemia renal) en pacientes sometidos a diálisis o que aún no están sometidos a diálisis.
- Prevención de la anemia en niños prematuros(con un peso corporal al nacer de 750 a 1.500 g y una edad gestacional de menos de 34 semanas).
- Tratamiento de la anemia con síntomas relacionados en pacientes adultos con cáncer tratados con quimioterapia.
- Tratamiento de personas donantes de su propia sangre antes de ser sometidas a una intervención quirúrgica.Las inyecciones de epoetina beta aumentarán la cantidad de sangre que puede extraerse de su cuerpo antes de la operación, para ponérsela durante la intervención o después de la misma (esto es una transfusión autóloga).

2. Qué necesita saber antes de empezar a usar NeoRecormon
No useNeoRecormon:
- si es alérgicoa la epoetina beta o a cualquiera de los demás componentes de este medicamento (incluidos en la sección 6).
- si tiene problemas de presión sanguíneaque no pueden ser controlados
- si va a donar su propia sangre antes de someterse a una operación y:
- ha sufrido un infarto de miocardio o accidente cerebrovascularen el mes anterior al tratamiento
- si presenta anginade pecho inestable– nuevo dolor de pecho o dolor en aumento
- si tiene riesgo de que se le formen coágulos de sangreen las venas (trombosis de las venas profundas) – p. ej. si ha sufrido anteriormente coágulos.
Si sufriera cualquiera de estas situaciones o pudiera llegar a padecerlas, dígaselo a su médico de inmediato.
Advertencias y precauciones
Consulte a su médico antes de empezar a usar NeoRecormon
- Si su bebé necesita tratamiento con NeoRecormon, su bebé será vigilado atentamente por los posibles efectos sobre el ojo
- si su anemia no mejoracon el tratamiento con epoetina
- si tiene bajos niveles de algunas vitaminas del complejo B(ácido fólico o vitamina B12)
- si tiene niveles altos de aluminioen sangre
- si el recuento de plaquetas es alto
- si tiene enfermedad hepática crónica
- si tiene epilepsia
- si ha desarrollado anticuerpos anti-eritropoyetina y aplasia pura de células rojas(disminución o anulación de la producción de glóbulos rojos) durante una exposición previa a cualquier sustancia eritropoyética. En este caso, no debe cambiar a NeoRecormon.
Tenga especial cuidado con otros medicamentos que estimulan la producción de glóbulos rojos:NeoRecormon es uno de los agentes estimuladores de la producción de glóbulos rojos como lo hace la proteína humana eritropoyetina. Su médico deberá siempre registrar el producto exacto que usted está utilizando.
Se han observado reacciones adversas cutáneas graves, como síndrome de Stevens-Johnson (SSJ) y necrolisis epidérmica tóxica (NET) con la administración de epoetinas.
El SSJ/NET puede aparecer inicialmente como máculas o manchas circulares de color rojo en escarapela, a menudo con ampollas centrales en el tronco. Pueden aparecer también úlceras en la boca, garganta, nariz, genitales y ojos (irritación e hinchazón ocular). Estas erupciones cutáneas graves van precedidas a menudo de fiebre y/o síntomas de tipo gripal. La erupción cutánea puede progresar a descamación generalizada de la piel y a complicaciones potencialmente mortales.
Si presenta una erupción cutánea grave o alguno de estos otros síntomas cutáneos, deje de tomar Neorecormon y póngase en contacto con su médico o solicite atención médica de inmediato.
Advertencia especial
Durante el tratamiento con Neorecormon
Si usted es un paciente con enfermedad renal crónica,y en particular si no responde adecuadamente a NeoRecormon, su médico controlará su dosis de NeoRecormon ya que el aumento repetido de la dosis de NeoRecormon si no está respondiendo al tratamiento puede aumentar el riesgo de tener un problema de corazón o de los vasos sanguíneos, y podría aumentar el riesgo de infarto de miocardio, accidente cerebrovascular y muerte.
Si usted es un paciente con cáncer,debe saber que NeoRecormon puede actuar como factor de crecimiento de las células de la sangre y que en algunas circunstancias puede tener un efecto negativo sobre el cáncer. Dependiendo de su situación individual, puede ser preferible una transfusión de sangre. Por favor, háblelo con su médico.
Si usted es un enfermo nefroscleróticoaún no sometido a diálisis, su médico decidirá si el tratamiento es conveniente para usted. Esto es debido a que no se puede descartar con certeza la posible aceleración de la insuficiencia renal.
Su médico puede realizar análisis de sangre de forma regularpara controlar:
- sus niveles de potasio. Si usted presenta niveles de potasio altos o en aumento su doctor debe reconsiderar su tratamiento
- su recuento de plaquetas. Durante el tratamiento con epoetina el número de plaquetas puede aumentar de forma leve a moderada y esto puede producir cambios en la coagulación sanguínea.
Si usted es un paciente con alteración renal sometido a hemodiálisis, su médico deberá ajustar su dosis de heparina. Esto evitará la obstrucción de los tubos del sistema de diálisis.
Si usted es un paciente con alteración renal sometido a hemodiálisis y con riesgo de trombosis de derivación, podrían formarse coágulos (trombosis) en su derivación(vaso utilizado para conectar al sistema de diálisis). Su médico podría recetarle ácido acetil salicílico o modificar la derivación.
Si usted está donando su propia sangre antes de ser operado, su médico necesitará:
- comprobar que usted puede donar sangre, especialmente si su peso es inferior a 50 kg
- comprobar que usted tiene nivel suficiente de glóbulos rojos (hemoglobina de al menos 11 g/dl)
- asegurarse que solo puede extraerle de una vez el 12% de su volumen sanguíneo.
No haga un uso inapropiado de NeoRecormon:
El uso inapropiado de NeoRecormon por personas sanas puede llevar a un aumento de las células sanguíneas y, en consecuencia, un espesamiento de la sangre que puede asociarse con complicaciones cardíacas o vasculares con riesgo para la vida.
Uso deNeoRecormoncon otros medicamentos
Informe a su médico o farmacéutico si está utilizando, ha utilizado recientemente o podría tener que utilizar cualquier otro medicamento, incluso los adquiridos sin receta.
Embarazo, lactancia y fertilidad
No se ha obtenido experiencia adecuada con NeoRecormon en mujeres durante el embarazo y la lactancia. Pida consejo a su médico o farmacéutico antes de tomar cualquier medicamento.
NeoRecormon no ha mostrado evidencia de alteración de la fertilidad en animales. Se desconoce el riesgo potencial en humanos.
Conducción y uso de máquinas
No se han descrito efectos sobre la capacidad para conducir y utilizar máquinas.
NeoRecormon contiene fenilalanina y sodio
Este medicamento contiene fenilalanina. Puede ser perjudicial para personas con fenilcetonuria.
Si tiene fenilcetonuria, consulte con su médicoacerca del tratamiento con NeoRecormon.
Este medicamento contiene menos de 1 mmol de sodio (23 mg) por dosis; esto es, esencialmente “exento de sodio”.
3. Cómo usar NeoRecormon
Use siempre este medicamento exactamente como su médico le haya indicado. Si no está seguro consulte asu médico o farmacéutico.
Su médico usará la dosis efectiva más baja para controlar los síntomas de su anemia.
Si no responde adecuadamente a NeoRecormon, su médico verificará su dosis y le informará si necesita cambiar las dosis.
El tratamiento debe iniciarse bajo la supervisión de un médico.
Otras inyecciones serán administradas por su médico o, después de haber sido entrenado, puede usted inyectarse NeoRecormon (ver instrucciones al final de este prospecto).
NeoRecormon se puede inyectar debajo de la piel en el abdomen, brazo o muslo, o en una vena. Su médico decidirá que es lo mejor para usted.
Su médico realizará análisis de sangre periódicos para controlar cómo está respondiendo su anemia al tratamiento midiendo su nivel de hemoglobina.
Dosis de NeoRecormon
La dosis de NeoRecormon depende del estado de su enfermedad, la forma en que se administra la inyección (bajo la piel o en una vena) y su peso corporal. Su médico calculará la dosis apropiada para usted.
Su médico utilizará la dosis eficaz más baja para controlar los síntomas de su anemia.
Si no responde adecuadamente a NeoRecormon, su médico controlará su dosis y le informará si necesita cambiar la dosis de NeoRecormon.
- Anemia sintomática provocada por enfermedad renal crónica
Las inyecciones se administran bajo la piel o en una vena. Si la solución se le administra en vena, debe ser inyectada a lo largo de unos 2 minutos, p.ej. en pacientes en hemodiálisis por vía de la fístula arteriovenosa al final de la diálisis.
Los pacientes no hemodializados recibirán normalmente la administración bajo la piel.
El tratamiento con NeoRecormon se divide en dos fases:
- Corrección de la anemia
La dosis inicial para la administración bajo la pieles de 20 UI por inyección por cada kg de peso, administrada tres veces por semana.
Después de 4 semanas, el médico le hará pruebas y puede incrementarle la dosis a 40 UI/kg por inyección, administrada tres veces por semana. El médico puede seguir aumentando su dosis a intervalos mensuales si fuera necesario.
La dosis semanal puede dividirse en dosis diarias.
La dosis inicial para la administración en venaes de 40 UI por inyección por cada kg de peso corporal administradas tres veces por semana.
Después de 4 semanas,su médico le hará pruebas y si la respuesta al tratamiento no es suficiente, puede incrementarle la dosis a 80 UI/kg por inyección, administradas tres veces por semana. El médico puede seguir aumentando la dosis a intervalos mensuales si fuera necesario.
Para ambos tipos de inyección, la dosis máxima no debe superar 720 UI por cada kg de su peso corporal por semana.
- Mantenimiento de los niveles de glóbulos rojos
Dosis de mantenimiento: Una vez que sus glóbulos rojos alcancen un nivel aceptable, la dosis se reduce a la mitad de la dosis utilizada para corregir la anemia. La dosis semanal puede administrarse una vez por semana, o dividirse en tres o siete dosis por semana. Si sus glóbulos rojos permanecen estables en un régimen de una dosis única semanal pueden pasar a una administración única cada dos semanas. En este caso, puede ser necesario un aumento de la dosis.
El médico puede ajustar su dosis cada una o dos semanashasta encontrar su dosis individual de mantenimiento.
Los niñosiniciarán el tratamiento siguiendo las mismas normas. En los ensayos clínicos, los niños normalmente necesitaron dosis más altas de NeoRecormon (cuanto más pequeño es el niño, mayor es la dosis).
El tratamiento con NeoRecormon normalmente es un tratamiento a largo plazo. No obstante, puede interrumpirse en cualquier momento en caso necesario.
- Anemia en niños prematuros
Las inyecciones se administran bajo la piel.
La dosis iniciales de 250 UI inyectadas por cada kg de peso, tres veces por semana.
Es probable que los bebés prematuros que ya hayan recibido una transfusión previa cuando se inicie el tratamiento con NeoRecormon no se beneficien tanto como los prematuros no transfundidos.
La duración de tratamiento recomendada es de 6 semanas.
- Adultoscon anemia sintomática con cáncer tratados con quimioterapia
Las inyecciones se administran bajo la piel.
Su médico puede iniciar el tratamiento con NeoRecormon si su nivel de hemoglobina es menor o igual a 10 g/dl. Después de comenzar el tratamiento, su médico mantendrá su nivel de hemoglobina entre 10 y 12 g/dl.
La dosis semanal iniciales de 30.000 UI. Esta dosis se puede administrar en una inyección semanal, o puede dividirse en 3 a 7 inyecciones por semana. Su médico tomará muestras de sangre de forma regular. En función de los resultados de los análisis, podrá aumentarle o reducirle la dosis o interrumpirle el tratamiento. Los valores de hemoglobina no excederán de 12 g/dl.
El tratamiento debe continuar hasta 4 semanas después de terminar la quimioterapia.
La dosis máximano debe exceder de 60.000 UI por semana.
- Pacientes donantes de su propia sangre antes de someterse a cirugía
Las inyecciones se administran en vena en unos 2 minutos, o debajo de la piel.
La dosis de NeoRecormondependerá de su condición, de los niveles de glóbulos rojos y de la cantidad de sangre que donará antes de la intervención.
La dosis calculada por el médico se administra dos veces por semana durante 4 semanas. Cuando usted done sangre, recibirá NeoRecormon al final de la donación.
La dosis máximano debe exceder
- para inyección en vena: 1.600 UI por kg de peso por semana
- para inyecciones bajo la piel: 1.200 UI por kg de peso por semana
Si inyecta demasiadoNeoRecormon
No aumente la dosis que le ha dado su médico. Si cree que se ha inyectado más NeoRecormon del que debiera, contacte con su médico. Es poco probable que sea grave. Incluso en presencia de altos niveles en sangre no han sido observados síntomas de intoxicación.
Si olvidó usarNeoRecormon
Si ha olvidado una inyección o se ha inyectado muy poco, dígaselo a su médico.
No se administre una dosis doblepara compensar las dosis olvidadas.
Si tiene cualquier otra duda sobre el uso de este medicamento, pregunte a su médico o farmacéutico.

4. Posibles efectos adversos
Al igual que todos los medicamentos, este medicamento puede tener efectos adversos, aunque no todas las personas los sufran.
Efectos adversos que pueden afectar a cualquier paciente
- La mayor parte de los pacientes (muy frecuentes pueden afectar a más de 1 de cada 10 personas) presenta niveles bajos de hierro en la sangre. Casi todos los pacientes deben ser tratados con suplementos de hierro durante el tratamiento con NeoRecormon.
- Rara vez (pueden afectar hasta 1 de cada 1.000 personas)han aparecido reacciones alérgicas o de la pielcomo sarpullido o urticaria o reacciones en el lugar de la inyección.
- Muy rara vez (pueden afectar hasta 1 de cada 10.000 personas) han aparecido formas severas de reacción alérgica, especialmente después de la inyección. Estas han de tratarse de inmediato. Si usted presenta sibilancias o dificultad para respirar; inflamación en la lengua, cara, garganta o alrededor del lugar de la inyección; si siente mareo o desmayos o si se cae llame al médico de inmediato.
- Muy rara vez (pueden afectar hasta 1 de cada 10.000 personas) la gente experimenta síntomas gripales, especialmente cuando inician el tratamiento. Estos síntomas incluyenfiebre, escalofríos, dolores de cabeza, dolor de las extremidades, dolor de huesos y/o malestar general. Estas reacciones fueron normalmente leves o moderadas y desaparecieron en unas horas o días.
- Se han observado erupciones cutáneas graves, como síndrome de Stevens-Johnson y necrolisis epidérmica tóxica, con la administración de epoetinas. Estas reacciones pueden aparecer como máculas o manchas circulares de color rojo en escarapela, a menudo con ampollas centrales en el tronco, descamación de la piel y úlceras en la boca, garganta, nariz, genitales y ojos y pueden ir precedidas de fiebre y síntomas de tipo gripal. Deje de usar Neorecormon si presenta estos síntomas y póngase en contacto con su médico o solicite atención médica de inmediato. Ver también la sección 2.
Efectos adversos en pacientes con enfermedad renal crónica (anemia renal)
- Los efectos adversos más comunes(muy frecuentes pueden afectar a más de 1 de cada 10 personas)son aumentos de la presión sanguínea, empeoramiento de la presión sanguínea existente y dolores de cabeza. Su médico deberá tratar la presión sanguínea elevada con medicamentos apropiados o interrumpir temporalmente el tratamiento con NeoRecormon.
- Si tiene dolores de cabeza, especialmente súbitos, punzantes, tipo migraña, confusión, alteración del habla, inestabilidad al andar, ataques o convulsiones llame enseguida al médico. Pueden ser síntomas de presión sanguínea extremadamente alta (crisis hipertensiva), aunque la presión sanguínea sea habitualmente normal o baja. Esta sintomatología debe tratarse de inmediato.
- Si usted tiene presión sanguínea baja o complicaciones de derivación, puede padecer una trombosis de derivación(un coágulo de sangre en el vaso utilizado para conectar al sistema de diálisis).
- Muy rara vez (pueden afectar hasta 1 de cada 10.000 personas), los pacientes presentan niveles elevados de potasio o fosfatosen sangre. Estos pueden ser tratados por su médico.
- Se ha observado aplasia pura de células rojas (APCR) causada por anticuerpos neutralizantes durante el tratamiento con eritropoyetina, incluidos algunos casos aislados durante el tratamiento con NeoRecormon. APCR quiere decir que el organismo para o reduce la producción de glóbulos rojos. Esto causa una anemia grave, entre cuyos síntomas se incluye cansancio inusual y carencia de energía. Si su organismo produce anticuerpos neutralizantes, su médico interrumpirá la terapia con NeoRecormon, y determinará la mejor forma de actuar para tratar su anemia.
Efectos adversos adicionales en adultos con cáncer tratados con quimioterapia
- Ocasionalmente puede producirse un aumento de la presión sanguínea y dolores de cabeza. Su médico puede tratar la presión sanguínea elevada con fármacos.
- Se ha observado un aumento de la incidencia de coágulos de sangre.
Efectos adversos adicionales en pacientes donantes de su propia sangre antes de someterse a cirugía
- Se ha observado un ligero aumento de la incidencia de coágulos de sangre.
Comunicación de efectos adversos
Si experimenta cualquier tipo de efecto adverso, consulte a su médico o enfermero, incluso si se trata de posibles efectos adversos que no aparecen en este prospecto. También puede comunicarlos directamente a través del sistema nacional de notificación incluido en el Apéndice V. Mediante la comunicación de efectos adversos usted puede contribuir a proporcionar más información sobre la seguridad de este medicamento.
5. Conservación de NeoRecormon
- Mantener este medicamento fuera de la vista y del alcance de los niños.
- No utilice NeoRecormon después de la fecha de caducidad que aparece en la caja y en la etiqueta.
- Conservar en nevera (entre 2°C – 8°C).
- La jeringa puede mantenerse fuera de la nevera durante un único periodo de hasta 3 días a temperatura ambiente (no superior a 25°C).
- Mantener la jeringa precargada en el embalaje exterior, para protegerla de la luz.
- Los medicamentos no se deben tirar por los desagües ni a la basura. Pregunte a su farmacéutico como deshacerse de los envases y de los medicamentos que no necesita. De esta forma, ayudará a proteger el medio ambiente.
6. Contenido del envase e información adicional
Composición de NeoRecormon
- El principio activo es la epoetina beta. 1 jeringa precargada contiene 500, 2.000, 3.000, 4.000, 5.000, 6.000, 10.000, 20.000 ó 30.000 UI (unidades internacionales) de epoetina beta en 0,3 ml ó 0,6 ml de solución.
- Los otros componentes son:
urea, cloruro sódico, polisorbato 20, fosfato monosódico dihidratado, fosfato disódico dodecahidratado, cloruro cálcico dihidratado, glicina, L-Leucina, L-Isoleucina, L-Treonina, L-Ácido glutámico y L-Fenilalanina y agua para preparaciones inyectables. (Ver sección 2 "NeoRecormon contiene fenilalanina y sodio").
Aspecto de NeoRecormon y contenidodel envase
NeoRecormon es una solución en jeringa precargada para inyección.
La Solución es incolora, de transparente a ligeramente opalescente.
NeoRecormon 500 UI, 2.000 UI, 3.000 UI, 4.000 UI, 5.000 UI y 6.000 UI: cada jeringa precargada contiene 0,3 ml de solución.
NeoRecormon 10.000 UI, 20.000 UI y 30.000 UI: cada jeringa precargada contiene 0,6 ml de solución.
NeoRecormon se presenta en los siguientes tamaños de envase:
NeoRecormon 500 UI
1 jeringa precargada con 1 aguja (30G1/2) o
6 jeringas precargadas con 6 agujas (30G1/2).
NeoRecormon 2.000 UI, 3.000 UI, 4.000 UI, 5.000 UI, 6.000 UI, 10.000 UI y 20.000 UI
1 jeringa precargada con 1 aguja (27G1/2) o
6 jeringas precargadas con 6 agujas (27G1/2).
NeoRecormon 30.000 UI
1 jeringa precargada con 1 aguja (27G1/2) o
4 jeringas precargadas con 4 agujas (27G1/2).
Puede que solamente algunos tamaños de envase estén comercializados.
Titular de la autorización de comercialización
Roche Registration GmbH
Emil-Barell-Strasse 1
79639 Grenzach-Wyhlen
Alemania
Responsable de la fabricación
Roche Pharma AG
Emil-Barell-Strasse 1
D-79639 Grenzach-Wyhlen
Alemania
Pueden solicitar más información respecto a este medicamento dirigiéndose al representante local del titular de la autorización de comercialización:
|

Ceská republika Roche s. r. o. Tel.: +420 - 2 20382111 | Magyarország Roche (Magyarország) Kft. Tel.: +36 - 1 279 4500 |
Danmark Roche Pharmaceuticals A/S Tel.: +45 - 36 39 99 99 | Malta (See Ireland) |
Deutschland Roche Pharma AG Tel.: +49 (0) 7624 140 | Nederland Roche Nederland B.V. Tel.: +31 (0) 348 438050 |
Eesti Roche Eesti OÜ Tel.: + 372 - 6 177 380 | Norge Roche Norge AS Tel.: +47 - 22 78 90 00 |
Ελλ?δα Roche (Hellas) A.E. Tel.: +30 210 61 66 100 | Österreich Roche Austria GmbH Tel.: +43 (0) 1 27739 |
España Roche Farma S.A. Tel.: +34 - 91 324 81 00 | Polska Roche Polska Sp.z o.o. Tel.: +48 - 22 345 18 88 |
France Roche Tel: +33 (0) 1 47 61 40 00 | Portugal Roche Farmacêutica Química, Lda Tel.: +351 - 21 425 70 00 |
Hrvatska Roche d.o.o. Tel.: +385 1 4722 333 | România Roche România S.R.L. Tel.: +40 21 206 47 01 |
Ireland Roche Products (Ireland) Ltd. Tel.: +353 (0) 1 469 0700 | Slovenija Roche farmacevtska družba d.o.o. Tel.: +386 - 1 360 26 00 |
Ísland Roche Pharmaceuticals A/S c/o Icepharma hf Sími: +354 540 8000 | Slovenská republika Roche Slovensko, s.r.o. Tel.: +421 - 2 52638201 |
Italia Roche S.p.A. Tel.: +39 - 039 2471 | Suomi/Finland Roche Oy Puh/Tel: +358 (0) 10 554 500 |
K?προς Γ.Α.Σταμ?της & Σια Λτδ. Tel.: +357 - 22 76 62 76 | Sverige Roche AB Tel.: +46 (0) 8 726 1200 |
Latvija Roche Latvija SIA Tel.: +371 - 6 7039831 | United Kingdom (Northern Ireland) Roche Products (Ireland) Ltd. Tel: +44 (0) 1707 366000 |
Fecha de la última revisión de este prospecto
La información detallada de este medicamento está disponible en al página web de la Agencia Europea de Medicamentos http://www.ema.europa.eu/
NeoRecormon jeringa precargada
Instrucciones de uso
Las siguientes instrucciones explican cómo administrar una inyección de NeoRecormon. Asegúrese de leer, comprender y seguir las instrucciones de uso así como el prospecto antes de inyectar NeoRecormon. El profesional sanitario le mostrará cómo preparar e inyectar NeoRecormon correctamente antes de usarlo por primera vez.
Nose inyecte usted mismo a menos que haya recibido entrenamiento. Consulte al profesional sanitario si necesita más formación.
Siga siempre todas las indicaciones de estas instrucciones de uso, ya que pueden diferir de sus experiencias. Estas instrucciones minimizarán riesgos como el pinchazo accidental de una aguja y evitarán un uso incorrecto.
NeoRecormon se puede administrar de 2 maneras, su médico decidirá qué manera es adecuada para usted:
- Administración intravenosa (en la vena o acceso venoso), sólo para ser realizada por profesionales sanitarios.
- Administración subcutánea (bajo la piel).
Antes de empezar a usar
- Noquite la tapa de la aguja hasta que esté listo para inyectar NeoRecormon.
- Notrate de quitar la jeringa en ningún momento.
- Novuelva a usar la misma jeringa.
- Nolo use si la jeringa se ha caído o está dañada.
- Nodeje la jeringa sin vigilancia.
- Mantenga la jeringa y la aguja, así como el contenedor de eliminación de punzones o de objetos cortantes, fuera del alcance de los niños.
- Si tiene alguna pregunta, póngase en contacto con el profesional sanitario.
Instrucciones de conservación
- Guarde la(s) jeringa(s) y las agujas sin usar en el embalaje original y conservela (s) en nevera entre 2 ° C y 8 ° C.
- Mantenga la jeringa y la aguja fuera de la luz directa del sol.
- Nocongelar.
- Nolo use si la jeringa se ha congelado.
- Mantenga siempre la jeringa y la aguja seca.
Materiales necesarios para administrar la inyección
Incluido en el embalaje:
- Jeringa (s) precargada NeoRecormon.
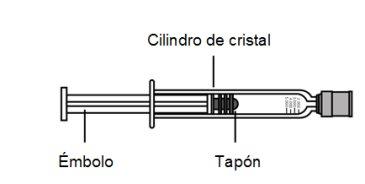
- Aguja (s) de inyección (de 27G o 30G) (dependiendo de la dosis prescrita del medicamento) con protector de seguridad (utilizado para preparación, ajuste de la dosis e inyección del medicamento).
Nota: Cada embalaje de Neorecormon contiene 1 jeringa / 1 aguja, 4 jeringas / 4 agujas o 6 jeringas / 6 agujas.
- Instrucciones de uso y prospecto.
No incluido en el embalaje:
- 1 toallita de alcohol.
- 1 gasa estéril seca.
- 1 recipiente resistente a la perforación o contenedor de objetos punzocortantes para la eliminación segura de la tapa de goma, la tapa de la aguja y la jeringa usada.
Preparación para la inyección
- Encuentre una superficie de trabajo bien iluminada, limpia y plana.
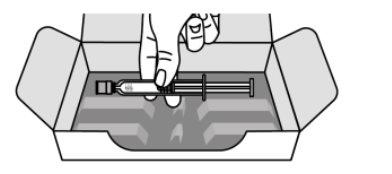
- Saque el cartonaje con la (s) jeringa (s) y la (s) aguja (s) fuera de la nevera
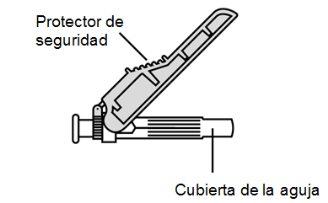
- Compruebe el embalaje, las perforaciones de la parte delantera y el sello. Compruebe también la fecha de caducidad.
- Noutilizar si la fecha de caducidad ha pasado, o si el envase parece manipulado. En este caso, continúe con el paso 20y comuníquese con el profesional sanitario.
- Noutilizar si las perforaciones o el sello están rotos. En este caso, pase al paso 20y póngase en contacto con el profesional sanitario.
- Abra el embalaje empujando a través de la perforación alrededor del sello.
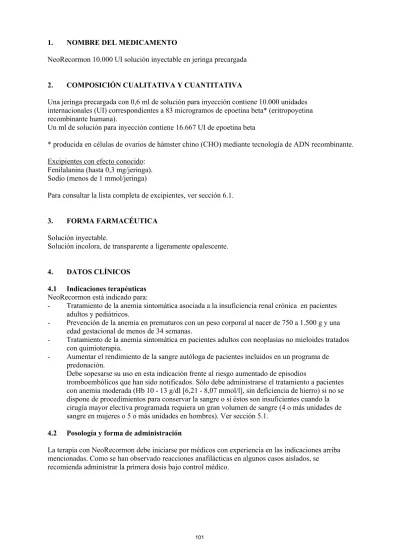
- Saque una jeringa del cartonaje y una aguja de la caja de las agujas. Tenga cuidado al sacar la jeringa. Asegúrese de sujetar siempre la jeringa como se muestra en la imagen más abajo.
- Noponga el cartonaje boca abajo para sacar la jeringa.
- Nomanipule la jeringa sujetando el émbolo o la tapa de la aguja.
Observación:Si tiene un multipack, ponga el cartonaje con la (s) jeringa (s) y aguja (s) restantes en la nevera.
- Inspeccione la jeringa y la aguja de cerca
- Compruebe que la jeringa y la aguja no estén dañadas. Noutilice la jeringa si se ha caído o si alguna parte de la jeringa parece estar dañada.
- Verifique la fecha de caducidad en la jeringa y la aguja. Nouse la jeringa o la aguja si la fecha de caducidad ha pasado.
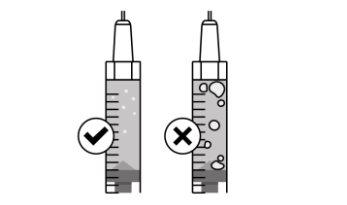
- Compruebe el líquido de la jeringa. El líquido debe ser transparente e incoloro. Noutilice la jeringa si el líquido está turbio, decolorado o tiene partículas.
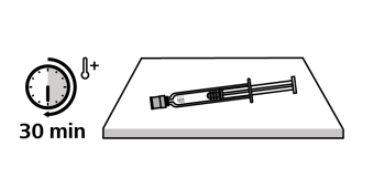
- Coloque la jeringa sobre una superficie limpia y plana.
- Deje a un lado la jeringa durante 30 minutos para que pueda alcanzar la temperatura ambiente. Deje la tapa de la aguja puesta mientras se atempera.
- Noacelere el proceso de calentamiento de ninguna manera, y no ponga la jeringa en un microondas o en agua tibia.
Observación:Si la jeringa no alcanza la temperatura ambiente, esto podría hacer que la inyección resulte incómoda y dificultar el empuje del émbolo.
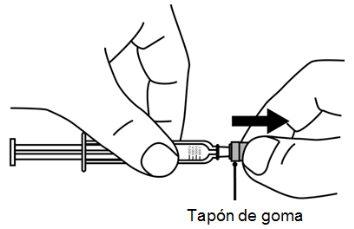
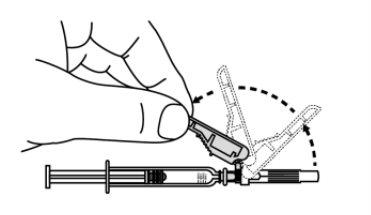
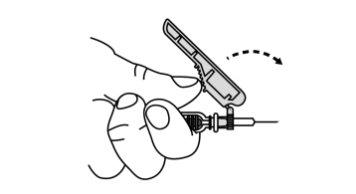
- Fije la aguja a la jeringa.
- Retire la aguja de su ampolla.
- Tire de la tapa de goma del extremo de la jeringa (A).
- Deseche inmediatamente la tapa de goma en un recipiente resistente a la perforación o o para objetos punzantes.
- Notoque la punta de la jeringa.
- Noempuje ni tire del émbolo.
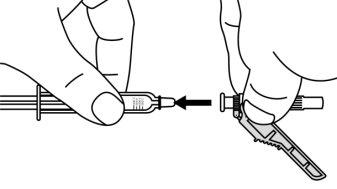
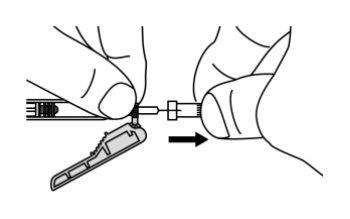
- Sostenga la jeringa por el cilindro y empuje la aguja sobre la jeringa (B).
- Gire suavemente hasta que quede completamente unido (C).
A)
B)

C)
- Coloque la jeringa sobre una superficie limpia y plana hasta que esté lista para su uso.
- Lávese las manos con agua y jabón.
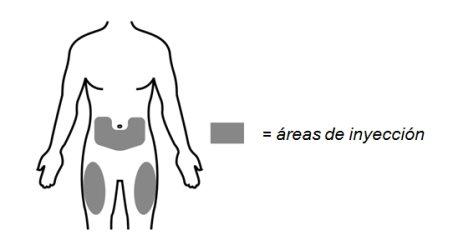
- Elija un área de inyección:
- Las áreas de inyección recomendadas son la parte superior de su muslo o la parte inferior de su abdomen debajo del ombligo. Noinyecte dentro del área de 5 cm (2 pulgadas) directamente alrededor de su ombligo.
- Elija un área de inyección diferente para cada nueva inyección.
- Noinyecte en lunares, cicatrices, hematomas o áreas donde la piel esté sensible, roja, dura o no intacta.
- Noinyectar en la vena o en un músculo.
- Limpie el lugar de la inyección con un toallita de alcohol y déjelo secar al aire durante 10 segundos.
- Noventilar ni soplar en el área limpia.
- Notoque el sitio de la inyección otra vez antes de poner la inyección.
La administración de la inyección subcutánea
- Aleje la protección de seguridad de la aguja hacia el cilindro de la jeringa.
- Sujete la jeringa y la aguja firmemente en el eje y retire cuidadosamente la tapa de la aguja de inyección de la jeringa. Utilice la jeringa dentro de los 5 minutos después de la retirada de la tapa; De lo contrario, la aguja puede obstruirse.
- Nosujete el émbolo mientras retira la tapa de la aguja.
- Notoque la aguja después de retirar la tapa de la aguja.
- Novuelva a tapar la aguja.
- Noenderezar la aguja si está doblada o dañada.
Deseche la tapa de la aguja en el contenedor de objetos punzantes inmediatamente.
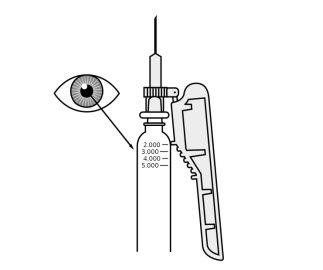
- Sostenga la jeringa con la aguja hacia arriba. Retire las burbujas de aire más grandes golpeando suavemente el cilindro de la jeringa con los dedos hasta que las burbujas de aire suban hasta la parte superior de la jeringa. A continuación, empuje lentamente el émbolo hacia arriba para empujar las burbujas de aire fuera de la jeringa.
- Ajuste la dosis recetada empujando lentamente el émbolo.
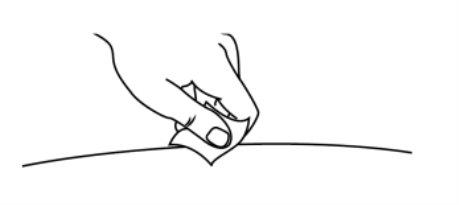
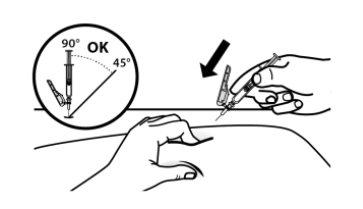
- Pellizque el punto de inyección seleccionado e inserte completamente la aguja en un ángulo de 45 ° a 90 ° con una acción rápida y firme.
- Notoque el émbolo mientras inserta la aguja en la piel
- Noinserte la aguja a través de la ropa.
Una vez que ha insertado la aguja, suelte el pellizco y sujete la jeringa firmemente en su lugar.
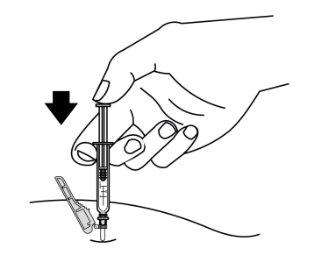
- Inyecte lentamente la dosis prescrita empujando suavemente el émbolo hasta el fondo
- Retire la aguja y la jeringa del lugar de inyección en el mismo ángulo que la insertó.
Después de la inyección
- Puede haber un poco de sangrado en el lugar de la inyección. Puede presionar la gasa estéril seca sobre el lugar de la inyección. Nofrote el lugar de la inyección.
- Si es necesario, puede cubrir el lugar de la inyección con un vendaje pequeño.
- En caso de contacto con la medicación, lave con agua el área que tocó la medicación.
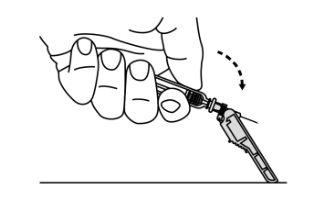
- Desplace el protector de seguridad hacia delante 90°, alejándolo del cilindro de la jeringa (A).
Sosteniendo la jeringa con una mano, presione el protector de seguridad contra una superficie plana con un movimiento firme y rápido hasta que escuche un "clic" (B).
- Si no escucha un clic, observe que la aguja está totalmente cubierta por el protector de seguridad.
- Mantenga los dedos detrás del protector de seguridad y lejos de la aguja en todo momento.
A)
B)
- Ponga la jeringa usada en un recipiente de eliminación de objetos punzantes inmediatamente después de usarlo.
- Nointente quitar la aguja de inyección usada de la jeringa usada.
- Novuelva a tapar la aguja de inyección con el tapón.
- Notire la jeringa en la basura de su casa.
Importante:Mantenga siempre el contenedor de eliminación de objetos punzantes fuera del alcance de los niños.
<---------------------------------------------------------------------------------------------------------------------->
Instrucciones de uso para inyección intravenosa, destinadas solo para profesiona sanitario
Las siguientes instrucciones de uso explican cómo administrar una inyección intravenosa de NeoRecormon. Asegúrese de leer, comprender y seguir las Instrucciones de uso, así como el prospecto antes de inyectar NeoRecormon.
Administración de la inyección intravenosa (solo para profesiona sanitario).
Preparación para la inyección: siga los pasos del 1 al 9 de inyección subcutánea (arriba).
- Seleccione una vena. Cambie de vena en cada inyección para prevenir el dolor en un solo punto.
- Noinyecte en un área roja o hinchada.
- Noinyectar en un músculo.
Limpie la piel por encima de la vena con una toallita de alcohol y deje secar.
- Noventilar ni soplar en el área limpia.
- Notoque el lugar de la inyección otra vez antes de poner la inyección.
- Prepare la jeringa y la aguja: siga los pasos 12 a 15 de inyección subcutánea (arriba).
- Inserte la aguja en la vena.
- Nosostenga ni empuje el émbolo mientras inserta la aguja.
- Inyecte lentamente la dosis recetada empujando suavemente el émbolo hasta el fondo. Retire la aguja y la jeringa del lugar de la inyección en el mismo ángulo que se insertó.
Después de la inyección, siga los pasos 18 a 20 de inyección subcutánea (arriba).
Administrar la inyección intravenosa a través del puerto de inyección (solo para profesiona sanitario).Preparación para la inyección: siga los pasos del 1 al 9 de inyección subcutánea (arriba).
- Limpie la piel por la zona del lugar de inyección con una toallita de alcohol y deje secar.
Limpie el lugar de la inyección según las instrucciones del proveedor del dispositivo.
- Noventilar ni soplar en el área limpiada.
- Notoque el sitio de la inyección otra vez antes de poner la inyección.
- Prepare la jeringa y la aguja: siga los pasos 12 al 15 de inyección subcutánea (arriba)
- Inserte la aguja en el lugar de la inyección (siga las instrucciones del proveedor del dispositivo de acceso venoso)
- Nosostenga ni empuje el émbolo mientras inserta la aguja.
- Inyecte lentamente la dosis prescrita empujando suavemente el émbolo hasta el fondo. Retire la aguja y la jeringa del orificio de inyección en el mismo ángulo que se ha insertado.
Después de la inyección, siga los pasos 18 a 20 de inyección subcutánea (arriba).
- País de registro
- Principio activo
- Requiere recetaSí
- Fabricante
- Esta información es de carácter general y no sustituye la consulta con un profesional sanitario.
- Alternativas a NEORECORMON 6000 UI SOLUCION INYECTABLE EN JERINGA PRECARGADAForma farmacéutica: INYECTABLE, 20000 UIPrincipio activo: erythropoietinFabricante: Sandoz GmbhRequiere recetaForma farmacéutica: INYECTABLE, 20 kilo UIPrincipio activo: erythropoietinFabricante: Sandoz GmbhRequiere recetaForma farmacéutica: INYECTABLE, 40.000 UI/ml de epoyetina alfaPrincipio activo: erythropoietinFabricante: Sandoz GmbhRequiere receta
Médicos online para NEORECORMON 6000 UI SOLUCION INYECTABLE EN JERINGA PRECARGADA
Comenta la dosis, los posibles efectos secundarios, interacciones, contraindicaciones o la revisión de receta de NEORECORMON 6000 UI SOLUCION INYECTABLE EN JERINGA PRECARGADA, sujeto a valoración médica y a la normativa local.


Preguntas frecuentes
