

REPATHA 140 mg SOLUTION FOR INJECTION IN PRE-FILLED PEN


How to use REPATHA 140 mg SOLUTION FOR INJECTION IN PRE-FILLED PEN
Translated with AI
This page provides general information and does not replace a doctor’s consultation. Always consult a doctor before taking any medication. Seek urgent medical care if symptoms are severe.
Show originalContents of the leaflet
Introduction
Package Leaflet: Information for the User
Repatha 140mg solution for injection in pre-filled pen
evolocumab
Read all of this leaflet carefully before you start using this medicine because it contains important information for you.
- Keep this leaflet, you may need to read it again.
- If you have any further questions, ask your doctor, pharmacist, or nurse.
- This medicine has been prescribed for you only. Do not pass it on to others. It may harm them, even if their signs of illness are the same as yours.
- If you get any side effects, talk to your doctor, pharmacist, or nurse. This includes any possible side effects not listed in this leaflet. See section 4.
- The warnings and precautions that are contained in this document are addressed to the person who is taking the medicine. If you are the parent or caregiver responsible for administering the medicine to another person, for example, a child, you should follow this information as appropriate.
Contents of the pack
- What is Repatha and what is it used for
- What you need to know before you use Repatha
- How to use Repatha
- Possible side effects
- Storage of Repatha
- Contents of the pack and further information
1. What is Repatha and what is it used for
What is Repatha and how does it work
Repatha is a medicine that reduces the levels of "bad" cholesterol, a type of fat found in the blood.
Repatha contains the active substance evolocumab, a monoclonal antibody (a type of specialized protein designed to bind to a specific substance in the body). Evolocumab is designed to bind to a substance called PCSK9 that influences the liver's ability to capture cholesterol. By binding to and eliminating PCSK9, the medicine increases the amount of cholesterol that enters the liver and reduces the level of cholesterol in the blood.
What is Repatha used for
Repatha is used as an addition to diet to reduce cholesterol in patients:
- adults with high cholesterol in the blood (primary hypercholesterolemia [heterozygous familial and non-familial] or mixed dyslipidemia). It is given:
- in combination with a statin or other cholesterol-reducing medicine, if cholesterol levels are not reduced enough with the maximum dose of a statin.
- alone or in combination with other cholesterol-reducing medicines when statins do not work well or cannot be used.
- children from 10 years of age with high cholesterol in the blood due to a familial disorder (heterozygous familial hypercholesterolemia or HeFH). It is given alone or in combination with other cholesterol-reducing treatments.
- adults and children from 10 years of age with high cholesterol in the blood due to a familial disorder (homocystatic familial hypercholesterolemia or HoFH). It is given in combination with other cholesterol-reducing medicines.
- adults with established atherosclerotic cardiovascular disease (history of heart attack, stroke, or problems with blood vessels). It is given:
- in combination with a statin or other cholesterol-reducing medicine, if cholesterol levels are not reduced enough with the maximum dose of a statin.
- alone or in combination with other cholesterol-reducing medicines when statins do not work well or cannot be used.
Repatha is used in patients who cannot control their cholesterol levels by diet alone. While using this medicine, you should continue to follow the cholesterol-reducing diet prescribed by your doctor. Repatha may help prevent heart attacks, strokes, and certain heart procedures to restore blood flow to the heart, due to the buildup of fatty deposits in your arteries (also known as atherosclerotic cardiovascular disease).

2. What you need to know before you use Repatha
Do not use Repathaif you are allergic to evolocumab or any of the other ingredients of this medicine (listed in section 6).
Warnings and precautions
Tell your doctor, pharmacist, or nurse before starting Repatha if you have liver disease.
The needle cap of the pre-filled pen is made of natural rubber (a derivative of latex), which may cause severe allergic reactions.
In order to improve the traceability of this medicine, your doctor or pharmacist should record the name and batch number of the medicine administered to you in your medical record. We also advise you to note this information in case you are asked for it in the future.
Children and adolescents
The use of Repatha has been studied in children from 10 years of age who are being treated for heterozygous familial hypercholesterolemia or homocystatic familial hypercholesterolemia.
The use of Repatha has not been studied in children under 10 years of age.
Other medicines and Repatha
Tell your doctor or pharmacist if you are using, have recently used, or might use any other medicines.
Pregnancy and breastfeeding
If you are pregnant or breastfeeding, think you may be pregnant, or are planning to have a baby, ask your doctor or pharmacist for advice before using this medicine.
Repatha has not been studied in pregnant women. It is not known if Repatha can harm the fetus.
It is not known if Repatha is present in breast milk.
It is important that you tell your doctor if you are breastfeeding or planning to breastfeed. Your doctor will help you decide whether to stop breastfeeding or stop Repatha treatment, taking into account the benefits of breastfeeding for the baby and the benefits of Repatha for the mother.
Driving and using machines
Repatha has no or negligible influence on the ability to drive and use machines.
Repatha contains sodium
This medicine contains less than 1 mmol of sodium (23 mg) per dose, which is essentially "sodium-free".
3. How to use Repatha
Follow exactly the administration instructions for this medicine given by your doctor. If you are unsure, consult your doctor again.
The recommended dose depends on the underlying disease:
- for adults with primary hypercholesterolemia and mixed dyslipidemia, the dose is 140 mg every 2 weeks or 420 mg once a month.
- for children from 10 years of age with heterozygous familial hypercholesterolemia, the dose is 140 mg every 2 weeks or 420 mg once a month.
- for adults or children from 10 years of age with homocystatic familial hypercholesterolemia, the initial recommended dose is 420 mg once a month. After 12 weeks, your doctor may decide to increase the dose to 420 mg every 2 weeks. If you are also receiving apheresis, a procedure similar to dialysis where cholesterol and other fats are removed from the blood, your doctor may decide to start with a dose of 420 mg every 2 weeks to coincide with the apheresis treatment.
- for adults with established atherosclerotic cardiovascular disease (history of heart attack, stroke, or problems with blood vessels), the dose is 140 mg every 2 weeks or 420 mg once a month.
Repatha is given by injection under the skin (subcutaneously).
If your doctor prescribes a dose of 420 mg, you should use three pre-filled pens, as each pre-filled pen contains only 140 mg of the medicine. After reaching room temperature, all injections should be administered within a 30-minute interval.
If your doctor considers that you or a caregiver can administer the Repatha injections, you or your caregiver should receive training on how to prepare and inject Repatha correctly. Do not attempt to inject Repatha until your doctor or nurse has shown you how to do it.
Consult the detailed instructions for use at the end of this leaflet to learn how to store, prepare, and administer Repatha injections at home. If you use the pre-filled pen, place the correct end (yellow) of the pen on the skin before injection.
Before starting treatment with Repatha, you should be following a cholesterol-reducing diet. While using Repatha, you should continue to follow this cholesterol-reducing diet.
If your doctor has prescribed Repatha in combination with another cholesterol-reducing medicine, follow their instructions on how to use these medicines together. In this case, also read the administration instructions in the leaflet of that specific medicine.
If you use more Repatha than you should
Contact your doctor or pharmacist immediately.
If you forget to use Repatha
Administer the missed dose as soon as you can. Then, contact your doctor to find out when to administer the next dose, and follow the new schedule exactly as your doctor has instructed.

4. Possible side effects
Like all medicines, this medicine can cause side effects, although not everybody gets them.
Common(may affect up to 1 in 10 people)
- Flu (fever, sore throat, nasal discharge, cough, and chills)
- Common cold, such as nasal discharge, sore throat, or sinus infection (nasopharyngitis or upper respiratory tract infections)
- Discomfort (nausea)
- Back pain
- Joint pain (arthralgia)
- Muscle pain
- Reactions at the injection site, such as bruising, redness, bleeding, pain, or swelling
- Allergic reactions, including skin rash
- Headache
Uncommon(may affect up to 1 in 100 people)
- Red itchy rash (urticaria)
- Flu-like symptoms
Rare(may affect up to 1 in 1,000 people)
- Swelling of the face, mouth, tongue, or throat (angioedema)
Reporting of side effects
If you experience any side effects, talk to your doctor, pharmacist, or nurse, even if they are not listed in this leaflet. You can also report side effects directly through the national reporting system listed in Appendix V. By reporting side effects, you can help provide more information on the safety of this medicine.
5. Storage of Repatha
Keep this medicine out of the sight and reach of children.
Do not use this medicine after the expiry date which is stated on the label and carton after EXP. The expiry date refers to the last day of the month shown.
Store in a refrigerator (2°C to 8°C). Do not freeze.
Store in the original package to protect from light.
The pre-filled pen can be left outside the refrigerator to reach room temperature (up to 25°C) before injection. This will make the injection less painful. Once outside the refrigerator, Repatha can be stored at room temperature (up to 25°C) in the original package and must be used within 1 month.
Do not use this medicine if you notice any change in color or if it contains lumps, flakes, or large colored particles.
Medicines should not be disposed of via wastewater or household waste.
Ask your pharmacist how to dispose of medicines no longer required. This will help protect the environment.
6. Container Contents and Additional Information
Repatha Composition
- The active ingredient is evolocumab. Each SureClick prefilled pen contains 140 mg of evolocumab in 1 ml of solution.
- The other components are proline, glacial acetic acid, polysorbate 80, sodium hydroxide, and water for injectable preparations.
Product Appearance and Container Contents
Repatha is a clear to opalescent, colorless to yellowish solution, and is practically free of particles.
Each container contains one, two, three, or six SureClick single-use prefilled pens.
Marketing Authorization Holder and Manufacturer
Amgen Europe B.V.
Minervum 7061
4817 ZK Breda
Netherlands
Marketing Authorization Holder
Amgen Europe B.V.
Minervum 7061
4817 ZK Breda
Netherlands
Manufacturer
Amgen Technology (Ireland) Unlimited Company
Pottery Road
Dun Laoghaire
Co Dublin
Ireland
Manufacturer
Amgen NV
Telecomlaan 5-7
1831 Diegem
Belgium
You can request more information about this medication by contacting the local representative of the marketing authorization holder:
België/Belgique/Belgien s.a. Amgen n.v. Tel/Tél: +32 (0)2 7752711 | Lietuva Amgen Switzerland AG Vilniaus filialas Tel: +370 5 219 7474 |
България Amgen Bulgaria EOOD Тел.: +359 (0)2 424 7440 | Luxembourg/Luxemburg s.a. Amgen Belgique/Belgien Tel/Tél: +32 (0)2 7752711 |
Ceská republika Amgen s.r.o. Tel: +420 221 773 500 | Magyarország Amgen Kft. Tel.: +36 1 35 44 700 |
Danmark Amgen, filial af Amgen AB, Sverige Tlf: +45 39617500 | Malta Amgen B.V. The Netherlands Tel: +31 (0)76 5732500 |
Deutschland AMGEN GmbH Tel.: +49 89 1490960 | Nederland Amgen B.V. Tel: +31 (0)76 5732500 |
Eesti Amgen Switzerland AG Vilniaus filialas Tel: +372 586 09553 | Norge Amgen AB Tel: +47 23308000 |
Ελλάδα Amgen Ελλάς Φαρμακευτική Ε.Π.Ε. Τηλ.: +30 210 3447000 | Österreich Amgen GmbH Tel: +43 (0)1 50 217 |
España Amgen S.A. Tel: +34 93 600 18 60 | Polska Amgen Biotechnologia Sp. z o.o. Tel.: +48 22 581 3000 |
France Amgen S.A.S. Tél: +33 (0)9 69 363 363 | Portugal Amgen Biofarmacêutica, Lda. Tel: +351 21 422 06 06 |
Hrvatska Amgen d.o.o. Tel: +385 (0)1 562 57 20 | România Amgen România SRL Tel: +4021 527 3000 |
Ireland Amgen Ireland Limited Tel: +353 1 8527400 | Slovenija AMGEN zdravila d.o.o. Tel: +386 (0)1 585 1767 |
Ísland Vistor hf. Sími: +354 535 7000 | Slovenská republika Amgen Slovakia s.r.o. Tel: +421 2 321 114 49 |
Italia Amgen S.r.l. Tel: +39 02 6241121 | Suomi/Finland Amgen AB, sivuliike Suomessa/Amgen AB, filial i Finland Puh/Tel: +358 (0)9 54900500 |
Kύπρος C.A. Papaellinas Ltd Τηλ.: +357 22741 741 | Sverige Amgen AB Tel: +46 (0)8 6951100 |
Latvija Amgen Switzerland AG Rigas filiale Tel: +371 257 25888 | United Kingdom (Northern Ireland) Amgen Limited Tel: +44 (0)1223 420305 |
Date of Last Revision
Other Sources of Information
Detailed information on this medication is available on the European Medicines Agency website: http://www.ema.europa.eu.
__________________________________________________________________________________
Instructions for Use: Repatha SureClick Single-Use Prefilled Pen |
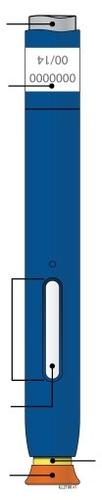
Component Guide | |||||||||||||
Before Use | After Use | ||||||||||||
|
| Yellow Safety Protector (needle inside) |
|
| |||||||||
Important: The needle is inside the yellow safety protector. |

Important | ||
Before using a Repatha prefilled pen, read this important information: | ||
Do notfreeze the Repatha prefilled pen or use a pen that has been frozen. | ||
Do notremove the orange cap from the Repatha prefilled pen before you are ready for injection. | ||
Do notuse the Repatha prefilled pen if it has been dropped onto a hard surface. The pen may be damaged, even if you cannot see the damage. |
Step 1: Preparation | ||
A | Remove a Repatha prefilled pen from the container. | |
Lift the pen straight up and out of the box. | ||
Put the original container with unused prefilled pens back in the refrigerator. | ||
Wait at least 30 minutes to allow the pen to reach room temperature before injecting. | ||
Do nottry to warm the pen by using a heat source such as hot water or a microwave. | ||
Do notexpose the pen to direct sunlight. | ||
Do notshake the pen. | ||
Do notremove the orange cap from the pen before you are ready to inject. |
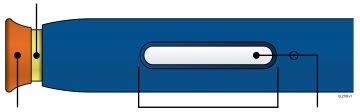
B | Inspect the Repatha prefilled pen. | ||
Yellow Safety Protector (needle inside) | |||
| |||
Make sure the medicine in the window is clear and colorless to yellowish. | |||
Check the expiration date. | |||
Do notuse the pen if the medicine is cloudy or has changed color, or contains large particles, flakes, or clumps. | |||
Do notuse the pen if any part is cracked or broken. | |||
Do notuse the pen if it has been dropped. | |||
Do notuse the pen if the orange cap is missing or loose. | |||
Do notuse the pen if it has passed the expiration date. | |||
In any of these cases, use a new prefilled pen. |
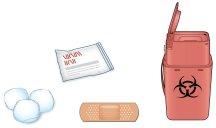
C | Gather all the materials you need for the injection. |
Wash your hands well with soap and water. | |
On a clean, well-lit work surface, place: | |
A new prefilled pen. | |
Alcohol wipes. | |
A cotton ball or gauze. | |
A bandage. | |
A sharps disposal container. |
|
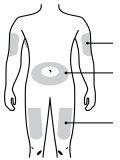
D | Prepare and clean the injection site. |
| Upper arm |
Abdomen (stomach area) | |
Thigh | |
Use only these injection sites: | |
Thigh. | |
Abdomen (stomach area), except for the area around the navel (1 inch radius). | |
Outer area of the upper arm (only if someone else is giving you the injection). | |
Clean the injection site with an alcohol wipe. Let the skin dry. | |
Do nottouch this area again before injecting. | |
Choose a different site for each injection. If you need to use the same injection site, make sure you do not inject in the same spot as the last time. | |
Do notinject into areas where the skin is tender, bruised, red, or hard. Avoid areas with scars or stretch marks. |
Step 2: Prepare | ||
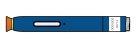
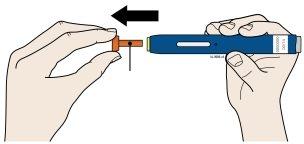
A | Remove the orange cap by pulling it straight off, only when you are ready to inject. Do notleave the pen without the orange cap for more than 5minutes, as this may cause the medicine to dry out. | |
| ||
Orange Cap | ||
It is normal to see a drop of medicine at the tip of the needle or yellow safety protector. | ||
Do nottwist, bend, or move the orange cap. | ||
Do notput the orange cap back on the pen. | ||
Do notput your fingers into the yellow safety protector. | ||
Important: Do notremove the orange cap from the pen until you are ready to inject. If you are unable to inject, ask your healthcare provider for help. |
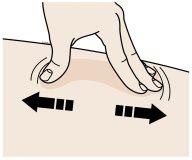
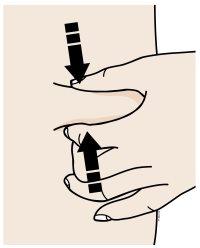
B | Create a firm surface on the injection site (thigh, abdomen, or outer area of the upper arm) using either the pinch or stretch method. |
Pinch Method | |
| |
Pinch the skin firmly by moving your thumb and fingers in opposite directions to create a 2-inch wide area. | |
Or | |
Stretch Method | |
| |
Stretch the skin firmly between your thumb and fingers, covering an area of about 2 inches wide. | |
Important:It is important to keep the skin pinched or stretched during the injection. |
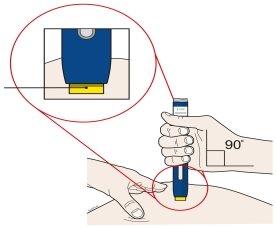
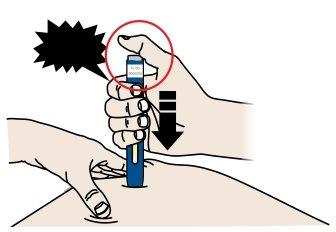
Step 3: Inject | |
A | Keep the skin pinched or stretched. Once the orange cap is removed, placethe yellow safety protector on your skin at a 90-degree angle. The needle is insidethe yellow safety protector. Do notpress the gray start button yet. |
Yellow Safety Protector (needle inside) |
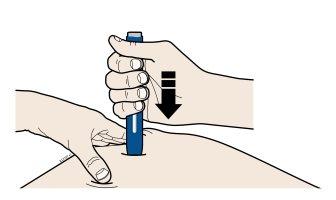
B | Pushthe pen firmly onto the skin until it stops moving. |
| |
Important:You must push the pen as far as it will go, but do notpress the gray start button until you are ready to inject. |
C | When you are ready to inject, pressthe gray start button. You will hear a click. |
“click” |
|
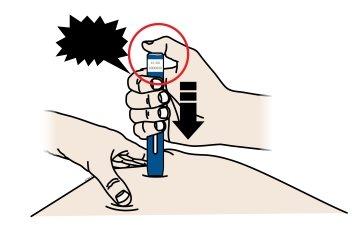
D | Continue to pressdown on the skin. Then, releaseyour thumb while keeping the pen on your skin. The injection may take up to 15 seconds to complete. |
“click” |
The transparent window turns yellow when the injection is complete. You may hear a second click. |
| NOTE:Once you remove the pen from your skin, the needle will automatically cover. |
 15seconds

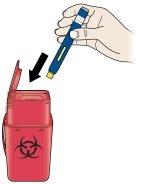
Step 4: Finish | ||
A | Dispose of the used pen and orange cap. | |
| ||
Put the used pen and orange cap in a sharps disposal container. | ||
Ask your healthcare provider how to properly dispose of the pen. There may be local regulations regarding disposal. | ||
Keep the pen and disposal container out of the sight and reach of children. | ||
Do notreuse the pen. | ||
Do notput the cap back on the pen or put your fingers into the yellow safety protector. | ||
Do notrecycle the pen or disposal container, or throw them in the trash. |
B | Check the injection site. |
If you see blood, press the injection site with a cotton ball or gauze. Do notrub the injection site. Apply a bandage if needed. |
- Country of registration
- Dosage formINJECTABLE, 140 mg (140mg/ml)
- ATC codeC10AX13
- Active substance
- Prescription requiredYes
- Manufacturer
- This information is for reference only and does not constitute medical advice. Always consult a doctor before taking any medication. Oladoctor is not responsible for medical decisions based on this content.
- Alternatives to REPATHA 140 mg SOLUTION FOR INJECTION IN PRE-FILLED PENDosage form: INJECTABLE, 140 mg / 140 mg/mlActive substance: evolocumabManufacturer: Amgen Europe B.V.Prescription requiredDosage form: TABLET, 10 mg ezetimibeActive substance: ezetimibeManufacturer: Organon Salud S.L.Prescription requiredDosage form: CAPSULE, 1000 mgActive substance: omega-3-triglycerides incl. other esters and acidsManufacturer: Kern Pharma S.L.Prescription required
Online doctors for REPATHA 140 mg SOLUTION FOR INJECTION IN PRE-FILLED PEN
Discuss questions about REPATHA 140 mg SOLUTION FOR INJECTION IN PRE-FILLED PEN, including use, safety considerations and prescription review, subject to medical assessment and local regulations.


Frequently Asked Questions
