

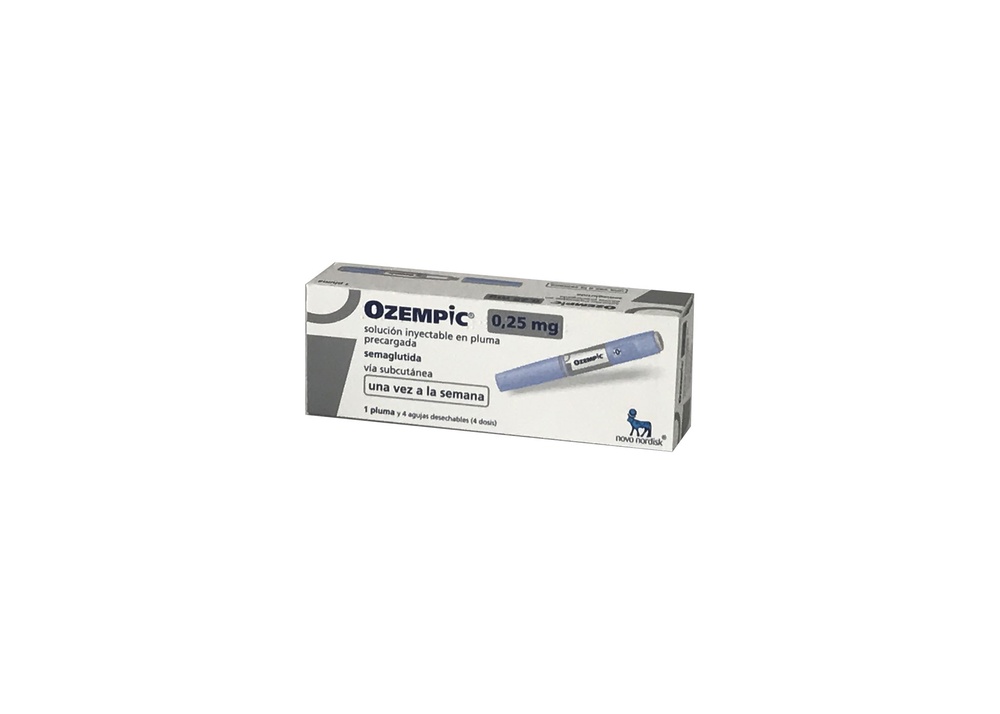
OZEMPIC 0.25 mg SOLUTION FOR INJECTION IN PRE-FILLED PEN


How to use OZEMPIC 0.25 mg SOLUTION FOR INJECTION IN PRE-FILLED PEN
Translated with AI
This page provides general information and does not replace a doctor’s consultation. Always consult a doctor before taking any medication. Seek urgent medical care if symptoms are severe.
Show originalContents of the leaflet
Introduction
Patient Information Leaflet
Ozempic 0.25mg solution for injection in pre-filled pen
semaglutide
Read all of this leaflet carefully before you start using this medicine because it contains important information for you.
- Keep this leaflet, you may need to read it again.
- If you have any further questions, ask your doctor, pharmacist, or nurse.
- This medicine has been prescribed for you only. Do not pass it on to others. It may harm them, even if their signs of illness are the same as yours.
- If you get any side effects, talk to your doctor, pharmacist, or nurse. This includes any possible side effects not listed in this leaflet. See section 4.
Contents of the pack
- What is Ozempic and what is it used for
- What you need to know before you use Ozempic
- How to use Ozempic
- Possible side effects
- Storing Ozempic
- Contents of the pack and other information
1. What is Ozempic and what is it used for
Ozempic contains the active substance semaglutide. It helps your body to reduce your blood sugar levels when they are too high and may help to prevent heart disease in patients with type 2 diabetes mellitus (T2DM). It also helps to slow down the worsening of kidney function in patients with T2DM through a mechanism that is different from blood sugar reduction.
Ozempic is used to treat adults (18 years or older) with T2DM when diet and exercise are not enough:
- as the only diabetes medicine when you cannot use metformin (another diabetes medicine) or
- with other diabetes medicines: when these are not enough to control your blood sugar levels. These can be medicines that you take by mouth or inject, such as insulin.
It is important that you continue with the diet and exercise plan recommended by your doctor, pharmacist, or nurse.

2. What you need to know before you use Ozempic
Do not use Ozempic
- if you are allergic to semaglutide or any of the other ingredients of this medicine (listed in section 6).
Warnings and precautions
Talk to your doctor, pharmacist, or nurse before you start using this medicine.
This medicine is not the same as insulin and should not be used if:
- you have type 1 diabetes, a condition where your body does not produce any insulin
- you develop diabetic ketoacidosis, a complication of diabetes characterized by high blood sugar levels, difficulty breathing, confusion, excessive thirst, sweet-smelling breath or a sweet or metallic taste in your mouth.
Ozempic is not an insulin and should not be used as a substitute for insulin.
If you know you are going to have surgery, tell your doctor that you are taking Ozempic.
Effects on the digestive system
During treatment with this medicine, you may experience nausea, vomiting, or diarrhea. These side effects can cause dehydration (loss of fluids). It is important that you drink plenty of fluids to avoid dehydration. This is especially important if you have kidney problems. If you have any doubts, talk to your doctor.
Severe and persistent stomach pain that may be due to acute pancreatitis
If you have severe and persistent stomach pain, go to your doctor immediately, as it may be a symptom of acute pancreatitis (inflammation of the pancreas). See section 4 for warning signs of pancreas inflammation.
Low blood sugar (hypoglycemia)
Combining a sulfonylurea or insulin with this medicine may increase the risk of experiencing low blood sugar levels (hypoglycemia). See section 4 for warning signs of low blood sugar. Your doctor may ask you to measure your blood sugar levels. This will help your doctor decide if it is necessary to change the dose of sulfonylurea or insulin to reduce the risk of low blood sugar.
Diabetic eye disease (retinopathy)
If you have diabetic eye disease and are using insulin, this medicine may cause a worsening of your vision, which may require treatment. Tell your doctor if you have diabetic eye disease or experience eye problems during treatment with this medicine. If you have potentially unstable diabetic eye disease, Ozempic 2 mg is not recommended.
Children and adolescents
This medicine is not recommended for children and adolescents under 18 years of age, as safety and efficacy have not been established in these age groups.
Other medicines and Ozempic
Tell your doctor, pharmacist, or nurse if you are taking, have recently taken, or might take any other medicines, including herbal medicines or other medicines that you buy without a prescription.
In particular, tell your doctor, pharmacist, or nurse if you are using medicines that contain any of the following ingredients:
- Warfarin or other similar oral medicines to reduce blood clotting (oral anticoagulants). You may need frequent blood tests to check how quickly your blood clots.
- If you are using insulin, your doctor will tell you how to reduce your insulin dose and recommend that you monitor your blood sugar levels more frequently to avoid high blood sugar (hyperglycemia) and diabetic ketoacidosis (a complication of diabetes that occurs when the body cannot break down glucose because there is not enough insulin).
Pregnancy and breastfeeding
If you are pregnant or breastfeeding, think you may be pregnant, or are planning to have a baby, ask your doctor for advice before taking this medicine.
This medicine should not be used during pregnancy, as it is not known if it affects the fetus. Therefore, the use of contraceptive methods is recommended during treatment with this medicine. If you wish to become pregnant, consult your doctor about how to change your treatment, as you should stop using this medicine at least 2 months in advance. If you become pregnant while using this medicine, consult your doctor immediately, as your treatment will need to be changed.
Do not use this medicine while breastfeeding, as it is not known if it passes into breast milk.
Driving and using machines
Ozempic is unlikely to affect your ability to drive or use machines. If you use this medicine in combination with a sulfonylurea or insulin, you may experience low blood sugar (hypoglycemia), which can reduce your ability to concentrate. Do not drive or use machines if you experience any symptoms of low blood sugar. See section 2, “Warnings and precautions” for information on the increased risk of experiencing low blood sugar and section 4 for warning signs of low blood sugar. Talk to your doctor for more information.
Sodium content
This medicine contains less than 1 mmol of sodium (23 mg) per dose; it is essentially “sodium-free”.
3. How to use Ozempic
Follow the instructions for administration of this medicine exactly as told by your doctor. If you are not sure, talk to your doctor, pharmacist, or nurse.
How much to use
- The initial dose is 0.25 mg once a week for four weeks.
- After four weeks, your doctor will increase the dose to 0.5 mg once a week.
- Your doctor may increase the dose to 1 mg once a week if your blood sugar levels are not adequately controlled with a dose of 0.5 mg once a week.
- Your doctor may increase the dose to 2 mg once a week if your blood sugar levels are not adequately controlled with a dose of 1 mg once a week.
Do not change your dose unless your doctor tells you to.
How to administer Ozempic
Ozempic is given as an injection under the skin (subcutaneous injection). Do not inject into a vein or muscle.
- The best injection sites are the front of your thigh, the front of your waist (abdomen), or the top of your arm.
- Before using the pen for the first time, your doctor or nurse will show you how to use it.
On the other side of this leaflet, you will find detailed instructions on how to use it.
When to use Ozempic
- You should use this medicine once a week, on the same day of the week if possible.
- The injection can be given at any time of the day, with or without food.
To help you remember to inject this medicine only once a week, it is a good idea to note on the carton the day of the week you have chosen (e.g., Wednesday) and the date of each injection.
If necessary, you can change the day of your weekly injection, as long as at least 3 days have passed since your last injection. Once you have chosen a new injection day, you should continue with your weekly dosing schedule.
If you use more Ozempic than you should
If you use more Ozempic than you should, talk to your doctor immediately. You may experience side effects such as nausea.
If you forget to use Ozempic
If you forget to inject a dose and:
- it has been 5 days or less since you should have used Ozempic, use it as soon as you remember. Then, give your next dose as usual, on your scheduled day.
- it has been more than 5 days since you should have used Ozempic, skip the missed dose. Then, give your next dose as usual, on your scheduled day.
Do not use a double dose to make up for a missed dose.
If you stop using Ozempic
Do not stop using this medicine without talking to your doctor. If you stop, your blood sugar levels may increase.
If you have any other questions about using this medicine, ask your doctor, pharmacist, or nurse.

4. Possible side effects
Like all medicines, this medicine can cause side effects, although not everybody gets them.
Serious side effects
Common(may affect up to 1 in 10 people)
- complications of diabetic eye disease (retinopathy); if you have eye problems, such as changes in vision during treatment with this medicine, you should tell your doctor.
Uncommon(may affect up to 1 in 100 people)
- inflamed pancreas (acute pancreatitis) that can cause severe and persistent stomach pain. If you experience such symptoms, go to your doctor immediately.
Rare(may affect up to 1 in 1,000 people)
- severe allergic reactions (anaphylactic reactions, angioedema). You should get medical help and tell your doctor immediately if you experience symptoms such as breathing problems, swelling of the face, lips, tongue, and/or throat with difficulty swallowing and rapid heartbeat.
Frequency not known(cannot be estimated from the available data)
- intestinal obstruction. A severe form of constipation with other symptoms such as stomach pain, abdominal swelling, vomiting, etc.
Other side effects
Very common(may affect more than 1 in 10 people)
- nausea; this side effect usually goes away over time
- diarrhea; this side effect usually goes away over time
- low blood sugar (hypoglycemia) when this medicine is used with sulfonylurea or insulin-containing medicines
Common(may affect up to 1 in 10 people)
- vomiting
- low blood sugar (hypoglycemia), when this medicine is used with oral diabetes medicines that are not sulfonylureas or insulin
The warning signs of low blood sugar may appear suddenly. Some of these symptoms are: cold sweat, cool pale skin, headache, rapid heartbeat, nausea or excessive hunger, changes in vision, drowsiness or feeling of weakness, nervousness, anxiety, or confusion, difficulty concentrating or trembling.
Your doctor will tell you how to treat low blood sugar and what to do if you notice these warning signs.
This low blood sugar is more likely to happen if you are also using a sulfonylurea or insulin. Your doctor may reduce the dose of these medicines before you start using this medicine.
- indigestion
- inflamed stomach (gastritis); symptoms include stomach pain, nausea, or vomiting
- reflux or heartburn; also known as “gastroesophageal reflux disease” (GERD)
- stomach pain
- stomach swelling
- constipation
- belching
- gallstones
- dizziness
- fatigue
- weight loss
- decreased appetite
- gas (flatulence)
- increased pancreatic enzymes (such as lipase and amylase)
- headache
Uncommon(may affect up to 1 in 100 people)
- changes in the taste of food and drinks
- rapid heartbeat
- reactions at the injection site, such as bruising, pain, irritation, itching, and rash
- allergic reactions such as rash, itching, or hives
- a delay in emptying the stomach.
Reporting of side effects
If you experience any side effects, talk to your doctor, pharmacist, or nurse. This includes any possible side effects not listed in this leaflet. You can also report side effects directly through the national reporting system listed in Appendix V. By reporting side effects, you can help provide more information on the safety of this medicine.
5. Storing Ozempic
Keep this medicine out of the sight and reach of children.
Do not use this medicine after the expiry date which is stated on the label of the pen and on the carton after EXP. The expiry date is the last day of the month stated.
Before opening:
Store in a refrigerator (2°C to 8°C). Do not freeze. Keep away from the freezer compartment. Store the pen with the cap on to protect it from light.
After first opening:
- You can store the pen for 6 weeks if stored below 30°C or in a refrigerator (2°C to 8°C), away from the freezer compartment. Do not freeze Ozempic and do not use it if it has been frozen.
- When not in use, store the pen with the cap on to protect it from light.
Do not use this medicine if you notice that the solution is not clear and colorless or almost colorless.
Medicines should not be disposed of via wastewater or household waste. Ask your pharmacist how to dispose of medicines no longer required. This will help protect the environment.
6. Container Content and Additional Information
Ozempic Composition
- The active ingredient is semaglutide. One ml of injectable solution contains 1.34 mg of semaglutide. A pre-filled pen contains 2 mg of semaglutide in 1.5 ml of solution. Each dose contains 0.25 mg of semaglutide in 0.19 ml.
- The other components are: disodium phosphate dihydrate, propylene glycol, phenol, water for injectable preparations, sodium hydroxide/hydrochloric acid (for pH adjustment). See also section 2 "Sodium Content".
Product Appearance and Container Content
Ozempic is a clear and colorless or almost colorless injectable solution in a pre-filled pen.
Each pre-filled pen contains 1.5 ml of solution, allowing for 4 doses of 0.25 mg to be administered.
Ozempic 0.25 mg injectable solution is available in the following pack size:
1 pre-filled pen and 4 NovoFine Plus disposable needles.
Marketing Authorization Holder and Manufacturer
Novo Nordisk A/S
Novo Allé
DK-2880 Bagsværd
Denmark
Date of Last Revision of this Leaflet
Other Sources of Information
Detailed information on this medicinal product is available on the European Medicines Agency website: http://www.ema.europa.eu.
Instructions for Use
Ozempic 0.25 mg Solution for Injection in Pre-filled Pen
semaglutide
Instructions for Use of Ozempic 0.25 mg Solution for Injection in Pre-filled Pen | |
Read these instructions carefullybefore using your pre-filled pen Ozempic. Ask your doctor, nurse, or pharmacist to show you how to inject Ozempic correctly. Use only the medicine from this pen as prescribed. Start by checking the pen to make sure it contains Ozempic 0.25 mgand then look at the following pictures to familiarize yourself with the different parts of the pen and needle. If you are blind or have low vision and cannot read the dose counter on the pen, do not use this pen without help.Ask for help from a person who can see well and knows how to use the pre-filled pen Ozempic. Your pen is a pre-filled dosing pen. It contains 2 mg of semaglutide and you can only select doses of 0.25 mg. A new, unused pen contains four doses of 0.25 mg. After you have injected the four doses, there will still be solution left in the pen. The pen must be discarded. Use the table that comes with the pen packaging to keep track of how many injections you have taken and when you took them. The pen is designed to be used with NovoFine Plus disposable needles, 30G, 31G, and 32G, up to 8 mm in length. The packaging includes NovoFine Plus needles. |
|
Important Information Pay special attention to these notes, as they are important for the safe use of the pen. | |
| |
|
|
|
|
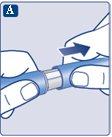
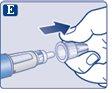
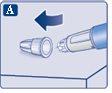
Check that the paper tab and the outer needle cap are not damaged, which could affect the sterility. If you see any damage, use a new needle.
|
|
Make sure to put the needle on correctly.
|
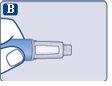
|
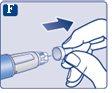
The needle is covered by two caps. You must remove both caps.If you forget to remove both caps, you will notinject the solution.
|
|
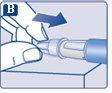
A drop of solution may appear on the tip of the needle. This is normal, but you must still check the flow if it is a new pen and you are using it for the first time. See step 2 "Checking the flow with each new pen". Never put a new needleon the pen until you are ready to take the injection. |
|
Always use a new needle for each injection. This helps to prevent the needles from becoming blocked, contamination, infection, and incorrect dosing. | |
Never use a bent or damaged needle. | |
| |
|
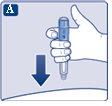
|
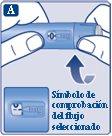
Press and hold the push buttonuntil the dose counter returns to '0'. The '0' must be aligned with the dose marker. A drop of solution should appear on the tip of the needle. |
|
It is possible that a small drop will remain on the tip of the needle, but it will not be injected. If no drop appears,repeat step 2 "Checking the flow with each new pen" up to 6 times. If you still do not see a drop, change the needle and repeat step 2 "Checking the flow with each new pen" one more time. Discard the pen and use a new one if, despite this, no drop of solution appears. | |
Always make sure a drop appearson the tip of the needle before using a new pen for the first time. This ensures that the solution flows. If no drop appears, do notinject the medicine, even if the dose counter moves. This may indicate that the needle is blocked or damaged. If you do not check the flow before the first injection with each new pen, you may not receive the prescribed dose and may not achieve the intended effect of Ozempic. | |
| |
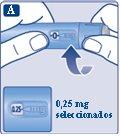
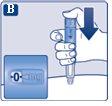
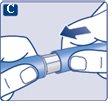
Continue turning until the dose counter stops and shows 0.25 mg. |
|
Only the dose counter and the dose marker will show that 0.25 mg has been selected. You can only select 0.25 mg per dose. The dose selector makes a different click when turned forward, backward, or passed 0.25 mg. Do not count the clicks of the pen. | |
Before injecting this medicine, always use the dose counter and the dose marker to check that you have selected 0.25 mg. Do not count the clicks of the pen. Only select doses of 0.25 mgwith the dose selector. 0.25 mg must be exactly aligned with the dose marker to ensure you receive the correct dose. | |
| |
|
|
|
|
|
|
If blood appears at the injection site, press gently. |
|
A drop of solution may appear on the tip of the needle after the injection. This is normal and does not affect your dose. | |
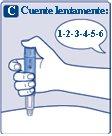
Always check the dose counter to see how many mg you are injecting.Keep the push button pressed until the dose counter returns to '0'. How to detect if the needle is blocked or damaged
What to do if the needle is blocked Change the needle as described in step 5 "After the injection" and repeat all the steps from step 1 "Preparing the pen with a new needle". Make sure to select the full dose you need. Never touch the dose counter during the injection.This can interrupt the injection. | |
| |
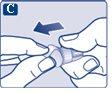
Always discard the needle after each injectionto ensure that injections are administered correctly and to prevent the needles from becoming blocked. If the needle is blocked, nomedicine will be injected.
|
|
|
|
|
|
When you discard the pen, do so withoutthe needle attached, following the instructions of your doctor, nurse, pharmacist, or local authorities. | |
Never try to put the inner cap back on the needle.You could prick yourself with the needle. Always remove the needle from the pen immediately after each injection. This helps to prevent the needles from becoming blocked, contamination, infection, loss of solution, and incorrect dosing. | |
Other Important Information | |
| |
Maintenance of Your Pen | |
Treat the pen with care. Rough handling or misuse can cause incorrect dosing. If this happens, you may not achieve the intended effect of this medicine. | |
|


- Country of registration
- Average pharmacy price128.15 EUR
- Active substance
- Prescription requiredYes
- Manufacturer
- This information is for reference only and does not constitute medical advice. Always consult a doctor before taking any medication. Oladoctor is not responsible for medical decisions based on this content.
- Alternatives to OZEMPIC 0.25 mg SOLUTION FOR INJECTION IN PRE-FILLED PENDosage form: INJECTABLE, 0.5 mgActive substance: semaglutideManufacturer: Novo Nordisk A/SPrescription requiredDosage form: INJECTABLE, 1 mgActive substance: semaglutideManufacturer: Novo Nordisk A/SPrescription requiredDosage form: TABLET, 1.5 mgActive substance: semaglutideManufacturer: Novo Nordisk A/SPrescription required
Online doctors for OZEMPIC 0.25 mg SOLUTION FOR INJECTION IN PRE-FILLED PEN
Discuss questions about OZEMPIC 0.25 mg SOLUTION FOR INJECTION IN PRE-FILLED PEN, including use, safety considerations and prescription review, subject to medical assessment and local regulations.


Frequently Asked Questions
