

PERGOVERIS (450 IU + 225 IU)/0.72 mL PRE-FILLED PEN SOLUTION FOR INJECTION


How to use PERGOVERIS (450 IU + 225 IU)/0.72 mL PRE-FILLED PEN SOLUTION FOR INJECTION
Translated with AI
This page provides general information and does not replace a doctor’s consultation. Always consult a doctor before taking any medication. Seek urgent medical care if symptoms are severe.
Show originalContents of the leaflet
Introduction
Package Leaflet: Information for the User
Pergoveris (450 IU + 225 IU)/0.72 ml solution for injection in pre-filled pen
follicle-stimulating hormone (follitropin alfa)/luteinizing hormone (lutropin alfa)
Read all of this leaflet carefully before you start using this medicine because it contains important information for you.
- Keep this leaflet, you may need to read it again.
- If you have any further questions, ask your doctor, pharmacist, or nurse.
- This medicine has been prescribed for you only. Do not pass it on to others. It may harm them, even if their signs of illness are the same as yours.
- If you get any side effects, talk to your doctor, pharmacist, or nurse. This includes any possible side effects not listed in this leaflet. See section 4.
Contents of the pack
- What Pergoveris is and what it is used for
- What you need to know before you use Pergoveris
- How to use Pergoveris
- Possible side effects
- Storing Pergoveris
- Contents of the pack and other information
1. What Pergoveris is and what it is used for
What Pergoveris is
Pergoveris contains two different active substances called "follitropin alfa" and "lutropin alfa". Both belong to the family of hormones known as "gonadotropins", which are involved in reproduction and fertility.
What Pergoveris is used for
This medicine is used to stimulate the development of follicles (each containing an egg) in the ovaries to help you get pregnant. It is intended for use in adult women (18 years of age or older) with low levels (severe deficiency) of "follicle-stimulating hormone" (FSH) and "luteinizing hormone" (LH). Normally, these women are infertile.
How Pergoveris works
The active substances in Pergoveris are copies of the natural hormones FSH and LH. In the body:
- FSH stimulates the production of eggs
- LH stimulates the release of eggs.
By replacing the missing hormones, Pergoveris allows women with low levels of FSH and LH to develop a follicle, from which an egg will be released after an injection of the hormone "human chorionic gonadotropin (hCG)". This helps women get pregnant.

2. What you need to know before you use Pergoveris
Before starting treatment, your fertility and that of your partner should be assessed by a doctor experienced in the treatment of fertility disorders.
Do not use Pergoveris:
- if you are allergic to follicle-stimulating hormone (FSH), luteinizing hormone (LH), or any of the other components of this medicine (listed in section 6).
- if you have a brain tumor (in the hypothalamus or pituitary gland).
- if you have large ovaries or fluid-filled bags in the ovaries (ovarian cysts) of unknown origin.
- if you have unexplained vaginal bleeding.
- if you have ovarian, uterine, or breast cancer.
- if you have a condition that would prevent a normal pregnancy, such as premature menopause, malformations of the sex organs, or benign tumors in the uterus.
Do not use this medicine if any of the above conditions apply to you. If you are not sure, consult your doctor, pharmacist, or nurse before starting treatment with this medicine.
Warnings and precautions
Consult your doctor, pharmacist, or nurse before starting treatment with Pergoveris.
Porphyria
Consult your doctor before starting treatment if you or any member of your family has porphyria (an inability to break down porphyrins that can be passed from parents to children).
Inform your doctor immediately if:
- your skin becomes fragile and blisters easily, especially in areas frequently exposed to the sun.
- you have stomach pain, arm, or leg pain.
In these cases, your doctor may recommend that you stop treatment.
Ovarian Hyperstimulation Syndrome (OHSS)
This medicine stimulates your ovaries, which increases the risk of experiencing Ovarian Hyperstimulation Syndrome (OHSS). This occurs when your follicles develop too much and become large cysts. If you have pelvic pain, rapid weight gain, nausea, vomiting, or difficulty breathing, consult your doctor immediately, who may tell you to stop treatment (see section 4, "Serious side effects").
If you do not ovulate and if the recommended dose and dosing schedule are followed, severe OHSS is less likely to occur. Treatment with Pergoveris rarely causes severe OHSS. This is more likely if the medicine used for final follicular maturation (containing human chorionic gonadotropin, hCG) is administered (see details in section 3, "How much to use"). If you develop OHSS, your doctor may not prescribe hCG in this treatment cycle and advise you to abstain from intercourse or use a barrier contraceptive for at least 4 days.
Your doctor will ensure careful monitoring of ovarian response, using ultrasound and blood tests (estradiol determinations), before and during treatment.
Multiple Pregnancy
If you use Pergoveris, you have a higher risk of becoming pregnant with more than one baby at a time ("multiple pregnancy", usually twins) than if you become pregnant through natural conception. Multiple pregnancy can cause medical complications for you and your babies. You can reduce the risk of multiple pregnancy by using the correct dose of Pergoveris at the right times.
To minimize the risk of multiple pregnancy, ultrasound and blood tests are recommended.
Abortion
If you undergo ovarian stimulation to produce eggs, the likelihood of having a miscarriage is higher than in the average woman.
Ectopic Pregnancy
Women who have ever suffered from blockage or damage to the Fallopian tubes (tubal disease) are at risk of pregnancy with implantation of the embryo outside the uterus (ectopic pregnancy). This is true whether the pregnancy is through natural conception or through fertility treatments.
Blood Clotting Problems (Thromboembolic Events)
Consult your doctor before starting treatment with Pergoveris if you or any member of your family has ever had blood clots in the leg or lung, heart attack, or stroke. You may have a higher risk of serious blood clots or worsening of existing clots with treatment with Pergoveris.
Sex Organ Tumors
Tumors in the ovaries and other sex organs, both benign and malignant, have been reported in women who have undergone multiple fertility treatment cycles.
Allergic Reactions
Isolated cases of non-serious allergic reactions to Pergoveris have been reported. If you have ever had this type of reaction with a similar medicine, consult your doctor before starting treatment with Pergoveris.
Children and Adolescents
Pergoveris should not be used in children and adolescents under 18 years of age.
Other Medicines and Pergoveris
Tell your doctor or pharmacist if you are using, have recently used, or might use any other medicines.
Do not use Pergoveris with other medicines in the same injection. You can use Pergoveris with a follitropin alfa preparation authorized in different injections if prescribed by your doctor.
Pregnancy and Breastfeeding
Do not use Pergoveris if you are pregnant or breastfeeding.
Driving and Using Machines
This medicine is not expected to affect your ability to drive or use machines.
Pergoveris contains Sodium
Pergoveris contains less than 1 mmol of sodium (23 mg) per dose; this is essentially "sodium-free".
3. How to use Pergoveris
Follow the instructions for administration of this medicine exactly as told by your doctor or pharmacist. If you are unsure, consult your doctor or pharmacist again.
Using this medicine
- Pergoveris is designed to be injected just under the skin (subcutaneously). To minimize skin irritation, choose a different injection site each day.
- Your doctor or nurse will teach you how to use the Pergoveris pre-filled pen to inject the medicine.
- If they agree that you can safely administer Pergoveris, you will then be able to prepare and inject the medicine yourself at home.
- If you administer Pergoveris yourself, carefully read and follow the "Instructions for use".
How much to use
A treatment cycle starts with the recommended dose of Pergoveris containing 150 international units (IU) of follitropin alfa and 75 IU of lutropin alfa, once a day.
- Depending on the response, your doctor may decide to add a daily dose of an authorized follitropin alfa preparation to the Pergoveris injection. In this case, the follitropin alfa dose is usually increased every 7 or 14 days by 37.5-75 IU.
- Treatment continues until the desired response is obtained. This happens when you have developed a suitable follicle, as assessed by ultrasound and blood tests.
- Up to five weeks of treatment may be needed.
When the desired response is obtained, you will be given a single injection of human chorionic gonadotropin (hCG) 24 to 48 hours after your last Pergoveris injection. The best time for intercourse is on the day of the hCG injection and the day after. Alternatively, intrauterine insemination or another medically assisted reproduction procedure may be performed, as decided by your doctor.
If you get an excessive response, your treatment will be stopped and you will not be given hCG (see section 2, "Ovarian Hyperstimulation Syndrome (OHSS)"). In this case, your doctor will prescribe a lower dose of follitropin alfa in the next treatment cycle.
If you use more Pergoveris than you should
The effects of an overdose of Pergoveris are unknown; however, it can be expected that OHSS may occur. However, this will only happen if hCG is administered (see section 2, "Ovarian Hyperstimulation Syndrome (OHSS)").
If you forget to use Pergoveris
Do not use a double dose to make up for forgotten doses. Contact your doctor.
If you have any further questions on the use of this medicine, ask your doctor, pharmacist, or nurse.

4. Possible side effects
Like all medicines, this medicine can cause side effects, although not everybody gets them.
Serious side effects
Tell your doctor immediately if you notice any of the following serious side effects. Your doctor may tell you to stop using Pergoveris.
Allergic reactions
Allergic reactions, such as skin rash, skin redness, blisters, swelling of the face with difficulty breathing, can sometimes be serious. This side effect is very rare.
Ovarian Hyperstimulation Syndrome (OHSS)
- Pelvic pain, accompanied by nausea or vomiting, may be symptoms of OHSS. It is possible that your ovaries have overreacted to treatment and developed large cysts or fluid-filled bags (see section 2, "Ovarian Hyperstimulation Syndrome (OHSS)"). This side effect is common. If this happens to you, your doctor will need to examine you as soon as possible.
- OHSS can worsen with clearly enlarged ovaries, decreased urine production, weight gain, difficulty breathing, and/or possible fluid accumulation in the abdomen or chest. This side effect is uncommon (may affect up to 1 in 100 people).
- Complications of OHSS, such as ovarian torsion or blood clotting, occur rarely (may affect up to 1 in 1,000 people).
- Severe blood clotting problems (thromboembolic events), usually with severe OHSS, occur very rarely. This could cause chest pain, shortness of breath, stroke, or heart attack. In rare cases, this can also happen independently of OHSS (see section 2, "Blood Clotting Problems (Thromboembolic Events)").
Other side effects
Very common (may affect more than 1 in 10 people)
- fluid-filled bags in the ovaries (ovarian cysts)
- headache
- local reactions at the injection site, such as pain, itching, bruising, swelling, or irritation.
Common (may affect up to 1 in 10 people)
- diarrhea
- chest pain
- nausea or vomiting
- abdominal or pelvic pain
- cramps or abdominal distension
Very rare (may affect up to 1 in 10,000 people)
- asthma may worsen.
Reporting side effects
If you experience any side effects, talk to your doctor, pharmacist, or nurse, even if they are not listed in this leaflet. You can also report side effects directly through the national reporting system listed in Appendix V. By reporting side effects, you can help provide more information on the safety of this medicine.
5. Storing Pergoveris
Keep this medicine out of the sight and reach of children.
Do not use this medicine after the expiry date which is stated on the label and carton after EXP. The expiry date is the last day of the month shown.
Store in a refrigerator (between 2°C and 8°C). Do not freeze.
Keep the pre-filled pen in the original packaging to protect it from light.
Once opened, the pre-filled pen can be stored for a maximum of 28 days outside the refrigerator (at 25°C). Do not use any remaining medicine in the pre-filled pen after 28 days.
Do not use Pergoveris if you notice visible signs of deterioration, if the liquid contains particles, or if it is not clear.
After injection, dispose of the used needle safely.
Medicines should not be disposed of via wastewater or household waste. Ask your pharmacist how to dispose of medicines no longer required. This will help protect the environment.
6. Container Contents and Additional Information
Pergoveris Composition
The active ingredients are folitropin alfa and lutropin alfa.
- Each Pergoveris pre-filled pen (450 IU + 225 IU)/0.72 ml contains 450 IU (international units) of folitropin alfa and 225 IU of lutropin alfa in 0.72 ml and can deliver three doses of Pergoveris 150 IU/75 IU,
The other components are:
- Sucrose, arginine monohydrochloride, poloxamer 188, methionine, phenol, disodium hydrogen phosphate dihydrate, sodium dihydrogen phosphate monohydrate, and water for injections. Small amounts of concentrated phosphoric acid and sodium hydroxide are added to maintain normal acidity levels (pH levels).
Product Appearance and Container Contents
Pergoveris is presented as a clear, colorless to slightly yellowish injectable solution in a multi-dose pre-filled pen:
- Pergoveris (450 IU + 225 IU)/0.72 ml is presented in packs containing 1 multi-dose pre-filled pen and 7 disposable injection needles.
Marketing Authorization Holder
Merck Europe B.V., Gustav Mahlerplein 102, 1082 MA Amsterdam, Netherlands
Manufacturer
Merck Serono S.p.A, Via delle Magnolie 15 (Industrial Zone), 70026 Modugno (Bari), Italy
Date of Last Revision of this Leaflet:{MM/YYYY}.
Other Sources of Information
Detailed information on this medicinal product is available on the European Medicines Agency website: http://www.ema.europa.eu.
Instructions for Use
Pergoveris
(300UI + 150UI)/0.48ml (450UI + 225UI)/0.72ml (900UI + 450UI)/1.44ml
Injectable solution in pre-filled pen
Folitropin alfa/Lutropin alfa
Important Information about the Pergoveris Pre-filled Pen
- Read the instructions for use and the leaflet before using the Pergoveris pre-filled pen.
- Always follow all the instructions in these instructions for use and the training provided by your healthcare professional, as they may be different from those you received previously. This information will help you avoid errors in treatment or infections from needle sticks or glass breakage.
- The Pergoveris pre-filled pen is for subcutaneous injection only.
- Only use the Pergoveris pre-filled pen if your healthcare professional has shown you how to use it correctly.
- Your healthcare professional will tell you how many Pergoveris pre-filled pens you need to complete your treatment.
- Take the injection at the same time every day.
- The pen is available in three different multi-dose presentations:
(300 UI + 150 UI)/0.48 ml |
|
(450 UI + 225 UI)/0.72 ml |
|
(900 UI + 450 UI)/1.44 ml |
|
Note:
- The maximum dose that can be selected is 300 UI for the (300 UI + 150 UI)/0.48 ml presentation.
- The maximum dose that can be selected is 450 UI for the (450 UI + 225 UI)/0.72 ml and (900 UI + 450 UI)/1.44 ml presentations.
- The dose adjustment button rotates in increments of 12.5 UI until the desired dose is reached.
Consult the leaflet for more information on the recommended dosage regimen and always follow the dose recommended by your healthcare professional.
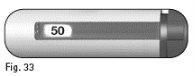
- The numbers in the dose information windowrepresent the number of international units (UI) and show the dose of folitropin alfa. Your healthcare professional will tell you how many UI of folitropin alfa you should inject each day.
- The numbers shown in the dose information windowhelp you:
|
|
injection (Figure 2). |
|
injection with a second pen (Figure 3). |
|
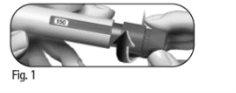
- Remove the needle from the pen immediately after each injection.
Do notreuse needles.
Do notshare the pen or needles with anyone else.
Do notuse the Pergoveris pre-filled pen if it has been dropped or if the pen is cracked or damaged, as this may cause injury.
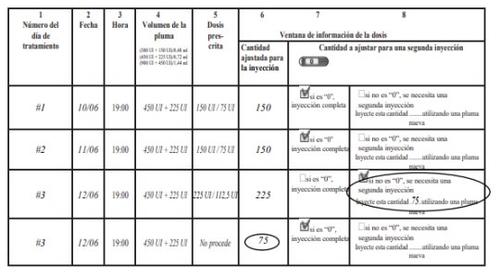
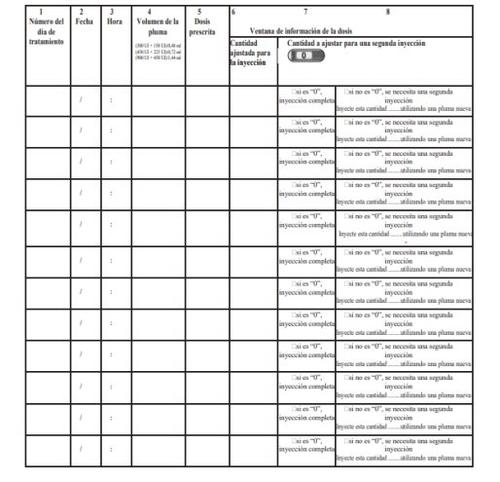
How to Use the Pergoveris Pre-filled Pen Treatment Diary
A treatment diary is included at the end of the instructions for use. Use the treatment diary to record the amount injected.
Injecting an incorrect amount of medication can affect treatment.
- Record the day of treatment (column 1), date (column 2), time of injection (column 3), and pen volume (column 4).
- Record the dose prescribed by your healthcare professional (column 5).
- Check that you have selected the correct dose before administering the injection (column 6).
- After the injection, read the number indicated in the dose information window.
- Confirm that you have received a complete injection (column 7) or record the number indicated in the dose information windowif it is different from "0" (column 8).
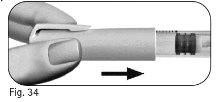
- When necessary, perform another injection with a second pen, selecting the remaining dose shown in the "Amount to adjust for a second injection" section (column 8).
- Record this remaining dose in the "Adjusted amount for injection" section in the next row (column 6).
Using the treatment diary to record the daily injection(s) allows you to check that you have received the complete prescribed dose every day.
Example of a treatment diary using a (450 UI + 225 UI)/0.72 ml pen:
Familiarize Yourself with the Pergoveris Pre-filled Pen

- For illustrative purposes only. The supplied needles may have a slightly different appearance.
** The numbers in the dose information windowand on the cartridge holder represent the number of International Units (UI) of the medication.
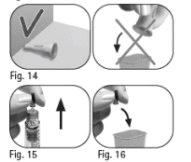
Step 1 Gather Materials
Do notuse a microwave or any other heating device to warm the pen. | |
|
|
Do notuse any utensils, as this may damage the pen. | |
| |
Do notuse the Pergoveris pre-filled pen if it has expired or if the pre-filled pen does not say Pergoveris. |
|

Step 2 Prepare for Injection
| |
Do notuse the pre-filled pen if the medication has changed color or is cloudy, as this may cause an infection.
|
|
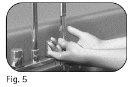
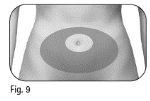
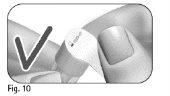
Choose an injection site: | |
Do nottouch or cover the skin that you have just cleaned. |
|
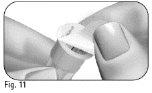
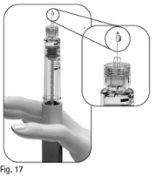
Step 3 Attach the Needle
Important:always use a new needle for each injection. Reusing needles can cause infection. |
|
| |
| |
| |
|
|
| |
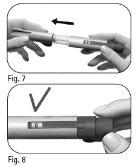
Do notuse the needle if it is damaged or expired or if the outer needle shield or closure tab is damaged or loose. Using expired or damaged needles or needles with damaged or loose outer shields or closure tabs can cause infection. Discard it in a container for sharp objects and take a new needle. | |
Do notovertighten the needle when attaching it, as it may be difficult to remove after injection. |
|
Do notdiscard the outer needle shield, as it will prevent needle stick injuries and infections when removing the needle from the pen. |
|
Do notreplace the inner needle protector, as this may cause needle stick injuries and infections. |
|
|

If | Then |
|
Using a new pen | Check that there is a drop of liquid on the needle tip.
proceed with Step 4 Select the dose.
needle tip or nearby, you must perform the steps indicated in the following sectionto remove air from the system. | |
Reusing a pen | It is notnecessary to check for a drop of liquid. Proceed directly to Step 4 Select the dose |
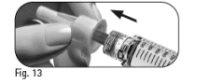
If you do not see any drop of liquid on the needle tip or nearby the first time you use a new pen:
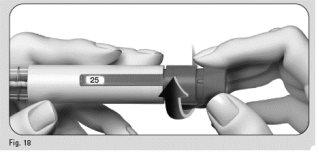
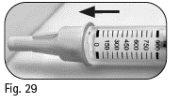
- Gently turn the dose adjustment button forward until "25" is shown in the dose information window(Figure 18).
- You can turn the dose adjustment button backward if you have turned it past "25".
- Hold the pen with the needle pointing upwards.
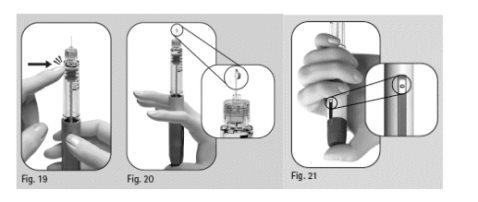
- Gently tap the cartridge holder (Figure 19).
- Press the dose adjustment button completely. A drop of liquid will appear on the needle tip (Figure 20).
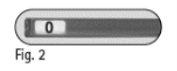
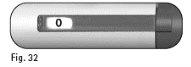
- Check that the dose information windowshows "0" (Figure 21).
- Proceed with Step 4 Select the dose.
If a drop of liquid does not appear, contact your healthcare professional.
Step 4 Select the Dose
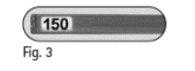
- Turn the dose adjustment button until the desired dose appears in the dose information window.
- Example: if the desired dose is "150" UI, confirm that the dose information window shows "150" (Figure 22). Injecting an incorrect amount of medication can affect treatment.
|
|
|
|
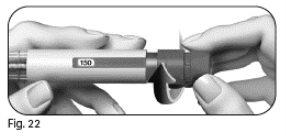
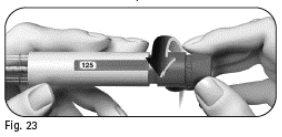
- Check that the dose information windowshows the complete prescribed dosebefore proceeding to the next step.
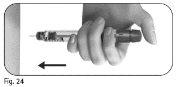
Step 5 Inject the Dose
Important:inject the dose as your healthcare professional has shown you. | |
|
|
|
|
Note:the larger the dose, the longer it will take to inject. | |
|
|
Do notrelease the dose adjustment button until you have removed the needle from the skin. |
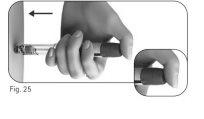

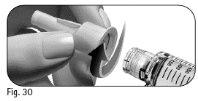
Step 6 Remove the Needle after Each Injection
|
| |
|
|
unscrew the needle by turning it in the opposite direction (Figure 30). |
|
|
|
Donot reuse or share any used needle. |
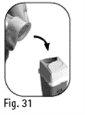
Step7 After the injection
If the dose information window shows “0”, you have completed the dose. If the dose information window shows a number greater than “0”,the Pergoveris prefilled pen is empty. You have not received the complete prescribed dose and must perform step 7.2 described below. |
|
|
|
Step8 Storage of the Pergoveris prefilled pen
|
|
| |
| |
Donot store the pen with the needle still attached, as this may cause an infection. | |
Donot reuse the Pergoveris prefilled pen if it has been dropped, or if the pen is cracked or damaged, as this may cause injuries. | |
Contact the healthcare professional if you have any questions. |
Pergoveris prefilled pen treatment diary
Date of the last review of these instructions for use:
- Country of registration
- Active substance
- Prescription requiredYes
- Manufacturer
- This information is for reference only and does not constitute medical advice. Always consult a doctor before taking any medication. Oladoctor is not responsible for medical decisions based on this content.
- Alternatives to PERGOVERIS (450 IU + 225 IU)/0.72 mL PRE-FILLED PEN SOLUTION FOR INJECTIONDosage form: INJECTABLE, 300 IU/150 IUActive substance: combinationsManufacturer: Merck Europe B.V.Prescription requiredDosage form: INJECTABLE, 900 IU/450 IUActive substance: combinationsManufacturer: Merck Europe B.V.Prescription requiredDosage form: INJECTABLEActive substance: combinationsManufacturer: Merck Europe B.V.Prescription required
Online doctors for PERGOVERIS (450 IU + 225 IU)/0.72 mL PRE-FILLED PEN SOLUTION FOR INJECTION
Discuss questions about PERGOVERIS (450 IU + 225 IU)/0.72 mL PRE-FILLED PEN SOLUTION FOR INJECTION, including use, safety considerations and prescription review, subject to medical assessment and local regulations.

Frequently Asked Questions
