

RISPERDAL CONSTA 25 mg POWDER AND SOLVENT FOR PROLONGED-RELEASE SUSPENSION FOR INTRAMUSCULAR INJECTION


How to use RISPERDAL CONSTA 25 mg POWDER AND SOLVENT FOR PROLONGED-RELEASE SUSPENSION FOR INTRAMUSCULAR INJECTION
Translated with AI
This page provides general information and does not replace a doctor’s consultation. Always consult a doctor before taking any medication. Seek urgent medical care if symptoms are severe.
Show originalContents of the leaflet
Introduction
Package Leaflet: Information for the User
Risperdal Consta 25 mg powder and solvent for prolonged-release suspension for injection
Risperidone
Read all of this leaflet carefully before you start using this medicine, because it contains important information for you., as it contains important information for you.
- Keep this leaflet, as you may need to read it again.
- If you have any further questions, ask your doctor or pharmacist.
- This medicine has been prescribed for you only. Do not pass it on to others. It may harm them, even if their symptoms are the same as yours.
- If you experience any side effects, talk to your doctor or pharmacist. This includes any possible side effects not listed in this leaflet. See section 4.
Contents of the pack
- What Risperdal Consta is and what it is used for
- What you need to know before you use Risperdal Consta
- How to use Risperdal Consta
- Possible side effects
- Storing Risperdal Consta
- Contents of the pack and other information
1. What Risperdal Consta is and what it is used for
Risperdal Consta belongs to a group of medicines called “antipsychotics”.
Risperdal Consta is used in the maintenance treatment of schizophrenia, which is characterized by seeing, hearing, or feeling things that are not present, believing in something that is not true, or unusually feeling suspicious or confused.
Risperdal Consta is intended for patients who are currently being treated with oral antipsychotics (e.g., tablets, capsules).
Risperdal Consta may help reduce the symptoms of your illness and prevent them from coming back.

2. What you need to know before you use Risperdal Consta
Do not use Risperdal Consta
- If you are allergic to risperidone or any of the other ingredients of this medicine (listed in section 6).
Warnings and precautions
- If you have never taken Risperdal in any of its forms, you should start with oral Risperdal before starting Risperdal Consta.
Talk to your doctor or pharmacist before using Risperdal Consta if:
- You have a heart problem. For example, an irregular heartbeat, or if you are prone to having low blood pressure or if you are using medicines for blood pressure. Risperdal Consta may lower your blood pressure. Your dose may need to be adjusted.
- You know you have any factors that make you prone to having a stroke, such as high blood pressure, cardiovascular disorders, or cerebral circulation disorders.
- You have ever had involuntary movements of the tongue, mouth, and face.
- You have ever had symptoms that include fever, muscle stiffness, sweating, or a decrease in the level of consciousness (also known as Neuroleptic Malignant Syndrome).
- You have Parkinson's disease or dementia.
- If you have had low white blood cell counts in the past (which may or may not have been caused by other medications).
- You are diabetic.
- You have epilepsy.
- You are male and have ever had a prolonged or painful erection.
- You have difficulty controlling your body temperature or feel excessive heat.
- You have kidney problems.
- You have liver problems.
- You have a high level of a hormone called prolactin in your blood or if you have a tumor that may be dependent on prolactin.
- You or a family member have blood clotting problems, as medications like this have been associated with the formation of blood clots.
If you are unsure about any of the above, talk to your doctor or pharmacist before using Risperdal or Risperdal Consta.
Because it has been rarely observed in patients treated with Risperdal Consta that there is a dangerously low number of a type of white blood cells necessary to fight infections in the blood, your doctor may check your white blood cell count.
Rarely, allergic reactions have occurred after receiving Risperdal Consta injections, even if you have previously tolerated oral risperidone. Seek medical attention immediately if you experience hives, throat swelling, itching, or breathing problems, as these may be symptoms of a severe allergic reaction.
Risperdal Consta may cause you to gain weight. A significant weight gain can affect your health unfavorably. Your doctor will regularly monitor your weight.
Because diabetes mellitus or a worsening of pre-existing diabetes mellitus has been seen in patients taking Risperdal, your doctor should check for signs of elevated blood sugar. In patients with pre-existing diabetes mellitus, blood sugar should be monitored regularly.
Risperdal Consta often increases the levels of a hormone called “prolactin”. This can cause side effects such as menstrual disorders or fertility problems in women or breast swelling in men (see Possible side effects). If these side effects occur, it is recommended to evaluate prolactin levels in the blood.
During eye surgery for cataracts, the pupil (the black circle in the center of the eye) may not increase in size as needed. Additionally, the iris (the colored part of the eye) may become flaccid during surgery, which can cause eye damage. If you are considering eye surgery, make sure to inform your ophthalmologist that you are using this medication.
Elderly patients with dementia
Risperdal Consta is not used in elderly patients with dementia.
If you or your caregiver notice a sudden change in your mental state or the sudden appearance of weakness or numbness in the face, arms, or legs, especially on one side, or confused speech, even if only for a short time, seek medical attention immediately. It may be a sign of a stroke.
Patients with kidney or liver problems
Although oral risperidone has been studied, Risperdal Consta has not been studied in patients with kidney or liver problems. Risperdal Consta should be administered with caution in this group of patients.
Using Risperdal Consta with other medicines
Tell your doctor or pharmacist if you are using or have recently used or may need to use any other medicines.
It is especially important that you talk to your doctor or pharmacist if you are taking any of the following
- Medicines that act on the brain used to calm down (benzodiazepines) or some pain medications (opioids), allergy medications (some antihistamines), as risperidone may increase the sedative effect of all these.
- Medicines that can change the electrical activity of your heart, such as those used for malaria, heart rhythm problems, allergies (antihistamines), some antidepressants, or other medicines for mental problems.
- Medicines that can cause a decrease in heart rate.
- Medicines that can cause a decrease in potassium levels in the blood (such as certain diuretics).
- Medicines for Parkinson's disease (such as levodopa).
- Medicines that increase the activity of the central nervous system (psychostimulants, such as methylphenidate).
- Medicines for high blood pressure. Risperdal Consta may lower blood pressure.
- Diuretics used for heart problems or to treat swelling of some parts of the body due to fluid retention (such as furosemide or chlorthiazide). Risperdal Consta, taken alone or with furosemide, may increase the risk of stroke or death in elderly patients with dementia.
The following medicines may reduce the effect of risperidone
- Rifampicin (a medicine used to treat some infections).
- Carbamazepine, phenytoin (medicines used to treat epilepsy).
- Phenobarbital.
If you start or stop taking these medicines, you may need a different dose of risperidone.
The following medicines may increase the effect of risperidone
- Quinidine (a medicine used to treat certain types of heart problems).
- Antidepressants such as paroxetine, fluoxetine, tricyclic antidepressants.
- Medicines known as beta-blockers (used to treat high blood pressure).
- Phenothiazines (such as medicines used to treat psychosis or to calm down).
- Cimetidine, ranitidine (medicines used to treat stomach acid).
- Itraconazole and ketoconazole (medicines used to treat fungal infections).
- Some medicines used to treat HIV/AIDS, such as ritonavir.
- Verapamil, a medicine used to treat high blood pressure and/or abnormal heart rhythm.
- Sertraline and fluvoxamine, medicines used to treat depression and other psychiatric disorders.
If you start or stop taking these medicines, you may need a different dose of risperidone.
If you are unsure about any of the above, talk to your doctor or pharmacist before using Risperdal Consta.
Using Risperdal Consta with food, drinks, and alcohol
You should avoid consuming alcohol while using Risperdal Consta.
Pregnancy, breastfeeding, and fertility
- If you are pregnant or breastfeeding, think you may be pregnant, or plan to become pregnant, consult your doctor or pharmacist before using this medicine. Your doctor will decide if you can use it.
- The following symptoms may occur in newborn babies of mothers who have been treated with Risperdal Consta in the last trimester of pregnancy (last three months of pregnancy): shaking, stiffness and/or muscle weakness, drowsiness, agitation, breathing problems, and difficulty feeding. If your baby develops any of these symptoms, you should contact your doctor.
- Risperdal Consta may increase the levels of a hormone called “prolactin” that could affect your fertility (see Possible side effects).
Driving and using machines
Dizziness, fatigue, and vision problems have been observed during treatment with Risperdal Consta. Do not drive or use tools or machinery without consulting your doctor first.
Risperdal Constacontains sodium
This medicine contains less than 23 mg of sodium (1 mmol) per dose; it is essentially “sodium-free”.
3. How to use Risperdal Consta
Follow exactly the administration instructions of this medicine given by your doctor. If you are unsure, consult your doctor or pharmacist again.
Risperdal Consta is administered by intramuscular injection in the arm or buttock every two weeks, by a healthcare professional. Injections should be alternated between the left and right sides and should not be administered intravenously.
The recommended dose is as follows:
Adults
Initial dose
If your daily dose of oral risperidone (e.g., tablets) was 4 milligrams or less during the two weeks prior, your initial dose should be 25 milligrams of Risperdal Consta.
If your daily dose of oral risperidone (e.g., tablets) was more than 4 milligrams during the two weeks prior, you may be given a dose of 37.5 milligrams of Risperdal Consta as the initial dose.
If you are currently being treated with another oral antipsychotic that is not risperidone, your initial dose of Risperdal Consta will depend on your current treatment. Your doctor will choose Risperdal Consta 25 mg or 37.5 mg.
Your doctor will decide if this dose of Risperdal Consta is suitable for you.
Maintenance dose
- The usual dose is an injection of 25 milligrams every two weeks.
- A higher dose of 37.5 or 50 mg may be necessary. Your doctor will decide which dose of Risperdal Consta is most suitable for you.
- Your doctor may prescribe oral Risperdal for the first three weeks after the first injection.
If you use more Risperdal Consta than you should
- People who have used more Risperdal Consta than they should have experienced the following symptoms: drowsiness, fatigue, abnormal body movements, problems standing and walking, feeling dizzy due to low blood pressure, and abnormal heartbeats. There have been reports of anomalies in the electrical conduction of the heart and seizures.
- Consult your doctor, pharmacist, or call the Toxicology Information Service, phone 91.562.04.20, indicating the medicine and the amount taken.
It is recommended to take the package and the package leaflet of the medicine to the healthcare professional.
If you stop using Risperdal Consta
You will lose the effects of this medicine. Do not stop using this medicine unless your doctor tells you to, as you may experience the symptoms again. Make sure to receive your injections every two weeks. If you cannot attend your appointments, contact your doctor immediately to schedule another appointment when you can. If you have any further questions about the use of this medicine, ask your doctor or pharmacist.
Use in children and adolescents
Children and adolescents under 18 years of age should not receive Risperdal Consta.

4. Possible Adverse Effects
Like all medicines, this medicine can cause adverse effects, although not all people suffer from them.
Report immediately to your doctor ifyou experience any of the following rare adverse effects (may affect up to 1 in 100 patients):
- You have dementia and experience a sudden change in your mental state or sudden weakness or numbness of the face, arms, or legs, especially on one side, or have difficulty speaking even for a short period. These may be signs of a stroke.
- You experience tardive dyskinesia (spasms or involuntary spasmodic movements that cannot be controlled in the face, tongue, or other parts of the body). Report to your doctor immediately if you experience involuntary rhythmic movements of the tongue, mouth, and face. It may be necessary to withdraw Risperdal Consta.
Report immediately to your doctor if you experience any of the following rare adverse effects (may affect up to 1 in 1,000 patients):
- You experience blood clots in the veins, especially in the legs (symptoms include swelling, pain, and redness of the leg), which can circulate through the blood vessels to the lungs, causing chest pain and difficulty breathing. If you notice any of these symptoms, seek medical advice immediately.
- You experience fever, muscle stiffness, sweating, or a decrease in the level of consciousness (a condition known as "Neuroleptic Malignant Syndrome"). You may need immediate medical treatment.
- You are a man and experience a prolonged or painful erection. This is known as priapism. You may need immediate medical treatment.
- You experience a severe allergic reaction characterized by fever, swelling of the mouth, face, lips, or tongue, difficulty breathing, itching, skin rash, or a drop in blood pressure. Even if you have previously tolerated oral risperidone, allergic reactions can rarely occur after receiving Risperdal Consta injections.
The following adverse effects may also occur:
Very common adverse effects (may affect more than 1 in 10 people)
- Common cold symptoms.
- Difficulty staying or falling asleep.
- Depression, anxiety.
- Parkinsonism: This disease may include slow or altered movement, feeling of stiffness or tension in the muscles (making jerky movements), and sometimes a feeling of "freezing" of movement that then restarts. Other signs of parkinsonism include walking slowly, dragging feet, tremors at rest, increased saliva and/or drooling, and loss of facial expressiveness.
- Headache.
Common adverse effects (may affect up to 1 in 10 people)
- Pneumonia, chest infection (bronchitis), sinusitis.
- Urinary tract infection, feeling like you have the flu, anemia.
- Increased levels of a hormone called "prolactin" that is detected in blood tests (which may or may not cause symptoms). Symptoms of increased prolactin appear rarely and in men may include breast swelling, difficulty having or maintaining erections, decreased sexual desire, or other sexual dysfunctions. In women, they may include breast discomfort, milk secretion from the breasts, loss of menstrual periods, or other problems with the cycle or fertility issues.
- Increased blood sugar, weight gain, increased appetite, weight loss, decreased appetite.
- Sleep disorder, irritability, decreased sexual desire, restlessness, feeling drowsy or less attentive.
- Dystonia: This is a disease that involves slow or continuous involuntary contraction of the muscles. Although any part of the body can be affected (and can cause abnormal postures), dystonia often affects the muscles of the face, including abnormal movements of the eyes, mouth, tongue, or jaw.
- Dizziness.
- Discinesia: This disease involves involuntary muscle movements and may include repetitive, spasmodic, or twisting movements, or spasms.
- Tremors (shakiness).
- Blurred vision.
- Fast heartbeat.
- Decreased blood pressure, chest pain, increased blood pressure.
- Shortness of breath, sore throat, cough, nasal congestion.
- Abdominal pain, abdominal discomfort, vomiting, nausea, stomach or intestinal infection, constipation, diarrhea, indigestion, dry mouth, toothache.
- Skin rash.
- Muscle spasms, bone or muscle pain, back pain, joint pain.
- Urinary incontinence.
- Erectile dysfunction.
- Loss of menstrual periods.
- Milk secretion from the breasts.
- Swelling of the body, arms, or legs, fever, weakness, fatigue.
- Pain.
- A reaction at the injection site, including itching, pain, or swelling.
- Increased liver transaminases in the blood, increased GGT (a liver enzyme called gamma-glutamyltransferase) in the blood.
- Falls.
Uncommon adverse effects (may affect up to 1 in 100 people)
- Respiratory tract infection, bladder infection, ear infection, eye infection, tonsillitis, fungal infection of the nails, skin infection, localized infection in a single area of the skin or body, viral infection, skin inflammation caused by mites, abscess under the skin.
- Decreased number of white blood cells, decreased platelets (blood cells that help stop bleeding), decreased red blood cells.
- Allergic reaction.
- Sugar in the urine, diabetes, or worsening of diabetes.
- Lack of appetite that causes malnutrition and weight loss.
- Increased triglycerides in the blood (fat), increased cholesterol in the blood.
- Euphoria (mania), confusion, inability to reach orgasm, nervousness, nightmares.
- Loss of consciousness, seizures (epileptic fits), fainting.
- A restlessness that causes movement of body parts, balance disorder, abnormal coordination, dizziness when standing up, attention problems, speech problems, loss or alteration of taste, decreased skin sensitivity to pain or touch, sensation of tingling, pinching, or numbness of the skin.
- Eye infection or "red eye", dry eyes, increased tearing, redness of the eyes.
- Feeling that everything is spinning (vertigo), ringing in the ears, ear pain.
- Atrial fibrillation (abnormal heart rhythm), interruption of conduction between the upper and lower parts of the heart, anomaly in the electrical activity of the heart, prolonged QT interval in the heart, slow heartbeat, anomaly in the electrical conduction of the heart (electrocardiogram or ECG), sensation of fluttering or pounding in the chest (palpitations).
- Decreased blood pressure when standing up (as a result, some people taking Risperdal Consta may feel weakness, dizziness, or loss of consciousness when getting up or sitting down suddenly).
- Rapid, shallow breathing, congestion of the airways, wheezing, nasal bleeding.
- Fecal incontinence, difficulty swallowing, excess gas or flatulence.
- Itching, hair loss, eczema, dry skin, redness of the skin, skin discoloration, acne, scaly or itchy skin or scalp.
- Increased CPK (creatine phosphokinase) in the blood, an enzyme that is sometimes released with muscle breakdown.
- Stiffness of the joints, swelling of the joints, muscle weakness, neck pain.
- Frequent urination, inability to urinate, pain when urinating.
- Ejaculation disorder, delayed menstruation, loss of menstrual periods, or other problems with the cycle (in women), development of breasts in men, sexual dysfunction, breast pain, breast discomfort, vaginal discharge.
- Swelling of the face, mouth, eyes, or lips.
- Chills, increased body temperature.
- Change in gait.
- Feeling of thirst, feeling of discomfort, chest discomfort, feeling "unwell".
- Hardening of the skin.
- Increased liver enzymes in the blood.
- Pain due to the procedure.
Rare adverse effects (may affect up to 1 in 1,000 people)
- Decreased number of a type of white blood cell that helps fight infections.
- Inadequate secretion of a hormone that controls urine volume.
- Low blood sugar.
- Excessive water intake.
- Sleepwalking.
- Sleep-related eating disorder.
- Lack of movement or response while awake (catatonia).
- Lack of emotions.
- Decreased level of consciousness.
- Head agitation.
- Eye movement problems, eye rotation, hypersensitivity of the eyes to light.
- Eye problems during cataract surgery. During cataract surgery, a condition called intraoperative floppy iris syndrome (IFIS) may occur if you are taking or have taken Risperdal Consta. If you need to undergo cataract surgery, be sure to inform your ophthalmologist if you are taking or have taken this medication.
- Irregular heartbeat.
- Dangerously low number of a type of white blood cell necessary to fight infections in the blood, increased eosinophils (a type of white blood cell) in the blood.
- Breathing difficulties during sleep (sleep apnea).
- Pneumonia caused by aspiration of food, lung congestion, crackling sounds in the lungs, voice disorder, respiratory tract disorder.
- Pancreatitis, intestinal obstruction.
- Very hard stools.
- Drug-related skin rash.
- Hives (or "urticaria"), skin thickening, dandruff, skin disorder, skin injury.
- Muscle fiber breakdown and muscle pain (rhabdomyolysis).
- Abnormal posture.
- Increased breast size, milk secretion from the breasts.
- Decreased body temperature, discomfort.
- Yellowing of the skin and eyes (jaundice).
- Excessive water intake.
- Increased insulin (a hormone that controls blood sugar levels) in the blood.
- Problems with blood vessels in the brain.
- No response to stimuli.
- Coma due to uncontrolled diabetes.
- Sudden loss of vision or blindness.
- Glaucoma (increased eye pressure), crusts on the eyelid margin.
- Flushing, tongue swelling.
- Cracked lips.
- Increased breast tissue.
- Decreased body temperature, coldness in the arms and legs.
- Drug withdrawal symptoms.
Very rare adverse effects (may affect up to 1 in 10,000 people)
- Complications of uncontrolled diabetes, life-threatening.
- Severe allergic reaction with swelling, which can affect the throat, causing difficulty breathing.
- Lack of movement of the intestinal muscles, causing obstruction.
Frequency not known: cannot be estimated from the available data
- Severe or fatal rash with blisters and peeling of the skin that can start around the mouth, nose, eyes, genitals, and spread to other areas of the body (Stevens-Johnson syndrome or toxic epidermal necrolysis).
The following adverse effect has appeared with the use of another medication called paliperidone, which is very similar to risperidone, so it is also expected to occur with Risperdal Consta: Fast heartbeat when standing up.
Reporting of adverse effects
If you experience any type of adverse effect, consult your doctor or pharmacist, even if it is a possible adverse effect that is not listed in this leaflet. You can also report them directly through the Spanish Pharmacovigilance System for Human Use Medicines: https://www.notificaram.es. By reporting adverse effects, you can contribute to providing more information on the safety of this medicine.
5. Storage of Risperdal Consta
Keep this medicine out of the sight and reach of children.
Do not use this medicine after the expiration date stated on the packaging. The expiration date is the last day of the month indicated.
Store in a refrigerator (between 2°C and 8°C). If refrigeration is not available, the packaging can be stored below 25°C for a maximum of 7 days before administration. Administer within 6 hours after reconstitution (if stored at 25°C or less).
Store in the original packaging to protect it from light.
Medicines should not be disposed of via wastewater or household waste. Deposit the packaging and any unused medicines in the SIGRE collection point at the pharmacy. In case of doubt, ask your pharmacist how to dispose of the packaging and any unused medicines. This will help protect the environment.
6. Container Content and Additional Information
Risperdal Consta Composition
The active ingredient is risperidone.
Each Risperdal Consta powder and solvent for prolonged-release suspension for injection contains 25 milligrams of risperidone.
The other components are:
Powder
poly-(d,l-lactide-co-glycolide).
Solvent (solution):
Polysorbate 20, Sodium Carmellose, Disodium Hydrogen Phosphate Dihydrate, Anhydrous Citric Acid, Sodium Chloride, Sodium Hydroxide, Water for Injection.
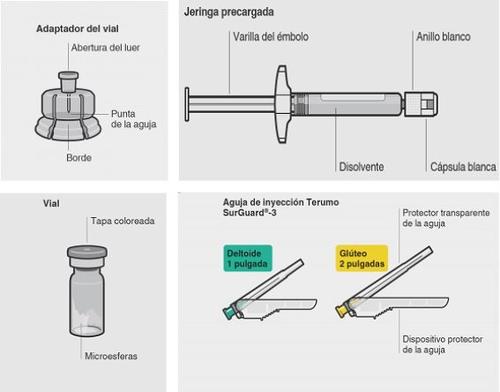
Appearance of Risperdal Consta and Container Content
- A small vial containing the powder (in this powder is the active ingredient, risperidone). A pre-filled syringe containing 2 ml of clear, colorless liquid that is added to the powder for prolonged-release suspension for injection.
- A vial adapter for reconstitution
- Two Terumo SurGuard® 3 needles for intramuscular injection (one 21G UTW 1-inch (0.8 mm × 25 mm) safety needle with a protective needle safety device for administration in the deltoid and one 20G TW 2-inch (0.9 mm × 51 mm) safety needle with a protective needle safety device for administration in the gluteus).
Risperdal Consta is available in packs containing 1 to 5 grouped containers.
Only some container sizes may be marketed.
Marketing Authorization Holder and Manufacturer
Marketing Authorization Holder
Janssen-Cilag, S.A.
Paseo del Club Deportivo 1, Edificio 16
28223 Pozuelo de Alarcón (Madrid)
Spain
Manufacturer
Janssen Pharmaceutica, N.V
Turnhoutseweg, 30
B-2340, Beerse
Belgium
This medicinal product has been authorized in the EEA Member States with the following names:
Austria: RISPERDAL CONSTA
Belgium: RISPERDAL CONSTA
Cyprus: RISPERDAL CONSTA
Czech Republic: RISPERDAL CONSTA
Denmark: RISPERDAL CONSTA
Estonia: RISPOLEPT CONSTA
Finland: RISPERDAL CONSTA
France: RISPERDAL CONSTA LP
Germany: RISPERDAL CONSTA 25mg, 37.5mg, 50mg
Greece: RISPERDAL CONSTA
Hungary: RISPERDAL CONSTA
Iceland: RISPERDAL CONSTA
Ireland: RISPERDAL CONSTA
Italy: RISPERDAL
Lithuania: RISPOLEPT CONSTA
Latvia: RISPOLEPT CONSTA
Liechtenstein: RISPERDAL CONSTA
Luxembourg: RISPERDAL CONSTA
Malta: RISPERDAL CONSTA
Netherlands: RISPERDAL CONSTA
Norway: RISPERDAL CONSTA
Poland: RISPOLEPT CONSTA
Portugal: RISPERDAL CONSTA
Romania: RISPOLEPT CONSTA
Slovakia: RISPERDAL CONSTA
Slovenia: RISPERDAL CONSTA
Spain: RISPERDAL CONSTA
Sweden: RISPERDAL CONSTA
United Kingdom: RISPERDAL CONSTA
This leaflet was last revised in:April 2021.
Detailed and up-to-date information on this medicinal product is available on the website of the Spanish Agency for Medicines and Health Products (AEMPS) http://www.aemps.gob.es
IMPORTANT INFORMATION FOR THE HEALTHCARE PROFESSIONAL
Important Information
RISPERDAL CONSTA requires detailed attention to each step of the "Instructions for Use" to help ensure successful administration.
Use of Provided Components
The container components are specifically designed for use with RISPERDAL CONSTA. RISPERDAL CONSTA should only be reconstituted with the solvent supplied in the container.
Do notsubstitute anyof the container components.
Do notstore the suspension after reconstitution.
Administer the dose as soon as possible after reconstitution to avoid sedimentation.
Appropriate Dose
All of the vial contents must be administered to ensure that the appropriate dose of RISPERDAL CONSTA is administered.

Do not reuse.Medical devices require materials with specific characteristics to function properly. These characteristics have been verified for single use. Any attempt to reprocess the device for subsequent reuse may negatively affect the integrity of the device or lead to deterioration of its function.
Container Components
Step 1 | Assemble Components | ||
Remove Dose Container | Attach Vial Adapter to Vial | ||
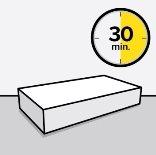
Wait 30 Minutes Remove the dose container from the refrigerator and let it reach room temperature for at least 30 minutesbefore reconstituting. Do not heatin any other way. |
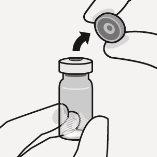
Remove Vial Cap Remove the colored cap from the vial. Clean the top of the gray stopper with an alcohol swab. Let it air dry. Do notremove the gray rubber stopper. |
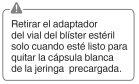
Prepare Vial Adapter Hold the sterile blister as shown. Remove the paper support. Do notremove the vial adapter from the blister. Do nottouch the tip of the spike at any time. This can lead to contamination. |
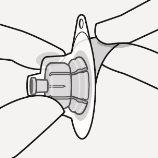
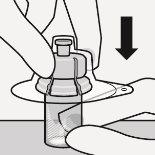
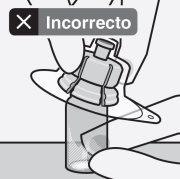
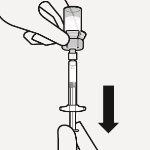
Attach Vial Adapter to Vial Place the vial on a hard surface and hold it by the base. Center the vial adapter over the gray rubber stopper. Press the vial adapter straight down until it clicks securely into place. Do notplace the vial adapter at an angle, as this may cause loss of solvent during transfer to the vial
|
Attach Pre-filled Syringe to Vial Adapter
Remove Sterile Blister
Keep the vial upright to prevent spills. Hold the base of the vial and pull the sterile blister to remove it. Do notshake. Do nottouch the exposed luer (cone) on the vial adapter. This can lead to contamination. |
Hold by the white ring at the tip of the syringe. Do nothold the syringe by the glass during assembly.
|
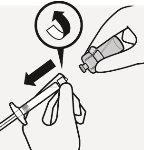
Remove Cap Holding the white ring, break the white cap. Do nottwist or cut the white cap. Do nottouch the tip of the syringe. This can lead to contamination.
|
Attach Syringe to Vial Adapter Hold the vial adapter by the edge to keep it stable. Hold the syringe by the white ringand then insert the tip into the luer (cone) opening of the vial adapter. Do nothold the syringe by the glass cylinder. This can cause the white ring to loosen or detach. Connect the syringe to the vial adapter with a firm clockwise rotationuntil it is secure. Do notpress too hard. Pressing too hard can cause the syringe tip to break. |
Step 2 | Reconstitute Microspheres | ||
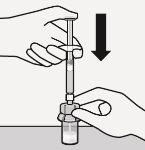
Inject Solvent Inject all of the solvent from the syringe into the vial.
|
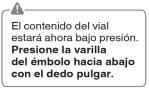
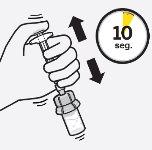
Suspend Microspheres in Solvent Continue pressing down on the plunger with your thumb, vigorously shakefor at least 10 seconds. Check the suspension. When properly mixed, the suspension will have a uniform, dense, and milky appearance. The microspheres will be visible in the liquid. Immediately proceed with the next step to avoid sedimentation of the suspension. |
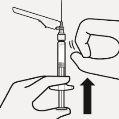
Transfer Suspension to Syringe Invert the vial completely. Slowly pull the plunger rod down to transfer all of the vial contents to the syringe. |
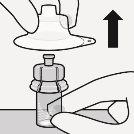
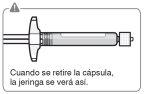
Remove Vial Adapter Hold the syringe by the white ring and unscrew it from the vial adapter. Cut the vial label at the perforated area. Place the removed label on the syringe to identify it. Properly dispose of both the vial and the vial adapter (see section 5 of this leaflet). |
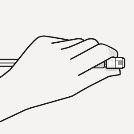 Use Correct Grip
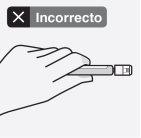
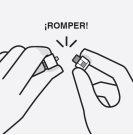
 The broken cap can be discarded.
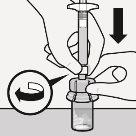
Step 3 | Attach Needle | |||
Select Appropriate Needle Select the needle according to the injection site (gluteus or deltoid). |
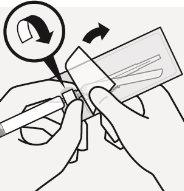
Attach Needle Open the blister bag at the partially detached area and use it to grasp the base of the needle, as shown. Holding the white ring of the syringe, attach the syringe to the luer (cone) of the needle with a firm clockwise rotationuntil it is secure. Do nottouch the luer (cone) opening of the needle. This can lead to contamination. |
Resuspend Microspheres Completely remove the blister bag. Just before injection, vigorously shake the syringe again, in case any sedimentation has occurred. | ||
Step 4 | Inject Dose | |||
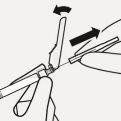
Remove Transparent Needle Protector Move the needle safety device towards the syringe, as shown. Then, holding the white ring of the syringe, carefully remove the transparent needle protector. Do nottwist the transparent needle protector, as the luer (cone) connection may be lost |
Eliminate Air Bubbles Hold the syringe upright and gently tap to make air bubbles rise to the top. Slowly and carefully, press the plunger rod to eliminate the air. |
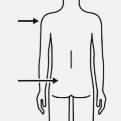
Inject Immediately inject all of the syringe contents intramuscularly (IM) into the gluteus or the deltoid muscle of the patient. The gluteal injection should be given in the upper outer quadrant of the gluteus. Do not administer intravenously. |
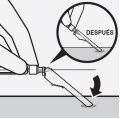
Protect Needle in Safety Device Using one hand, place the needle safety device at a 45-degree angle on a flat, hard surface. Press down firmly and quickly until the needle is completely inside the safety device. To avoid a needlestick: Do notuse two hands. Do notdeliberately disconnect or mishandle the needle safety device. Do notattempt to straighten the needle or attach the safety device if the needle is bent or damaged. |
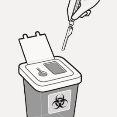
Properly Dispose of Needles Check that the needle safety device is completely attached. Dispose of it in a container for used needles. Also, dispose of the unused needle provided in the dose container (see section 5 of this leaflet). |


- Country of registration
- Average pharmacy price69.14 EUR
- Active substance
- Prescription requiredYes
- Manufacturer
- This information is for reference only and does not constitute medical advice. Always consult a doctor before taking any medication. Oladoctor is not responsible for medical decisions based on this content.
- Alternatives to RISPERDAL CONSTA 25 mg POWDER AND SOLVENT FOR PROLONGED-RELEASE SUSPENSION FOR INTRAMUSCULAR INJECTIONDosage form: TABLET, 1 mgActive substance: risperidoneManufacturer: Neuraxpharm Spain S.L.Prescription requiredDosage form: TABLET, 3 mgActive substance: risperidoneManufacturer: Neuraxpharm Spain S.L.Prescription requiredDosage form: TABLET, 6 mgActive substance: risperidoneManufacturer: Neuraxpharm Spain S.L.Prescription required
Online doctors for RISPERDAL CONSTA 25 mg POWDER AND SOLVENT FOR PROLONGED-RELEASE SUSPENSION FOR INTRAMUSCULAR INJECTION
Discuss questions about RISPERDAL CONSTA 25 mg POWDER AND SOLVENT FOR PROLONGED-RELEASE SUSPENSION FOR INTRAMUSCULAR INJECTION, including use, safety considerations and prescription review, subject to medical assessment and local regulations.


Frequently Asked Questions
