Background pattern
HEMLIBRA 30 mg/mL Injectable Solution
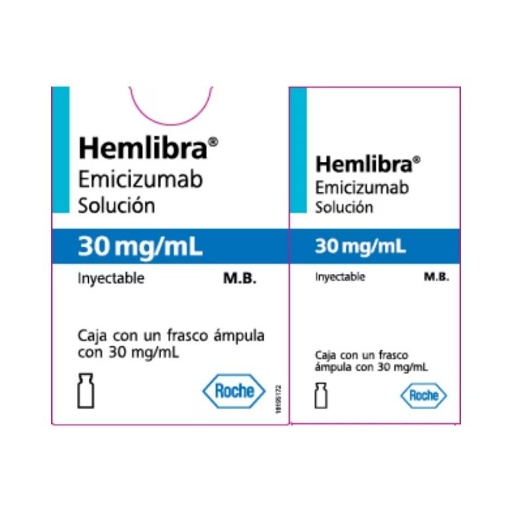
HEMLIBRA 30 mg/mL Injectable Solution

Ask a doctor about a prescription for HEMLIBRA 30 mg/mL Injectable Solution

5.0(12)
Doctor

Anna Biriukova

General medicine5 years of experience

Dr Anna Biriukova is an internal medicine doctor with clinical experience in cardiology, endocrinology, and gastroenterology. She provides online consultations for adults, offering expert medical support for heart health, hormonal balance, digestive issues, and general internal medicine.

Cardiology – Diagnosis and treatment of:

  • High blood pressure, blood pressure fluctuations, and cardiovascular risk prevention.
  • Chest pain, shortness of breath, arrhythmias (tachycardia, bradycardia, palpitations).
  • Leg swelling, chronic fatigue, reduced exercise tolerance.
  • EKG interpretation, lipid profile evaluation, cardiovascular risk assessment (heart attack, stroke).
  • Post-COVID-19 cardiac monitoring and care.
Endocrinology – Diabetes, thyroid, metabolism:
  • Diagnosis and management of type 1 and type 2 diabetes, and prediabetes.
  • Individual treatment plans including oral medications and insulin therapy.
  • GLP-1 therapy– modern pharmacological treatment for weight management and diabetes control, including drug selection, monitoring, and safety follow-up.
  • Thyroid disorders – hypothyroidism, hyperthyroidism, autoimmune thyroid diseases (Hashimoto’s, Graves’ disease).
  • Metabolic syndrome – obesity, lipid disorders, insulin resistance.
Gastroenterology – Digestive health:
  • Abdominal pain, nausea, heartburn, gastroesophageal reflux (GERD).
  • Stomach and intestinal conditions: gastritis, irritable bowel syndrome (IBS), indigestion.
  • Management of chronic digestive disorders and interpretation of tests (endoscopy, ultrasound, labs).
General internal medicine and preventive care:
  • Respiratory infections – cough, colds, bronchitis.
  • Lab test analysis, therapy adjustments, medication management.
  • Adult vaccinations – planning, contraindications assessment.
  • Cancer prevention – screening strategies and risk assessment.
  • Holistic approach – symptom relief, complication prevention, and quality of life improvement.
Dr Biriukova combines internal medicine with specialist insight, offering clear explanations, personalised treatment plans, and comprehensive care tailored to each patient.
CameraBook a video appointment
€60
October 2613:00
October 2613:50
October 2614:40
October 2806:00
October 2806:50
More times
0.0(1)
Doctor

Svetlana Kolomeeva

Cardiology17 years of experience

Dr. Svetlana Kolomeeva is a general practitioner and internal medicine doctor providing online consultations for adults. She helps patients manage acute symptoms, chronic conditions, and preventive care. Her clinical focus includes cardiovascular health, hypertension control, and managing symptoms like fatigue, weakness, sleep issues, and overall low energy.

Patients commonly seek her help for:

  • High blood pressure, headaches, dizziness, swelling, palpitations.
  • Diagnosis and management of hypertension, arrhythmias, and tachycardia.
  • Metabolic syndrome, excess weight, high cholesterol.
  • Chronic fatigue, insomnia, poor concentration, anxiety.
  • Respiratory symptoms: colds, flu, sore throat, cough, fever.
  • Digestive issues: heartburn, bloating, constipation, IBS symptoms.
  • Chronic conditions: diabetes, thyroid disorders.
  • Interpretation of lab tests and medical reports, therapy adjustment.
  • Second opinion and decision-making support.
  • Cardiovascular disease prevention and metabolic risk reduction.
  • Long-term follow-up and dynamic health monitoring.

Dr Kolomeeva combines clinical expertise with personalised care. She clearly explains diagnoses, guides patients through symptoms and treatment options, and provides actionable plans. Her consultations are designed not only to address current complaints but also to stabilise chronic conditions and prevent future complications. She supports patients through every stage of care – from first symptoms to ongoing health management.

CameraBook a video appointment
€50
October 2709:00
October 2710:05
October 2711:10
October 2712:15
October 2713:20
More times
This page is for general information. Consult a doctor for personal advice. Call emergency services if symptoms are severe.
About the medicine

How to use HEMLIBRA 30 mg/mL Injectable Solution

Introduction

Package Leaflet: Information for the User

Hemlibra 30mg/ml solution for injection

emicizumab

Read all of this leaflet carefully before you start using this medicine because it contains important information for you.

  • Keep this leaflet, you may need to read it again.
  • If you have any further questions, ask your doctor, pharmacist, or nurse.
  • This medicine has been prescribed for you only. Do not pass it on to others. It may harm them, even if their signs of illness are the same as yours.
  • If you get any side effects, talk to your doctor, pharmacist, or nurse. This includes any possible side effects not listed in this leaflet. See section 4.

In addition to this leaflet, your doctor will give you a patient information card that contains important safety information you need to know. Keep this card with you.

Contents of the package leaflet

  1. What is Hemlibra and what is it used for
  2. What you need to know before you use Hemlibra
  3. How to use Hemlibra
  4. Possible side effects
  5. Storage of Hemlibra
  6. Contents of the pack and other information
  7. Instructions for use

1. What is Hemlibra and what is it used for

What is Hemlibra

Hemlibra contains the active substance “emicizumab”. This belongs to a group of medicines called “monoclonal antibodies”. Monoclonal antibodies are a type of protein that recognizes and binds to a target in the body.

What Hemlibra is used for

Hemlibra is a medicine that can be used to treat patients of all ages with hemophilia A (congenital factor VIII deficiency):

  • who have developed factor VIII inhibitors
  • who have not developed factor VIII inhibitors with:
  • severe disease (factor VIII level in blood is less than 1%)
  • moderate disease (factor VIII level in blood is 1% to 5%) with a severe bleeding phenotype.

Hemophilia A is a hereditary condition caused by the lack of factor VIII, a substance essential for blood to form clots and to stop any bleeding.

The medicine prevents bleeding or reduces bleeding episodes in people with this condition.

Some patients with hemophilia A may develop factor VIII inhibitors (antibodies against factor VIII) that prevent replacement factor VIII from working.

How Hemlibra works

Hemlibra restores the function of activated factor VIII that is missing and necessary for effective blood coagulation. Its structure is different from factor VIII, so Hemlibra is not affected by factor VIII inhibitors.

2. What you need to know before you use Hemlibra

Do not use Hemlibra

  • if you are allergic to emicizumab or any of the other ingredients of this medicine (listed in section 6). If you are not sure, talk to your doctor, pharmacist, or nurse before using Hemlibra.

Warnings and precautions

Before you start using Hemlibra, it is very important that you talk to your doctor about the use of “bypassing agents”(medicines that help blood to clot, but work in a different way to factor VIII). This is because you may need to change your treatment with bypassing agents while receiving Hemlibra. Examples of bypassing agents are activated prothrombin complex concentrate (aPCC) and recombinant factor VIIa (rFVIIa). Serious and potentially life-threatening side effects can occur when aPCC is used in patients who are also receiving Hemlibra:

Potentially serious side effects of using aPCC while receiving Hemlibra.

  • Destruction of red blood cells (thrombotic microangiopathy)
  • This is a serious and potentially life-threatening condition.
  • When a person has this condition, the lining of the blood vessels can be damaged and blood clots can form in the small blood vessels. In some cases, this can cause damage to the kidneys or other organs.
  • You should be cautious if you are at high risk of having this condition (you have had this condition in the past, or a family member has had it), or if you are taking medicines that may increase the risk of developing this condition, such as cyclosporin, quinine, and tacrolimus.
  • It is important to know the symptoms of thrombotic microangiopathy in case you develop the condition (see section 4, “Possible side effects” for a list of symptoms).

Stop using Hemlibra and aPCC and talk to your doctor immediatelyif you or your caregiver notice any symptoms of thrombotic microangiopathy.

  • Blood clots (thromboembolism)
  • In rare cases, a blood clot can form inside the blood vessels and block them, and could be potentially life-threatening.
  • It is important to know the symptoms of such internal blood clots in case they form (see section 4, “Possible side effects” for a list of symptoms).

Stop using Hemlibra and aPCC and talk to your doctor immediatelyif you or your caregiver notice any symptoms of blood clots in the blood vessels.

Other important information about Hemlibra

  • Formation of antibodies (immunogenicity)
  • You may notice that your bleeding is not being controlled with the prescribed dose of this medicine. This may be due to the development of antibodies to this medicine.

Talk to your doctor immediatelyif you or your caregiver notice an increase in bleeding. Your doctor may decide to change your treatment if this medicine stops working for you.

Children under 1 year of age

In children under 1 year of age, the blood system is still developing. If your child is under 1 year of age, your doctor may prescribe Hemlibra only after carefully weighing the expected benefits and risks of using Hemlibra.

Other medicines and Hemlibra

Tell your doctor or pharmacist if you are using, have recently used, or might use any other medicines.

  • Use of a bypassing agent while receiving Hemlibra
  • Before you start using Hemlibra, talk to your doctor and follow their instructions carefully about when to use a bypassing agent and the dose and schedule to follow. Hemlibra increases the blood's ability to clot. Therefore, the dose of the bypassing agent needed may be lower than the dose you used before starting Hemlibra.
  • Use aPCC only if you cannot use another treatment. If aPCC is needed, talk to your doctor if you think you need more than 50 units/kg of aPCC in total. For more information on the use of aPCC while receiving Hemlibra, see section 2: Potentially serious side effects of using aPCC while receiving Hemlibra.
  • Despite limited experience with the concomitant administration of antifibrinolytics with aPCC or rFVIIa in patients treated with Hemlibra, you should know that thrombotic events may occur when antifibrinolytics are administered intravenously in combination with aPCC or rFVIIa.

Lab tests

Talk to your doctor if you use Hemlibra before having lab tests to measure your blood's ability to clot. This is because the presence of Hemlibra in your blood may interfere with some of these lab tests and give inaccurate results.

Pregnancy and breastfeeding

  • You must use an effective method of birth control (contraception) during treatment with Hemlibra and for 6 months after the last injection of Hemlibra.
  • If you are pregnant or breastfeeding, think you may be pregnant, or plan to become pregnant, talk to your doctor or pharmacist before using this medicine. Your doctor will weigh the benefits of you taking Hemlibra against the risks to your baby.

Driving and using machines

It is unlikely that this medicine will affect your ability to drive or use machines.

3. How to use Hemlibra

Hemlibra is supplied in single-use vials as a ready-to-use solution that does not need to be diluted.

A qualified doctor who is experienced in treating patients with hemophilia will teach you how to use Hemlibra. Follow your doctor's instructions for administering this medicine exactly. If you are unsure, talk to your doctor again.

Keep a record

Each time you use Hemlibra, write down the name and batch number of the medicine.

How much Hemlibra to use

The dose of Hemlibra depends on your weight, and your doctor will calculate the amount (in mg) and the corresponding amount of Hemlibra solution (in ml) to be injected:

  • Loading dose regimen, weeks 1-4: the dose is 3 milligrams per kilogram of body weight, injected once a week.
  • Maintenance dose regimen, week 5 and onwards: the dose is either 1.5 milligrams per kilogram of body weight, injected once a week; 3 milligrams per kilogram of body weight, injected every 2 weeks; or 6 milligrams per kilogram of body weight, injected every 4 weeks.

The decision to use the maintenance dose of 1.5 mg/kg once a week, 3 mg/kg every 2 weeks, or 6 mg/kg every 4 weeks should be discussed with your doctor and, when applicable, your caregiver.

Do notmix different concentrations of Hemlibra (30 mg/ml and 150 mg/ml) in a single injection to achieve the total volume to be administered.

Do not administer more than 2 ml of Hemlibra solution in a single injection.

How Hemlibra is administered

If you or your caregiver administer an injection of Hemlibra, you must read and follow the instructions in section 7, “Instructions for use” carefully.

  • Hemlibra is administered by injection under the skin (subcutaneously).
  • Your doctor or nurse will teach you how to inject Hemlibra.
  • Once you have received training, you can inject the medicine yourself at home, either alone or with the help of a caregiver.
  • To correctly insert the needle under the skin, make a skin fold at the injection site with your free hand. It is important to make a skin fold to ensure that you inject under the skin (into the fatty tissue) and not deeper (into the muscle). An injection into the muscle can be painful.
  • Prepare and administer the injection in a clean and germ-free environment using an aseptic technique. Your doctor or nurse will give you more information about this.

Where to inject Hemlibra

  • Your doctor will teach you which areas of the body are suitable for injecting Hemlibra.
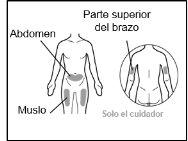
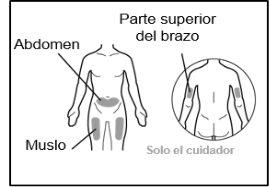
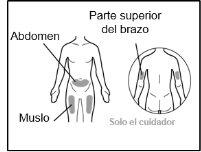
  • Recommended injection sites are: the front of the waist (lower abdomen), the upper outer arm, or the front of the thighs. Only use recommended injection sites.
  • For each injection, use a different area of the body than you used last time.
  • Do not administer injections in areas where the skin is red, bruised, tender, hardened, or has moles or scars.
  • When using Hemlibra, other medicines injected under the skin should be administered in a different area.

Use of syringes and needles

  • To withdraw the Hemlibra solution from the vial, transfer it to the syringe, and inject it under the skin, you need a syringe, a transfer needle with a 5-micron filter, or a vial adapter with a 5-micron filter and an injection needle.
  • Syringes, transfer needles with filters, or vial adapters with filters and injection needles are not included in the pack. For more information, see section 6, “What you need to administer Hemlibra that is not included in the pack”.
  • Make sure to use a new injection needle for each injection and discard it after a single use.
  • For an injection of up to 1 ml of Hemlibra solution, use a 1-ml syringe.
  • For an injection of more than 1 ml and up to 2 ml of Hemlibra solution, use a 2-3 ml syringe.

Use in children and adolescents

Hemlibra can be used in children and adolescents of all ages.

  • A child may inject the medicine themselves, provided that the healthcare professional and the child's parent or caregiver agree. Self-injection is not recommended in children under 7 years of age.

If you use more Hemlibra than you should

If you use more Hemlibra than you should, talk to your doctor immediately. This is because you may be at risk of experiencing side effects such as blood clots. Follow your doctor's instructions for administering Hemlibra exactly. If you are unsure, talk to your doctor, pharmacist, or nurse again.

If you forget to use Hemlibra

  • If you miss a scheduled injection, inject the missed dose as soon as possible before the next scheduled dose. Then, continue with the scheduled injections of the medicine. Do not inject two doses on the same day to make up for missed doses.
  • If you are unsure, talk to your doctor, pharmacist, or nurse.

If you stop using Hemlibra

Do not stop using Hemlibra without talking to your doctor. If you stop using Hemlibra, you may no longer be protected against bleeding.

If you have any other questions about using this medicine, talk to your doctor, pharmacist, or nurse.

4. Possible side effects

Like all medicines, this medicine can cause side effects, although not everybody gets them.

Serious side effects of using aPCC while receiving Hemlibra

Stop using Hemlibra and aPCC and talk to your doctor immediatelyif you or your caregiver notice any of the following side effects:

  • Destruction of red blood cells (thrombotic microangiopathy):
  • confusion, weakness, swelling of arms and legs, yellowing of the skin and eyes, abdominal pain or back pain, feeling sick (nausea), being sick (vomiting), or urinating less than usual: these symptoms could be signs of thrombotic microangiopathy.
  • Blood clots (thromboembolism):
  • swelling, warmth, pain, or redness: these symptoms could be signs of a blood clot in a vein near the surface of the skin.
  • headache, numbness of the face, pain or swelling in the eyes, or problems with your vision: these symptoms could be signs of a blood clot in a vein behind the eye.
  • discoloration of the skin: this symptom could be a sign of serious damage to the skin tissue.

Other side effects of using Hemlibra

Very common:may affect more than 1 in 10 people

  • reaction at the injection site (redness, itching, pain)
  • headache
  • joint pain

Common:may affect up to 1 in 10 people

  • fever
  • muscle pain
  • diarrhea
  • itchy rash or hives (urticaria)
  • skin rash

Uncommon:may affect up to 1 in 100 people

  • destruction of red blood cells (thrombotic microangiopathy)
  • blood clot in a vein behind the eye (cavernous sinus thrombosis)
  • serious damage to the skin tissue (necrotic skin lesion)
  • blood clot in a vein near the surface of the skin (superficial thrombophlebitis)
  • swelling of the face, tongue, and/or throat, and/or difficulty swallowing, or hives, along with difficulty breathing, which are indicative of angioedema
  • lack of effect or reduced response to treatment

Reporting side effects

If you experience any side effects, talk to your doctor, pharmacist, or nurse, even if they are not listed in this leaflet. You can also report side effects directly through the national reporting system listed in Appendix V. By reporting side effects, you can help provide more information on the safety of this medicine.

5. Storage of Hemlibra

Keep this medicine out of the sight and reach of children.

Do not use this medicine after the expiry date which is stated on the carton and vial after “EXP”. The expiry date is the last day of the month shown.

Store in a refrigerator (2°C - 8°C). Do not freeze.

Keep the pack in the outer carton in order to protect from light.

Once removed from the refrigerator, unopened vials can be stored at room temperature (below 30°C) for a maximum of 7 days. After storage at room temperature, unopened vials can be returned to the refrigerator. The total time of storage of the medicine at room temperature should not exceed 7 days.

Discard vials that have been stored at room temperature for more than 7 days or have been exposed to temperatures above 30°C.

Once the solution is transferred from the vial to the syringe, use Hemlibra immediately. Do not refrigerate the solution in the syringe.

Before using the medicine, check that the solution does not contain particles or has changed color. The solution should be colorless to slightly yellow. Do not use this medicine if it is cloudy, has changed color, or contains visible particles.

Dispose of unused solution properly. Medicines should not be disposed of via wastewater or household waste. Ask your pharmacist how to dispose of medicines no longer required. This will help protect the environment.

6. Container Contents and Additional Information

Hemlibra Composition

  • The active ingredient is emicizumab. Each vial of Hemlibra contains 12 mg (0.4 ml at a concentration of 30 mg/ml) or 30 mg (1 ml at a concentration of 30 mg/ml) of emicizumab.
  • The other components are L-arginine, L-histidine, L-aspartic acid, poloxamer 188, and water for injectable preparations.

Appearance of Hemlibra and Container Contents

Hemlibra is an injectable solution. It is a colorless or slightly yellowish liquid.

Each Hemlibra container contains 1 glass vial.

Only some package sizes may be marketed.

What is Needed for Hemlibra Administration Not Included in the Container

To extract the Hemlibra solution from the vial, insert it into a syringe, and inject it under the skin, a syringe, a transfer needle with a filter or a vial adapter with a filter, and an injection needle are needed (see section 7, "Instructions for Use").

Syringes

  • 1 ml Syringe:transparent polypropylene or polycarbonate syringe with Luer-lock tip, 0.01 ml graduation or
  • 2-3 ml Syringe:transparent polypropylene or polycarbonate syringe with Luer-lock tip, 0.1 ml graduation.

Note: Low Dead Space (LDS) syringes should be used when using the vial adapter with a filter.

Transfer Devices and Needles

  • Transfer Needle with Filter:stainless steel with Luer-lock connection, 18 G gauge, 35 mm (1½″) length, containing a 5-micron filter and preferably with a semi-blunt tip or
  • Vial Adapter with Filter:polypropylene with Luer-lock connection, with an integrated 5-micron filter and an outer diameter adjustment of the vial neck of 15 mm and
  • Injection Needle:stainless steel with Luer-lock connection, 26 G gauge (acceptable range: 25-27 gauge), preferred length of 9 mm (3/8″) or up to 13 mm (½″), preferably with needle safety.

Marketing Authorization Holder

Roche Registration GmbH

Emil-Barell-Strasse 1

79639 Grenzach-Wyhlen

Germany

Manufacturer

Roche Pharma AG

Emil-Barell-Strasse 1

79639 Grenzach-Wyhlen

Germany

You can request more information about this medication by contacting the local representative of the marketing authorization holder:

Text in multiple languages including French, Bulgarian, German, and Lithuanian with company names and phone numbers

Ceská republika

Roche s. r. O.

Tel.: +420 - 2 20382111

Magyarország

Roche (Magyarország) Kft.

Tel: +36 – 1 279 4500

Danmark

Roche Pharmaceuticals A/S

Tel.: +45 - 36 39 99 99

Malta

(See Ireland)

Deutschland

Roche Pharma AG

Tel: +49 (0) 7624 140

Nederland

Roche Nederland B.V.

Tel: +31 (0) 348 438050

Eesti

Roche Eesti OÜ

Tel: + 372 - 6 177 380

Norge

Roche Norge AS

Tlf: +47 - 22 78 90 00

Ελλάδα

Roche (Hellas) A.E.

Τηλ: +30 210 61 66 100

Österreich

Roche Austria GmbH

Tel: +43 (0) 1 27739

España

Roche Farma S.A.

Tel: +34 - 91 324 81 00

Polska

Roche Polska Sp.z o.o.

Tel: +48 - 22 345 18 88

France

Roche

Tél: +33 (0) 1 47 61 40 00

Portugal

Roche Farmacêutica Química, Lda

Tel: +351 - 21 425 70 00

Hrvatska

Roche d.o.o.

Tel: +385 1 4722 333

Ireland

Roche Products (Ireland) Ltd.

Tel: +353 (0) 1 469 0700

România

Roche România S.R.L.

Tel: +40 21 206 47 01

Slovenija

Roche farmacevtska družba d.o.o.

Tel: +386 - 1 360 26 00

Ísland

Roche Pharmaceuticals A/S

c/o Icepharma hf

Sími: +354 540 8000

Slovenská republika

Roche Slovensko, s.r.o.

Tel: +421 - 2 52638201

Italia

Roche S.p.A.

Tel: +39 - 039 2471

Suomi/Finland

Roche Oy

Puh/Tel: +358 (0) 10 554 500

Κύπρος

Γ.Α.Σταμ?της & Σια Λτδ.

Τηλ: +357 - 22 76 62 76

Sverige

Roche AB

Tel: +46 (0) 8 726 1200

Latvija

Roche Latvija SIA

Tel: +371 - 6 7039831

United Kingdom (Northern Ireland)

Roche Products (Ireland) Ltd.

Tel: +44 (0) 1707 366000

Date of Last Revision of this Leaflet

Other Sources of Information

Detailed information on this medicinal product is available on the European Medicines Agency website: http://www.ema.europa.eu/

  1. Instructions for Use

Transfer Needle with Filter

Option

(for transferring the medication from the vial to the syringe)

Instructions for Use

Hemlibra

Injection

Single-Dose Vial(s)

You must read, understand, and follow the instructions for use before injecting Hemlibra. Your healthcare professional should teach you how to prepare, measure, and inject Hemlibra correctly before you use it for the first time. If you are unsure, consult your healthcare professional.

Important Information:

Do not follow these instructions when using a Vial Adapter to transfer Hemlibra from the vial. These instructions are only used with the Transfer Needle.

? Do not inject yourself or another person unless your healthcare professional has taught you how to do it.

? Check that the name Hemlibra appears on the box and the vial label.

? Before opening the vial, read the vial label to check that you have the medication of the correct concentration to administer the prescribed dose for you. You may need to use more than 1 vial to administer the correct total dose.

? Check the expiration date on the box and the vial label. Do not useit after the expiration date.

? Only use the vial once.Once the dose is injected, discard the remaining Hemlibra solution in the vial. Do not store unused medication in the vial for later use.

? Only use the syringes, transfer needles, and injection needles prescribed by your healthcare professional.

? Only use the syringes, transfer needles, and injection needles once. Discard the caps, vial(s), and used syringes and needles.

? If the prescribed dose is more than 2 ml, you will need to administer more than one subcutaneous injection of Hemlibra; contact your healthcare professional for proper injection instructions.

? You must inject Hemlibra only under the skin.

Storage of Hemlibra Vials:

? Store the vial in the refrigerator (2 °C to 8 °C). Do notfreeze.

  • Store the vial in its original packaging to protect the medication from light.

? Once removed from the refrigerator, the unopened vial can be stored at room temperature (below 30 °C) for up to 7 days. After storage at room temperature, unopened vials can be returned to the refrigerator. The total time of storage outside the refrigerator and at room temperature should not exceed 7 days.

? Discard vials that have been stored at room temperature for more than 7 days or have been at temperatures above 30°C.

? Keep vials out of sight and reach of children.

? Remove the vial from the refrigerator 15 minutes before use and let it reach room temperature (below 30 °C) before preparing an injection.

  • Do notshake the vial.

Storage of Needles and Syringes:

? Keep the transfer needle, injection needle, and syringe dry.

? Keep the transfer needle, injection needle, and syringe out of sight and reach of children.

Inspection of Medication and Materials:

? Gather all the materials mentioned below to prepare and administer the injection.

? Checkthe expiration date on the box, the vial label, and the materials mentioned below. Do not usethem after the expiration date.

? Do not usethe vial if:

  • the medication is cloudy, hazy, or has changed color.
  • the medication contains particles.
  • the cap covering the stopper is missing.

? Inspect the materials for damage. Do not usethem if they appear damaged or have fallen to the ground.

? Place the materials on a flat, clean, and well-lit work surface.

The Box Includes:

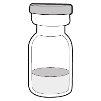
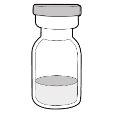
Transparent glass vial with a small liquid content at the base and a gray upper stopper

  • Vial with the medication

White paper sheets stacked with horizontal black lines on the top right

  • Hemlibra Instructions for Use

The Box Does Not Include:

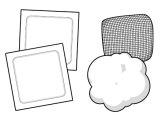
White cotton swab next to two sterile square pads and a rolled bandage

? Alcohol swabs

Note:If you need to use more than 1 vial to inject the prescribed dose, you should use a new alcohol swab for each vial.

? Gauze

? Cotton

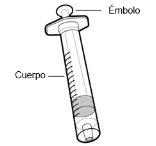
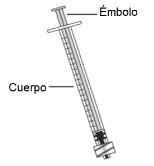
Syringe with plunger and labeled body showing liquid inside the transparent cylinder

? Syringe

  • To inject up to 1 ml, use a 1 ml syringe.
  • For an injection of 1 ml to 2 ml, use a 2 ml or 3 ml syringe.
  • Note: Do notuse a 2 ml or 3 ml syringe for doses up to 1 ml.

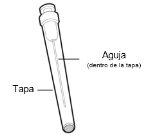
Needle with protective cap shown at an angle, with text indicating “Needle (inside cap)” and “Cap”

? Transfer Needle

with 5-micron filter

18 G

Note:If you need to use more than 1 vial to inject the prescribed dose, you should use a new transfer needle for each vial. Do notuse the transfer needle to inject the medication.

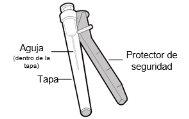
Needle with cap and deployed safety shield showing labeled parts in black and white

? Injection Needle with safety shield (used to inject the medication).

  • Do notuse the injection needle to withdraw the medication from the vial.

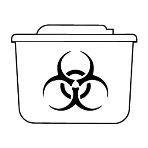
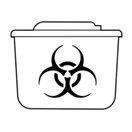
Biohazard waste container with lid and black infectious hazard symbol on a white background

  • Sharps Container

for sharp objects

Prepare:

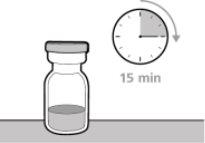
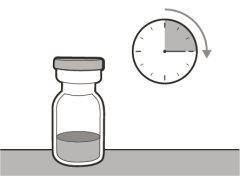
Medication vial with liquid and a circular arrow pointing to a clock marking 15 minutes

? Before using it/them, leave the vial(s) for 15 minutes on a flat, clean, and light-protected surface to reach room temperature.

? Do notattempt to heat the vial in any other way.

? Wash your handswell with water and soap.

Selection and Preparation of the Injection Site:

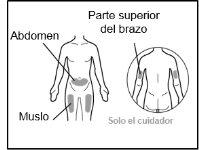
Human torso diagram showing injection areas on the abdomen, thigh, and upper arm with a magnification circle

? Clean the chosen injection site area with an alcohol swab.

? Let the skin dry for about 10 seconds.

  • Do nottouch, fan, or blow on the cleaned area before injection.

For Injection, You Can Use:

? The thigh (front and middle).

? The stomach area (abdomen), except for the 5 cm around the navel.

? The outer area of the upper arm (only if the caregiver administers the injection).

? You must use a different injection site each time you apply an injection, at least 2.5 cm away from the one used in any previous injection.

? Do notinject into areas that may be irritated by a belt or band.

? Do notinject into moles, scars, bruises, or areas where the skin is sensitive, red, hardened, or damaged.

Preparing the Syringe for Injection:

? When you have filled the syringe with the medication, you must use it immediately.

? Once the injection needle cap is removed, the medication must be injected under the skin within 5 minutes.

? Do nottouch the exposed needles or leave them on any surface once the cap is removed.

? Do notuse the syringe if the needle touches any surface.

Important Information After Injection:

? If you notice blood droplets at the injection site, you can press it with a sterile cotton swab or gauze for at least 10 seconds until the bleeding stops.

? If you have a hematoma (a small bleed under the skin), you can also apply ice with gentle pressure. If the bleeding does not stop, contact a healthcare professional.

? Do notrub the injection site after injection.

Disposal of Medication and Materials:

Important: Always keep the sharps container out of the reach of children.

? Discard any used cap(s), vial(s), needles, and syringes in a sharps container.

? Dispose of used needles and syringes in a sharps container immediately after use. Do notdispose of caps, vials, needles, or syringes loosely in household trash.

? If you do not have a sharps container, you can use a household trash container that:

  • is made of reinforced plastic.
  • can be closed with a tight and puncture-resistant lid that does not allow sharp objects to escape.
  • is kept upright and stable during use.
  • is leak-proof.
  • is properly labeled to indicate that it contains hazardous waste.

? When the sharps container is almost full, you should follow local guidelines for proper disposal.

? Do not dispose of any used sharps container in household trash unless local guidelines permit it. Do not recycle your sharps container.

  1. PREPARATION

Step 1. Remove the Vial Cap and Clean

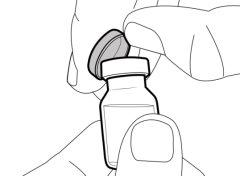
Glass vial with partially removed cap held by two fingers of a hand

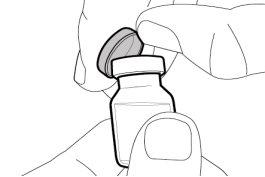
  • Remove the cap from the vial(s).
  • Discard the cap(s) in the sharps container.

Medication vial with liquid and black cap next to a white rectangular patch with an arrow indicating direction

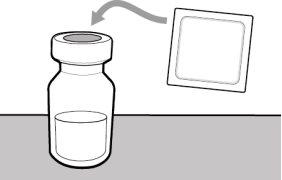
  • Clean the top of the stopper of the vial(s) with an alcohol swab.

Step 2. Attach the Transfer Needle with Filter to the Syringe

Pre-filled syringe with extended plunger and connected needle, arrow indicates push and turn for use

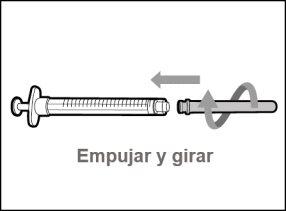
  • Push and turn the transfer needle with filter clockwiseonto the syringe until it is securely attached.

Hand holding a syringe with needle inserted into the skin, black arrow indicates direction of injection, subcutaneous technique

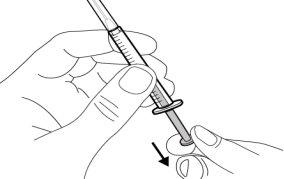
  • Slowly pull the plunger back and draw into the syringe the same amount of air as the prescribed dose.

Step 3. Remove the Transfer Needle Cap

Hand holding syringe with needle being inserted into the skin, showing direction of movement with bidirectional arrows

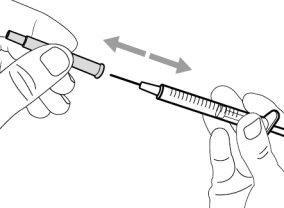
  • Hold the syringe body with the transfer needle pointing upwards.
  • Carefully remove the transfer needle cap, keeping it away from you. Do notdiscard the cap.

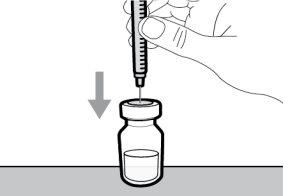
Step 4. Inject air into the vial

Hand holding a syringe injecting into a transparent vial with liquid, gray arrow indicates direction of insertion

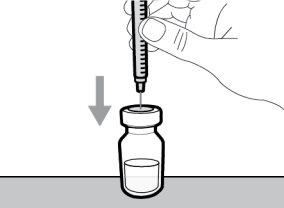
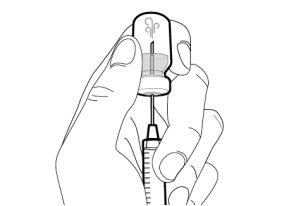
  • Hold the vial on a flat work surface and insert the transfer needle and syringe just into the centerof the vial stopper.

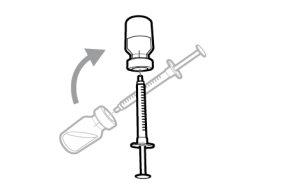
Syringe extracting liquid from a transparent vial with a curved arrow indicating the movement of extraction

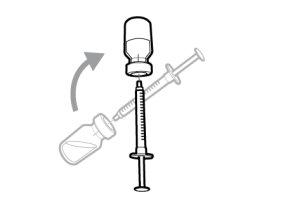
  • Keep the needle in the vial and turn it upside down.

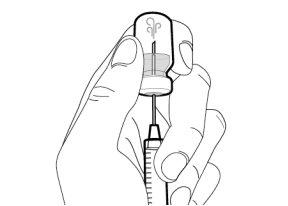
Hand holding a medication vial with a needle inserted to extract the clear liquid

  • With the needle pointing upwards, push the plunger to inject the air from the syringe above the medication.
  • Without changing position, continue pushing the syringe plunger with your finger.
  • Do notinject air into the medication, as it may form air bubbles or foam inside.

Step 5. Transfer the medication to the syringe

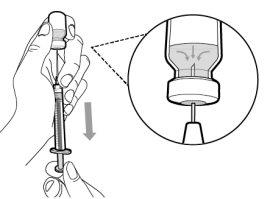
Hand holding a syringe with a needle, arrow indicates direction of injection and enlarged detail of the liquid inside the vial with the needle

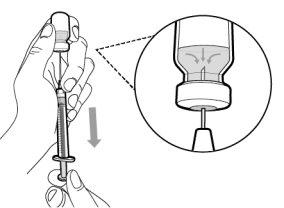
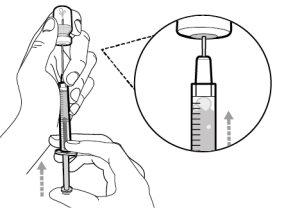
  • Slide the tip of the needle downwards so that it is inside the medication.
  • With the syringe facing upwards, slowly pull back the plunger to fill the syringewith more than the amount of medicationneeded for the prescribed dose.
  • Hold the plunger firmlyto ensure it does not retract.
  • Avoid pulling the plunger out of the syringe.

Important:If the prescribed dose is greater than the amount of Hemlibra in the vial, extract all the medicationand refer to the section “Combining vials”now.

Step 6. Remove air bubbles

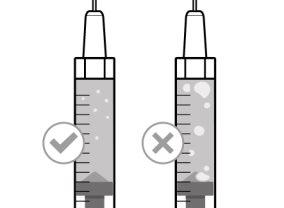
Two syringes with clear liquid and air bubbles, one with a checkmark and the other with a cross, showing correct and incorrect preparationHand holding a syringe filling with liquid from a vial, enlarged detail of the needle and plunger moving up

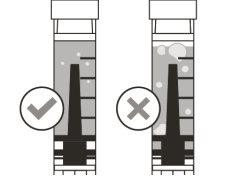
  • Keep the needle in the vial and check that there are no large air bubbles in the syringe. Large bubbles can reduce the dose received.
  • Remove the larger air bubblesby gently tapping the syringe body with your fingers until the air bubbles rise to the top of the syringe. Move the tip of the needle above the medicationand slowly push the plunger upwards to remove the air bubbles from the syringe.
  • If the amount of medication in the syringe is now equal to or less than the prescribed dose, move the tip of the needle to the inside of the medicationand slowly pull backthe plunger until you have moreof the medication needed for the prescribed dose.
  • Avoid pulling the plunger out of the syringe.
  • Repeat the previous steps until the larger air bubbles have been removed.

Note:Make sure you have enough medication in the syringe to complete the dose before proceeding to the next step. If you cannot extract all the medication, turn the vial upside down to reach the remaining amount.

Do notuse the transfer needle to inject the medication, as it may cause pain and bleeding.

  1. INJECTION

Step 7. Replace the transfer needle cap

Hand holding a syringe with a needle inserted into the skin, gray arrows indicate direction of insertion and extraction of the needle

  • Remove the syringe and transfer needle from the vial.
  • Using one hand, insertthe transfer needle into the cap and push upwardsto cover the needle.
  • Once the needle is covered, push the transfer needle cap towards the syringe to secure it completely with one handto avoid accidental needlestick injury.

Step 8. Clean the injection site

Diagram of the human torso showing injection areas on the abdomen, thigh, and upper arm with an enlarged circle

  • Select and cleanthe injection site with an alcohol swab.

Step 9. Remove the used transfer needle from the syringe

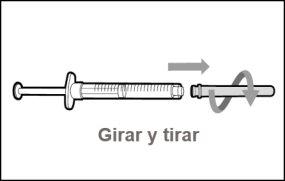
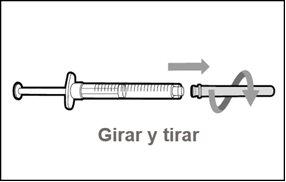
Syringe with a needle showing a rotation arrow and plunger extraction with the indication “Rotate and pull”

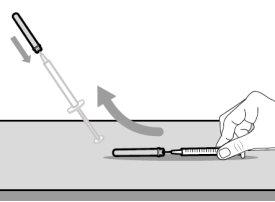
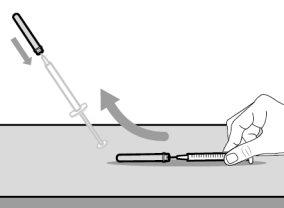
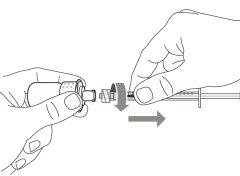
  • Remove the used transfer needle from the syringe by rotating it counterclockwise and pulling it gently.
  • Discard the used transfer needle in a sharps container.

Step 10. Attach the injection needle to the syringe

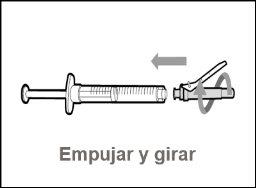
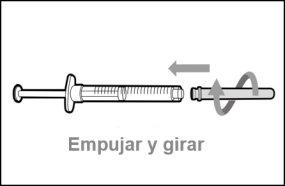
Syringe with a needle connected and an arrow indicating rotation for connection to another transparent device with the text “Push and rotate”

  • Push and rotate the injection needle clockwise over the syringe until it is securely attached.

Step 11. Remove the safety protector

Needle inserted into a cylinder with measurement marks and a hand holding the syringe with an arrow indicating the angle of insertion

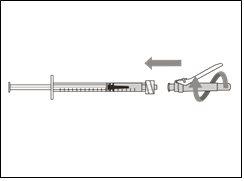
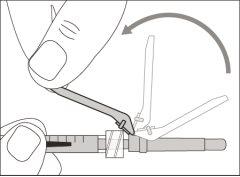
  • Remove the safety protector from the needle by sliding it towardsthe syringe body.

Step 12. Remove the injection needle cap

Hand holding a syringe with a needle inserted into the skin, arrow indicates direction of movement and plunger retracted

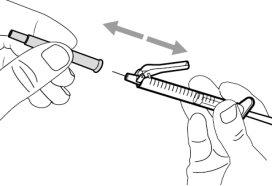
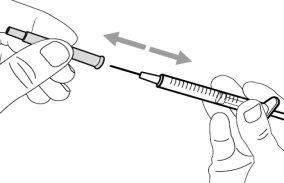
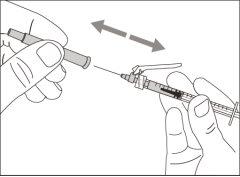
  • Carefully, pull the injection needle cap straight off the syringe.
  • Discard the cap in a sharps container.
  • Do nottouch the tip of the needle or allow it to touch any surface.
  • After removing the injection needle cap, the medication in the syringe must be injected within 5 minutes.

Step 13. Adjust the plunger according to the prescribed dose

Syringe with a needle inserted into the skin, enlarged detail showing the measurement scale and arrow indicating direction

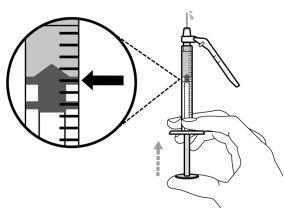
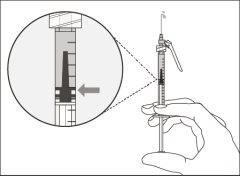
  • Hold the syringe with the needle pointing upwards and slowly push the plunger until the prescribed dose is reached.
  • Check your dose, ensure that the top edge of the plunger is aligned with the syringe mark corresponding to the prescribed dose.

Step 14. Subcutaneous injection (under the skin)

Hand holding a syringe with a needle inserting into the skin with an arrow indicating direction and a circle showing angles of 45 and 90 degrees

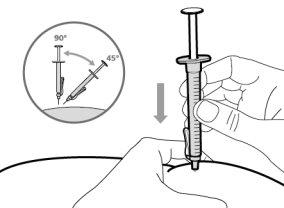
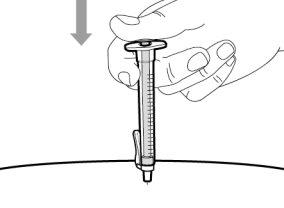
  • Pinch the selected injection site and insert the needle completely at an angle of between 45º and 90ºwith a quick and firm motion. Do nothold or push the plunger while inserting the needle.
  • Maintain the position of the syringe and release the selected injection site.

Step 15. Inject the medication

Hand holding an auto-injector with the needle inserted into the skin at a downward angle

  • Slowly, inject all the medication by gently pressing the plunger until it reaches the end.
  • Remove the needle and syringe from the injection site at the same angle they were inserted.
  1. SYRINGE AND NEEDLE DISPOSAL

Step 16. Cover the needle with the safety protector

Syringe with a needle inserted into the skin at an angle showing an arrow indicating direction and curve of injection

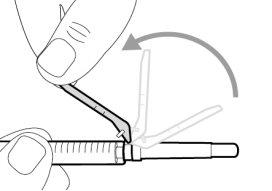
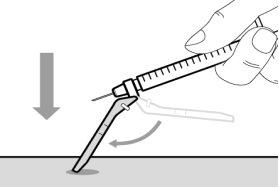
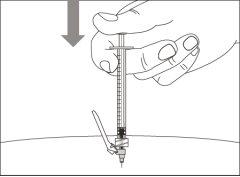
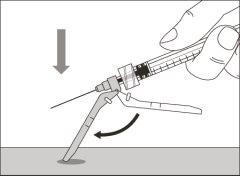
  • Slide the safety protector forward 90º, away from the syringe body.
  • Holding the syringe with one hand, press the safety protectordownwardsagainst a flat surface with a firm and quick motion until you hear a “click”.

Hand holding a syringe with a graduated scale inserting the needle into the skin with an eye observing the process and an arrow indicating direction

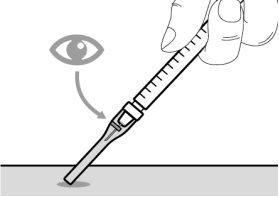
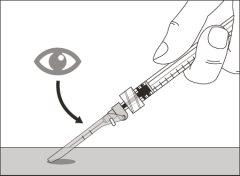
  • If you do not hear the click, check that the needle is completely covered by the safety protector.
  • Keep your fingers behind the safety protector and away from the needle at all times.
  • Do notseparate the injection needle.

Step 17. Discard the syringe and needle.

Syringe with a needle showing the dose and a biological waste container with an infectious hazard symbol below

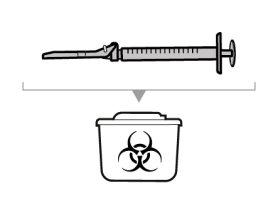
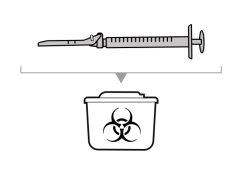
  • Discard used needles and syringes in a sharps container immediately after use. For more information, refer to the section “Disposal of medication and materials”.
  • Do notattempt to remove the used injection needle from the syringe.
  • Do notrecapthe injection needle.
  • Important:Always keep the sharps container out of the reach of children.
  • Discard any caps, vial(s), needles, and syringes in the sharps container.

Combining vials

If you need to use more than 1 vial to reach the prescribed dose, follow these steps after extracting the medication from the first vial as described in step 5. You must use a new transfer needle for each vial.

Step A. Replace the transfer needle cap

Hand holding a syringe with a needle inserted into the skin, arrows indicate direction of insertion and extraction of the device

  • Remove the syringe and transfer needle from the first vial.
  • Using one hand, insertthe transfer needle into the cap and push upwardsto cover the needle.
  • Once the needle is covered, push the transfer needle cap towards the syringe to secure it completely with one handto avoid accidental needlestick injury.

Step B. Remove the used transfer needle from the syringe

Syringe with a needle showing a rotation movement and extraction with an arrow indicating direction

  • Remove the used transfer needle from the syringe by rotating it counterclockwise and pulling it gently.
  • Discard the used transfer needle in a sharps container.

Step C. Attach a new transfer needle with a filter to the syringe

Pre-filled syringe with an end connector and an arrow indicating push and rotate to connect

  • Push and rotate a newtransfer needle clockwise over the syringe until it is securely attached.
  • Slowly, pull back the plunger and introduce a little air into the syringe.

Step D. Remove the transfer needle cap

Hand holding a syringe with a needle inserting into the skin, arrows indicate movement of entry and exit of the needle

  • Hold the syringe body with the transfer needle cap pointing upwards.
  • Carefully, remove the transfer needle cap while keeping it away from you. Do not discard the cap.You will need to replace the transfer needle cap after transferring the medication.
  • Do nottouch the tip of the needle.

Step E. Inject air into the vial

Syringe injecting liquid into a transparent vial with a gray arrow indicating the direction of injection

  • With the new vial on a flat work surface, insert the new transfer needle and syringe just into the centerof the vial stopper.

Medication vial with a removed stopper and a syringe inserted extracting the liquid with an arrow indicating direction

  • Keep the transfer needle in the vial and turn it upside down.

Hand holding a medication vial and a syringe preparing to extract the liquid with the needle

  • With the needle pointing upwards, inject the air from the syringe above the medication.
  • Keep your finger pressing on the plunger in the same position.
  • Do notinject air into the medication, as it may form air bubbles or foam inside.

Step F. Transfer the medication to the syringe

Hand holding a syringe with a needle, arrow indicates direction of injection and enlarged detail of the liquid inside the vial with the needle

  • Slide the tip of the needle downwards so that it is inside the medication.
  • With the syringe facing upwards, slowly pull back the plunger to fill the syringe body with moreof the medicationneeded for the prescribed dose.
  • Hold the plunger firmlyto ensure it does not retract.
  • Avoid pulling the plunger out of the syringe.

Note:Make sure you have enough medication in the syringe to complete the dose before proceeding to the next steps. If you cannot extract all the medication, turn the vial upside down to reach the remaining amount.

Do notuse the transfer needle to inject the medication, as it may cause damage such as pain and bleeding.

Repeat steps A to F with each additional vial until you have more than the amount of medication needed for your prescribed dose. When finished, keep the transfer needle inserted in the vial and return to step 6 “Remove air bubbles”. Continue with the remaining steps.

Vial adapter with filter

Option

(for transferring the medication from the vial to the syringe)

Transparent glass vial with a cylindrical neck and a rounded base showing graduated measurement marks

Instructions for Use

Hemlibra

Injection

Single-dose vial(s)

You must read, understand, and follow the Instructions for Use before injecting Hemlibra. Your healthcare professional should teach you how to prepare, measure, and inject Hemlibra correctly before you use it for the first time. If you have any questions, consult your healthcare professional.

Important information:

Do not follow these instructions when using a Transfer Needle to transfer Hemlibra from the vial. These instructions are only used with the Vial Adapter.

  • Do notinject yourself or another person unless your healthcare professional has taught you how to do it.
  • Check that the name Hemlibra appears on the carton and vial label.
  • Before opening the vial, read the vial label to check that you have the correct concentration of the medication to administer the prescribed dose for you. You may need to use more than 1 vial to administer the correct total dose.
  • Check the expiration date on the carton and vial label. Do not useit after the expiration date.
  • Use the vial only once.Once the dose is injected, discard the remaining Hemlibra solution in the vial. Do notstore unused medication in the vial for later use.
  • Only use the syringes, vial adapters, and injection needles prescribed by your healthcare professional.
  • Only use the syringes, vial adapters, and injection needles once. Discard used caps, vial(s), syringes, and needles.
  • If the prescribed dose is greater than 2 ml, you will need to administer more than one subcutaneous injection of Hemlibra; contact your healthcare professional for proper injection instructions.
  • You must inject Hemlibra only under the skin.
  • Storage of Hemlibra vials:

    • Store the vial in the refrigerator (2 °C to 8 °C). Do notfreeze.
    • Store the vial in its original packaging to protect the medication from light.
    • Once removed from the refrigerator, the unopened vial can be stored at room temperature (below 30 °C) for at least 7 days. After storage at room temperature, unopened vials can be returned to the refrigerator. The total time of storage outside the refrigerator and at room temperature should not exceed 7 days.
    • Discard vials that have been stored at room temperature for more than 7 days or have been at temperatures above 30 °C.
    • Keep vials out of sight and reach of children.
    • Remove the vial from the refrigerator 15 minutes before use and let it reach room temperature (below 30 °C) before preparing an injection.
    • Do notshake the vial.

    Storage of vial adapters, needles, and syringes:

    • Keep the vial adapter, injection needle, and syringe dry.
    • Keep the vial adapter, injection needle, and syringe out of sight and reach of children.

    Inspection of the medication and materials:

    • Gather all the materials mentioned below to prepare and administer the injection.
    • Checkthe expiration date on the box, vial label, and the materials mentioned below. Do not usethem after the expiration date.
    • Do not usethe vial if:
      • the medication is cloudy, blurry, or has changed color
      • the medication contains particles.
      • the cap covering the stopper is missing.
    • Inspect the materials for damage. Do not usethem if they appear damaged or have fallen to the floor.
    • Place the materials on a flat, clean, and well-lit work surface.

    The box includes:

    Glass vial with a small solid content at the bottom and a gray top cap

    • Vial with the medication

    Partially opened white cardboard box with empty interior and horizontal black lines on the lower edge

    • Hemlibra instructions for use

    The box does not include:

    White cotton with irregular shape and two sterile square gauzes in transparent protective packaging

    • Alcohol wipesNote:if you need to use more than 1 vial to inject the prescribed dose, you must use a new alcohol wipe for each vial.
    • Gauze
    • Cotton

    Medication vial with gray cap and perforated cylindrical base with small circular holes

    • Vial adapter with filter(to be inserted into the top of the vial).Note:use it to transfer the medicine from the vial to the syringe. If you need more than 1 vial to inject the prescribed dose, you must use a new vial adapter for each vial.

    Do not insertthe injection needle into the vial adapter.

    Schematic syringe with plunger and body labeled, showing the main parts of a medical injection device

    • Low Dead Space (LDS) syringe with plunger

    Important:

    • To inject up to 1 ml, use a 1 ml LDS syringe.
    • To inject more than 1 ml, use a 2 or 3 ml LDS syringe.
    • Note: do notuse a 2 or 3 ml LDS syringe for doses up to 1 ml.

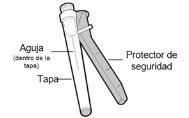
    Needle with open safety protector showing the cap and interior of the cap labeled with text

    • Injection needle with safety protector (used to inject the medication)
    • Do not insertthe injection needle into the vial adapter or use the injection needle to withdraw the medication from the vial.

    White biohazard container with lid and black biohazard symbol on the front

    • Sharps container

    Prepare:

    Text indicating fifteen minutes with large gray numbers on a white backgroundGlass vial with dark liquid and clock showing 10 o'clock with rotating arrow

    • Before using it/them, leave the vial(s) for about 15 minutes on a flat, clean, and sun-protected surface to reach room temperature.
    • Do notattempt to heat the vial in any other way.
    • Wash your handswell with water and soap.

    Selection and preparation of the injection site:

    Schematic of the human torso showing injection areas on the abdomen, thigh, and upper arm with shaded circles

    • Clean the injection site area with an alcohol wipe.
    • Let the skin dry for about 10 seconds.
    • Do nottouch, fan, or blow on the cleaned area before injection.

    For injection, you can use:

    • The thigh (front and middle).
    • The stomach area (abdomen), except for the 5 cm around the navel.
    • The outer area of the upper arm (only if the caregiver administers the injection).
    • You must use a different injection site each time you apply an injection, at least 2.5 cm away from the one used in any previous injection.
    • Do notinject into areas that may be irritated by a belt or girdle.
    • Do notinject into moles, scars, bruises, or areas where the skin is sensitive, red, hardened, or damaged.

    Preparation of the syringe for injection:

    • When you have filled the syringe with the medication, the injection should be administered immediately.
    • Once the injection needle cap is removed, the medication must be injected under the skin within 5 minutes.
    • Do nottouch exposed needles or leave them on any surface once the cap is removed.
    • Do notuse the syringe if the needle touches any surface.

    Important information after injection:

    • If you notice blood drops at the injection site, you can press it with a sterile cotton ball or gauze for at least 10 seconds until the bleeding stops.
    • If you have a hematoma (a small bleeding under the skin), you can also apply ice with gentle pressure. If the bleeding does not stop, contact a healthcare professional.
    • Do notrub the injection site after injection.

    Disposal of medication and materials:

    Important: Always keep the sharps container out of the reach of children.

    • Discard any cap(s), vial(s), vial adapters, needles, and syringes used in a sharps container.
    • Dispose of vial adapters, needles, and syringes in a sharps container. Do notdiscard caps, vials, needles, or syringes loose in household trash.
    • If you do not have a sharps container, you can use a household trash container that:
      • is made of reinforced plastic.
      • can be closed with a tight and puncture-resistant lid that does not allow sharp objects to escape.
      • is kept upright and stable during use.
      • is leak-proof.
      • is properly labeled to indicate that it contains hazardous waste.
    • When the sharps container is almost full, you must follow local guidelines for proper disposal.
    • Do not discardany used sharps container in household trash unless local guidelines permit it. Do not recycleyour sharps container.
    1. PREPARATION

    Step 1. Remove the vial cap and clean the top

    Hand holding a medication vial and pressing a gray cap on its top opening

    • Remove the cap from the vial(s).
    • Discard the cap(s) in the sharps container.

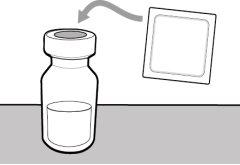
    Medication vial with liquid and black cap next to a white square gauze with arrow indicating direction

    • Clean the top of the stopper of the vial(s) with an alcohol wipe.

    Step 2. Insert the vial adapter into the vial

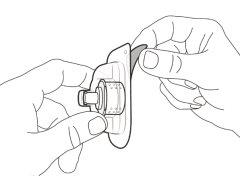
    Hands holding an auto-injector with the protective cover partially removed for use

    • Open the blister pack by peeling off the cover.

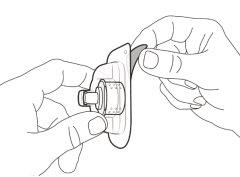
    Do not removethe vial adapter from the transparent plastic blister.

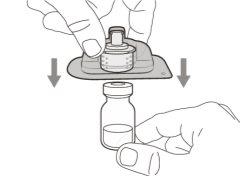
    Medication vial with a gray applicator on top and a hand holding the assembly, black arrows indicate direction

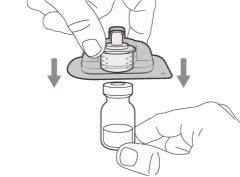
    • Press the plastic blister with the vial adapter firmly onto the new vial until you hear a “click”.

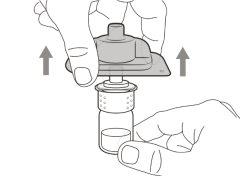
    Hand holding an injection device with vial connected, arrows indicate direction of pressure on the plunger

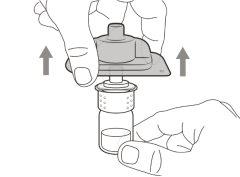
    • Remove and discard the plastic blister.
    • Do not touchthe tip of the vial adapter.

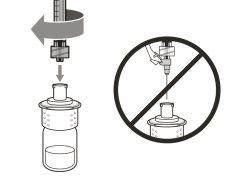
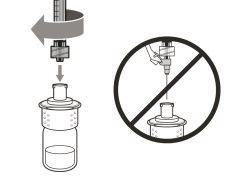
    Step 3. Connect the syringe to the vial adapter

    Vial with liquid and adapter, arrow indicates connection and circle with prohibition of direct injection

    • Remove the syringe cap(if necessary).
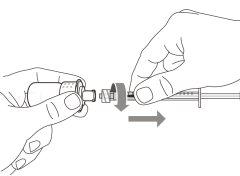
    • Push and turn the syringe clockwiseonto the vial adapter until it is fully secured.

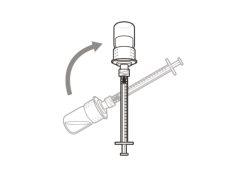
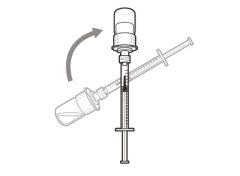
    Step 4. Transfer the medication to the syringe

    Syringe with transparent cylinder showing liquid levels and plunger in the process of extraction with arrow indicating direction

    • Hold the vial adapter in place on the syringe and turn the vial upside down.

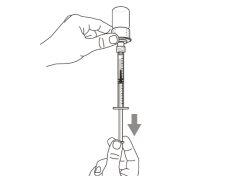
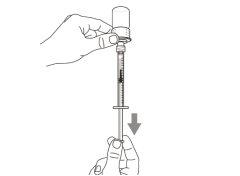
    Hand holding an auto-injector with a visible needle and an arrow indicating the direction of injection

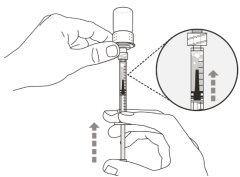
    • With the syringe facing upwards, slowly pull back the plunger to fill the syringewith more than the required amount of medicationfor the prescribed dose.
    • Hold the plunger firmlyto ensure it does not retract.
    • Try not to pull the plunger out of the syringe.

    Important:if the prescribed dose is more than the amount of Hemlibra in the vial, withdraw all the medicationand consult the “Combining vials”section now.

    Step 5. Remove air bubbles

    Hand holding a syringe with needle and vial, arrow indicates direction of medication extraction and detail of liquid level in the syringe

    • Hold the vial attached to the syringe and check for air bubbles. Large air bubbles can reduce the dose received.

    Two test tubes with liquid and bubbles, one with a check mark and the other with a cross, showing visual comparison

    • Remove large air bubblesby gently tapping the syringe body with your fingers until the air bubbles rise to the top of the syringe. Slowly push the plungerto remove the large air bubbles from the syringe.
    • If the amount of medication in the syringe is now equal to or less than the prescribed dose, slowly pull back the plunger until you have morethan the required amount of medication for the prescribed dose.
    • Try not to pull the plunger out of the syringe.
    • Repeat the above steps until you have removed the large air bubbles.

    Note:make sure you have enough medication in the syringe to complete the dose before proceeding to the next step.

    1. INJECTION

    Step 6. Clean the injection site

    Schematic of the human torso showing injection areas on the abdomen, thigh, and upper arm with magnified circle

    • Select and cleanthe injection site with an alcohol wipe.

    Step 7. Remove the syringe from the vial adapter

    Hands holding a cylinder and a syringe connecting with an arrow indicating the direction of insertion

    • Remove the syringe from the vial adapter by turning it counterclockwise and gently pulling it.
    • Discard the used vial and vial adapter in a sharps container.

    Step 8. Place the injection needle on the syringe

    White text on a black background that says “Push and turn” with bold sans-serif lettersPre-filled transparent syringe with yellow liquid and gray needle connected and ready for injectionPre-filled transparent syringe with yellow liquid and gray needle ready for injectionPre-filled syringe with partially retracted safety device showing the plunger and needle

    • Push and turn the injection needle clockwise onto the syringe until it is fully secured.
    • Do notinsert the injection needle into the vial adapter to withdraw the medication from the vial.

    Step 9. Remove the safety protector

    Needle being inserted into the skin with an applicator device, curved arrow indicating direction of insertion and syringe with graduated scale

    • Remove the safety protector from the needle by sliding it towardthe syringe body.

    Step 10. Remove the needle cap

    Hand holding a syringe with needle inserted into the skin showing movement of the plunger

    • Carefully, pull the needle cap straight off awayfrom the syringe.
    • Discard the cap in a sharps container.
    • Do nottouch the needle tip or allow it to touch any surface.
    • After removing the needle cap, the medication in the syringe must be injected within 5 minutes.

    Step 11. Adjust the plunger according to the prescribed dose

    Syringe with transparent needle held by a hand extracting liquid from a vial with black plunger and indicating arrow

    • Hold the syringe with the needle facing upwards and slowly push the plunger until you reach the prescribed dose.
    • Check your doseand make sure the top edge of the plunger is aligned with the syringe mark corresponding to the prescribed dose.

    Step 12. Subcutaneous injection (under the skin)

    Hand holding a syringe with needle being inserted into the skin showing angles of 45 and 90 degrees with arrow indicating direction

    • Pinch the selected injection site and insert the needle completely at an angle of between 45° and 90°with a quick and firm motion. Do nothold or push the plunger while inserting the needle.
    • Maintain the position of the syringe and release the pinched injection site.

    Step 13. Inject the medication

    Hand holding a syringe with needle inserted into the skin showing injection angle and plunger filled with dark liquid

    • Slowly inject all the medication by gently pressing the plunger until it reaches the end.
    • Remove the needle and syringe from the injection site at the same angle you inserted them.

    Alternatives to HEMLIBRA 30 mg/mL Injectable Solution in other countries

    The best alternatives with the same active ingredient and therapeutic effect.

    Alternative to HEMLIBRA 30 mg/mL Injectable Solution in Ukraine

    Dosage form: solution, 30 mg/1 ml
    Active substance: emicizumab
    Manufacturer: F.Hoffmann-La Ros Ltd
    Prescription required
    Dosage form: solution, 150 mg/1 ml; 0.4 ml (60 mg); 0.7 ml (105 mg); 1 ml (150 mg)
    Active substance: emicizumab
    Manufacturer: F.Hoffmann-La Ros Ltd
    Prescription required
    Dosage form: extract, 25 ml in a bottle
    Prescription not required
    Dosage form: extract, 25 ml in dropper bottles
    Manufacturer: TOV "Ternofarm
    Prescription not required
    Dosage form: solution, 15,000 IU/ml
    Prescription required
    Dosage form: herb, 50 g in a pack
    Prescription not required

    Online doctors for HEMLIBRA 30 mg/mL Injectable Solution

    Discuss dosage, side effects, interactions, contraindications, and prescription renewal for HEMLIBRA 30 mg/mL Injectable Solution – subject to medical assessment and local rules.

    5.0(12)
    Doctor

    Anna Biriukova

    General medicine5 years of experience

    Dr Anna Biriukova is an internal medicine doctor with clinical experience in cardiology, endocrinology, and gastroenterology. She provides online consultations for adults, offering expert medical support for heart health, hormonal balance, digestive issues, and general internal medicine.

    Cardiology – Diagnosis and treatment of:

    • High blood pressure, blood pressure fluctuations, and cardiovascular risk prevention.
    • Chest pain, shortness of breath, arrhythmias (tachycardia, bradycardia, palpitations).
    • Leg swelling, chronic fatigue, reduced exercise tolerance.
    • EKG interpretation, lipid profile evaluation, cardiovascular risk assessment (heart attack, stroke).
    • Post-COVID-19 cardiac monitoring and care.
    Endocrinology – Diabetes, thyroid, metabolism:
    • Diagnosis and management of type 1 and type 2 diabetes, and prediabetes.
    • Individual treatment plans including oral medications and insulin therapy.
    • GLP-1 therapy– modern pharmacological treatment for weight management and diabetes control, including drug selection, monitoring, and safety follow-up.
    • Thyroid disorders – hypothyroidism, hyperthyroidism, autoimmune thyroid diseases (Hashimoto’s, Graves’ disease).
    • Metabolic syndrome – obesity, lipid disorders, insulin resistance.
    Gastroenterology – Digestive health:
    • Abdominal pain, nausea, heartburn, gastroesophageal reflux (GERD).
    • Stomach and intestinal conditions: gastritis, irritable bowel syndrome (IBS), indigestion.
    • Management of chronic digestive disorders and interpretation of tests (endoscopy, ultrasound, labs).
    General internal medicine and preventive care:
    • Respiratory infections – cough, colds, bronchitis.
    • Lab test analysis, therapy adjustments, medication management.
    • Adult vaccinations – planning, contraindications assessment.
    • Cancer prevention – screening strategies and risk assessment.
    • Holistic approach – symptom relief, complication prevention, and quality of life improvement.
    Dr Biriukova combines internal medicine with specialist insight, offering clear explanations, personalised treatment plans, and comprehensive care tailored to each patient.
    CameraBook a video appointment
    €60
    October 2613:00
    October 2613:50
    October 2614:40
    October 2806:00
    October 2806:50
    More times
    0.0(1)
    Doctor

    Svetlana Kolomeeva

    Cardiology17 years of experience

    Dr. Svetlana Kolomeeva is a general practitioner and internal medicine doctor providing online consultations for adults. She helps patients manage acute symptoms, chronic conditions, and preventive care. Her clinical focus includes cardiovascular health, hypertension control, and managing symptoms like fatigue, weakness, sleep issues, and overall low energy.

    Patients commonly seek her help for:

    • High blood pressure, headaches, dizziness, swelling, palpitations.
    • Diagnosis and management of hypertension, arrhythmias, and tachycardia.
    • Metabolic syndrome, excess weight, high cholesterol.
    • Chronic fatigue, insomnia, poor concentration, anxiety.
    • Respiratory symptoms: colds, flu, sore throat, cough, fever.
    • Digestive issues: heartburn, bloating, constipation, IBS symptoms.
    • Chronic conditions: diabetes, thyroid disorders.
    • Interpretation of lab tests and medical reports, therapy adjustment.
    • Second opinion and decision-making support.
    • Cardiovascular disease prevention and metabolic risk reduction.
    • Long-term follow-up and dynamic health monitoring.

    Dr Kolomeeva combines clinical expertise with personalised care. She clearly explains diagnoses, guides patients through symptoms and treatment options, and provides actionable plans. Her consultations are designed not only to address current complaints but also to stabilise chronic conditions and prevent future complications. She supports patients through every stage of care – from first symptoms to ongoing health management.

    CameraBook a video appointment
    €50
    October 2709:00
    October 2710:05
    October 2711:10
    October 2712:15
    October 2713:20
    More times
    5.0(14)
    Doctor

    Sergio Correa

    General medicine7 years of experience

    Dr. Sergio Correa is a licensed general practitioner, aesthetic medicine specialist, and trichologist with experience in emergency care and preventive health. He offers online consultations in English and Spanish, supporting adult patients with a wide range of medical concerns – from acute symptoms to chronic condition management.

    His areas of focus include:

    • General and urgent care: fever, fatigue, infections, digestive issues, respiratory symptoms, and other common concerns
    • Chronic condition support: hypertension, high cholesterol, diabetes, thyroid issues
    • Aesthetic medicine and dermatology: acne, skin ageing, hyperpigmentation, personalised skincare guidance
    • Trichology: hair loss, scalp conditions, treatment strategies for men and women
    • Preventive care: health check-ups, lifestyle advice, second opinions

    Dr. Correa combines medical knowledge with an aesthetic and holistic approach to help patients improve both health and quality of life.

    CameraBook a video appointment
    €40
    October 2709:00
    October 2710:00
    October 2711:00
    October 2712:00
    October 2713:00
    More times
    0.0(0)
    Doctor

    Roman Raevskii

    Oncology6 years of experience

    Dr. Roman Raevskii is an oncologist and general practitioner. He provides online consultations focused on cancer-related care, early diagnosis, and personalised treatment – combining clinical expertise with a patient-centred approach.

    Dr. Raevskii provides medical care in the following areas:

    • Diagnosis and management of common conditions: hypertension, diabetes, respiratory and digestive disorders.
    • Oncological consultations: early cancer detection, risk evaluation, and treatment navigation.
    • Supportive care for oncology patients — pain control, symptom relief, and side effect management.
    • Preventive medicine and health screenings.
    • Development of tailored treatment plans based on clinical guidelines.

    With a patient-centred approach, Dr. Raevskii helps individuals manage both chronic illnesses and complex oncological cases. His consultations are guided by current medical standards and adapted to each patient’s needs.

    CameraBook a video appointment
    €50
    October 2710:00
    October 2710:30
    October 2711:00
    October 2711:30
    October 2712:00
    More times
    5.0(4)
    Doctor

    Mar Tabeshadze

    Endocrinology10 years of experience

    Dr. Mar Tabeshadze is a licensed endocrinologist and general practitioner in Spain. She provides online consultations for adults, offering medical support for a wide range of endocrine conditions and related health concerns.

    • Diagnostic consultations for suspected endocrine disorders
    • Management of thyroid conditions, including in pregnant women
    • Early detection and treatment of type 1 and type 2 diabetes, with personalised therapy plans
    • Obesity treatment: identifying underlying causes of weight gain, combining medication and non-pharmacological strategies, and long-term support
    • Diagnosis and treatment of endocrine-related skin, hair, and nail issues
    • Ongoing care for patients with osteoporosis, pituitary, and adrenal gland disorders
    Dr. Tabeshadze takes a patient-centred approach based on evidence-based medicine. Her goal is to help patients achieve hormonal balance, manage chronic conditions effectively, and improve overall well-being through targeted, personalised care.
    CameraBook a video appointment
    €55
    October 2711:00
    October 2811:00
    October 2911:00
    October 3011:00
    October 3111:00
    More times
    0.0(0)
    Doctor

    Antonio Cayatte

    General medicine43 years of experience

    Dr Antonio Cayatte is a physician in General and Acute Medicine with over 30 years of experience across clinical care, medical research, and education. He offers online consultations for adults with a wide range of symptoms, both acute and chronic.

    His clinical background includes:

    • assessment of sudden or unclear symptoms
    • ongoing care for chronic conditions
    • follow-up after hospital discharge
    • interpretation of test results
    • medical support while abroad
    Dr Cayatte earned his degree from the University of Lisbon and taught internal medicine at Boston University School of Medicine. He holds active medical registrations in both Portugal and the UK and is a Fellow of the American Heart Association.

    Consultations are available in English and Portuguese. Patients value his clarity, professionalism, and balanced approach to evidence-based care.

    CameraBook a video appointment
    €60
    October 2714:00
    October 2714:30
    October 2715:00
    October 2715:30
    October 2716:00
    More times
    5.0(130)
    Doctor

    Andrei Popov

    General medicine6 years of experience

    Dr. Andrei Popov is a licensed pain management specialist and general practitioner based in Spain. He provides expert online care for adults dealing with both chronic and acute pain, as well as a wide range of everyday health concerns.

    He specialises in diagnosing and treating pain conditions that affect quality of life, including:

    • Chronic pain lasting more than 3 months.
    • Migraines and recurring headaches.
    • Neck, back, lower back, and joint pain.
    • Post-traumatic pain following injury or surgery.
    • Nerve-related pain, fibromyalgia, and neuralgia.
    In addition to pain management, Dr. Popov helps patients with:
    • Respiratory infections (colds, bronchitis, pneumonia).
    • High blood pressure and metabolic conditions such as diabetes.
    • Preventive care and routine health check-ups.

    Online consultations last up to 30 minutes and include a detailed symptom review, personalised treatment planning, and medical follow-up when needed.

    Dr. Popov’s approach is rooted in evidence-based medicine, combined with individualised care tailored to each patient’s history, lifestyle, and clinical needs.

    CameraBook a video appointment
    €59
    October 2716:00
    October 2716:30
    October 2717:00
    October 2717:30
    October 2718:00
    More times
    5.0(11)
    Doctor

    Dmytro Horobets

    Family medicine6 years of experience

    Dr. Dmytro Horobets is a licensed family medicine physician in Poland, specialising in endocrinology, diabetology, obesity management, gastroenterology, pediatrics, general surgery, and pain medicine. He offers online consultations for adults and children, providing personalised medical support for a wide range of acute and chronic health concerns.

    Areas of expertise:

    • Endocrinology: diabetes type 1 and type 2, prediabetes, thyroid disorders, metabolic syndrome, hormonal imbalance.
    • Obesity medicine: structured weight management plans, nutritional counselling, obesity-related health risks.
    • Gastroenterology: acid reflux (GERD), gastritis, irritable bowel syndrome (IBS), liver and biliary conditions.
    • Pediatric care: infections, respiratory symptoms, digestive issues, growth and development monitoring.
    • General surgery support: pre- and post-surgical consultations, wound care, rehabilitation.
    • Pain management: chronic and acute pain, back pain, joint pain, post-traumatic pain syndromes.
    • Cardiovascular health: hypertension, cholesterol control, risk assessment for heart disease.
    • Preventive medicine: regular check-ups, health screenings, long-term management of chronic conditions.

    Dr. Horobets combines evidence-based medicine with a patient-centred approach. He carefully evaluates each patient’s medical history and symptoms, offering clear explanations and structured treatment plans adapted to individual needs.

    Whether you need help managing diabetes, tackling weight-related health issues, interpreting lab results, or receiving general family medicine support, Dr. Horobets provides professional online care tailored to your specific health goals.

    CameraBook a video appointment
    €60
    November 109:00
    November 109:30
    November 809:00
    November 809:30
    November 1509:00
    More times
    0.0(3)
    Doctor

    Alexandra Alexandrova

    General medicine8 years of experience

    Dr Alexandra Alexandrova is a licensed general medicine doctor in Spain, specialising in trichology, nutrition, and aesthetic medicine. She offers online consultations for adults, combining a therapeutic approach with personalised care for hair, scalp, and overall health.

    Areas of expertise:

    • Hair loss in women and men, postpartum hair loss, androgenetic and telogen effluvium.
    • Scalp conditions: seborrheic dermatitis, psoriasis, scalp irritation, dandruff.
    • Chronic conditions: hypertension, diabetes, metabolic disorders.
    • Online trichology consultation: customised treatment plans, nutritional support, hair growth stimulation.
    • Hair loss prevention: hormonal imbalance, stress factors, haircare strategies.
    • Routine health check-ups, prevention of cardiovascular and metabolic diseases.
    • Personalised nutritional advice to improve hair strength, skin health, and hormonal balance.
    • Aesthetic medicine: non-invasive strategies to enhance skin quality, tone, and metabolic wellness.

    Dr Alexandrova follows an evidence-based and holistic approach: online consultations with a therapist and trichologist on Oladoctor provide professional support for hair, scalp, and overall health — all from the comfort of your home.

    CameraBook a video appointment
    €59
    November 1310:00
    November 1310:30
    November 1311:00
    November 1311:30
    November 2009:00
    More times

    Get updates and exclusive offers

    Be the first to know about new services, marketplace updates, and subscriber-only promos.

    Follow us on social media
    FacebookInstagram
    Logo
    Oladoctor
    Find a doctor
    Doctors by specialty
    Services
    Choose language
    © 2025 Oladoctor. All rights reserved.
    VisaMastercardStripe
    1. DISPOSAL

    Step 14. Cover the needle with the safety protector

    Needle inserted into the skin with a safety device activated, showing downward arrow and circular rotation

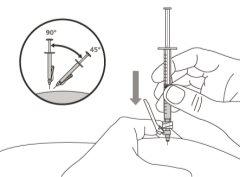
    • Slide the safety protector forward 90°, away from the syringe body.
    • Holding the syringe with one hand, press the safety protector downagainst a flat surface with a firm and quick motion until you hear a “click”.

    Syringe with needle being inserted into the skin with an indicated angle and an eye observing

    • If you do not hear the click, check that the needle is completely covered by the safety protector.

    ? Keep your fingers behind the safety protector and away from the needle at all times.

    ? Do notseparate the needle from the syringe.

    Step 15. Dispose of the syringe and needle

    Pre-filled syringe with medication and biological waste container with infectious hazard symbol below

    • Discard used needles and syringes in a puncture-resistant container immediately after use. For more information, see the "Disposal of Medication and Materials" section.
    • Do notattempt to remove the used injection needle from the syringe.
    • Do notrecap the injection needle with the cap.
    • Important:always keep the puncture-resistant container out of the reach of children.
    • Discard any cap(s), vial(s), vial adapter(s), needles, and syringes in the puncture-resistant container.

    Vial Combination

    If you need to use more than 1 vial to reach the prescribed dose, follow these steps after withdrawing the medication from the first vial as described in step 4. You must use a new vial adapter for each vial.

    Step A. Insert a new vial adapter into the new vial

    Hands holding an auto-injector device with exposed needle and removed protector

    • Peel off the cap to open the blister.

    Do notremove the vial adapter from the transparent plastic blister.

    Medication vial with gray applicator and hands holding both preparing for injection

    • Press the plastic blister with the vial adapter firmly down onto the new vial until you hear a "click".

    Hand holding an injection device with connected vial, arrows indicating direction of pressure on the plunger

    • Remove and discard the plastic blister.
    • Do not touchthe tip of the vial adapter.

    Step B. Withdraw the syringe from the used vial adapter

    Hands holding a cylinder and a syringe connecting with an arrow indicating the direction of insertion

    • Remove the syringe from the used vial adapter by turning it counterclockwise and pulling gently.
    • Discard the used vial and vial adapter in a puncture-resistant container.

    Step C. Attach the syringe to the new vial adapter

    Vial with liquid and adapter, arrow indicating connection and circle with cross over direct injection

    • Push and turn the same syringe clockwiseinto the new vial adapter until it is fully secured.

    Step D. Transfer the medication to the syringe

    Syringe with needle showing rotation of a transparent cylindrical connection device over the end

    • Hold the vial adapter secure on the syringe and turn the vial upside down.

    Hand holding a syringe with connected vial, arrow indicating downward direction and visible plunger

    • With the syringe facing up, slowly pull back the plunger to fill the syringewith more than the amount of medicationneeded for the prescribed dose.
    • Hold the plunger firmlyto ensure it does not retract.
    • Try not to pull the plunger out of the syringe.

    Note:make sure you have enough medication in the syringe to complete the dose before proceeding to the next step.

    Repeat steps A to D with each additional vial until you have more than the amount of medication needed for your prescribed dose. When finished, keep the vial adapter on the vial and return to step 5 "Withdraw air bubbles". Continue with the remaining steps.