

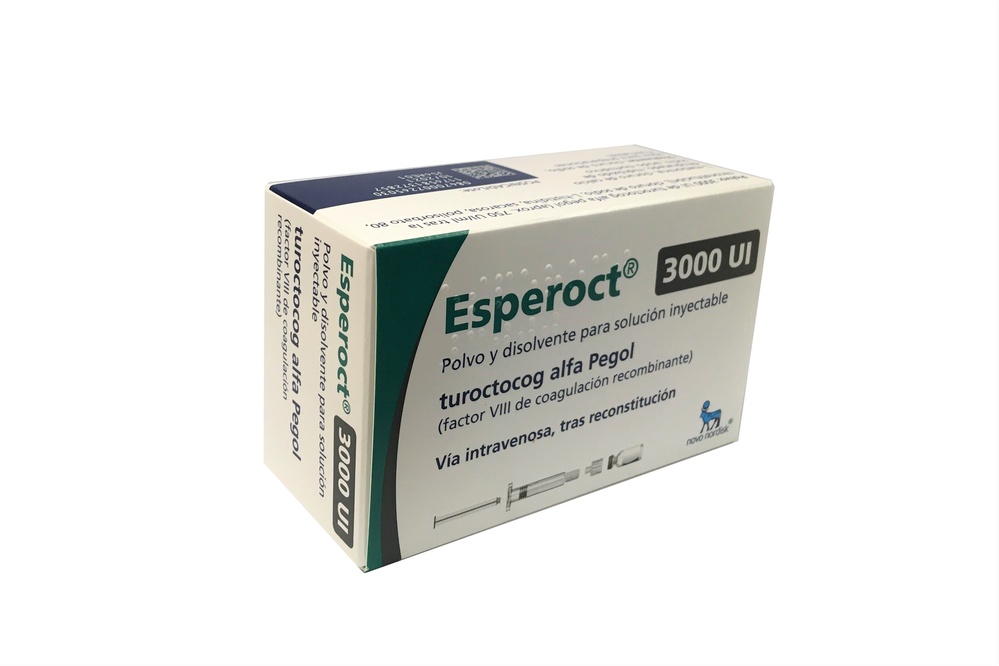
ESPEROCT 3000 IU POWDER AND SOLVENT FOR INJECTABLE SOLUTION


How to use ESPEROCT 3000 IU POWDER AND SOLVENT FOR INJECTABLE SOLUTION
Translated with AI
This page provides general information and does not replace a doctor’s consultation. Always consult a doctor before taking any medication. Seek urgent medical care if symptoms are severe.
Show originalContents of the leaflet
Introduction
Package Leaflet: Information for the User
Esperoct 500UI powder and solvent for solution for injection
Esperoct 1000UI powder and solvent for solution for injection
Esperoct 1500UI powder and solvent for solution for injection
Esperoct 2000UI powder and solvent for solution for injection
Esperoct 3000UI powder and solvent for solution for injection
Esperoct 4000UI powder and solvent for solution for injection
Esperoct 5000UI powder and solvent for solution for injection
turoctocog alfa pegol [human coagulation factor VIII (rDNA)]
This medicinal product is subject to additional monitoring, which will allow for quick identification of new safety information. You can help by reporting any side effects you may get. The last section of the package leaflet contains information on how to report side effects.
Read all of this leaflet carefully before you start using this medicine because it contains important information for you.
- Keep this leaflet, you may need to read it again.
- If you have any further questions, ask your doctor or pharmacist.
- This medicine has been prescribed for you only. Do not pass it on to others. It may harm them, even if their signs of illness are the same as yours.
- If you get any side effects, talk to your doctor or pharmacist. This includes any possible side effects not listed in this leaflet. See section 4.
Contents of the pack and other information
- What is Esperoct and what is it used for
- What you need to know before you use Esperoct
- How to use Esperoct
- Possible side effects
- Storage of Esperoct
- Contents of the pack and other information
1. What is Esperoct and what is it used for
What is Esperoct
Esperoct contains the active substance turoctocog alfa pegol and is a long-acting recombinant coagulation factor VIII medicinal product. Factor VIII is a protein that is found in the blood and helps to prevent and stop bleeding.
What Esperoct is used for
Esperoct is used to treat and prevent bleeding in people of all age groups with haemophilia A (congenital factor VIII deficiency).
In people with haemophilia A, factor VIII is missing or does not work properly. Esperoct replaces the missing or defective factor VIII and helps the blood to form clots at the site of bleeding.

2. What you need to know before you use Esperoct
Do not use Esperoct
- if you are allergic to turoctocog alfa pegol or any of the other ingredients of this medicine (listed in section 6)
- if you are allergic to hamster proteins.
Do not use Esperoct if any of the above applies to you. If you are not sure, consult your doctor before using this medicine.
Warnings and precautions
Previous use of factor VIII medicines
Tell your doctor if you have previously used factor VIII medicines, especially if you have developed inhibitors (antibodies) to the medicine, as there may be a risk that this will happen again.
Allergic reactions
There is a risk of a severe and sudden allergic reaction (e.g. anaphylactic reaction) to Esperoct.
If you show early signs of allergic reactions, stop the injection and contact your doctor or emergency services immediately. These early signs may include rash, hives, itching, redness and/or swelling of the lips, tongue, face or hands, difficulty swallowing or breathing, wheezing, chest tightness, pale and cold skin, palpitations, or dizziness, headache, nausea and vomiting.
Development of “factor VIII inhibitors” (antibodies)
Inhibitors (antibodies) may develop during treatment with all factor VIII medicines
- These inhibitors, especially at high levels, prevent the treatment from working properly
- You will be closely monitored for the development of inhibitors
- If your bleeding is not being controlled with Esperoct, inform your doctor immediately
- Do not increase the total dose of Esperoct to control bleeding without talking to your doctor.
Catheter-related complications
If you have a catheter through which you are given medicines into your blood (a central venous access device), you may develop infections or blood clots at the site of the catheter insertion.
Heart disease
Tell your doctor or pharmacist if you have heart disease or if you are at risk of heart disease.
Other medicines and Esperoct
Tell your doctor if you are using, have recently used or might use any other medicines.
Pregnancy and breast-feeding
If you are pregnant or breast-feeding, think you may be pregnant or are planning to have a baby, ask your doctor for advice before using this medicine.
Driving and using machines
Esperoct has no influence on the ability to drive and use machines.
Decrease in factor VIII activity in previously untreated patients
A decrease in factor VIII activity may occur at the start of your treatment. If your bleeding is not being controlled with Esperoct, inform your doctor.
Decrease in factor VIII activity in previously treated patients
A decrease in factor VIII activity may occur at the start of your treatment. Inform your doctor if your usual dose of Esperoct is not controlling your bleeding.
Esperoct contains sodium
This medicine contains 30.5 mg of sodium (main component of cooking/table salt) per reconstituted vial. Equivalent to 1.5% of the maximum recommended daily intake of sodium for an adult.
3. How to use Esperoct
Treatment with Esperoct will be started by a doctor who has experience in treating people with haemophilia A.
Follow the instructions for administration of this medicine given by your doctor. If you are not sure how to use Esperoct, consult your doctor.
How Esperoct is given
Esperoct is given by injection into a vein (intravenously), see “Instructions for using Esperoct” for more information.
How much to use
Your doctor will calculate your dose based on your body weight and whether you are using it to prevent or treat a bleed.
To prevent bleeding
For children (under 12 years of age), the recommended dose is 65 IU of Esperoct per kg body weight twice a week. Your doctor may choose a different dose or frequency of injections based on your needs.
For adults and adolescents (12 years of age or older), the recommended dose is 50 IU of Esperoct per kg body weight every 4 days. Your doctor may choose a different dose or frequency of injections based on your needs.
To treat bleeding
The dose of Esperoct is calculated based on your body weight and the desired factor VIII levels. The desired factor VIII level depends on the severity and location of the bleed. Inform your doctor if your usual dose of Esperoct is not controlling your bleeding.
Use in children and adolescents
For children (under 12 years of age), the recommended dose is 65 IU of Esperoct per kg body weight twice a week. Adolescents (12 years of age or older) may use the same dose as adults.
If you use more Esperoct than you should
If you use more Esperoct than you should, contact your doctor immediately.
Always use Esperoct exactly as your doctor has told you. If you are not sure, consult your doctor. For more information, see “Development of factor VIII inhibitors (antibodies)” in section 2.
If you forget to use Esperoct
If you forget a dose, inject the missed dose as soon as you remember. Do not inject a double dose to make up for a forgotten dose. Continue with the next injection as scheduled and follow the advice of your doctor. If you have any further questions, ask your doctor.
If you stop using Esperoct
Do not stop using Esperoct without talking to your doctor first.
If you stop using Esperoct, you will no longer be protected against bleeding, or an existing bleed may not stop. If you have any further questions on the use of this medicine, ask your doctor.

4. Possible side effects
Like all medicines, this medicine can cause side effects, although not everybody gets them.
Allergic reactions (hypersensitivity)
Stop the injection immediately if you develop severe and sudden allergic reactions (anaphylactic reactions). If you get any of the following symptoms of an allergic reaction, contact your doctor or emergency services immediately:
- difficulty swallowing or breathing
- wheezing
- chest tightness
- redness and/or swelling of the lips, tongue, face or hands
- rash, hives, itching or prickling sensation
- pale and cold skin, palpitations or dizziness (low blood pressure)
- headache, feeling sick (nausea) or being sick (vomiting).
Development of “factor VIII inhibitors” (antibodies)
If you have previously received more than 150 days of treatment with factor VIII, you may develop inhibitors (antibodies) (may affect up to 1 in 100 people). If this happens, the treatment may stop working properly and you may have persistent bleeding. If this happens, contact your doctor immediately. See “Development of factor VIII inhibitors (antibodies)” in section 2.
Side effects with Esperoct
Very common side effects(may affect more than 1 in 10 people)
- factor VIII inhibitors (antibodies) in patients who have not been previously treated with factor VIII.
Common side effects(may affect up to 1 in 10 people)
- reactions at the injection site
- itching (pruritus)
- redness of the skin (erythema)
- rash.
Uncommon side effects(may affect up to 1 in 100 people)
- allergic reactions (hypersensitivity). These can be severe and life-threatening, see the above section “Allergic reactions (hypersensitivity)” for more information
- factor VIII inhibitors (antibodies) in patients who have been previously treated with factor VIII.
Other possible side effects(frequency not known)
Decrease in factor VIII activity in the absence of factor VIII inhibitors.
A temporary response of the immune system may occur at the start of treatment, which may reduce the effectiveness of the medicine.
Reporting of side effects
If you get any side effects, talk to your doctor, pharmacist or nurse. This includes any possible side effects not listed in this leaflet. You can also report side effects directly via the national reporting system listed in Appendix V. By reporting side effects, you can help provide more information on the safety of this medicine.
5. Storage of Esperoct
Keep this medicine out of the sight and reach of children.
Do not use this medicine after the expiry date which is stated on the carton and on the labels of the vial and the pre-filled syringe after “EXP”. The expiry date refers to the last day of the month shown.
Before reconstitution(before mixing the powder with the solvent):
Store in a refrigerator (2°C - 8°C). Esperoct can be stored
- at room temperature (≤ 30°C) for a single period not exceeding 1 year during the shelf-life of the medicine or
- above room temperature (> 30°C up to 40°C) for a single period not exceeding 3 months during the shelf-life of the medicine.
When you start storing Esperoct outside of the refrigerator, write down the date and storage temperature in the space provided on the carton.
Once you have removed the medicine from the refrigerator to store it outside, you must not put it back in the refrigerator. Do not freeze. Store in the original package to protect from light.
After reconstitution(after mixing the powder with the solvent – 500 IU, 1000 IU, 1500 IU, 2000 IU, 3000 IU):
Once Esperoct has been reconstituted, it should be used immediately. If it is not possible to use the reconstituted solution immediately, it can be used
- within 24 hours when stored in a refrigerator (2°C - 8°C) or
- within 4 hours at ≤ 30°C or
- within 1 hour between > 30°C and 40°C, only if the product has been stored prior to reconstitution above room temperature (> 30°C up to 40°C) for no more than 3 months.
After reconstitution(after mixing the powder with the solvent – 4000 IU, 5000 IU):
Chemical and physical stability in-use has been demonstrated for:
- 24 hours when stored in a refrigerator (2°C - 8°C) or
- 4 hours at ≤ 30°C.
The powder in the vial is a white to off-white powder. If the colour of the powder has changed, do not use it.
The reconstituted solution should be clear and colourless. Do not use the reconstituted solution if you notice it contains particles or discolouration.
Medicines should not be disposed of via wastewater or household waste. Ask your pharmacist how to dispose of medicines no longer required. These measures will help to protect the environment.
6. Container Contents and Additional Information
Composition of Esperoct
- The active substance is turoctocog alfa pegol [pegylated human coagulation factor VIII (rDNA)]. Each vial of Esperoct contains 500, 1,000, 1,500, 2,000, 3,000, 4,000, or 5,000 IU of turoctocog alfa pegol.
- The other components are L-histidine, sucrose, polysorbate 80, sodium chloride, L-methionine, calcium chloride dihydrate, sodium hydroxide, and hydrochloric acid.
- The components of the solvent are sodium chloride 9 mg/ml (0.9%) solution for injection and water for injections.
See section 2 "Esperoct contains sodium".
After reconstitution with the supplied solvent [sodium chloride 9 mg/ml (0.9%) solution for injection], the prepared injection solution contains 125, 250, 375, 500, 750, 1,000, or 1,250 IU of turoctocog alfa pegol per ml, respectively (based on the concentration of turoctocog alfa pegol, i.e., 500, 1,000, 1,500, 2,000, 3,000, 4,000, or 5,000 IU).
Appearance of Esperoct and Container Contents
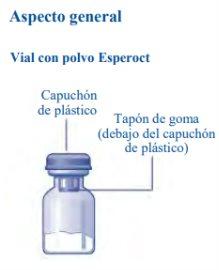
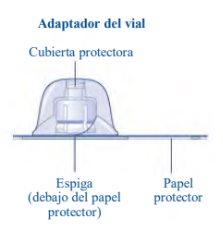
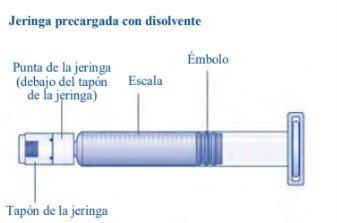
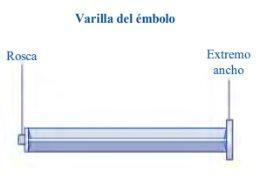
Esperoct is available in containers containing 500 IU, 1,000 IU, 1,500 IU, 2,000 IU, 3,000 IU, 4,000 IU, or 5,000 IU. Each Esperoct container contains a vial with white to off-white powder, a pre-filled syringe with 4 ml of a colorless and clear solvent, a plunger rod, and a vial adapter.
Marketing Authorization Holder and Manufacturer
Novo Nordisk A/S
Novo Allé
DK-2880 Bagsværd, Denmark
Date of Last Revision of this Leaflet:
Other Sources of Information
Detailed information on this medicinal product is available on the European Medicines Agency website: http://www.ema.europa.eu.
Instructions for Use of Esperoct Read these instructions carefully before using Esperoct. Esperoct is supplied as a powder. Before injection, it must be reconstituted with the supplied solvent in the syringe. The solvent is a sodium chloride 9 mg/ml (0.9%) solution for injection. The reconstituted medicinal product must be injected into a vein [intravenous (IV) injection]. The components of this container are designed to reconstitute and inject Esperoct. You will also need:
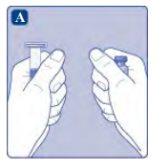
These items are not included in the Esperoct container. Do not use the equipment without having received proper training from your doctor or nurse. Always wash your hands and make sure the area around you is clean. When preparing and injecting the medicinal product directly into a vein, it is essential to use a clean and germ-free (aseptic) technique.Incorrect technique can introduce germs that can infect the blood. Do not open the equipment until you are ready to use it. Do not use the equipment if it has been dropped or damaged.Use a new container instead. Do not use the equipment if it has expired.Use a new container instead. The expiration date is printed on the outer packaging, the vial, the vial adapter, and the pre-filled syringe. Do not use the equipment if you suspect it is contaminated.Use a new container instead. Do not discard any items until the reconstituted solution has been injected. The equipment is for single use. | |
Contents The container contains:
| |
| |
Do not use any other system to heatthe vial and pre-filled syringe. |
|
|
|
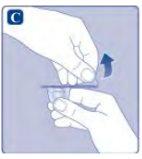
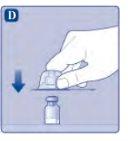
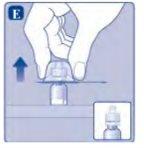
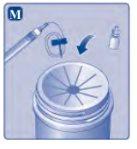
If the protective paper is not fully sealed or is broken, do not use the vial adapter. Do not remove the vial adapter from the protective cover with your fingers. If you touch the spike of the vial adapter, you can transfer germs from your fingers. |
|
Once attached, do not remove the vial adapter from the vial. |
|
Do not remove the vial adapterwhen removing the protective cover. |
|
|
|
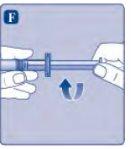
Do not touch the tip of the syringeunder the syringe cap. If you touch the tip of the syringe, you can transfer germs from your fingers. If the syringe cap is loose or missing, do not use the pre-filled syringe. |
|
|
|
|
|
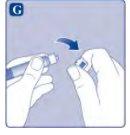
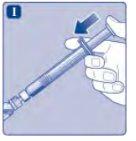
Do not shake the vial, as this will create foam.
|
|
It is recommended to use Esperoct immediately after reconstitution. If you cannot use the reconstituted Esperoct solution immediately (applies to 500IU, 1000IU, 1500IU, 2000IU, 3000IU),you must use it within:
If you cannot use the reconstituted Esperoct solution immediately (applies to 4000IU, 5000IU),you must use it within:
Store the reconstituted medicinal product in the vial. Do not freeze the reconstituted solution or store it in syringes. Storethe reconstituted solution away from direct light. If your dose requires more than one vial, repeat steps Athrough Jwith additional vials, vial adapters, and pre-filled syringes until you reach the required dose. | |
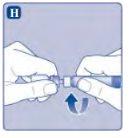
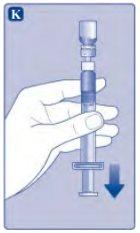
If there is air in the syringe at any time, inject the air back into the vial.
|
|
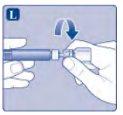
Do not touch the tip of the syringe. If you touch the tip of the syringe, you can transfer germs from your fingers. |
|
Esperoct is now ready to be injected into a vein.
Do not mix Esperoct with other injections or intravenous medications. Injection of Esperoct through needle-free connectors for intravenous (IV) catheters Precaution:The pre-filled syringe is made of glass and is designed to be compatible with standard luer-lock connections. Some needle-free connectors with an internal spike are incompatible with the pre-filled syringe. This incompatibility can prevent administration of the medicinal product and damage the needle-free connector. Injection of the solution through a central venous access device (CVAD) such as a central venous catheter or a subcutaneous port:
| |
Disposal
Do not throw them away in household trash. |
|
Do not disassemble the equipment before disposal. Do not reuse the equipment. |


- Country of registration
- Active substance
- Prescription requiredYes
- Manufacturer
- This information is for reference only and does not constitute medical advice. Always consult a doctor before taking any medication. Oladoctor is not responsible for medical decisions based on this content.
- Alternatives to ESPEROCT 3000 IU POWDER AND SOLVENT FOR INJECTABLE SOLUTIONDosage form: INJECTABLE, 1,000 IUActive substance: coagulation factor VIIIManufacturer: Takeda Manufacturing Austria AgPrescription requiredDosage form: INJECTABLE, 1500 IUActive substance: coagulation factor VIIIManufacturer: Takeda Manufacturing Austria AgPrescription requiredDosage form: INJECTABLE, 1000 IU - after reconstitution in 2 ml of water for injections, the dose is 500 IU/mlActive substance: coagulation factor VIIIManufacturer: Takeda Manufacturing Austria AgPrescription required
Online doctors for ESPEROCT 3000 IU POWDER AND SOLVENT FOR INJECTABLE SOLUTION
Discuss questions about ESPEROCT 3000 IU POWDER AND SOLVENT FOR INJECTABLE SOLUTION, including use, safety considerations and prescription review, subject to medical assessment and local regulations.


Frequently Asked Questions
