

BETAFERON 250 micrograms/ml POWDER AND SOLVENT FOR INJECTABLE SOLUTION


How to use BETAFERON 250 micrograms/ml POWDER AND SOLVENT FOR INJECTABLE SOLUTION
Translated with AI
This page provides general information and does not replace a doctor’s consultation. Always consult a doctor before taking any medication. Seek urgent medical care if symptoms are severe.
Show originalContents of the leaflet
Introduction
Package Leaflet: Information for the User
Betaferon 250 micrograms/ml, powder and solvent for solution for injection
interferon beta-1b
Read all of this leaflet carefully before you start using this medicine because it contains important information for you.
- Keep this leaflet, you may need to read it again.
- If you have any further questions, ask your doctor, pharmacist, or nurse.
- This medicine has been prescribed for you only. Do not pass it on to others. It may harm them, even if their signs of illness are the same as yours.
- If you get any side effects, talk to your doctor, pharmacist, or nurse. This includes any possible side effects not listed in this leaflet. See section 4.
Contents of the pack
- What is Betaferon and what is it used for
- What you need to know before you use Betaferon
- How to use Betaferon
- Possible side effects
- Storage of Betaferon
- Contents of the pack and other information
Appendix – procedure for self-injection
1. What is Betaferon and what is it used for
What is Betaferon
Betaferon is a type of medicine known as an interferon, used to treat multiple sclerosis. Interferons are proteins produced by the body that help it fight against attacks on the immune system, such as viral infections.
How Betaferon works
Multiple sclerosis (MS)is a chronic condition that affects the central nervous system (CNS), particularly the functioning of the brain and spinal cord. In MS, inflammation destroys the protective covering (called myelin) that surrounds the nerves of the CNS and prevents the nerves from functioning properly. This is called demyelination.
The exact cause of MS is unknown. It is thought that in the process that damages the CNS, an abnormal response by the immune system plays an important role.
Damage to the CNScan occur during an MS attack (relapse). It can cause temporary disability, such as difficulty walking. The symptoms can disappear completely or partially.
It has been shown that interferon beta-1b changes the immune system's response and helps reduce disease activity.
How Betaferon helps fight your disease
Single clinical episode suggestive of a high risk of developing multiple sclerosis:It has been shown that Betaferon delays the progression to definite multiple sclerosis.
Relapsing-remitting multiple sclerosis:People with relapsing-remitting MS have occasional attacks or relapses, during which their symptoms worsen considerably. Betaferon has been shown to reduce the number of attacks and make them less severe, reduce the number of hospitalizations due to the disease, and prolong the time without relapses.
Secondary progressive multiple sclerosis:In some cases, people with relapsing-remitting MS notice that their symptoms increase and progress to another form of MS, called secondary progressive MS. With this, people become increasingly disabled, with or without relapses. Betaferon may reduce the number and severity of attacks and delay the progression of disability.
What Betaferon is used for
Betaferon is for use in patients
Who have suffered symptoms for the first time that indicate a high risk of developing multiple sclerosis. Your doctor will rule out other causes that could explain these symptoms before administering treatment.
Who suffer from relapsing-remitting multiple sclerosis, with the appearance of at least two relapses in the previous two years.
Who suffer from secondary progressive multiple sclerosis, with active disease demonstrated by the appearance of relapses.

2. What you need to know before you use Betaferon
Do not use Betaferon
- If you are allergic (hypersensitive)to natural or recombinant interferon beta, human albumin, or any of the other components of this medicine (listed in section 6).
- If you currently have severe depression and/or suicidal thoughts(see also "Warnings and precautions" and section 4. "Possible side effects").
- If you have severe liver disease(see "Warnings and precautions", "Use of Betaferon with other medicines" and section 4. "Possible side effects").
Tell your doctorif any of the above applies to you.
Warnings and precautions
Consult your doctor before starting Betaferon:
- If you havemonoclonal gammopathy. This is a disease of the immune systemin which an abnormal protein is found in the blood. Problems in the small blood vessels (capillaries) may occur when using medicines like Betaferon (systemic capillary leak syndrome). This can lead to shock (collapse) and even be fatal.
- If you have had or have depression, or have had suicidal thoughts in the past. Your doctor will closely monitor you during treatment. If your depression and/or suicidal thoughts are severe, you will not be prescribed Betaferon (see also "Do not use Betaferon").
- If you have had seizures, or if you are taking medicines to treat epilepsy(antiepileptics), your doctor will closely monitor your treatment (see also "Use of Betaferon with other medicines" and section 4. "Possible side effects").
- If you have severe kidney problems, your doctor may monitor your kidney function during treatment.
Your doctor should also be aware of the following circumstances while you are using Betaferon:
- If you experience symptoms such as itching all over your body, swelling of the face and/or tongue, or sudden difficulty breathing.These may be symptoms of a severe allergic reaction (hypersensitivity), which could be fatal.
- If you feel much sadder or more hopeless than before starting treatment with Betaferon, or if you have suicidal thoughts.If you become depressed while taking Betaferon, you may need special treatment, and your doctor will closely monitor you and may also consider stopping your treatment. If you have severe depression and/or suicidal thoughts, you will not be treated with Betaferon (see also "Do not use Betaferon").
- If you notice that you bruise easily, bleed too much when you have wounds, or get many infections. These may be symptoms of a decrease in the number of blood cells or platelets in your blood. You may need closer monitoring by your doctor.
- If you have loss of appetite, fatigue, dizziness(nausea), repeated vomiting, especially if you notice diffuse itching, yellowing of the skin or the white part of the eyes, or easy bruising.These symptoms may indicate liver problems. In some clinical studies, changes in liver function values have been observed in patients treated with Betaferon. As with other interferon betas, severe liver damage, including cases of liver failure, has been reported in patients treated with Betaferon. The most severe cases were reported in patients taking other medicines or having diseases that can affect the liver (e.g., alcohol abuse, severe infection).
- If you experience symptoms such as irregular heartbeats or swelling in the ankles or legs, or difficulty breathing.This may indicate a heart muscle disease (myocardial disease), which has been reported in rare cases in patients using Betaferon.
- If you notice abdominal pain that radiates to the back, and/or if you feel dizzy or have a fever.This may indicate inflammation of the pancreas (pancreatitis), which has been reported with the use of Betaferon. This is often associated with an increase in certain fats in the blood (triglycerides).
Stop using Betaferon and tell your doctor immediatelyif you experience any of these.
Other things to consider when using Betaferon
- A blood test will be necessaryto measure the number of your blood cells, blood chemistry, and liver enzymes. This will be done before you start using Betaferon, regularly after starting treatment with Betaferon, and periodically while you continue with it,even if you have no specific symptoms. These blood tests will be done in addition to the tests normally performed to monitor your MS.
- If you have heart disease, the flu-like symptoms that often occur at the start of treatment may be a burden for you.Betaferon should be used with caution, and your doctor will monitor any worsening of your heart condition, especially at the start of treatment. Betaferon itself does not directly affect the heart.
- You will have a check of your thyroid gland function, regularly or whenever your doctor considers it necessary for other reasons.
- Betaferon contains human albumin and therefore carriesa potential risk of transmitting viral diseases. The risk of transmitting Creutzfeldt-Jakob disease (CJD) cannot be excluded.
- During treatment with Betaferon, your body may produce substances calledneutralizing antibodies, which can react with Betaferon (neutralizing activity). It is not clear whether these neutralizing antibodies reduce the effectiveness of treatment. Neutralizing antibodies are not produced in all patients. Currently, it is not possible to predict which patients belong to this group.
- During treatment with Betaferon, kidney problems may occur that can affect yourkidney function, including scarring (glomerulosclerosis). Your doctor may perform tests to check your kidney function.
- During treatment, blood clots may form in the small blood vessels.These clots could affect your kidneys. This can occur after several weeks or years after starting treatment with Betaferon. Your doctor may want to perform checks on your blood pressure, blood (platelet count), and kidney function.
- During treatment, you may experience paleness, yellow skin, or dark urine, possibly accompanied by unusual dizziness, fatigue, or difficulty breathing.These may be symptoms of red blood cell breakdown. This can occur after several weeks or years after starting treatment with Betaferon. Your doctor may perform blood tests. Tell your doctor about other medicines you are taking at the same time as Betaferon.
Injection site reactions
During treatment with Betaferon, it is likely that you will experience injection site reactions.The symptoms consist of redness, swelling, change in skin color, inflammation, pain, and hypersensitivity. Less frequently, infections around the injection site and skin lesions and tissue damage (necrosis) are observed. Injection site reactions usually become less frequent over time.
The skin lesions and tissue damage can result in scarring. If these are severe, a doctor may need to perform removal of foreign material and dead tissue (debridement) and, less frequently, a skin graft, which can take up to six months to heal.
To reduce the risk of having an injection site reaction, such as infection or necrosis, you should:
- Use a sterile injection technique (aseptic).
- Rotate the injection sites with each injection (see Appendix "Procedure for self-injection", Part II, in the second part of this leaflet).
Injection site reactions may occur less frequently if you use an autoinjector device and rotate the injection sites. Your doctor or nurse can inform you about this.
If you experience a break in the skin, which may be associated with swelling or fluid loss at the injection site:
- Stop injecting Betaferonand tell your doctor.
If you have a single ulcerated injection site (lesion) and the tissue destruction (necrosis) is not too extensive, you can continue using Betaferon.
If you have multiple ulcerated injection sites (lesions), you must stop using Betaferon until your skin has healed.
Your doctor will regularly checkhow you are self-injecting, especially if you have experienced injection site reactions.
Children and adolescents
No formal clinical trials have been conducted in children or adolescents.
However, some data are available in children and adolescents aged 12 to 16 years. These data suggest that the safety profile in this age group is the same as in adults for the administration of 8.0 million IU of Betaferon under the skin on alternate days. There is no information on the use of Betaferon in children under 12 years of age. Therefore, Betaferon should not be used in this population.
Other medicines and Betaferon
Tell your doctor or pharmacist if you are using, have recently used, or might use any other medicines, including those obtained without a prescription.
No formal interaction studies have been conducted to determine if Betaferon affects other medicines or is affected by them.
The use of Betaferon with other medicines that modify the immune system's response is not recommended, except for anti-inflammatory medicines called corticosteroidsor adrenocorticotropic hormone (ACTH).
Betaferon should be used with caution with:
- Medicines that require a certain liver enzyme systemfor their elimination from the body (known as the cytochrome P450 system), such as medicines used to treat epilepsy (e.g., phenytoin).
- Medicines that affect blood cell production.
Use of Betaferon with food and drink
Betaferon is injected under the skin, so it is not considered that any food or drink you consume has any effect on Betaferon.
Pregnancy and breastfeeding
If you are pregnant or breastfeeding, think you may be pregnant, or plan to become pregnant, consult your doctor or pharmacist before using this medicine.
No harmful effects are expected in the newborn/child during breastfeeding. Betaferon can be used during breastfeeding.
Driving and using machines
Betaferon can cause side effects in the central nervous system (see section 4. "Possible side effects"). If you are particularly sensitive, this may affect your ability to drive or use machines.
Betaferon contains manitol, human albumin, and sodium
Among the inactive ingredients of Betaferon are
- small amounts of manitol, a natural sugar, and human albumin, a protein.
- Sodium - this medicine contains less than 1 mmol of sodium (23 mg) per ml; this is, essentially "sodium-free".
If you are allergic (hypersensitive)to any of the components or become hypersensitive, you should not use Betaferon.
3. How to use Betaferon
Treatment with Betaferon should be initiated under the supervision of a doctor with experience in the treatment of multiple sclerosis.
Follow the administration instructions of this medication exactly as indicated by your doctor. In case of doubt, consult your doctor, pharmacist, or nurse again.
The recommended dose is:
On alternate days(once every two days) 1.0 ml of the prepared solution is injected under the skin (subcutaneously)(see Annex "Procedure for self-injection" in the second part of this prospectus). This is equivalent to 250 micrograms (8.0 million IU) of interferon beta-1b.
When starting treatment with Betaferon, it will be better tolerated if started with a dose and gradually increased, i.e., starting with only 0.25 ml of the medication and then increasing, after three injections, first to 0.5 ml, then to 0.75 ml, and finally to the full dose (1 ml) of Betaferon.
Your doctor may decide, with you, to change the time interval between dose increases, depending on the adverse effects you may experience at the start of treatment. To easily increase the dosage during the first 12 injections, you may be provided with a special dosage escalation packagethat contains four packages in different colors, including syringes with special markings and an 'introductory prospectus for the dosage escalation package' with detailed instructions.
Preparation of the injection
Before injection, the Betaferon injection solution is preparedfrom a vial of Betaferon powder and 1.2 ml of liquid from one of the pre-loaded syringes of solvent. This will be done by your doctor or nurse, or even by yourself, once you have been carefully instructed in the technique. For more information on how to prepare the Betaferon injectable solution, see Annex "Procedure for self-injection", Part I.
Detailed instructions for the self-injection of Betaferon under the skinare included in Part IE of the Annex "Procedure for self-injection".
The injection site should be changed regularly.See section 2 "Warnings and precautions" and follow the instructions indicated in Part II "Rotation of injection sites" and Part III (Calendar for the administration of Betaferon) of the Annex "Procedure for self-injection".
Duration of treatment
To date, it is not known how long the patient should be treated. The duration of treatment should be decided by the doctor together with you.
If you use more Betaferon than you should
The administration of Betaferon doses much higher than those recommended for multiple sclerosis has not led to life-threatening situations.
? Tell your doctorif you have injected too much Betaferon or if you have injected it too frequently.
If you forget to use Betaferon
If you have forgotten to administer an injection at the scheduled time, do so as soon as possible and continue with the next one, 48 hours later.
Do not inject a double dose to make up for forgotten doses.
If you interrupt treatment with Betaferon
Talk to your doctor if you interrupt or wish to interrupt treatment. It is not known if stopping Betaferon causes acute withdrawal symptoms.
? If you have any other questions about the use of this medication, ask your doctor, pharmacist, or nurse.

4. Possible side effects
Like all medicines, this medicine can cause side effects, although not everyone gets them.
Betaferon can cause serious side effects. If you think any of the side effects you are suffering from is serious or if you notice any side effect not mentioned in this prospectus, tell your doctor, pharmacist, or nurse.
- Tell your doctor immediately and stop using Betaferon:
- If you experience symptoms such as itching all over your body, swelling of the face and/or tongue, or sudden difficulty breathing.
- If you feel much sadder or more desperate than before starting treatment with Betaferon, or if you have suicidal thoughts.
- If you notice that you bruise easily, bleed too much when you have wounds, or get many infections.
- If you have loss of appetite, fatigue, nausea, repeated vomiting, especially if you notice diffuse itching, the appearance of a yellowish color on the skin or in the white of the eyes, or if you bruise easily.
- If you experience symptoms such as irregular heartbeats or swelling in the ankles or legs, or difficulty breathing.
- If you notice abdominal pain that radiates to the back, and/or if you feel dizzy or have a fever.
? Tell your doctor immediately:
- If you have any or all of these symptoms: foamy urine, fatigue, swelling, especially in the ankles and eyelids, and weight gain, as they may be signs of a possible kidney problem.
When starting treatment, side effects are common, but they generally decrease as treatment continues.
The most frequent side effects are:
? A flu-like syndrome,such as fever, chills, joint pain, discomfort, sweating, headache, or muscle pain. These symptoms can be reduced by taking paracetamol or non-steroidal anti-inflammatory drugs, such as ibuprofen.
? Reactions at the injection site. Symptoms may include redness, swelling, discoloration, inflammation, infection, pain, hypersensitivity, or tissue damage (necrosis). See "Warnings and precautions" in section 2 for more information and what to do if you experience a reaction at the injection site. These can be reduced by using an auto-injector device and rotating the injection sites. Talk to your doctor, pharmacist, or nurse for additional information.
To reduce side effects at the start of treatment, your doctor should start with a low dose of Betaferon and gradually increase it (see section 3 "How to use Betaferon").
The list of side effects below is based on communications from clinical trials with Betaferon and reported side effects of the marketed drug.
? Very common (may affect more than 1 in 10 patients):
- reduction in the number of white blood cells
- headache
- sleep disorders (insomnia)
- abdominal pain
- a specific liver enzyme (alanine aminotransferase or ALT) may increase (this will be revealed in blood tests)
- rash
- skin disorder
- muscle pain (myalgia)
- muscle stiffness (hypertonia)
- joint pain (arthralgia)
- urinary urgency
- reaction at the injection site (including redness, swelling, discoloration, inflammation, pain, infection, allergic reactions (hypersensitivity)
- flu-like symptoms, pain, fever, chills, fluid accumulation in the arm or leg (peripheral edema), lack/loss of strength (asthenia)
? Frequent (may affect up to 1 in 10 patients):
- swelling of the lymph nodes(lymphadenopathy)
- may decrease the number of red blood cells in the blood (anemia)
- the thyroid gland does not function correctly (produces little hormone) (hypothyroidism)
- weight gain or loss
- confusion
- abnormally fast heartbeats (tachycardia)
- increased blood pressure(hypertension)
- a specific liver enzyme (aspartate aminotransferase or AST) may increase (this will be revealed in blood tests)
- breathing difficulties(dyspnea)
- may increase a yellow-red pigment (bilirubin)produced by the liver (this will be revealed in blood tests)
- skin patches or mucous membranes, edematous and itchy (urticaria)
- itching (pruritus)
- hair loss (alopecia)
- menstrual disorders (menorrhagia)
- abundant uterine bleeding (metrorrhagia) especially between menstrual periods
- impotence
- skin lesions and tissue damage (necrosis) at the injection site (see section 2 "Warnings and precautions")
- chest pain
- discomfort
? Uncommon (may affect up to 1 in 100 patients):
- may decrease the number of platelets (which contribute to blood clotting) (thrombocytopenia)
- may increase a fraction of fats in the blood (triglycerides) (this will be revealed in blood tests), see section 2 "Warnings and precautions"
- suicidal attempt
- emotional instability
- seizures
- may increase a specific liver enzyme (gamma GT)produced by the liver (this will be revealed in blood tests)
- liver inflammation (hepatitis)
- skin discoloration
- kidney problems, including scarring (glomerulosclerosis), which can decrease kidney function
? Rare (may affect up to 1 in 1,000 patients):
- blood clots in small blood vessels that can affect your kidneys (thrombotic thrombocytopenic purpura or hemolytic uremic syndrome). Symptoms may include increased bruising, bleeding, fever, extreme weakness, dizziness, or fainting. Your doctor may find changes in your blood and kidney function.
- severe allergic reactions (anaphylactic)
- the thyroid gland does not function correctly (thyroid disorders),produces too much hormone (hyperthyroidism)
- significant loss of appetite that causes weight loss (anorexia)
- heart muscle disease (cardiomyopathy)
- sudden breathing difficulties (bronchospasm)
- pancreas inflammation (pancreatitis), see section 2 "Warnings and precautions"
- the liver does not function correctly (liver damage including hepatitis, liver failure)
- Frequency not known (frequency cannot be estimated from available data)
- breakdown of red blood cells (hemolytic anemia)
- problems with small blood vessels may occur when using medications like Betaferon (systemic capillary leak syndrome)
- depression, anxiety
- dizziness
- fast and irregular heartbeats or palpitations (palpitation)
- redness and/or flushing of the face due to dilation of blood vessels (vasodilation)
- significant narrowing of the blood vessels in the lungs that causes an increase in blood pressure in the blood vessels that carry blood from the heart to the lungs (pulmonary arterial hypertension). Pulmonary arterial hypertension has been reported at various times during treatment, even several years after starting treatment with Betaferon.
- nausea
- vomiting
- diarrhea
- rash, facial flushing, joint pain, fever, weakness, and other symptoms caused by the medication (drug-induced lupus erythematosus)
- menstrual disorder
- sweating
Reporting of side effects
If you experience any side effects, consult your doctor, pharmacist, or nurse, even if it is a possible side effect not listed in this prospectus. You can also report them directly through the national reporting system included in Appendix V. By reporting side effects, you can help provide more information on the safety of this medication.
5. Storage of Betaferon
Keep this medication out of sight and reach of children.
Do not use this medication after the expiration date stated on the packaging. The expiration date is the last day of the month indicated.
Do not store above 25°C. Do not freeze.
The solution should be used immediately after preparation. However, if this is not possible, it will be in good condition for use for 3 hours, if stored between 2 and 8°C (in a refrigerator).
Do not use Betaferon if you notice that it contains particles or has any coloration.
Medicines should not be disposed of via wastewater or household waste. Ask your pharmacist how to dispose of the packaging and any unused medication. This will help protect the environment.
6. Contents of the pack and additional information
Composition of Betaferon
The active substanceis interferon beta-1b, 250 micrograms per milliliter reconstituted
The other ingredients are
- In the powder: mannitol and human albumin.
- In the solvent: (sodium chloride solution with 5.4 mg/ml (0.54% w/v)): sodium chloride, water for injectable preparations.
The Betaferon powder is supplied in a 3-milliliter vial containing 300 micrograms (9.6 million IU) of interferon beta-1b per vial. After reconstitution, each milliliter contains 250 micrograms (8.0 million IU) of interferon beta-1b.
The solvent for Betaferon is supplied in a pre-filled syringe of 2.25 milliliters and contains 1.2 milliliters of a sodium chloride solution with 5.4 mg/ml (0.54% w/v).
Appearance of the product and pack contents
Betaferon is a sterile white or almost white powder for solution for injection.
Betaferon is supplied in:
- a multidose pack with 5 individual packs, each containing 1 vial with powder, 1 pre-filled syringe with solvent, 1 vial adapter with needle, and 2 alcohol swabs, or
- a multidose pack with 12 individual packs, each containing 1 vial with powder, 1 pre-filled syringe with solvent, 1 vial adapter with needle, and 2 alcohol swabs, or
- a multidose pack with 14 individual packs, each containing 1 vial with powder, 1 pre-filled syringe with solvent, 1 vial adapter with needle, and 2 alcohol swabs, or
- a multidose pack with 15 individual packs, each containing 1 vial with powder, 1 pre-filled syringe with solvent, 1 vial adapter with needle, and 2 alcohol swabs, or
- 2-month packs with 2 x 14 individual packs, each containing 1 vial with powder, 1 pre-filled syringe with solvent, 1 vial adapter with needle, and 2 alcohol swabs, or
- 3-month packs with 3 x 15 individual packs, each containing 1 vial with powder, 1 pre-filled syringe with solvent, 1 vial adapter with needle, and 2 alcohol swabs, or
- 3-month packs with 3 x 14 individual packs, each containing 1 vial with powder, 1 pre-filled syringe with solvent, 1 vial adapter with needle, and 2 alcohol swabs, or
- a dose escalation pack for the first 12 injections containing 4 triple packs, each containing 3 vials with powder, 3 pre-filled syringes with solvent, 3 vial adapters with needle, and 6 alcohol swabs
Only some pack sizes may be marketed.
Marketing authorisation holder and manufacturer
Marketing authorisation holder
Bayer AG
51368 Leverkusen
Germany
Manufacturer
Bayer AG
Müllerstraße 178
13353 Berlin
Germany
You can request more information about this medicinal product from the local representative of the marketing authorisation holder:
België / Belgique / Belgien Bayer SA-NV Tel: +32-(0)2-535 63 11 | Lietuva UAB Bayer Tel: +370 5 23 36 868 |
България Байер България ЕООД Тел: +359 02 4247280 | Luxembourg / Luxemburg Bayer SA-NV Tel: +32-(0)2-535 63 11 |
Ceská republika Bayer s.r.o. Tel: +420 266 101 111 | Magyarország Bayer Hungária Kft. Tel: +36-1 487 41 00 |
Danmark Bayer A/S Tlf: +45-45 23 50 00 | Malta Alfred Gera and Sons Ltd. Tel: +356-21 44 62 05 |
Deutschland Bayer Vital GmbH Tel: +49-(0)214-30 513 48 | Nederland Bayer B.V. Tel: +31-(0)23 799 1000 |
Eesti Bayer OÜ Tel: +372 655 85 65 | Norge Bayer AS Tlf: +47 23 13 05 00 |
Ελλάδα Bayer Ελλάς ΑΒΕΕ Τηλ: +30 210 618 75 00 | Österreich Bayer Austria Ges. m. b. H. Tel: +43-(0)1-711 46-0 |
España Bayer Hispania S.L. Tel: +34-93-495 65 00 | Polska Bayer Sp. z o.o. Tel: +48-22-572 35 00 |
France Bayer HealthCare Tel (Green Number): +33-(0)800 87 54 54 | Portugal Bayer Portugal, Lda. Tel: +351-21-416 42 00 |
Hrvatska Bayer d.o.o. Tel: +385-(0)1-6599 900 | România SC Bayer SRL Tel: +40 21 529 59 00 |
Ireland Bayer Limited Tel: +353 1 216 3300 | Slovenija Bayer d. o. o. Tel: +386-(0)1-58 14 400 |
Ísland Icepharma hf. Sími: +354 540 80 00 | Slovenská republika Bayer, spol. s r.o. Tel: +421 2 59 21 31 11 |
Italia Bayer S.p.A. Tel: +39-02-397 81 | Suomi/Finland Bayer Oy Puh/Tel: +358-20 785 21 |
Κύπρος NOVAGEM Limited Τηλ: +357 22 48 38 58 | Sverige Bayer AB Tel: +46-(0)8-580 223 00 |
Latvija SIA Bayer Tel: +371 67 84 55 63 | United Kingdom (Northern Ireland) Bayer AG Tel: +44 (0) 118 206 3000 |
Date of last revision of this leaflet:
Other sources of information
Detailed information on this medicinal product is available on the European Medicines Agency web site: http://www.ema.europa.eu.
Annex: PROCEDURE FOR SELF-INJECTION
Your doctor has prescribed Betaferon for the treatment of your MS. You will tolerate Betaferon better if you start with a low dose and gradually increase it to the full standard dose (see the first part of this leaflet, section 3. "How to use Betaferon"). To make it easier to increase the dosage during the first 12 injections, you may be provided with a special dose escalation pack, which contains four triple packs in different colors with specially marked syringes and a "Introductory Leaflet for the dose escalation pack" with detailed instructions. The syringes in this dose escalation pack are marked according to the corresponding doses (0.25; 0.5; 0.75 or 1.0 ml).
The following instructions and illustrations are intended to explain how to prepare the Betaferon injection and how to administer it yourself. Read the instructions carefully and follow them step by step. Your doctor or nurse will instruct and train you in the procedure and technique of self-administration. Do not attempt self-administration until you are sure you have understood how to prepare the injection solution and how to inject it.
PART I: STEP-BY-STEP INSTRUCTIONS
The instructions include the following main steps:
- General tips
- Preparing for injection
- Reconstitution of the solution step by step
- Preparing the injection
- Administering the injection
- Quick review of the process
- General tips
Get off to a good start!
You will find that in a few weeks the treatment will become part of your life. To start with, the following may help:
- Always have a suitable area at home, out of sight and reach of children, where you can easily find Betaferon and the other utensils.
Consult the storage conditions in section 5 of the leaflet: "Storage of Betaferon" in the first part of this leaflet.
- Try to inject yourself at the same time every day, as it will be easier to remember and to set aside a time when you will not be disturbed.
- Prepare each dose only when you are ready to inject yourself, as it must be injected immediately after reconstituting Betaferon (if you do not use Betaferon immediately, consult section 5 in the first part of this leaflet: "Storage of Betaferon").
Important tips to keep in mind
- Be consistent. Use Betaferon as described in section 3, in the first part of this leaflet: "How to use Betaferon". Always check the prepared dose twice.
- Keep the container in which you dispose of the syringes and the syringes themselves out of sight and reach of children. Lock the material away, if possible.
- Never reuse the syringes or needles.
- Always use a sterile (aseptic) technique, as described below.
- Always dispose of used syringes only in the appropriate container.
- Preparing for injection
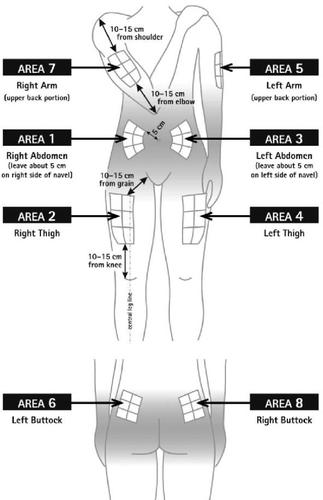
How to choose the injection site?
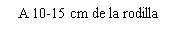
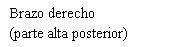
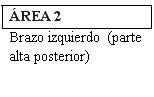
Before preparing the Betaferon injection, decide where you will inject it. You must inject Betaferon into the fatty layer between the skin and the muscle (i.e., into the subcutaneous tissue, between 8 and 12 mm below the skin). The best injection sites are those where the skin is soft and smooth, and away from joints, nerves, or bones, such as the abdomen, arm, thigh, or buttocks.
Important:Do not inject into areas where you feel lumps, bruises, firm nodules, pain, or an area where the skin is discolored, depressed, scabbed, or has an open break. Talk to your doctor or nurse about these or other unusual conditions you may find.
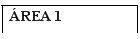
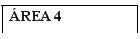
You must rotate the injection site each time you inject yourself. If any area is too difficult to reach, you may need a family member or friend to help you administer the injections. Follow the sequence described in the scheme included at the end of the Annex (see Part II "Rotation of injection sites") and you will return to the first injection site after 8 injections (16 days). By that time, each injection site will have fully recovered before receiving the next injection.
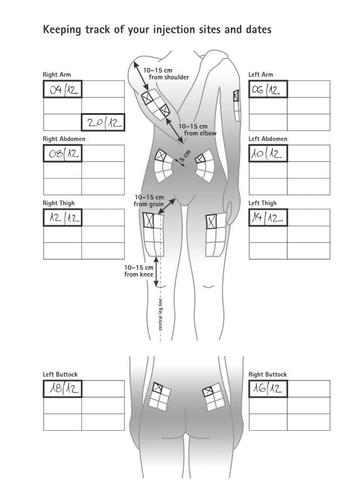
Consult the rotation scheme at the end of this Annex to learn how to choose the injection site. Also included is an example of an "Injection Schedule" (see Annex Part III). With this, you will have an idea of how to keep track of the injection sites and dates.
Checking the contents of the pack
In each individual Betaferon pack, you will find:
- 1 vial of Betaferon (powder for injectable solution)
- 1 pre-filled syringe with solvent for Betaferon (sodium chloride solution with 5.4 mg/ml (0.54% w/v))
- 1 vial adapter with integrated needle
- 2 alcohol swabs
In addition, you will need a container for disposing of used syringes and needles.
Use a suitable disinfectant to disinfect the skin.
If you have a Betaferon dose escalation pack, you will find 4 triple packs in different colors and numbered, each containing:
- 3 vials of Betaferon (powder for injectable solution)
- 3 pre-filled syringes with solvent for Betaferon powder (sodium chloride solution 5.4 mg/ml (0.54% w/v))
- 3 vial adapters with integrated needle
- 6 alcohol swabs
In addition, you will need a container for the used syringes and needles.
Use a suitable disinfectant to disinfect the skin.
Start with the yellow triple pack 1containing 3 syringes with a 0.25 ml mark, for treatment days 1, 3, and 5.
Then use the red triple pack 2containing 3 syringes with a 0.5 ml mark, for treatment days 7, 9, and 11.
Continue with the green triple pack 3containing 3 syringes with a 0.75 ml mark, for treatment days 13, 15, and 17.
Use the blue triple pack 4containing 3 syringes with 0.25; 0.5; 0.75 and 1.0 ml marks, for treatment days 19, 21, and 23.
- Reconstitution of the solution, step by step
| 1 - Wash your hands carefully with water and soap before starting this process. |
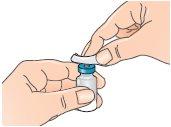
| 2 - Open the Betaferon vial and place it on the table. It is better to use your thumb than your fingernails, as you could break them. |
| 3 - Clean the top of the vial with an alcohol swab, moving it only in one direction. Leave it resting on top of the vial. |
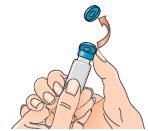
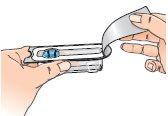
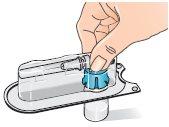
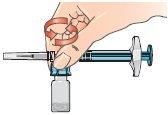
| 4 - Open the blister pack containing the vial adapter, but do not remove it. Do not remove the vial adapter from the blister pack at this point. Do not touch the adapter. This is to keep it sterile. |
| 5 - Before attaching the adapter, remove and discard the alcohol swab and let the vial rest on a flat surface. 6 - Hold the blister pack by its outer surface and place it over the vial. Push down firmly until it clicks into place over the vial. |
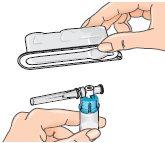
| 7 - Remove the blister pack from the vial adapter, holding it by the edges. Now it is ready to connect the pre-filled syringe with solvent to the vial adapter. |
|
|
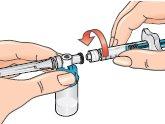
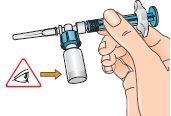
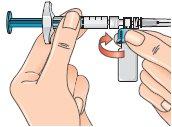
| 9 - Connect the syringe to the lateral opening of the vial adapter, inserting the end of the syringe and pressing carefully, while turning it clockwise (see the arrow). This will correctly connect the syringe. |
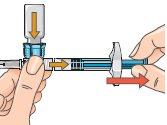
| 10 - Hold the connected syringe by the lower part of the vial. Slowly push the syringe plunger all the way down to transfer all the solvent into the vial. Release the plunger, which should return to its original position. This also applies to the dose escalation pack. |
| 11 - Without releasing the connected syringe, slowly move the vial in circles to dissolve all the dry Betaferon powder. Do not shake the vial. |
| 12 - Carefully examine the solution, which should be colorless (clear) and free of particles. If the solution is colored or contains particles, discard it and start again using another pack. If foam appears, which can happen when the vial is shaken or moved too much in circles, let it rest until the foam disappears. |


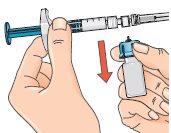
- Preparing the injection
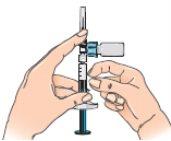
| 13 - If the plunger has returned to its original position, push it again and hold it in that position. To prepare the injection, turn the system so that the vial is above the syringe, with the cap facing down. This allows the solution to flow into the syringe. Keep the syringe in a horizontal position. Slowly pull the plunger back to withdraw all the solution from the vial into the syringe. With the dose escalation pack, withdraw the solution only up to the mark on the syringe: 0.25mlfor the first three injections (treatment days 1, 3, 5), or 0.5mlfor injections on treatment days 7, 9, 11, or 0.75mlfor injections on treatment days 13, 15, 17. Discard the vial with any remaining solution. From day 19, you will be injecting the full dose of 1.0ml. |
| 14 - After withdrawing the solution, turn the connected syringe so that the needle points upwards. This allows any air bubbles to move to the top of the solution. |
15 - Remove any air bubbles by gently tapping the syringe and pushing the plunger up to the 1 ml mark, or to the volume prescribed by your doctor. If you are injecting less than 1 ml with the dose escalation pack, there may not be any air bubbles; however, for the full dose injection, some air bubbles may appear. Remove any air bubbles. |
By gently tapping the syringe with your finger and pushing the plunger until the respective mark on the syringe.
If, along with air bubbles, too much solution enters the vial, return to the horizontal position (see figure 13) and pull the plunger slightly to re-extract the solution from the vial into the syringe.
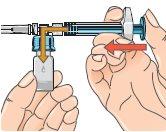
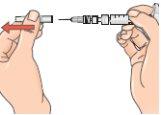
16 - Next, hold the blue vial adapter connected to the vial and separate it from the syringe by turning it downward to remove it from the syringe.
When doing this, hold only the blue plastic adapter. Keep the syringe in a horizontal position, with the vial below the syringe.
Separate the vial and adapter from the syringe so that the solution can flow properly when you inject it.
17 – Discard the vial and any unused solution in the waste container
18 - You are now ready for injection.
If, for any reason, you cannot inject Betaferon immediately, you can store the reconstituted solution in the syringe in the refrigerator for up to 3 hours before use. Never freeze it or wait more than 3 hours to inject it. If more than three hours pass, discard the reconstituted Betaferon solution and prepare a new injection. When using the solution, warm the syringe with your hands before injection to avoid pain.
- Performing the injection
1 - Choose an injection area (see tips at the beginning and diagrams at the end of this Appendix) and note it in your “Administration Calendar”. | |
| 2 - Use an alcohol swab to clean the skin at the injection site: Let the skin air dry. Discard the swab. Use a suitable disinfectant to disinfect the skin. |
| 3 - Remove the needle cap by pulling it off without twisting. |
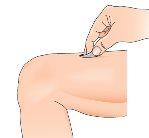
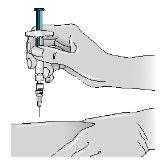
| 4 - Gently pinch the skin around the previously disinfected injection site (to lift it slightly). |
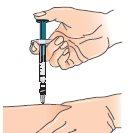
5 - Hold the syringe like a pencil or dart; push the needle into the skin, keeping it straight at a 90° angle with a quick and steady motion. Note: Betaferon can also be administered with an auto-injector. | |
6 - Inject the medication, pushing the plunger with a slow and constant motion (press the plunger to the end until the syringe is empty). | |
7- Discard the syringe and needle, placing them in the waste container. |
- Quick review of the process
- Take out the contents needed for an injection.
- Connect the vial adapter to the vial.
- Connect the syringe to the vial adapter.
- Push the syringe plunger to transfer all the solvent to the vial.
- Turn the system (vial on top of the syringe) and extract the prescribed amount of solution.
- Remove the vial from the syringe; it is now ready for injection.
NOTE: The injection should be administered immediately after mixing (if the injection is delayed, refrigerate the solution and inject it within the next three hours). Do not freeze.
PART II:ROTATION OF INJECTION SITES
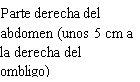
You should choose a new site for each injection to allow the area time to recover, helping to prevent infection. Advice on which areas to choose is provided in the first part of this Appendix. It is a good idea to know where you will apply the injection before preparing the syringe. The scheme shown in the diagram later will help you vary the sites adequately. For example, administer the first injection on the right side of the abdomen, choose the left side for the second injection, then move to the right thigh for the third, and so on through the diagram until all suitable areas of the body have been used. Keep a record of where and when you last injected. One way to do this is to note this information in the “Administration Calendar” that accompanies it.
Following this scheme, you will return to the initial site (i.e., the right side of the abdomen) after 8 injections (16 days). This is what is known as the “Rotation Cycle”. In our example calendar, each of the 8 body areas has been divided into 6 injection sites (adding them all up, there are 48 places to administer injections), left and right: upper, middle, and lower parts of each body area. When you return to an injection area after completing a rotation cycle, choose the farthest zone within that area. If any ulcers appear, consult your doctor or nurse before choosing other injection sites.
Rotation calendar:
To help you rotate the injection sites properly, we recommend that you fill out a record with the date and injection site. You can use the following rotation scheme.
Work through each rotation cycle successively. Each cycle will be 8 injections (16 days), administered from the first area to the eighth area, in turn. Following this sequence, you will give each area the opportunity to recover before receiving another injection.
First rotation cycle:Upper left section of each area
Second rotation cycle:Lower right section of each area
Third rotation cycle:Central left section of each area
Fourth rotation cycle:Upper right section of each area
Fifth rotation cycle:Lower left section of each area
Sixth rotation cycle:Central right section of each area
ROTATION CALENDAR: |
|


PART III:ADMINISTRATION CALENDAR FORBETAFERON
Instructions for controlling injection sites and dates
- Select an injection site for your first injection.
- Clean the injection site with an alcohol swab and let it air dry.
- After the injection, fill in the injection site and date in the “Administration Calendar” (see the example in: the following figure with instructions for controlling injection sites and dates).
EXAMPLE OF ADMINISTRATION CALENDAR: |
|


---------------------------------------------------------------------------------------------------------------------------
Appendix: INTRODUCTORY PROSPECTUS FOR THE DOSE ESCALATION PACKAGE
Your doctor has prescribed Betaferon to treat your MS. You will tolerate Betaferon better if you start with a low dose and gradually increase it to the full standard dose (see the first part of the prospectus, section 3. “How to use Betaferon”). The syringes in this dose escalation package are marked according to the corresponding doses (0.25; 0.5; 0.75 or 1.0 ml).
? Checking the package contents
You will find in the Betaferon dose escalation package 4 triple packages of different colors and numbers, each containing:
- 3 Betaferon vials (with powder for injectable solution)
- 3 syringes preloaded with solvent for the Betaferon powder (sodium chloride solution 5.4 mg/ml (0.54% w/v))
- 3 vial adapters with incorporated needle
- 6 alcohol swabs
Each triple package contains the syringes you will need to prepare each dose. The syringes have special marks for that dose. Follow the instructions for use that appear below carefully. For each dose adjustment step, use the full amount of solvent for the reconstitution of the Betaferon powder, and then extract the required dose with the syringe.
Start using the yellow triple packagethat is clearly marked with a “1”in the upper right corner of the box.
This first triple package is to be used for treatment days 1, 3, and 5.
It contains syringes specially marked with 0.25mlmarks. This will help you inject only the necessary dose.
After finishing the yellow package, start using the red triple packagethat is clearly marked with a “2”in the upper right corner of the box.
This second triple package is to be used for treatment days 7, 9, and 11.
It contains syringes specially marked with 0.50mlmarks. This will help you inject only the necessary dose.
After finishing the red package, start using the green triple packagethat is clearly marked with a “3”in the upper right corner of the box
This third triple package is to be used for treatment days 13, 15, and 17.
It contains syringes specially marked with 0.75mlmarks. This will help you inject only the necessary dose.
Finally, after finishing the green package, start using the blue triple packagethat is clearly marked with a “4”in the upper right corner of the box. This last triple package is to be used for treatment days 19, 21, and 23.
It contains syringes with 0.25, 0.5, 0.75, and 1.0mlmarks. With the triple package “4” you can inject the full dose of 1.0 ml.
For a description of how to prepare and use the Betaferon powder, see section 3. “How to use Betaferon” in the first part of the prospectus and the Appendix “Procedure for self-injection” in the second part of the prospectus.
In addition, you will need a container for used syringes and needles.
- Country of registration
- Active substance
- Prescription requiredYes
- Manufacturer
- This information is for reference only and does not constitute medical advice. Always consult a doctor before taking any medication. Oladoctor is not responsible for medical decisions based on this content.
- Alternatives to BETAFERON 250 micrograms/ml POWDER AND SOLVENT FOR INJECTABLE SOLUTIONDosage form: INJECTABLE, 300 µgActive substance: interferon beta-1bManufacturer: Bayer AgPrescription requiredDosage form: INJECTABLE, 30 µgActive substance: interferon beta-1aManufacturer: Biogen Netherlands B.V.Prescription requiredDosage form: INJECTABLE, 30 µgActive substance: interferon beta-1aManufacturer: Biogen Netherlands B.V.Prescription required
Online doctors for BETAFERON 250 micrograms/ml POWDER AND SOLVENT FOR INJECTABLE SOLUTION
Discuss questions about BETAFERON 250 micrograms/ml POWDER AND SOLVENT FOR INJECTABLE SOLUTION, including use, safety considerations and prescription review, subject to medical assessment and local regulations.


Frequently Asked Questions
