

SIXMO 74.2 mg IMPLANT


How to use SIXMO 74.2 mg IMPLANT
Translated with AI
This page provides general information and does not replace a doctor’s consultation. Always consult a doctor before taking any medication. Seek urgent medical care if symptoms are severe.
Show originalContents of the leaflet
Introduction
Package Leaflet: Information for the User
Sixmo 74.2 mg implant
buprenorphine
This medicine is subject to additional monitoring, which will allow for quick identification of new safety information. You can help by reporting any side effects you may get. The last section of the leaflet includes information on how to report side effects.
Read all of this leaflet carefully before you start using this medicine, because it contains important information for you.
- Keep this leaflet, you may need to read it again.
- If you have any further questions, ask your doctor or pharmacist.
- If you get any side effects, talk to your doctor or pharmacist, even if you have read it in this leaflet. See section 4.
Contents of the pack
- What is Sixmo and what is it used for
- What you need to know before you use Sixmo
- How to use Sixmo
- Possible side effects
- Storing Sixmo
- Contents of the pack and further information
1. What is Sixmo and what is it used for
Sixmo contains the active substance buprenorphine, which is a type of opioid medicine. It is used to treat opioid dependence in adults who are also receiving medical, social, and psychological support.

2. What you need to know before you use Sixmo
Do not use Sixmo if you are:
- allergic to buprenorphine or any of the other ingredients of this medicine (listed in section 6)
- have severe breathing problems
- have severely reduced liver function
- suffer from acute alcoholism or delirium tremens caused by alcohol withdrawal
- are using naltrexone or nalmefeno to treat alcohol or opioid dependence
- have had increased scar tissue formation
Patient who cannot be examined using a magnetic resonance imaging (MRI) technique should not be allowed to receive Sixmo.
Warnings and precautions
Talk to your doctor before starting Sixmo if you have:
- asthma or other breathing problems
- mild or moderate liver problems
- kidney function impairment
- head injury or other circumstances in which head pressure may increase
- history of seizures
- low blood pressure
- enlarged prostate or narrowing of the urethra
- underactive thyroid
- reduced function of the adrenal glands, such as Addison's disease
- abnormal bile duct function
- general weakness and poor health, or are elderly
- history of connective tissue diseases such as scleroderma
- history of recurrent infections with methicillin-resistant Staphylococcus aureus (MRSA)
- depression or other conditions treated with antidepressants.
Using these medicines with Sixmo may cause serotonin syndrome, a potentially life-threatening condition (see "Using Sixmo with other medicines").
Important considerations during treatment:
- You may feel drowsiness, especially in the first week after insertion. See "Driving and using machines".
- Your doctor should check the insertion sitefor signs of infection and wound problems:
- one week after insertion of the implant and
- at least once a month thereafter
- An infection at the insertion or removal siteof the implant may occur. Touching the implants or insertion site excessively shortly after insertion may increase the risk of infection. Inform your doctor immediately if you notice any signs of infection (such as redness or swelling) at the insertion or removal site.
- If an implant comes out after insertion, follow these steps:
- Make an appointment with the doctor who inserted the implant as soon as possible.
- Place the implant in a glass jar with a lid. Store it safely out of reach of others, especially children. Bring it to the doctor who inserted the implant to determine if the entire implant has been expelled.
Be aware that buprenorphine can cause severe respiratory depression, possibly life-threatening (shortness of breath or interruption of breathing) in children who are accidentally exposed to it.
- Your doctor will monitor you until the implant is replaced to assess withdrawal symptoms.
- Avoid displacing the implants under the skin or gaining much weight after Sixmo insertion, as this may make it difficult to locate the implants.
- Misuse and abuse:if buprenorphine is abused, it can cause overdose and death. This risk increases when alcohol or other substances are also consumed.
- This medicine can cause dependence, but to a lower level than other substances like morphine. If you stop treatment with Sixmo, your doctor will monitor you for withdrawal symptoms.
- Several cases of death from respiratory depressionhave been reported while receiving buprenorphine. This occurs, in particular, when alcohol, other opioids, or certain medicines that calm, induce sleep, or relax muscles are also consumed. Buprenorphine can cause life-threatening breathing problems in non-dependent individuals.
Sixmo should be used with caution in patients with asthma or other breathing problems.
- Liver damagehas been reported, including liver failure, when using buprenorphine. This may be related to existing reduced liver function and the continued use of injectable drugs. If liver problems are suspected, your doctor will perform tests to decide whether treatment should be discontinued.
- During treatment with Sixmo, situations may arise where you need pain treatmentor anesthesia. Consult your doctor or pharmacist in these cases.
- Substances like buprenorphine can cause pupil constriction, change in level of consciousnessor the way you feel pain.
- Substances like buprenorphine can cause a sudden drop in blood pressure, causing dizziness when standing up quickly.
Children and adolescents
Sixmo is not recommended for children under 18 years of age.
Patients over 65 years of age
Sixmo is not recommended for patients over 65 years of age.
Using Sixmo with other medicines
Tell your doctor or pharmacist if you are using, have recently used, or might use any other medicines.
In particular, tell your doctorduring treatment with Sixmo before using:
- medicines that calm, induce sleep, or relax muscles, with active substance names ending in "azepam"
This combination may cause death from respiratory depression. Therefore, use these medicines during Sixmo treatment only under medical advice and in the prescribed dose.
- other medicines that depress the brain or spinal cord, as they reduce alertness, making driving and using machines hazardous
- other opioid derivatives such as methadone, strong painkillers, and cough suppressants
- certain medicines for treating depression
- medicines called antihistamines used to treat allergic reactions, sleep disorders, colds; or to prevent and treat nausea and vomiting
- medicines for treating epilepsy or for sedation, with active substance names mostly ending in "tal"
- medicines for treating anxiety, other than those described in the first point
- medicines for treating mental or anxiety disorders, with sedative effects, called neuroleptics
- clonidine: a medicine for treating high blood pressure and high eye pressure
- naltrexone, nalmefeno, used to treat addiction
They may block the effects of buprenorphine. Do not use these medicines during treatment with Sixmo, as they may cause sudden onset of prolonged and intense withdrawal symptoms
- medicines for treating HIV infections with active substance names ending in "navir", such as ritonavir, nelfinavir, amprenavir, fosamprenavir
- medicines for treating fungal infections, such as oral candidiasis, with active substance names ending in "azol", such as ketoconazole, itraconazole, fluconazole
- clarithromycin, erythromycin, troleandomycin: medicines for treating bacterial infections
- nefazodone: a medicine for treating depression
- verapamil, diltiazem, amiodarone: medicines for treating high blood pressure and heart disorders
- aprepitant: a medicine for preventing nausea and vomiting
- phenobarbital, carbamazepine, phenytoin: medicines for treating epilepsy and other conditions
- rifampicin: a medicine for treating tuberculosis or other infections
- certain medicines for treating depression or Parkinson's disease, called monoamine oxidase inhibitors, such as phenelzine, isocarboxazid, iproniazid, and tranylcypromine
- antidepressants such as moclobemide, tranylcypromine, citalopram, escitalopram, fluoxetine, fluvoxamine, paroxetine, sertraline, duloxetine, venlafaxine, amitriptyline, doxepin, or trimipramine. These medicines may interact with Sixmo, and you may experience symptoms such as involuntary muscle contractions, including muscles that control eye movement, agitation, hallucinations, coma, excessive sweating, tremors, exaggerated reflexes, increased muscle tension, body temperature above 38 °C. Contact your doctor if you experience these symptoms.
Using Sixmo with food, drinks, and alcohol
Do not drink alcohol during Sixmo treatment, as it increases the sedative effect.
Avoid grapefruit juice to prevent possible side effects.
Pregnancy and breastfeeding
If you are pregnant or breastfeeding, think you may be pregnant, or are planning to have a baby, ask your doctor for advice before using this medicine.
- Pregnancy
Sixmo is not recommended during pregnancy or in women of childbearing potential who are not using contraception.
When used during pregnancy, particularly towards the end of pregnancy, buprenorphine may cause withdrawal symptoms, including breathing problems, in the newborn, which may appear several days after birth.
- Breastfeeding
Do not breastfeed during Sixmo treatment, as buprenorphine passes into breast milk.
Driving and using machines
Buprenorphine may reduce your ability to drive and use machines, especially during the first 24 to 48 hours and up to one week after implant insertion. You may feel dizzy, drowsy, and less alert.
Do not drive or perform hazardous activities until you are sure that Sixmo does not affect your ability to perform these activities.
3. How to use Sixmo

Follow exactly the administration instructions of this medicine given by your doctor.
In case of doubt, consult your doctor again.
Sixmo implants should be inserted, removed, and patients monitored by a healthcare professional familiar with the procedure, with experience in the management of opioid dependence.
Before administering Sixmo implants
You must be taking a stable dose of buprenorphine of between 2 and 8 mg per day, administered under the tongue. This must have been done for at least 30 days and must have been decided by your doctor.
The buprenorphine administered under the tongue will be discontinued 12 to 24 hours before the insertion of the Sixmo implants.
Treatment with Sixmo implants
Each dose consists of 4 implants.
Before inserting Sixmo, your doctor will administer a local anesthetic to numb the area. The implants are inserted under the skin on the inner side of the arm.
After insertion of the implants, the doctor will apply a sterile gauze with a compressive bandage to minimize bruising. The compressive bandage can be removed after 24 hours and the adhesive dressing after five days. Apply an ice pack to the arm for 40 minutes every two hours during the first 24 hours, and then as needed. Your doctor will also give you a Patient Alert Card that will indicate
- the location and date of insertion
- the deadline for implant removal
Keep this card in a safe place, as the information on the card may facilitate implant removal.
Your doctor will check the insertion site one week after implant insertion and, as a minimum, once a month thereafter, to detect signs:
- of infection or any wound healing problems
- that the implant is coming out of the skin
Please attend all these necessary appointments. Inform your doctor immediately if you think you have an infection at the implant site or if the implant starts to come out.
If you feel the need for additional doses of buprenorphine, contact your doctor immediately.
Removal of Sixmo implants
Sixmo implants are designed to remain in place for 6 monthsand provide a continuous supply of buprenorphine. The doctor will remove them at the end of the sixth month.
The implants should only be removed by a doctor familiar with the procedure. If the implants cannot be located, the doctor may use an ultrasound or a type of scanner called magnetic resonance imaging (MRI).
After removing the implant, the doctor will apply a sterile gauze with a compressive bandage to minimize bruising. The compressive bandage can be removed after 24 hours and the adhesive dressing after five days. Apply an ice pack to the arm for 40 minutes every two hours during the first 24 hours, and then as needed.
Retreatment with Sixmo implants
At the end of the first 6-month treatment period, a new set of Sixmo implants can be inserted after removal of the old implants, preferably on the same day. New implants will be inserted in the other arm.
If another set of implants is not inserted on the same day as the previous set is removed:
A dose of 2 to 8 mg of buprenorphine per day, administered under the tongue, is recommended until treatment is repeated. This should be discontinued 12 to 24 hours before the insertion of the next set of Sixmo implants.
If you receive more Sixmo than you need
In some cases, the dose administered by the implants may be higher than you need.
Symptoms of overdose include:
- pupil constriction
- sedation
- low blood pressure
- breathing difficulties, slow breathing
In the worst case, it can cause interruption of breathing, heart failure, and death.
Inform your doctor immediately if you experience the above symptoms, or go to the nearest hospital and bring this leaflet and your Patient Alert Card with you. Do not attempt to remove the implants yourself, as this could be very dangerous.
If you have any further questions on the use of this medicine, ask your doctor or pharmacist.
4. Possible Adverse Effects
Like all medicines, this medicine can cause adverse effects, although not all people suffer from them.
Adverse effects may occur with the following frequencies:
Frequent, may affect up to 1 in 10 people
- constipation, nausea, vomiting, diarrhea
- other stomach and intestinal disorders, dental disorders
- pain, such as abdominal pain, bone pain, muscle pain, chest pain, headache
- dizziness, drowsiness
- insomnia, anxiety, hostility, nervousness
- mental disorder, characterized by delirium and irrationality
- high blood pressure, feeling heartbeats
- fainting
- dilated pupils
- flushing, bruising, dilation of blood vessels
- drug withdrawal syndrome, such as sweating, feeling hot and cold
- fatigue, chills, weakness, increased muscle tone
- infection, such as a viral infection (e.g., flu)
- cough, shortness of breath
- inflammation of the respiratory tract in the lungs, throat, or inner nose mucosa
- increased sweating, feeling of discomfort
- decreased appetite
- increased level of a liver enzyme, alanine aminotransferase, in blood tests
- reactions at the implantation site
- pain, itching
- local reaction to the procedure, such as pain during the insertion procedure
- bruising, skin redness, scarring
- bleeding
Infrequent, may affect up to 1 in 100 people
- dry mouth, flatulence, indigestion, blood in stools
- migraine, tremor
- excessive drowsiness
- abnormal sensation such as pins and needles, tingling, and itching
- decreased consciousness
- sleep disorder, lack of interest
- depression, euphoria
- decreased sexual desire, decreased orgasmic sensation
- restlessness, excitement, excitability, abnormal thoughts
- drug dependence
- decreased sense of touch or sensitivity
- fever, feeling of cold, discomfort
- swelling, including swelling of arm, leg, or face tissues caused by excess fluid
- muscle spasms, discomfort in limbs
- pain affecting muscles and skeleton, neck, limbs, and joints
- pain and dysfunction of masticatory muscles and joints, called temporomandibular joint syndrome
- respiratory depression, yawning
- cellulitis, skin infection, boils
- tonsillar complications
- skin rash, pustular skin rash, skin lesion
- cold sweat, dry skin
- small bleeding under the skin
- changes in blood levels
- increase in enzyme levels: aspartate aminotransferase, gamma-glutamyl transferase, lactate dehydrogenase in blood, lipase, amylase
- decrease in enzyme levels: alkaline phosphatase
- increase in bicarbonate level
- increase in bilirubin level (a yellow breakdown pigment of blood)
- increased glucose level
- decreased cholesterol level
- decreased hematocrit (percentage of blood cells in blood volume)
- decreased hemoglobin (red blood cell pigment), increased mean corpuscular hemoglobin
- increased count of certain white blood cells: monocytes, neutrophils
- decreased corpuscular count: platelets, red blood cells, lymphocytes
- abnormal mean corpuscular volume
- weight increase or decrease, including abnormal weight gain
- dehydration, increased appetite
- painful menstrual period, erectile dysfunction
- ocular discharge, blurred vision, tear disorder
- slow heart rate, abnormal heart rhythm starting in the heart's atria
- difficulty starting to urinate, urgent need to urinate, frequent urination with little urine
- urinary tract infection
- vulvovaginal fungal infection
- lymph node disease
- lack of a type of white blood cell called neutrophils
- complication after procedure
- migration of one or more implants, device rupture or expulsion
- re-opening of a closed wound
- reactions at the implantation site
- infection, including wound infection
- skin rash, scarring
- reduced scarring
- inflamed area containing pus
Reporting of Adverse Effects
If you experience any type of adverse effect, consult your doctor or pharmacist, even if it is a possible adverse effect that does not appear in this prospectus. You can also report it directly through the national reporting system included in Appendix V. By reporting adverse effects, you can contribute to providing more information on the safety of this medicine.
5. Conservation of Sixmo
Keep this medicine out of sight and reach of children.
Do not use this medicine after the expiration date shown on the label and on the box after CAD. The expiration date is the last day of the month indicated.
This medicine does not require special storage conditions.
6. Container Content and Additional Information
Composition of Sixmo
- The active ingredient is buprenorphine.
Each implant contains buprenorphine hydrochloride equivalent to 74.2 mg of buprenorphine.
- The other component is ethylene-vinyl acetate copolymer.
Appearance of the Product and Container Contents
Sixmo is a rod-shaped implant, 26.5 mm in length and 2.4 mm in diameter, white/white-yellow in color.
Sixmo is supplied in a cardboard box. It consists of four implants individually packaged in laminated film pouches and a sterile disposable applicator individually packaged.
Marketing Authorization Holder and Manufacturer
- Molteni & C. dei F.lli Alitti Soc.Es.S.p.A,
Strada Statale 67,
50018 Scandicci (Firenze),
Italy
For further information about this medicinal product, please contact the local representative of the marketing authorization holder:
Belgium/Belgique/Belgien | Lithuania |
Accord Healthcare bv | Accord Healthcare AB |
Tel: +32 51 79 40 12 | Tel: +46 8 624 00 25 |
Bulgaria | Luxembourg/Luxemburg |
Accord Healthcare Polska Sp. z o.o. | Accord Healthcare bv |
Tel: +48 22 577 28 00 | Tel: +32 51 79 40 12 |
Czech Republic | Hungary |
Accord Healthcare Polska Sp. z o.o. | Accord Healthcare Polska Sp. z o.o. |
Tel: +48 22 577 28 00 | Tel: +48 22 577 28 00 |
Denmark | Malta |
Accord Healthcare AB | Accord Healthcare Ireland Ltd |
Tel: +46 8 624 00 25 | Tel: +44 (0) 208 901 3370 |
Germany | Netherlands |
Accord Healthcare GmbH | Accord Healthcare B.V. |
Tel: +49 89 700 9951 0 | Tel: +31 30 850 6014 |
Estonia | Norway |
Accord Healthcare AB | Accord Healthcare AB |
Tel: +46 8 624 00 25 | Tel: +46 8 624 00 25 |
Greece | Austria |
Accord Healthcare Italia Srl | Accord Healthcare GmbH |
Tel: +39 02 943 23 700 | Tel: +43 (0)662 424899-0 |
Spain | Poland |
Accord Healthcare S.L.U. | Molteni Farmaceutici Polska Sp. z o.o. |
Tel: +34 93 301 00 64 | Tel: +48 (12) 653 15 71 |
France | Portugal |
Accord Healthcare France SAS | Accord Healthcare, Unipessoal Lda |
Tel: +33 (0)320 401 770 | Tel: +351 214 697 835 |
Croatia | Romania |
Accord Healthcare Polska Sp. z o.o. | Accord Healthcare Polska Sp. z o.o. |
Tel: +48 22 577 28 00 | Tel: +48 22 577 28 00 |
Ireland | Slovenia |
Accord Healthcare Ireland Ltd | Accord Healthcare Polska Sp. z o.o. |
Tel: +353 (0) 21 461 9040 | Tel: +48 22 577 28 00 |
Iceland | Slovak Republic |
Accord Healthcare AB | Accord Healthcare Polska Sp. z o.o. |
Tel: +46 8 624 00 25 | Tel: +48 22 577 28 00 |
Italy | Finland |
L.Molteni & C. dei F.lli Alitti Soc.Es.S.p.A | Accord Healthcare Oy |
Tel: +39 055 73611 | Tel: +358 10 231 4180 |
Cyprus | Sweden |
Accord Healthcare S.L.U. | Accord Healthcare AB |
Tel: +34 93 301 00 64 | Tel: +46 (0)8 624 00 25 |
Latvia | United Kingdom |
Accord Healthcare AB | Accord-UK Ltd |
Tel: +46 8 624 00 25 | Tel: +44 (0)1271 385257 |
Date of Last Revision of this Leaflet:
Detailed information on this medicinal product is available on the European Medicines Agency website: http://www.ema.europa.eu.
------------------------------------------------------------------------------------------------------------------------
This information is intended solely for healthcare professionals:
The insertion and removal of Sixmo should be performed in an environment that allows for aseptic insertion and where the patient can lie on their back. It is recommended that the healthcare professional remain seated throughout the insertion procedure so that the insertion site and the movement of the needle just below the skin can be clearly seen from the side.
Only a healthcare professional trained in the insertion of Sixmo should perform the procedure, using only the implant applicator, with the recommended local anesthesia. An applicator is used to insert the four implants. Implants inserted more deeply than at the subcutaneous level (deep insertion) may not be palpable and localization and/or removal may be difficult. If the implants are placed deeply, a neurovascular injury may occur. For patients returning for subsequent treatment with Sixmo, necessary preparations should be made to perform both the removal and insertion of Sixmo during the same visit. The removed implant contains a significant residual amount of buprenorphine. It should be handled with due safety and responsibility for its proper disposal in accordance with local regulations.
Basic Instructions for Correct Insertion
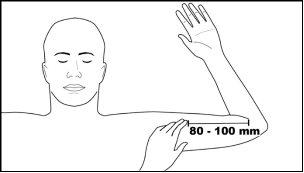
The basis for the satisfactory use and subsequent removal of Sixmo is the correct and careful subcutaneous insertion of the implants according to the instructions. Correctly placed implants are those that are placed just under the skin, using the implant applicator, about 80 to 100 mm (8 to 10 cm) above the medial epicondyle, in the groove between the biceps and triceps on the inner aspect of the arm. The implants should be placed in a fan-like distribution at a minimum distance of 5 mm from the incision and should be palpable after placement. The closer the implants are to each other at the time of placement, the easier they will be to remove.
Equipment for Subcutaneous Insertion of Sixmo
The following equipment is necessary to insert the implant under aseptic conditions:
- a examination table for the patient to lie on
- instrument stand covered with a sterile drape
- adequate lighting, such as a headlamp
- sterile fenestrated drape
- sterile latex gloves without talc
- alcohol swab
- surgical marker
- antiseptic solution, such as chlorhexidine
- local anesthesia, such as 1% lidocaine with adrenaline 1:100,000
- 5 mL syringe with 25G×1.5" (0.5×38 mm) needle
- Adson tissue forceps with one tooth
- No. 15 scalpel with blade
- fine adhesive tape, about 6 mm wide (butterfly tape)
- sterile gauze 100×100 mm
- adhesive dressings
- compressive bandage, about 8 cm wide
- liquid adhesive
- 4 Sixmo implants
- 1 implant applicator
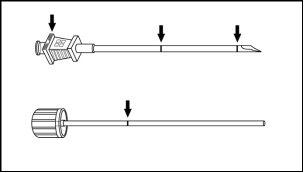
The implant applicator (disposable) and its parts are shown in Figure 1.
Figure 1
Instructions for Subcutaneous Insertion of Sixmo
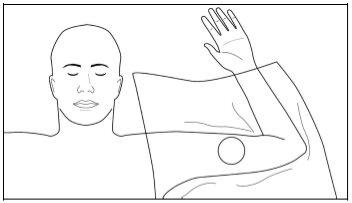
Step 1:The patient should lie on their back, with the desired arm flexed at the elbow and rotated outward, so that the hand is next to the head. Identify the insertion site, which is on the inner aspect of the arm, about 80 to 100 mm (8 to 10 cm) above the medial epicondyle, in the groove between the biceps and triceps. Having the patient flex the biceps may facilitate identification of the site (Figure 2).
Figure 2
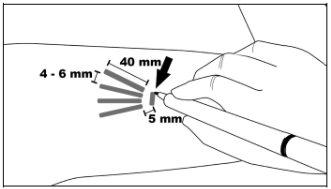
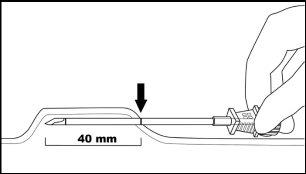
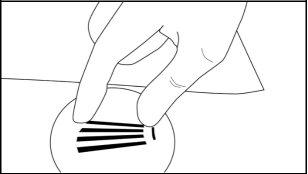
Step 2:Clean the insertion site with an alcohol swab. Mark the insertion site with the surgical marker. The implants will be inserted through a small subcutaneous incision of 2.5 to 3 mm. Mark the paths of the channels where each implant will be inserted by drawing 4 lines. Each line should be 40 mm long. The implants will be placed in a partially open fan-like distribution, separated from each other by 4 to 6 mm, and with the opening of the fan facing towards the shoulder (Figure 3).
Figure 3
Step 3:Put on sterile gloves and check the functioning of the implant applicator by removing the obturator from the cannula and reinserting it. Clean the insertion site with an antiseptic solution such as chlorhexidine. Do not dry or clean it.
Apply the sterile fenestrated drape over the patient's arm (Figure 4). Administer local anesthesia in the insertion area at the incision site and just under the skin, and along the planned insertion channels, by injecting 5 mL of 1% lidocaine with adrenaline 1:100,000. After verifying that the anesthesia is sufficient and effective, make a shallow incision of 2.5 to 3 mm in length at the marked insertion site.
Figure 4
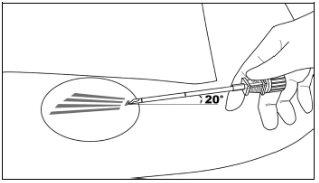
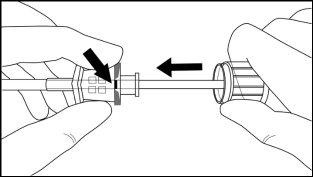
Step 4:Elevate the edge of the incision with the toothed forceps. While applying gentle traction to the skin, insert the tip of the applicator only (to a depth of 3 to 4 mm under the skin) into the subcutaneous space at a small angle (no more than 20 degrees), with the beveled end of the cannula facing upwards and visible, and the obturator fully engaged in the cannula (Figure 5).
Figure 5
Step 5:Lower the applicator to a horizontal position; lift the skin with the tip of the applicator, but keep the cannula in the subcutaneous connective tissue (Figure 6).
Figure 6
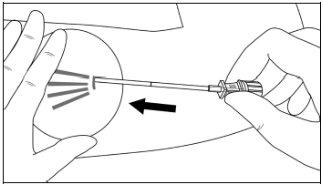
Step 6:While lifting, gently advance the applicator subcutaneously along the marked channel on the skin. Stop immediately when the proximal mark of the cannula has disappeared into the incision (Figures 7 and 8).
Figure 7
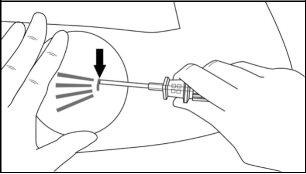
Figure 8
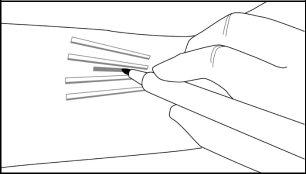
Step 7:With the cannula in place, disengage the obturator and remove it. Insert an implant into the cannula (Figure 9), reinsert the obturator, and gently push it forward (a slight resistance should be felt) until the stop line of the obturator is aligned with the beveled end mark, indicating that the implant is placed at the tip of the cannula (Figure 10). Do not force the implant beyond the end of the cannula with the obturator.There should be a distance of at least 5 mm between the incision and the implant when the implant is properly placed.
Figure 9
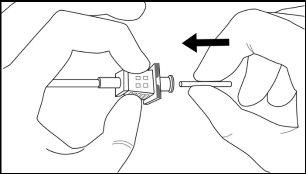
Figure 10
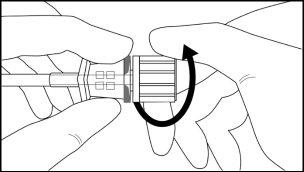
Step 8:Withdraw the cannula by sliding it over the obturator, while keeping the obturator in place on the arm, thus leaving the implant in place (Figure 11). Note: Do not push the obturator.Remove the cannula until its axis is at the level of the obturator, then turn the obturator clockwise to secure it to the cannula (Figure 12). Withdraw the applicator, with the bevel upwards, until the distal mark of the cannula is visible in the incision opening (the sharp tip will remain in the subcutaneous space).
Figure 11
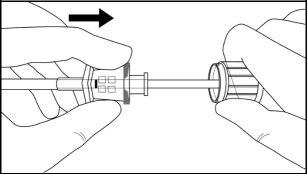
Figure 12
Step 9:Redirect the applicator to the next channel mark, while stabilizing the previously inserted implant with the index finger, moving it away from the sharp tip (Figure 13). Follow steps 6 to 9 to insert the remaining three implants through the same incision.
Figure 13

Step 10:Verify that the implants (26.5 mm in length) are in place by palpating the patient's arm immediately after insertion, as shown in Figure 14. If you do not feel the four implants, or doubt their presence, use other methods to confirm the presence of the implant.
Figure 14
Step 11:Apply pressure to the incision site for about five minutes if necessary. Clean the incision site. Apply liquid adhesive to the skin margins and let it dry before closing the incision with the fine adhesive tape, about 6 mm wide (butterfly tape). Place a small adhesive dressing over the insertion site. Apply a compressive bandage with sterile gauze to minimize bruising. Inform the patient that the compressive bandage can be removed after 24 hours and the adhesive dressing in three to five days, and that they should apply an ice pack to the arm for 40 minutes every two hours during the first 24 hours, and then as needed.
Step 12:Fill out the Patient Alert Card and give it to the patient to keep. Also, scan or enter the implantation procedure details into the patient's medical history. Advise the patient on proper care of the insertion site.
Instructions for Localization of Implants Before Removal
Verify the location of the implants by palpation. Non-palpable implants must be localized before attempting to remove them.In the case of non-palpable implants, removal should be performed under ultrasound guidance (after localization). Suitable methods for localization include a high-frequency linear array ultrasound transducer (10 MHz or higher) or, if ultrasound is unsuccessful, magnetic resonance imaging (MRI). Sixmo implants are not radiopaque and cannot be seen with X-rays or computed tomography. Exploratory surgery without knowing the exact location of all implants is not recommended.
Equipment for Removal of Sixmo
The implants must be removed under aseptic conditions, for which the following equipment is needed:
- a examination table for the patient to lie on
- instrument stand covered with a sterile drape
- adequate lighting, such as a headlamp
- sterile fenestrated drapes
- sterile latex gloves without talc
- alcohol swab
- surgical marker
- antiseptic solution, such as chlorhexidine
- local anesthesia, such as 1% lidocaine with adrenaline 1:100,000
- 5 mL syringe with 25G×1.5" (0.5×38 mm) needle
- Adson tissue forceps with one tooth
- mosquito forceps
- two X-plant forceps (vasectomy grasp forceps with 2.5 mm ring diameter)
- Iris scissors
- needle holder
- No. 15 scalpel with blade
- sterile ruler
- sterile gauze 100×100 mm
- adhesive dressing
- compressive bandage, about 8 cm wide
- sutures, such as Prolene 4-0 with a cutting FS-2 needle (may be absorbable)
Instructions for Removal of Sixmo
Step 13:The patient should lie on their back, with the arm that has the implants flexed at the elbow and rotated outward, so that the hand is next to the head. Reconfirm the location of the implants by palpation. Clean the removal site with an alcohol swab before marking the skin. Mark the location of the implants and the incision with the surgical marker. The incision should be made parallel to the arm axis, between the second and third implant, to access the subcutaneous space (Figure 15).
Figure 15
Step 14:Put on sterile gloves. Using an aseptic technique, place the sterile equipment in the sterile field of the instrument support. Clean the extraction site with an antiseptic solution such as chlorhexidine. Do not dry or clean it. Apply the sterile cloth over the patient's arm. Administer anesthesia at the incision site and the subcutaneous space containing the implants (for example, injecting 5 to 7 mL of 1% lidocaine with adrenaline 1:100,000). NOTE: Make sure to inject the local anesthesia deeply into the center of the implants; this will effectively raise the implants towards the skin, facilitating implant removal. After verifying that the anesthesia is sufficient and effective, make a 7 to 10 mm incision with a scalpel, parallel to the arm axis, between the second and third implant.
Step 15:Take the edge of the skin with the Adson forceps and separate the tissues above and below the visible implant, using an Iris scissors or a curved mosquito forceps (Figure 16).
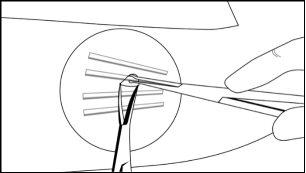
Grasp the center of the implant with the X-plant forceps (Figure 17) and pull gently. If the implant is encapsulated, or if you see umbilication, use the scalpel to trim the adherent tissue and release the implant.
Figure 16
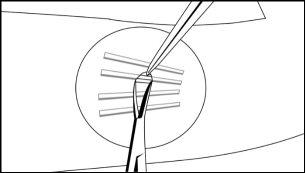
Figure 17
Step 16:After removing the implant, confirm that the entire 26.5 mm long implant has been removed by measuring its length. Follow steps 15 and 16 for the removal of the remaining implants through the same incision. The same technique is used for the removal of implants that are protruding or have been partially expelled. Exploratory surgery without knowing the exact location of all implants is discouraged.
Step 17:After removing all implants, clean the incision site. Close the incision with sutures and apply an adhesive dressing over the incision. With the sterile gauze, apply gentle pressure to the incision site for five minutes to ensure hemostasis. Apply a compressive bandage with sterile gauze to minimize bruising. Inform the patient that the compressive bandage can be removed after 24 hours and the adhesive dressing in three to five days. Advise the patient on proper wound care. Inform the patient to apply an ice pack to the arm for 40 minutes every two hours for the first 24 hours, and then as needed. Schedule a follow-up appointment for suture removal.
Step 18:The disposal of Sixmo implants will be carried out in accordance with local regulations, as they contain buprenorphine.
If one or more implants or fragments of them are not removed during an extraction attempt, the patient should undergo imaging diagnosis for localization as soon as possible, with the subsequent extraction attempt performed on the same day as localization. If localization and a second extraction attempt are not performed on the same day as the first extraction attempt, the wound should be closed with sutures in the meantime.
- Country of registration
- Active substance
- Prescription requiredYes
- Manufacturer
- This information is for reference only and does not constitute medical advice. Always consult a doctor before taking any medication. Oladoctor is not responsible for medical decisions based on this content.
- Alternatives to SIXMO 74.2 mg IMPLANTDosage form: INJECTABLE, 128 mg/0.36 mlActive substance: buprenorphineManufacturer: Camurus AbPrescription requiredDosage form: INJECTABLE, 50 mg/mLActive substance: buprenorphineManufacturer: Camurus AbPrescription requiredDosage form: INJECTABLE, 160 mgActive substance: buprenorphineManufacturer: Camurus AbPrescription required
Online doctors for SIXMO 74.2 mg IMPLANT
Discuss questions about SIXMO 74.2 mg IMPLANT, including use, safety considerations and prescription review, subject to medical assessment and local regulations.


Frequently Asked Questions
