

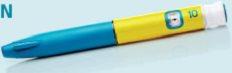
BYETTA 5 micrograms injectable solution in a prefilled pen
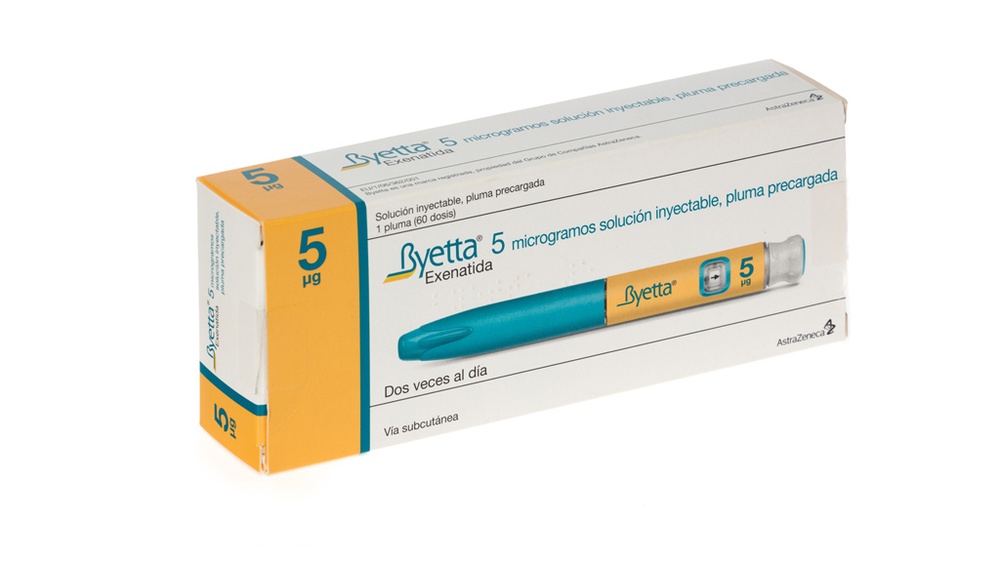


How to use BYETTA 5 micrograms injectable solution in a prefilled pen
Translated with AI
This page provides general information and does not replace a doctor’s consultation. Always consult a doctor before taking any medication. Seek urgent medical care if symptoms are severe.
Show originalContents of the leaflet
Introduction
Package Leaflet: Information for the User
Byetta 5micrograms solution for injection in pre-filled pen
Byetta 10micrograms solution for injection in pre-filled pen
Exenatide
Read all of this leaflet carefully before you start using this medicine because it contains important information for you.
- Keep this leaflet, you may need to read it again.
- If you have any further questions, ask your doctor, pharmacist, or diabetes nurse.
- This medicine has been prescribed for you only. Do not pass it on to others. It may harm them, even if their signs of illness are the same as yours.
- If you get any side effects, talk to your doctor, pharmacist, or diabetes nurse. This includes any possible side effects not listed in this leaflet. See section 4.
Contents of the pack and other information:
- What is Byetta and what is it used for
- What you need to know before you use Byetta
- How to use Byetta
- Possible side effects
- Storing Byetta
- Contents of the pack and further information
1. What is Byetta and what is it used for
Byetta contains the active substance exenatide. It is an injectable medicine used to improve blood sugar control in adults with type 2 diabetes mellitus (non-insulin dependent).
Byetta is used with other diabetes medicines called metformin, sulfonylureas, thiazolidinediones, and basal or long-acting insulin. Your doctor has prescribed Byetta as an additional medicine to help control your blood sugar. Continue with your exercise and diet plan.
You have diabetes because your body does not produce enough insulin to control your blood sugar levels or because your body cannot use insulin properly. The medicine in Byetta helps your body increase insulin production when your blood sugar is high.

2. What you need to know before you use Byetta
Do not use Byetta
- If you are allergic to exenatide or any of the other ingredients of this medicine (listed in section 6).
Warnings and precautions
Talk to your doctor, pharmacist, or diabetes nurse before starting Byetta about the following:
- Using this medicine in combination with a sulfonylurea, as you may have low blood sugar (hypoglycemia). Ask your doctor, pharmacist, or diabetes nurse if you are not sure if any of your other medicines contain a sulfonylurea.
- If you have type 1 diabetes or diabetic ketoacidosis (a dangerous condition that can occur in diabetes), as you should not use this medicine.
- How to inject this medicine. It should be injected under the skin and not into a vein or muscle.
- If you have severe problems with emptying your stomach or digesting food, as the use of this medicine is not recommended. The active ingredient in this medicine slows down stomach emptying, so food passes more slowly through your stomach.
- If you have ever had pancreatitis (inflammation of the pancreas) (see section 4).
- Tell your doctor if you lose weight too quickly (more than 1.5 kg per week), as it may cause problems such as gallstones.
- If you have severe kidney disease or are on dialysis, as the use of this medicine is not recommended. There is limited experience with this medicine in patients with kidney problems.
Byetta is not insulin, so it should not be used as a substitute for insulin.
Children and adolescents
Do not give this medicine to children and adolescents under 18 years old, as there is no experience with this medicine in this age group.
Using Byetta with other medicines
Tell your doctor or pharmacist if you are using or have recently used or might use any other medicines, especially:
- medicines used to treat type 2 diabetes that work like Byetta (e.g., liraglutide and extended-release exenatide), as it is not recommended to use these medicines with Byetta.
- medicines used to thin the blood (anticoagulants), e.g., warfarin, as you will need additional monitoring of changes in your INR (a measure of blood clotting) during the start of therapy with this medicine.
Ask your doctor if you should change the time you take any tablets you are using, as this medicine slows down stomach emptying and may affect medicines that need to pass through the stomach quickly, e.g.:
- Enteric-coated tablets or capsules (e.g., medicines that reduce stomach acid (proton pump inhibitors)) that should not stay in the stomach for too long may need to be taken 1 hour before or 4 hours after injecting this medicine.
- Some antibiotics may need to be taken 1 hour before injecting Byetta.
- For tablets that need to be taken with food, the best option may be to take them at a meal where you do not inject this medicine.
Using Byetta with food
Use this medicine at any time within 60 minutes (1 hour) beforeyour meal. (See section 3 "How to use Byetta"). Do not usethis medicine aftera meal.
Pregnancy and breastfeeding
It is not known if this medicine can have harmful effects on the fetus. If you are pregnant, think you may be pregnant, or plan to become pregnant, consult your doctor or pharmacist before using this medicine, as it should not be used during pregnancy.
It is not known if exenatide passes into breast milk. This medicine should not be used if you are breastfeeding.
Driving and using machines
If you use this medicine in combination with a sulfonylurea or insulin, low blood sugar (hypoglycemia) may occur. Hypoglycemia can reduce your ability to concentrate. Please note this possible problem in all situations where you may put yourself or others at risk (e.g., driving a car or using machines).
Byetta contains metacresol.
Metacresol may cause allergic reactions.
Byetta contains sodium.
This medicine contains less than 1 mmol of sodium (23 mg) per dose; this is essentially "sodium-free".
3. How to use Byetta
Follow the instructions for administration of this medicine exactly as told by your doctor, pharmacist, or diabetes nurse. If you are unsure, consult your doctor, pharmacist, or diabetes nurse again.
There are two concentrations of Byetta available: Byetta 5 micrograms and Byetta 10 micrograms. Your doctor may tell you to start treatment using Byetta 5 micrograms twice a day. After using Byetta 5 micrograms twice a day for 30 days, your doctor may increase your dose to Byetta 10 micrograms twice a day.
If you are over 70 years old or have kidney problems, it may take more than 30 days to tolerate the dose of Byetta 5 micrograms, so your doctor may not increase your dose.
An injection from your pre-filled pen will give you your dose. Do not change your dose unless your doctor tells you to.
You should inject this medicine under the skin (subcutaneous injection) in the upper leg (thigh), stomach area (abdomen), or upper arm. If you are using Byetta and insulin, you should inject them separately.
To establish your dose of Byetta, you do notneed to check your blood sugar levels daily. However, if you are also using a sulfonylurea or insulin, your doctor may tell you to check your blood sugar levels to adjust the dose of sulfonylurea or insulin. If you are receiving insulin, your doctor will tell you how to reduce your insulin dose and recommend that you check your blood sugar levels more frequently to avoid hyperglycemia (high blood sugar) and diabetic ketoacidosis (a complication of diabetes that occurs when the body cannot break down glucose because there is not enough insulin).
In the User Manual for the Pen that comes with this leaflet, you can find instructions on how to use the Byetta pen.
Your doctor or nurse should teach you how to inject Byetta before you use it for the first time.
Becton, Dickinson and Company needles are suitable for use with the Byetta pen. Needles for injection are not included.
Use a new needle for each injection and discard it after each use. This medicine is for you; never share the Byetta pen with others.
If you use more Byetta than you should
If you use more of this medicine than you should, talk to your doctor or go to a hospital immediately. Using too much of this medicine can cause nausea, vomiting, dizziness, or symptoms of low blood sugar (see section 4).
If you forget to use Byetta
If you miss a dose of this medicine, skip that dose and give your next dose when it is due. Do notgive a double dose or increase the amount of your next dose to make up for the missed dose.
If you stop using Byetta
If you think you need to stop using this medicine, consult your doctor first. If you stop using this medicine, it may affect your blood sugar levels.
If you have any other questions about using this medicine, ask your doctor, pharmacist, or diabetes nurse.

4. Possible side effects
Like all medicines, this medicine can cause side effects, although not everybody gets them.
Rarely (may affect up to 1 in 1,000 people), severe allergic reactions(anaphylaxis) have been reported.
You should talk to your doctor immediately if you get symptoms such as:
- Swelling of the face, tongue, or throat (angioedema)
- Rash, itching, and rapid swelling of the tissues of the neck, face, mouth, or throat
- Difficulty swallowing
- Hives and difficulty breathing
Cases of pancreatitis(inflammation of the pancreas) have been reported (frequency not known) in patients taking this medicine. Pancreatitis can be a serious and potentially life-threatening medical condition.
- Talk to your doctor if you have had pancreatitis, gallstones, alcoholism, or very high triglycerides. These medical conditions may increase the risk of pancreatitis or make it more likely to happen again, whether or not you are taking this medicine.
- Stop takingthis medicine and contact your doctor immediately if you have severe and persistentstomach pain, with or without vomiting, as you may have pancreatitis.
Very commonside effects (may affect more than 1 in 10 people):
- nausea (nausea is the most common side effect when starting treatment with this medicine, but it decreases over time in most patients)
- vomiting
- diarrhea
- low blood sugar (hypoglycemia)
When using this medicine with another medicine that contains a sulfonylurea or insulin, low blood sugar (hypoglycemia) may occur very commonly. It may be necessary to reduce the dose of your sulfonylurea or insulin while using this medicine. The signs and symptoms of low blood sugar can include headache, drowsiness, weakness, dizziness, confusion, irritability, hunger, rapid heartbeat, sweating, and a feeling of nervousness. Your doctor should tell you how to treat low blood sugar.
Commonside effects (may affect up to 1 in 10 people):
- dizziness
- headache
- feeling nervous
- constipation
- stomach pain
- swelling
- indigestion
- itching (with or without rash)
- flatulence (gas)
- increased sweating
- loss of energy and strength
- heartburn
- loss of appetite
This medicine may reduce your appetite, the amount of food you eat, and your weight.
Tell your doctor if you lose weight too quickly (more than 1.5 kg per week), as it may cause problems such as gallstones.
Uncommonside effects (may affect up to 1 in 100 people):
- decreased kidney function
- dehydration, usually associated with nausea, vomiting, and/or diarrhea
- unusual taste in the mouth
- belching
- reactions at the injection site (redness)
- drowsiness
- hair loss
- weight loss
- delayed stomach emptying
- inflamed gallbladder
- gallstones
Rareside effects (may affect up to 1 in 1,000 people):
- intestinal obstruction (blockage in the intestine)
Not known(frequency cannot be estimated from the available data).
Other side effectshave also been reported:
- bleeding or bruising more easily than normal due to a low level of platelets in the blood.
- changes in INR (a measure of blood clotting) have been reported when used with warfarin.
Reporting of side effects
If you get any side effects, talk to your doctor, pharmacist, or diabetes nurse. This includes any possible side effects not listed in this leaflet. You can also report side effects directly via the national reporting system listed in Appendix V. By reporting side effects, you can help provide more information on the safety of this medicine.
5. Storing Byetta
Keep this medicine out of the sight and reach of children.
Do not use this medicine after the expiry date which is stated on the label and carton after "EXP". The expiry date is the last day of the month stated.
Store in a refrigerator (between 2°C and 8°C). Once in use, store your pen below 25°C for 30 days. Discard the Byetta pen after 30 days, even if there is still medicine left in the pen.
Put the pen cap back on the pen to protect it from light. Do not freeze. Discard any Byetta pen that has been frozen.
Do not use this medicine if you notice particles in the solution or if it is cloudy or colored.
Do not store the pen with the needle attached. If you leave the needle attached, the medicine may leak from the pen or air bubbles may form in the cartridge.
Medicines should not be disposed of via wastewater or household waste. Ask your pharmacist how to dispose of medicines no longer required. This will help protect the environment.
6. Container Contents and Additional Information
Composition of Byetta
- The active ingredient is exenatide.
- Two pre-filled pens are available. One for the administration of a 5 microgram dose and another for a 10 microgram dose.
- Each dose of the Byetta 5 microgram solution for injection contains 5 micrograms of exenatide in 20 microliters.
- Each dose of the Byetta 10 microgram solution for injection contains 10 micrograms of exenatide in 40 microliters.
- Each milliliter (ml) of the solution for injection contains 0.25 milligrams (mg) of exenatide.
- The other components are metacresol (44 micrograms/dose in the Byetta 5 microgram solution for injection and 88 micrograms/dose in the Byetta 10 microgram solution for injection), mannitol, glacial acetic acid, sodium acetate trihydrate, and water for injectable preparations (see section 2).
Appearance of the Product and Container Contents
Byetta is a clear and colorless liquid (solution for injection) found in a glass cartridge within a pen. When the pen is empty, it cannot be reused. Each pen contains 60 doses to provide two injections per day for 30 days.
Byetta is available in packs of 1 and 3 pre-filled pens. Only some pack sizes may be marketed.
Marketing Authorization Holder
AstraZeneca AB
SE-151 85 Södertälje
Sweden
Manufacturer
AstraZeneca AB
Global External Sourcing (GES)
Astraallén
Gärtunaporten (B 674:5)
SE-151 85 Södertälje
Sweden
You can request more information about this medication by contacting the local representative of the marketing authorization holder:
Belgium AstraZeneca S.A./N.V. Tel: +32 2 370 48 11 | Lithuania UAB AstraZeneca Lietuva Tel: +370 5 2660550 |
Bulgaria AstraZeneca Bulgaria EOOD Tel: +359 24455000 | Luxembourg AstraZeneca S.A./N.V. Tel: +32 2 370 48 11 |
Czech Republic AstraZeneca Czech Republic s.r.o. Tel: +420 222 807 111 | Hungary AstraZeneca Kft. Tel: +36 1 883 6500 |
Denmark AstraZeneca A/S Tel: +45 43 66 64 62 | Malta Associated Drug Co. Ltd Tel: +356 2277 8000 |
Germany AstraZeneca GmbH Tel: +49 40 809034100 | Netherlands AstraZeneca BV Tel: +31 79 363 2222 |
Estonia AstraZeneca Tel: +372 6549 600 | Norway AstraZeneca AS Tel: +47 21 00 64 00 |
Greece AstraZeneca A.E. Tel: +30 210 6871500 | Austria AstraZeneca Österreich GmbH Tel: +43 1 711 31 0 |
Spain AstraZeneca Farmacéutica Spain, S.A. Tel: +34 91 301 91 00 | Poland AstraZeneca Pharma Poland Sp. z o.o. Tel: +48 22 245 73 00 |
France AstraZeneca Tel: +33 1 41 29 40 00 | Portugal AstraZeneca Produtos Farmacêuticos, Lda. Tel: +351 21 434 61 00 |
Croatia AstraZeneca d.o.o. Tel: +385 1 4628 000 | Romania AstraZeneca Pharma SRL Tel: +40 21 317 60 41 |
Ireland AstraZeneca Pharmaceuticals (Ireland) Ltd Tel: +353 1609 7100 | Slovenia AstraZeneca UK Limited Tel: +386 1 51 35 600 |
Iceland Vistor hf. Tel: +354 535 7000 | Slovakia AstraZeneca AB, o.z. Tel: +421 2 5737 7777 |
Italy AstraZeneca S.p.A. Tel: +39 02 00704500 | Finland AstraZeneca Oy Tel: +358 10 23 010 |
Cyprus Alektou Farmaeutikē Ltd Tel: +357 22490305 | Sweden AstraZeneca AB Tel: +46 8 553 26 000 |
Latvia SIA AstraZeneca Latvija Tel: +371 67377100 | United Kingdom AstraZeneca UK Ltd Tel: +44 1582 836 836 |
This project has been approved in:
Detailed information on this medication is available on the European Medicines Agency website http://www.ema.europa.eu.
USER MANUAL FOR THE PEN
Byetta 5 micrograms solution for injection in a pre-filled pen
(exenatide)
CONTENTS OF THE USER MANUAL
Section 1 – WHAT YOU NEED TO KNOW ABOUT YOUR BYETTA PEN
Section 2 – STARTING TO USE YOUR PEN: FOR NEW USERS OR NEW PENS
Section 3 – USUAL USE: FOR PATIENTS WHO HAVE PREPARED THEIR PEN
Section 4 – FREQUENTLY ASKED QUESTIONS: QUESTIONS RELATED TO THE PEN
Section 1. WHAT YOU NEED TO KNOW ABOUT YOUR BYETTA PEN
Read this section completely before starting. Then go to Section 2 – starting to use your pen.
Read these instructions carefully BEFORE using your Byetta pen. Also, read the Byetta leaflet included in the pen pack.
You must use the pen correctly to get the most benefit from Byetta. If you do not follow these instructions exactly, the result may be, for example, that an incorrect dose is administered, the pen breaks, or an infection occurs.
These instructions do not replace talking to your healthcare professional about your illness or treatment. If you are having problems using the Byetta pen, contact your healthcare professional.
IMPORTANT INFORMATION ABOUT YOUR BYETTA PEN
- Byetta is injected twice a day and the pen contains enough medication for 30 days. You do not need to measure the dose; the pen sets each dose for you.
- DO NOT TRANSFER THE MEDICATION FROM THE BYETTA PEN TO A SYRINGE.
- Do not use the pen if any part of it is broken or damaged.
- Do not share your pen or needles as this may pose a risk of infection transmission.
- The use of this pen is not recommended for blind or visually impaired persons. Assistance from a person trained in the use of the pen will be necessary.
- Healthcare professionals or other caregivers must follow institutional or local guidelines for needle handling.
- Follow the instructions recommended by your healthcare professional for a hygienic injection technique.
- Follow the instructions included in Section 2 only for the preparation of a new pen before the first use.
- For each injection, follow the instructions included in Section 3 of this user manual.
INFORMATION ABOUT INJECTION NEEDLES
Your Byetta pen is suitable for use with Becton, Dickinson and Company injection needles.
Should I use a new needle for each injection?
- Yes. Do not reuse needles.
- Remove the needle immediately after each injection. This will help prevent Byetta loss, avoid air bubbles, reduce needle blockages, and decrease the risk of infection.
- Do not press the injection button unless a needle is attached to the pen.
How do I dispose of my needles?
- Dispose of used needles in a puncture-resistant container or as instructed by your healthcare professional.
- Do not throw the pen away with the needle attached.
STORAGE OF YOUR BYETTA PEN
How should I store my Byetta pen?
- Store in the refrigerator (between 2°C and 8°C).
- Do not freeze. Discard any Byetta pen that has been frozen.
- Once in use, your Byetta pen must be stored below 25°C.
- Put the pen cap on to protect it from light.
- Do not store the Byetta pen with the needle attached. If you leave the needle attached, medication loss from the Byetta pen or air bubbles may form in the cartridge.
Keep the pen and needles out of the sight and reach of children.
How long can I use a Byetta pen?
- Use a Byetta pen only for the 30 days following the preparation of a new pen for its first use.
After 30 days, discard the used Byetta pen, even if there is still medication left in the pen.
- Mark the date you first used your pen and the date 30 days later in the space provided below:
Date of first day of use
Date of pen disposal
- Do not use Byetta after the expiration date shown on the label and on the carton after "EXP". The expiration date is the last day of the month indicated.
How can I clean my Byetta pen?
- If necessary, clean the outside of the pen with a clean, damp cloth.
- During usual use, white particles may appear on the external end of the cartridge. You can remove them with a cotton swab or cotton ball dipped in alcohol.
Please also read the Byetta leaflet included in the pen pack. For additional information, consult your healthcare professional.
Section 2. STARTING TO USE YOUR PEN
Read and follow the instructions in this section once you have read Section 1 – what you need to know about your Byetta pen.
Prepare your new pen just before using it for the first time. Follow the instructions for Preparing the New Penonly once. Do not repeatthe Preparing the New Pen for each usual use. If you do, you will run out of Byetta before 30 days of use.
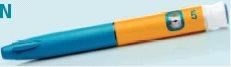
PARTS OF THE BYETTA PEN | ||||||
|
| |||||
Blue pen cap | Cartridge | Byetta liquid | Label | Dose window | Dose button | Injection button |

PARTS OF THE NEEDLE (Needles not included) | SYMBOLS ON THE DOSE WINDOW | ||||
|
|
|
| Ready to extract the dose button | |
Ready to turn to the dose position | |||||
Ready to inject 5 micrograms (μg) | |||||
Outer needle cap | Inner needle protector | Needle | Paper tab | Dose button inside and ready to reset |


PREPARING THE NEW PEN – DO THIS ONLY ONCE
STEP A. Check the Pen

- Wash your hands before starting.
- Check the pen label to ensure it is your 5 microgram pen.
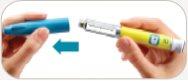
- Remove the blue pen cap.
Check the appearance of Byetta in the cartridge. The liquid should be clear and colorless and free of particles. If it is not, do not use it.
Note:A small air bubble in the cartridge is normal.
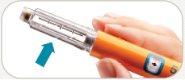
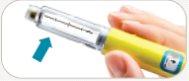
STEP B. Attach the Needle
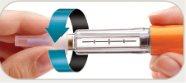
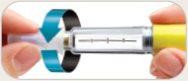
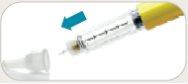
- Remove the paper tab from the outer needle cap.
- Pressthe outer needle cap, which contains the needle, directlyonto the pen, then screwthe needle on until it is secure.

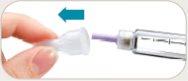
- Remove the outer needle cap. Do not throw it away.The outer needle cap will be used when you remove the needle from the pen after injection.

- Remove the inner needle protector and throw it away. A small drop of liquid may appear. This is normal.
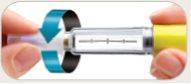
STEP C. Set the Dose
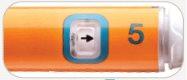
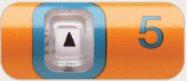
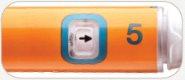
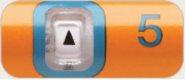
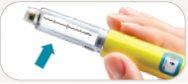
- Check that 5appears in the dose window. If it does not, turn the dose button clockwise until it stopsand 5appears in the dose window.

- Pull the dose button until it stopsand 5appears in the dose window.
- Turn the dose button clockwise until it stopsand 5appears. Make sure the 5with the line below it is in the center of the dose window.
Note:If you cannot turn the dose button clockwise to 5, see question 9 in the Frequently Asked Questionssection of Section 4 of this user manual.
STEP D. Prepare the Pen

- Hold the pen with the needle pointing upwards and away from you.
PRESS AND HOLD
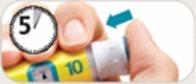
- Use your thumb to press the injection button firmly until it stops, then hold the injection button firmly pressed and count slowly to 5.
- If you do not see a small flow or a few drops coming out of the needle tip, repeat Steps C and D.
- The pen preparation is complete when 5appears in the center of the dose window ANDyou have seen a small flow or a few drops coming out of the needle tip.
Note:If you do not see liquid after repeating this operation 4 times, see question 3 in the Frequently Asked Questionssection of Section 4 of this user manual.
STEP E. Complete the Preparation of the New Pen
- Turn the dose button clockwise until it stopsand 5appears in the dose window.
- The preparation of the new pen is complete. Do not repeat the instructions included in Section 2 for each usual use; if you do, you will run out of Byetta before 30 days of use.
- You are now ready to inject your first dose of Byetta.
- Go to Section 3, step 3, where you will find the instructions for injecting your first usual dose.
Note:If you cannot turn the dose button, see question 9 in the Frequently Asked Questionssection of Section 4 of this user manual.
Section 3. USUAL USE
Now that you have prepared the new pen, follow the instructions included in this section for allyour injections.
STEP 1. Check the Pen

- Wash your hands before using it.
- Check the pen label to ensure it is your 5 microgram pen.
- Remove the blue pen cap.
Orange with transparent needle ready to inject, blue arrow indicating direction and informative label">
- Check the appearance of Byetta in the cartridge.
- The liquid must be transparent and colorless and free of particles. If it is not, do not use it.
Note: A small air bubble will not harm you or affect your dose.
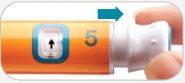
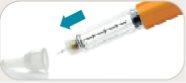
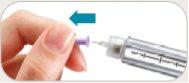
STEP 2. Attach the Needle
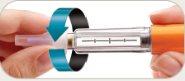
- Remove the paper tab from the outer hood of the needle.
- Pressthe outer hood of the needle, which contains the needle, directlyonto the pen. Screwthe needle until it is fixed.

- Remove the outer hood of the needle. Do not throw it away. The outer hood of the needle will be used when you remove the needle from the pen after injection.

- Remove the inner protector of the needle and throw it away. A small drop of liquid may appear. This is normal.
Note:If the needle is not attached, you may not receive your full dose.
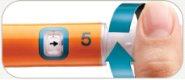
STEP 3. Set the Dose
- Check that appears in the dosing window. If it does not, turn the dosing button clockwise until it stopsand appears in the dosing window.
- Pull the dosing button until it stopsand appears in the dosing window.
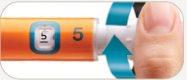
- Turn the dosing button clockwise until it stopsat . Make sure the 5 with the line below is in the center of the dosing window.
Note: If you cannot turn the dosing button clockwise to , see question 9 in the Frequently Asked Questionssection of Section 4 of this user manual.
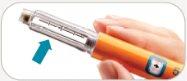
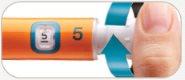
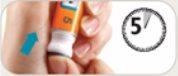
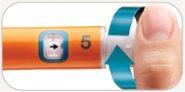
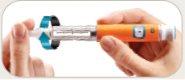
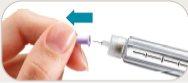
STEP 4. Inject the Dose
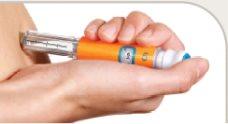
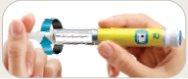
- Hold the pen firmly in your hand.
- Avoid pinching your skin too hard before injection. Insert the needle into your skin following the instructions recommended by your healthcare professional for a hygienicinjection.

PRESS AND HOLD
- Use your thumb to press the injection button firmly until it stops, then hold the injection button firmly pressed and count slowly to 5to administer the full dose.
- Hold the injection button while removing the needle from your skin, this keeps the medication in the cartridge transparent. See question 4 in Frequently Asked Questions.
- The injection is complete when appears in the center of the dosing window.
- The pen is now ready to restart.
Note: If you see several drops of Byetta coming out of the needle, it means you did not press the injection button completely. See question 5 in the Frequently Asked Questionssection of Section 4 of this user manual.
STEP 5. Restart the Pen
- Turn the dosing button clockwise until it stopsand appears in the dosing window.
Note:This must be repeated after each injection.
Note: If you cannot turn the dosing button or your pen is leaking, it means you have not injected your full dose. See questions 5 and 9 in the Frequently Asked Questionssection of Section 4 of this user manual.
STEP 6. Remove and Dispose of the Needle
- Carefully replace the outer hood of the needle.
- Remove the needle after each injection.This prevents liquid from escaping.
- Unscrew the needle.
- Replace the blue cap of the pen before storing it.

- Dispose of used needles in a puncture-resistant container or as instructed by your healthcare professional.
STEP 7. Storing the Pen for the Next Dose
- Store your Byetta pen properly. (For more information, see Storing Your Byetta Penin Section 1 of this user manual).
- When it is time for your next scheduled dose, repeat steps 1 to 7 included in Section3.
Section4. FREQUENTLY ASKED QUESTIONS
- Do I need to follow the preparation instructions for a new pen before each dose?
- No. Preparation of the new pen is only done once, just before each new pen is used for the first time.
- The purpose of preparation is to ensure that your Byetta pen is ready to use for the next 30 days.
- If you repeat the New Pen Preparation before each dose, you will not have enough Byetta for 30 days.The small amount of Byetta used in the new pen preparation will not affect the Byetta content for 30 days.
- Why are there air bubbles in the cartridge?
- A small air bubble is normal. It will not harm you or affect your dose.
- If you store the pen with the needle attached, air bubbles may form in the cartridge. Do notstore the pen with the needle attached.
- What should I do if Byetta does not come out of the needle tip after four attempts during new pen preparation?
- Carefully replace the outer hood of the needle and remove the needle. Unscrew it and dispose of it properly.
- Put on a new needle and repeat steps B to Eof the New Pen Preparationsection of Section 2 of this user manual. Once you see a small flow or a few drops coming out of the needle tip, the preparation is complete.
- Why do I see particles in the cartridge after I finish my injection?
Particles or discoloration may appear in the cartridge after injection. This can occur if you pinched your skin too hard or if you released the injection button before the needle was removed from your skin.
- Why do I see Byetta still dripping from my needle after I finish my injection?
It is normal for a single drop to remain on the tip of the needle after completing the injection. If you see more than one drop:
- You may not have injected the full dose. Do notinject another dose. Consult your healthcare professional about what to do if you have injected an incomplete dose.
- To prevent this, for your next dose, make sure to press the injection button firmly, hold it pressed, and count slowly to 5(see Step 4: Inject the Dosein Section3).
- What do the arrows mean?
The arrows mean you are ready for the next step. These arrows show the direction to pull or turn the dosing button in the next step. This symbol means the dosing button is pressed and the pen is ready to restart.
- How do I know when the injection is complete?
The injection is complete when:
- You have pressed the injection button firmly until it stops
and
- You have counted slowly to 5while still holding the injection button pressed and the needle is still in your skin
and
- appears in the center of the dosing window.
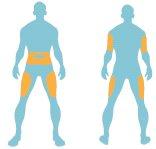
- Where should I inject Byetta?
Byetta should be injected into your abdomen, thigh, or upper arm using the injection technique recommended by your healthcare professional.
Front Back

- What should I do if I cannot pull, turn, or press the dosing button?
Check which symbol appears in the dosing window. Follow the steps indicated next to that symbol.
Ifappears in the dosing window:
- Pull the dosing button until appears.
Ifappears in the dosing window and the dosing button does not turn:
- The cartridge in your Byetta pen may not have enough liquid to deliver a full dose. There will always be a small amount of Byetta left in the cartridge. If the cartridge contains a small amount or appears to be empty, get a new Byetta pen.
Ifand part ofappear in the window and the dosing button cannot be pressed:
- The needle may be blocked, bent, or not properly attached.
- Put on a new needle. Make sure the needle is straight and fully screwed on.
- Press the injection button completely with firmness. Byetta should come out of the needle tip.
Ifappears in the dosing window and the dosing button does not turn:
- You have not pressed the injection button completely and have not administered a full dose. Consult your healthcare professional about what to do if you have injected an incomplete dose.
- Follow these steps to restart your pen for the next injection:
- Press the injection button firmly until it stops. Hold the injection button pressed and count slowly to 5. Then, turn the dosing button clockwise until appears in the dosing window.
- If you cannot turn the dosing button, the needle may be blocked. Change the needle and repeat the previous step.
- For your next dose, make sure to press the injection button firmly, hold it pressed, and count slowly to 5before removing the needle from your skin.
Please also read the Byetta package leaflet included in the packaging. For additional information, contact your healthcare professional.
BYETTA PEN USER MANUAL
Byetta 10micrograms solution for injection in pre-filled pen
(exenatide)
CONTENTS OF THEUSER MANUAL
Section 1 –WHAT YOU NEED TO KNOW ABOUT YOUR BYETTA PEN
Section 2 –STARTING TO USE YOUR PEN: FOR NEW USERS OR NEW PENS
Section 3 – USUAL USE: FOR PATIENTS WHO HAVE PREPARED THEIR PEN
Section 4 –FREQUENTLY ASKED QUESTIONS: QUESTIONS RELATED TO THE PEN
Section1.WHAT YOU NEED TO KNOW ABOUT YOUR BYETTA PEN
Read this section completely before starting. Then go to section2 – starting to use your pen.
Read these instructions carefully BEFORE using your Byetta pen. Also, read the Byetta package leaflet included in the packaging of the Byetta pen.
You must use the pen correctly to get the most benefit from Byetta. If you do not follow these instructions exactly, the result may be, for example, that you administer an incorrect dose, the pen breaks, or you get an infection.
These instructions do not replace talking to your healthcare professional about your condition or treatment. If you are having problems using the Byetta pen, contact your healthcare professional.
IMPORTANT INFORMATION ABOUT YOUR BYETTA PEN
- Byetta is injected twice a day and the pen contains enough medication for 30 days. You do not need to measure the dose; the pen sets each dose for you.
- DO NOT TRANSFER THE MEDICATION FROM THE BYETTA PEN TO A SYRINGE.
- Do not use the pen if any part of it is broken or damaged.
- Do not share your pen or needles as it may pose a risk of infection transmission.
- The use of this pen is not recommended for blind or visually impaired individuals. Assistance from a trained person will be necessary for pen use.
- Healthcare professionals or other caregivers must follow institutional or local guidelines for handling needles.
- Follow the instructions recommended by your healthcare professional for a hygienic injection technique.
- Follow the instructions included in Section2 only for the preparation of a new pen before the first use.
- For each injection, follow the instructions included in Section 3 of this manual.
INFORMATION ABOUT INJECTION NEEDLES
Your Byetta pen is suitable for use with Becton, Dickinson and Company injection needles.
Should I use a new needle for each injection?
- Yes. Do not reuse needles.
- Remove the needle immediately after each injection. This will help prevent Byetta loss, avoid air bubbles, reduce needle blockages, and decrease the risk of infection.
- Do not press the injection button unless a needle is attached to the pen.
How do I dispose of my needles?
- Dispose of used needles in a puncture-resistant container or as instructed by your healthcare professional.
- Do not throw away the pen with the needle attached.
STORING YOUR BYETTA PEN
How should I store my Byetta pen?
- Store in the refrigerator (between 2°C and 8°C).
- Do not freeze. Discard any Byetta pen that has been frozen.
- Once in use, your Byetta pen must be stored below 25°C.
- Put the cap on the pen to protect it from light.
- Do not store the Byetta pen with the needle attached. If you leave the needle attached, medication loss from the Byetta pen or air bubbles in the cartridge may occur.
Keep the pen and needles out of sight and reach of children.
How long can I use a Byetta pen?
- Use a Byetta pen only for the 30 days following the preparation of a new pen for its first use.
After 30days, discard the used Byetta pen, even if there is still medication in the pen.
- Mark the date you first used your pen and the date 30 days later in the space below:
Date of first day of use
Date of pen disposal
- Do not use Byetta after the expiration date shown on the label and on the packaging after "EXP". The expiration date is the last day of the month indicated.
How can I clean my Byetta pen?
- If necessary, clean the outside of the pen with a clean, damp cloth.
- During usual use, white particles may appear on the external end of the cartridge. You can remove them with a swab or cotton ball soaked in alcohol.
Please also read the Byetta package leaflet included in the packaging. For additional information, consult your healthcare professional.
Section2. STARTING TO USE YOUR PEN
Read and follow the instructions in this section once you have read Section1 – what you need to know about your Byetta pen.
Prepare your new pen just before using it for the first time. Follow the New Pen Preparationinstructions only once. Do not repeatthe New Pen Preparation.
Preparation of the New Pen for each usual use. If you do, you will run out of Byetta before 30 days of use.
PARTS OF THE BYETTA PEN | ||||||
|
| |||||
Blue cap of the pen | Cartridge | Byetta liquid | Label | Dosing window | Dosing button | Injection button |


PARTS OF THE NEEDLE (Needles are not included) | SYMBOLS OF THE DOSING WINDOW | ||||
|
|
|
| Ready to extract the dosing button | |
Ready to turn to the dose position | |||||
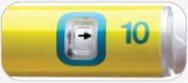
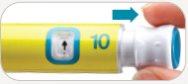
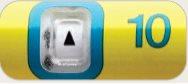
Ready to inject 10 micrograms (µg) | |||||
Outer needle cap | Inner needle protector | Needle | Paper tab | Dosing button inside and ready to restart |


PREPARATION OF THE NEW PEN – DO THIS ONLY ONCE
STEP A. Check the Pen

- Wash your hands before starting.
- Check the pen label to make sure it is your 10 microgram pen.
- Remove the blue cap from the pen.
Check the appearance of Byetta in the cartridge. The liquid should be clear and colorless and free of particles. If it is not, do not use it.
Note: A small air bubble in the cartridge is normal.
STEP B. Attach the Needle
- Remove the paper tab from the outer needle cap.
- Pressthe outer needle cap, which contains the needle, directlyonto the pen, then screwthe needle on until it is secure.
- Remove the outer needle cap. Do notthrow it away. The outer needle cap will be used when you remove the needle from the pen after injection.
- Remove the inner needle protector and throw it away. A small drop of liquid may appear. This is normal.
STEP C. Set the Dose
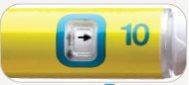
- Check that appears in the dosing window. If it does not, turn the dosing button clockwise until it stopsand appears in the dosing window.
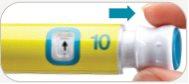
- Pull the dosing button until it stopsand appears in the dosing window.

- Turn the dosing button clockwise until it stopsand appears. Make sure the 10 with the line below is in the center of the dosing window.
Note: If you cannot turn the dosing button clockwise to , see question 9 in the Frequently Asked Questionssection of Section 4 of this user manual.
STEP D. Prepare the Pen

- Hold the pen with the needle pointing up and away from you.
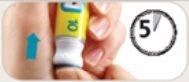
PRESS AND HOLD
- Use your thumb to press the injection button firmly until it stops, then hold the injection button firmly pressed and count slowly to 5.
- If you do not see a small flow or a few drops coming out of the needle tip, repeat Steps C and D.

- The preparation of the Pen is complete when appears in the center of the dosing window AND you have seen a small flow or a few drops coming out of the needle tip.
Note: If you do not see liquid after repeating this operation 4 times, see question 3 in the Frequently Asked Questionssection of Section 4 of this user manual.
STEP E. Complete the Preparation of the New Pen

- Turn the dosing button clockwise until it stopsand appears in the dosing window.
- The preparation of the new pen is complete. Do not repeat the instructions included in Section 2 for each usual use, if you do, you will run out of Byetta before 30 days of use.
- You are now ready to inject your first dose of Byetta.
- Go to Section 3, step 3, where you will find the instructions to inject your first usual dose.
Note: If you cannot turn the dosing button, see question 9 in the Frequently Asked Questionssection of Section 4 of this user manual.
SECTION 3. USUAL USE
Now that you have Prepared the New Pen, follow the instructions included in this section for allyour injections.
STEP 1. Check the Pen
- Wash your hands before using it.
- Check the pen label to make sure it is your 10 microgram pen.
- Remove the blue cap from the pen.
- Check the appearance of Byetta in the cartridge.
- The liquid should be clear and colorless and free of particles. If it is not, do not use it.
Note: A small air bubble will not harm you or affect your dose.
STEP 2. Attach the Needle
- Remove the paper tab from the outer needle cap.
- Pressthe outer needle cap, which contains the needle, directlyonto the pen. Screwthe needle on until it is secure.
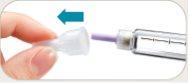
- Remove the outer needle cap. Do notthrow it away. The outer needle cap will be used when you remove the needle from the pen after injection.
- Remove the inner needle protector and throw it away. A small drop of liquid may appear. This is normal.
Note: If the needle is not secure, you may not receive your full dose.
STEP 3. Set the Dose
- Check that appears in the dosing window. If it does not, turn the dosing button clockwise until it stopsand appears in the dosing window.
- Pull the dosing button until it stopsand appears in the dosing window.

- Turn the dosing button clockwise until it stopsand appears. Make sure the 10 with the line below is in the center of the dosing window.
Note: If you cannot turn the dosing button clockwise to , see question 9 in the Frequently Asked Questionssection of Section 4 of this user manual.
STEP 4. Inject the Dose
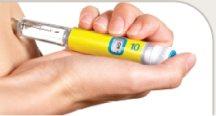
- Hold the pen firmly in your hand.
- Avoid pinching your skin too hard before injection. Insert the needle into your skin following the injection technique recommended by your healthcare professional for a hygienicinjection.
PRESS AND HOLD
- Use your thumb to press the injection button firmly until it stops, then hold the injection button firmly pressed and count slowly to 5to administer the full dose.
- Hold the injection button pressed while removing the needle from your skin, this keeps the medication in the cartridge clear. See question 4 in Frequently Asked Questions.
- The injection is complete when appears in the center of the dosing window.
- The pen is now ready to restart.
Note: If you see several drops of Byetta coming out of the needle, it means you did not press the injection button completely. See question 5 in the Frequently Asked Questionssection of Section 4 of this user manual.
STEP 5. Restart the Pen

- Turn the dosing button clockwise until it stopsand appears in the dosing window.
Note: This should be repeated after each injection.
Note: If you cannot turn the dosing button or your pen is leaking, it means you have not injected your full dose. See questions 5 and 9 in the Frequently Asked Questionssection of Section 4 of this user manual.
STEP 6. Remove and Dispose of the Needle
- Carefully replace the outer needle cap.
- Remove the needle after each injection.This prevents liquid from escaping.
- Unscrew the needle.
- Replace the blue cap on the pen before storing it.

- Dispose of used needles in a puncture-resistant container or as instructed by your healthcare professional.
STEP 7. Store the Pen for the Next Dose
- Store the Byetta pen properly. (For more information, see Storing Your Byetta Penin Section 1 of this user manual).
- When it is time to administer your next usual dose, repeat steps 1 to 7 included in Section 3.
SECTION 4. FREQUENTLY ASKED QUESTIONS
- Do I need to follow the instructions for preparing a new pen before each dose?
- No. Preparation of the new pen is only done once, just before each new pen is used for the first time.
- The purpose of the preparation is to ensure that your Byetta pen is ready to use for the next 30 days.
- If you repeat the Preparation of the New Pen before each usual dose, you will not have enough Byetta for 30 days.The small amount of Byetta used in the preparation of the new pen will not affect the Byetta content for the 30 days.
- Why are there air bubbles in the cartridge?
- A small air bubble is normal. It will not harm you or affect your dose.
- If you store the pen with the needle attached, air bubbles may form in the cartridge. Do not store the pen with the needle attached.
- What should I do if Byetta does not come out of the needle tip after four attempts during the preparation of the new pen?
- Carefully replace the outer needle cap and remove the needle. Unscrew it and dispose of it properly.
- Put on a new needle and repeat steps B to Eof the Preparation of the New Pensection of Section 2 of this user manual. Once you see a small flow or a few drops coming out of the needle tip, the preparation is complete.
- Why do I see particles in the cartridge after I finish my injection?
Particles or discoloration may appear in the cartridge after injection. This can happen if you pinched your skin too hard or if you released the injection button before the needle was removed from your skin.
- Why do I see Byetta still dripping from my needle after I have finished my injection?
It is normal for a single drop to remain on the tip of the needle after completing the injection. If you see more than one drop:
- You may not have injected the full dose. Do notinject another dose. Consult your healthcare professional about what to do in case of an incomplete dose.
- To prevent this, for your next dose, make sure to press the injection button firmly, hold it pressed, and count slowly to 5(see Step 4: Inject the Dosein Section 3).
- What do the arrows mean?
The arrows mean you are ready for the next step. These arrows show the direction to pull or turn the dosing button in the next step. This symbol means the dosing button is pressed and the pen is ready to restart.
- How do I know when the injection is complete?
The injection is complete when:
- You have pressed the injection button firmly until it stops
and
- You have counted slowly to 5while still holding the injection button pressed and the needle is still in your skin
and
- appears in the center of the dosing window.
- Where should I inject Byetta?
Byetta should be injected into your abdomen, thigh, or upper arm using the injection technique recommended by your healthcare professional.
Front Back
- What should I do if I cannot pull, turn, or press the dosing button?
Check which symbol appears in the dosing window. Follow the steps indicated next to that symbol.
Ifappears in the dosing window:
- Pull the dosing button until appears.
Ifappears in the dosing window and the dosing button does not turn:
- The cartridge in your Byetta pen may not have enough liquid to deliver a full dose. There will always be a small amount of Byetta left in the cartridge. If the cartridge contains a small amount or appears to be empty, get a new Byetta pen.
Ifand part ofappear in the window and the dosing button cannot be pressed:
- The dosing button has not been turned completely. Continue turning it clockwise until appears in the center of the dosing window.
Identification:
- The needle may be obstructed, bent, or not properly attached.
- Put on a new needle. Make sure the needle is straight and fully screwed on.
- Press the injection button completely with firmness. Byetta should come out of the needle tip.
Ifit appears in the dosing window and the dosing button does not turn:
- The injection button has not been pressed completely and a full dose has not been administered. Consult your healthcare professionalon what to do in case of an incomplete dose.
- Follow these steps to reset your pen for the next injection:
- Press the injection button firmly until it stops. Hold the injection button pressed and count slowly to 5. Then, turn the dosing button clockwise until it appears in the dosing window.
- If you cannot turn the dosing button, the needle may be obstructed. Change the needle and repeat the previous step.
- In your next dose, make sure to press firmlythe injection button, hold it pressed, and count slowly to 5before removing the needle from the skin.
Please also read the leaflet included in the packaging. For additional information, contact your healthcare professional.
- Country of registration
- Active substance
- Prescription requiredYes
- Manufacturer
- This information is for reference only and does not constitute medical advice. Always consult a doctor before taking any medication. Oladoctor is not responsible for medical decisions based on this content.
- Alternatives to BYETTA 5 micrograms injectable solution in a prefilled penDosage form: INJECTABLE, 2 mgActive substance: exenatideManufacturer: Astrazeneca AbPrescription requiredDosage form: INJECTABLE, 2 mg exenatideActive substance: exenatideManufacturer: Astrazeneca AbPrescription requiredDosage form: INJECTABLE, 2 mg injectable 0.85 mlActive substance: exenatideManufacturer: Astrazeneca AbPrescription required
Online doctors for BYETTA 5 micrograms injectable solution in a prefilled pen
Discuss questions about BYETTA 5 micrograms injectable solution in a prefilled pen, including use, safety considerations and prescription review, subject to medical assessment and local regulations.


Frequently Asked Questions
