

BYDUREON 2 mg PROLONGED-RELEASE INJECTABLE SUSPENSION IN PRE-FILLED PEN


How to use BYDUREON 2 mg PROLONGED-RELEASE INJECTABLE SUSPENSION IN PRE-FILLED PEN
Translated with AI
This page provides general information and does not replace a doctor’s consultation. Always consult a doctor before taking any medication. Seek urgent medical care if symptoms are severe.
Show originalContents of the leaflet
Introduction
Package Leaflet: Information for the User
Bydureon 2 mg prolonged-release suspension for injection in pre-filled pen
exenatide
Read all of this leaflet carefully before you start using this medicine because it contains important information for you.
- Keep this leaflet, you may need to read it again.
- If you have any further questions, ask your doctor, pharmacist, or diabetes nurse.
- This medicine has been prescribed for you only. Do not pass it on to others. It may harm them, even if their signs of illness are the same as yours.
- If you get any side effects, talk to your doctor, pharmacist, or diabetes nurse. This includes any possible side effects not listed in this leaflet. See section 4.
Contents of the pack
- What is Bydureon and what is it used for
- What you need to know before you use Bydureon
- How to use Bydureon
- Possible side effects
- Storing Bydureon
- Contents of the pack and other information
1. What is Bydureon and what is it used for
Bydureon contains the active substance exenatide. It is an injectable medicine used to improve blood sugar control in adults, adolescents, and children aged 10 years and older with type 2 diabetes mellitus.
This medicine is used in combination with the following diabetes medicines: metformin, sulfonylureas, thiazolidinediones (combination therapy with thiazolidinediones was only studied in adult patients), SGLT2 inhibitors, and/or long-acting insulin. Your doctor has prescribed this medicine as an additional medicine to help you control your blood sugar level. Continue with your diet and exercise plan.
You have diabetes because your body does not produce enough insulin to control your blood sugar levels or your body is not able to use insulin properly. This medicine helps your body increase insulin production when your blood sugar is high.

2. What you need to know before you use Bydureon
Do not use Bydureon:
- If you are allergic to exenatide or any of the other ingredients of this medicine (listed in section 6).
Warnings and precautions
Talk to your doctor, pharmacist, or diabetes nurse before you start using Bydureon about the following:
- If you use this medicine in combination with a sulfonylurea, as low blood sugar (hypoglycemia) may occur. Check your blood sugar levels regularly. Ask your doctor, pharmacist, or diabetes nurse if you are not sure if any of your other medicines contain a sulfonylurea.
- If you have type 1 diabetes or diabetic ketoacidosis, as this medicine should not be used.
- How to inject this medicine. It must be injected into the skin and not into a vein or muscle.
- The use of this medicine is not recommended if you have severe problems with emptying your stomach (including gastroparesis) or digesting food. The active substance in this medicine delays stomach emptying, so food passes more slowly through your stomach.
- If you have ever had pancreatitis (inflammation of the pancreas) (see section 4).
- Tell your doctor if you lose weight too quickly (more than 1.5 kg per week), as this can cause problems such as gallstones.
- If you have severe kidney disease or are on dialysis, as the use of this medicine is not recommended.
Bydureon is not insulin, so it should not be used as a substitute for insulin.
Children and adolescents
Bydureon can be used in adolescents and children aged 10 years and older. There is no data available on the use of this medicine in children under 10 years of age.
Using Bydureon with other medicines
Tell your doctor or pharmacist if you are using, have recently used, or might use any other medicines, especially:
- other medicines used to treat type 2 diabetes, such as medicines that work like Bydureon (e.g., liraglutide or other medicines that contain exenatide), as the use of these medicines with Bydureon is not recommended.
- medicines used to thin the blood (anticoagulants), e.g., warfarin, as you will need extra monitoring of changes in your INR (a measure of blood clotting) during the start of therapy with this medicine.
- a medicine that contains a sulfonylurea, as low blood sugar (hypoglycemia) may occur when combined with Bydureon.
- if you are receiving insulin, your doctor will tell you how to reduce your insulin dose and recommend that you check your blood sugar level more often to avoid high blood sugar (hyperglycemia) and diabetic ketoacidosis (a complication of diabetes that occurs when the body cannot break down glucose because there is not enough insulin).
Pregnancy and breastfeeding
It is not known if this medicine can harm your unborn baby, so you should not use it during pregnancy or for at least 3 months before a planned pregnancy.
It is not known if exenatide passes into breast milk. You should not use this medicine during breastfeeding.
If you are pregnant or breastfeeding, think you may be pregnant, or plan to become pregnant, ask your doctor or pharmacist for advice before using this medicine.
You should use contraception if you could become pregnant during treatment with this medicine.
Driving and using machines
If you use this medicine in combination with a sulfonylurea, low blood sugar (hypoglycemia) may occur. Hypoglycemia can reduce your ability to concentrate. Please be aware of this possible problem in all situations where you could put yourself or others at risk (e.g., driving a car or using machines).
3. How to use Bydureon
BCise is the name of the pre-filled pen device used to inject your Bydureon medicine.
Follow the instructions for administering this medicine exactly as told by your doctor, pharmacist, or diabetes nurse. If you are unsure, ask your doctor, pharmacist, or diabetes nurse again.
You should inject this medicine once a week, at any time of day, with or without food.
You should inject this medicine into the skin (subcutaneous injection) in the area around your stomach (abdomen), the top of your leg (thigh), or the upper back of your arm. Do not inject into a vein or muscle.
You can use the same area each week. Make sure to choose a different injection site within that area.
Check your blood sugar levels regularly, especially if you are also using a sulfonylurea.
To inject Bydureon BCise, follow the “Instructions for Use” included in the pack.
Your doctor or diabetes nurse should teach you how to inject this medicine before you use it for the first time.
Take a pen out of the refrigerator and let it lie down for at least 15 minutes. Mix the suspension by shaking it vigorously for at least 15 seconds. Use the suspension only if it is well mixed, white to off-white in color, and opaque. If you see any remaining medicine on the side, top, or bottom of the pen viewer, the medicine is NOT well mixed. Shake it vigorously again until it is well mixed.
This medicine should be injected immediately after mixing the suspension.
Use a new pen for each injection. You should dispose of the pen safely after each use, as your doctor or diabetes nurse has told you.
If you use more Bydureon than you should
If you use more of this medicine than you should, talk to your doctor before taking any more. You may need medical treatment. Too much of this medicine can cause nausea, vomiting, dizziness, or low blood sugar symptoms (see section 4).
If you forget to use Bydureon
You might find it helpful to set a specific day to take your Bydureon injection each week.
If you forget a dose and there are 3 days or more until your next scheduled dose, take the missed dose as soon as possible. For your next injection, you can go back to your usual day.
If you forget a dose and there are only 1 or 2 days until your next scheduled dose, skip the missed dose and take your next dose at the usual time. You can also change the day you take your injection, as long as the last dose was given 3 or more days before.
Do not take two doses of Bydureon if there are less than 3 days between them.
If you are not sure if you have taken your full dose of Bydureon:
If you are not sure if you took your full dose, do not take another dose. Just take your next dose at the usual time.
If you stop using Bydureon
If you think you need to stop using this medicine, talk to your doctor first. If you stop using this medicine, it may affect your blood sugar levels.
If you have any other questions about using this medicine, ask your doctor, pharmacist, or diabetes nurse.

4. Possible side effects
Like all medicines, this medicine can cause side effects, although not everybody gets them.
Severe allergic reactions(anaphylaxis) have been reported rarely (may affect up to 1 in 1,000 people).
See a doctor immediately if you experience symptoms such as
- Swelling of the face, tongue, or throat (angioedema)
- Hypersensitivity (rash, itching, and rapid swelling of the tissues of the neck, face, mouth, or throat)
- Difficulty swallowing
- Hives and difficulty breathing
Cases of pancreatitis(inflammation of the pancreas) have been reported uncommonly (may affect more than 1 in 100 people) in patients treated with this medicine. Pancreatitis can be a serious medical condition that can be life-threatening.
- Tell your doctor if you have had pancreatitis, gallstones, alcoholism, or very high triglycerides. These medical conditions can increase the risk of pancreatitis or make it worse, whether or not you are taking this medicine.
- STOP taking this medicine and contact your doctor immediatelyif you have severe and persistent stomach pain, with or without vomiting, as you may have pancreatitis.
Very common side effects(may affect more than 1 in 10 people):
- Low blood sugar (hypoglycemia) when used with a sulfonylurea.
When this medicine is used with a sulfonylurea, episodes of low blood sugar (hypoglycemia, usually mild to moderate) may occur. You may need to reduce the dose of your sulfonylurea medicine while using this medicine. The signs and symptoms of low blood sugar can include headache, drowsiness, weakness, dizziness, confusion, irritability, hunger, rapid heartbeat, sweating, and a feeling of nervousness. Your doctor will tell you how to treat low blood sugar.
Common side effects(may affect up to 1 in 10 people):
- Low blood sugar (hypoglycemia) when used with insulin
- Headache
- Dizziness
- Nausea (nausea is more common when starting treatment with this medicine but decreases over time in most patients)
- Diarrhea
- Vomiting
- Constipation
- Indigestion
- Acid reflux
- Bloating
- Stomach pain
- Itching and redness at the injection site
- Fatigue
Uncommon side effects
- Low blood sugar (hypoglycemia) when taken with a medicine that does not contain a sulfonylurea
- Decreased appetite
This medicine may reduce your appetite, the amount of food you eat, and your weight.
Tell your doctor if you lose weight too quickly (more than 1.5 kg per week), as this can cause problems such as gallstones.
- Dehydration
- Unusual taste
- Drowsiness
- Flatulence (gas)
- Belching
- Intestinal blockage (blockage in the intestine)
- Hives
- Increased sweating
- Rash, itching
- Hair loss
- Decreased kidney function
- Injection site reactions.
If you experience an injection site reaction (redness, rash, or itching), you can talk to your doctor about prescribing something to help alleviate any signs or symptoms. After injection, you may see or feel a small lump under your skin; this should disappear after 4 to 8 weeks. You should not need to stop your treatment.
- Lack of energy and strength
- Delayed stomach emptying
- Gallstones
- Inflamed gallbladder
Rare side effects
- Nervousness
Unknown frequency(cannot be estimated from the available data)
Other adverse reactionshave been reported:
- Bleeding or bruising more easily than normal due to a low platelet count in the blood.
- Injection site reactions after injection of exenatide. These include: abscess (a pocket of pus) and cellulitis (a red, swollen, and painful area of skin).
- Changes in INR (a measure of blood clotting) have been reported when used with warfarin.
Reporting of side effects
If you experience any side effects, talk to your doctor, pharmacist, or diabetes nurse, even if they are not listed in this leaflet. You can also report side effects directly via the national reporting system listed in Appendix V. By reporting side effects, you can help provide more information on the safety of this medicine.
5. Storing Bydureon
Keep this medicine out of the sight and reach of children.
Do not use this medicine after the expiry date which is stated on the label and carton after EXP. The expiry date refers to the last day of the month shown.
The Bydureon BCise pen should be stored as follows:
- Store in a refrigerator (between 2°C and 8°C).
- The pen can be stored for up to 4 weeks below 30°C before use.
- Keep the pen in the original packaging to protect it from light.
- The pen should be stored lying down.
Medicines should not be disposed of via wastewater or household waste. Ask your pharmacist how to dispose of medicines no longer required. This will help protect the environment.
6. Container Contents and Additional Information
Bydureon Bcise Composition
- The active ingredient is exenatide. Each preloaded pen contains 2 mg of exenatide.
- The other components are: poly (D, L-lactide-co-glycolide) and sucrose and medium-chain triglyceride.
Product Appearance and Container Contents
Extended-release injectable suspension in a preloaded pen (BCise).
Opaque white to off-white suspension.
Each preloaded pen administers 2 mg of exenatide in a volume of 0.85 ml.
This medication is available in containers containing 4 single-dose preloaded pens (BCise) and in multiple containers containing 12 (3 containers of 4) single-dose preloaded pens (BCise). Only some pack sizes may be marketed.
Marketing Authorization Holder:
AstraZeneca AB
SE-151 85 Södertälje
Sweden
Manufacturer:
AstraZeneca AB
Gärtunavägen
SE-151 85 Södertälje
Sweden
AstraZeneca UK Limited
Silk Road Business Park,
Macclesfield, Cheshire, SK10 2NA
United Kingdom
You can request more information about this medication by contacting the local representative of the marketing authorization holder:
Belgium/Belgique/Belgien AstraZeneca S.A./N.V. Tel: +32 2 370 48 11 | Lithuania UAB AstraZeneca Lietuva Tel: +370 5 2660550 |
| Luxembourg/Luxemburg AstraZeneca S.A./N.V. Tél/Tel: +32 2 370 48 11 |
Czech Republic AstraZeneca Czech Republic s.r.o. Tel: +420 222 807 111 | Hungary AstraZeneca Kft. Tel.: +36 1 883 6500 |
Denmark AstraZeneca A/S Tlf: +45 43 66 64 62 | Malta Associated Drug Co. Ltd Tel: +356 2277 8000 |
Germany AstraZeneca GmbH Tel: +49 40 809034100 | Netherlands AstraZeneca BV Tel: +31 79 363 2222 |
Estonia AstraZeneca Tel: +372 6549 600 | Norway AstraZeneca AS Tlf: +47 21 00 64 00 |
Greece AstraZeneca A.E. Τηλ: +30 210 6871500 | Austria AstraZeneca Österreich GmbH Tel: +43 1 711 31 0 |
Spain AstraZeneca Farmacéutica Spain, S.A. Tel: +34 91 301 91 00 | Poland AstraZeneca Pharma Poland Sp. z o.o. Tel.: +48 22 245 73 00 |
France AstraZeneca Tél: +33 1 41 29 40 00 | Portugal AstraZeneca Produtos Farmacêuticos, Lda. Tel: +351 21 434 61 00 |
Croatia AstraZeneca d.o.o. Tel: +385 1 4628 000 | Romania AstraZeneca Pharma SRL Tel: +40 21 317 60 41 |
Ireland AstraZeneca Pharmaceuticals (Ireland) DAC Tel: +353 1609 7100 | Slovenia AstraZeneca UK Limited Tel: +386 1 51 35 600 |
Iceland Vistor hf. Sími: +354 535 7000 | Slovak Republic AstraZeneca AB, o.z. Tel: +421 2 5737 7777 |
Italy AstraZeneca S.p.A. Tel: +39 02 00704500 | Finland AstraZeneca Oy Puh/Tel: +358 10 23 010 |
| Sweden AstraZeneca AB Tel: +46 8 553 26 000 |
Latvia SIA AstraZeneca Latvija Tel: +371 67377100 | United Kingdom (Northern Ireland) AstraZeneca UK Ltd Tel: +44 1582 836 836 |


Date of Last Revision of this Leaflet:
Other Sources of Information
Detailed information on this medicinal product is available on the European Medicines Agency website http://www.ema.europa.eu/.
INSTRUCTIONS FOR THE USER
Step-by-Step Guide
Bydureon 2 mg powder and solvent for prolonged-release injectable suspension.
If you have questions about using Bydureon
- Consult the Frequently Asked Questions
Useful Tips
- Take your time.
- Follow these instructions step by step.
- You will need to have enough time to complete all the steps without interruptions.
- You will probably need less time as you get used to giving yourself injections.
IMPORTANT:
Read and follow each of the steps in these instructions carefully every time you administer Bydureon. Do not skip any steps. Also, read the Leaflet included in your container.
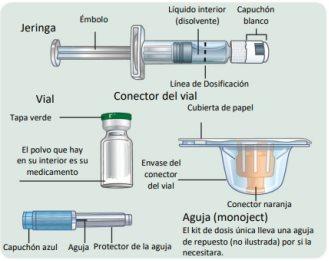
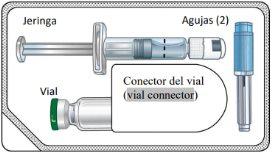
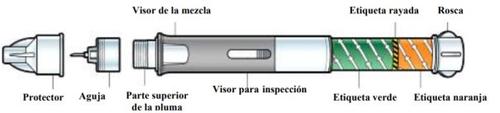
Component Diagram
Single-Dose Kit

Lift here to view components in detail
Keep this page open so you can refer back to it as you go through the steps
Component Diagram
Single-Dose Kit
Contents
To establish the correct dose, read each section so you can perform each step in the correct sequence.
This guide is divided into sections:
- Preparation
- Connection of Components
- Mixing of Medication and Filling of Syringe
- Injection of Medication
Frequently Asked Questions
- Preparation
1a Take a single-dose kit from the refrigerator.
Prepare to dispose of needles and syringes safely.Have everything you need ready to safely dispose of used needles and syringes.
1b Wash your hands.
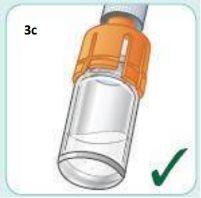
1c
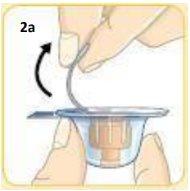
Lift the cover to open it.
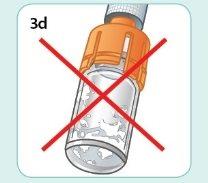
Remove the syringe. The liquid in the syringe should be clear and free of particles. It does not matter if there are air bubbles.
Place the needle, the vial connector container, the vial, and the syringe on a clean, flat surface.

Take the needle and unscrew the blue cap.
Put the needle down with its protector on. The needle is now ready. You will need it later.
You have a spare needle in case you need it.

Take the vial.
Gently tap the vial several times against a hard surface to loosen the powder.
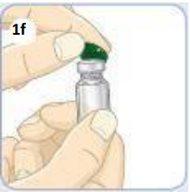
Use your thumb to remove the green cap.
Leave the vial.
- Connection of Components
Take the vial connector container and remove the paper cover.Do not touch the orange connector inside.

Hold the vial connector container.
With your other hand, hold the vial.
Press the top of the vial firmly onto the orange connector.
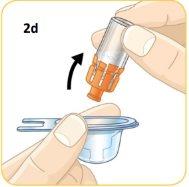
Remove the vial with the orange connector already attached.
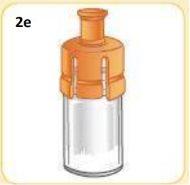
This is what the vial should look like now.
Leave it for later.
Take the syringe.
With your other hand, firmly hold the 2 grey squares of the white cap.

Break the cap
Be careful not to push the plunger.
Break the cap as you would break a twig.
This is what the cap looks like once broken.
You will not need the cap, you can throw it away.
This is what the syringe should look like now.
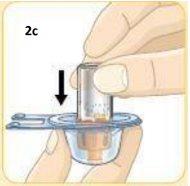
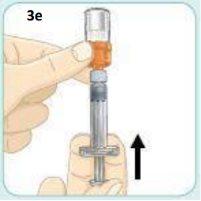
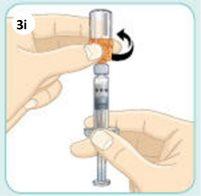
Now, take the vial with the orange connector attached.
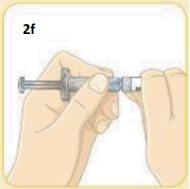
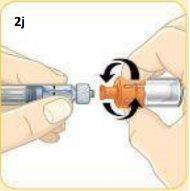
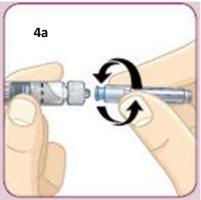
Screw the orange connector into the syringe until it is secure.As you screw it in, make sure to hold the orange connector. Do not overtighten. Be careful not to push the plunger.
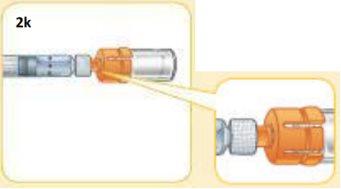
This is what the components should look like once connected.
- Mixing of Medication and Filling of Syringe
IMPORTANT:
During the following steps, you will mix the medication and fill the syringe. Once you mix the medication, you must inject it immediately.Do not store the mixed medication to inject it later.
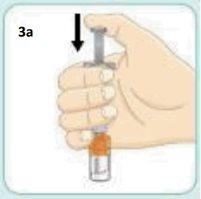
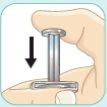
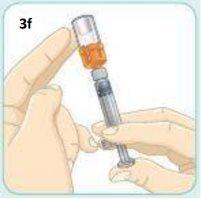
With your thumb, push the plunger until it stops and keep your thumb where it is.
It may seem like the plunger moves back a little.
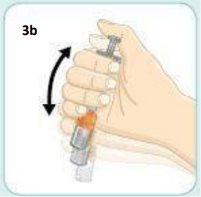
Keep your thumb pushing the plunger and shake vigorously.Continue shaking until the liquid and powder are well mixed.
Do not worry if the vial might come loose. The orange connector will keep it attached to the syringe.
Shake vigorouslyas you would shake a bottle of oil and vinegar dressing.
When the medication is well mixed, it should have a cloudy appearance.
If you see dry powder lumps on the walls or at the bottom of the vial, the medication is NOT well mixed.
Shake again vigorously until it is well mixed.
Continue pushing the plunger with your thumb while shaking.
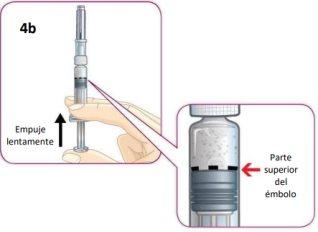
Now, hold the vial so that the syringe is pointing upwards. Continue pushing the plunger with your thumb until it stops and keep it in place.
Tap the vial gently with your other hand. Continue pushing the plunger with your thumb to keep it in place.
The tapping helps the medication to slide down the walls of the vial. It does not matter if there are air bubbles.
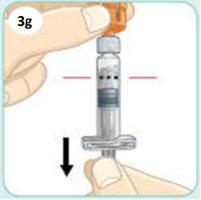
Pull the plunger downbeyondthe Dosing Line of black dots.
This will draw the medication from the vial into the syringe. You may see air bubbles. This is normal.
A little liquid may stick to the walls of the vial. This is also normal.
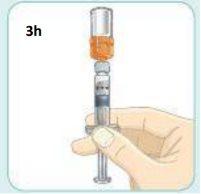
With one hand, keep the plunger in place so it does not move.
With your other hand, unscrew the orange connector to remove it.
After removing the connector, be careful not to push the plunger.
This is what the syringe should look like now.
- Injection of Medication
IMPORTANT:
Read the following steps carefully and look closely at the drawings.
This will help you get the correct dose of medication.
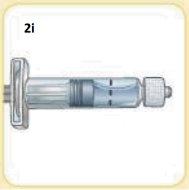
Screw the needle into the syringe until it is secure.Do not remove the needle protector yet. Be careful not to push the plunger.
Slowly push the plunger until the top of the plunger aligns with the Dosing Line of black dots.Then, you can remove your thumb from the plunger.
It is important to stop pushing at this moment, or you will waste your medication and not get the correct dose.
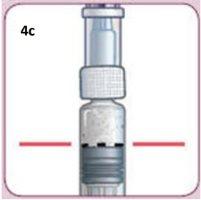
As you perform the following steps, the top of the plunger must remain aligned with the Dosing Line of black dots.This will help you get the correct dose of medication.
IMPORTANT:
It is normal to see a few air bubbles in the mixture.
The air bubbles will not harm you and will not affect your dose.

You can inject each dose of medication into the area of your stomach (abdomen), into your thigh, or into the back of your upper arm.
Each week, you can use the same area of your body. But make sure to choose different injection points in that area.
Hold the syringe near the Dosing Line of black dots.
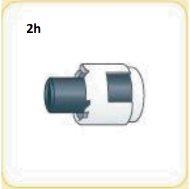
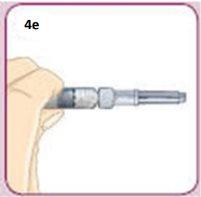
Remove the needle protector by pulling it straight off.
Do not unscrew it.
Be careful not to push the plunger.
When you remove the protector cap, you may see 1 or 2 drops of liquid. This is normal.
Make sure to follow the injection techniques recommended by your doctor or diabetes nurse. Remember: You must administer your Bydureoninjection immediately after mixing it.
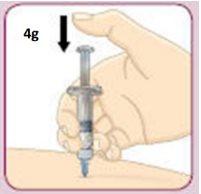
Insert the needle into your skin (subcutaneously). To inject the full dose, push the plunger with your thumb until it stops.
Remove the needle.
Consult the leaflet (section 3) regarding what to do if you are unsure if you have administered the full dose.
4h. Dispose of the syringe with the needle still on as instructed by your doctor or nurse
Important: Do not try to put the needle guard back on or reuse the needle.
You do not need to keep any of the components. Each single-dose kit contains everything you need for your weekly dose of Bydureon.
Medicines should not be disposed of via wastewater or household waste. Ask your pharmacist how to dispose of the packaging and any unused medicines. This will help protect the environment.
When it's time for your next weekly dose, start again from step 1.
Frequently Asked Questions and Answers
If your question is about: | See question number: |
When to inject after mixing | 1 |
Mixing the medication | 2 |
Air bubbles in the syringe | 3 |
Connecting the needle | 4 |
Removing the needle guard | 5 |
Plunger not aligned with Dose Indicator Line | 6 |
Unable to push the plunger when injecting | 7 |
Frequently Asked Questions and Answers
- After mixing the medication, how long can I wait before injecting?
You should inject Bydureonimmediately after mixing. If you do not inject Bydureonimmediately, the medication will start to form small clumps in the syringe. These clumps could clog the needle when you are injecting (see question 7).
- How do I know the medication is well mixed?
When the medication is well mixed, it should have a cloudy appearance. There should be no dry powder on the walls or bottom of the vial. If you see any dry powder, shake vigorously while continuing to push the plunger with your thumb (this question refers to the steps shown in sections 3a to 3d).
- I'm ready to inject. What should I do if I see air bubbles in the syringe?
It's normal to have air bubbles in the syringe. The air bubbles won't harm you or affect your dose. Bydureonis injected under your skin (subcutaneously). Air bubbles are not a problem with this type of injection.
- What should I do if I have trouble connecting the needle?
First, make sure you have removed the blue cap. Then, screw the needle onto the syringe until it is secure. To avoid losing medication, do not push the plunger while connecting the needle. For more information on injection techniques, consult your healthcare professional (this question refers to step 4a).
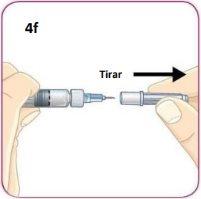
- What should I do if I have trouble removing the needle guard?
With one hand, hold the syringe near the Dose Indicator Line. With the other hand, grasp the needle guard. Remove the needle guard by pulling it straight off. Do not twist it (this question refers to step 4f).
- I'm at step 4c. What should I do if I've pushed the top of the plunger past the Dose Indicator Line?
The Dose Indicator Line indicates the correct dose. If the top of the plunger has gone past the line, you should continue from step 4d and inject. Before your next injection within a week, carefully review the instructions for steps 3a to 4h.
- When injecting, what should I do if I'm unable to push the plunger all the way?
This means the needle is clogged. Remove the needle and replace it with the spare needle from your kit. Then, choose a different injection site and finish injecting.
To review how:
- Remove the blue cap from the needle, see step 1d.
- Connect the needle, see step 4a.
- Remove the needle guard and inject, see steps 4e to 4g.
If you still can't push the plunger all the way, remove the needle. Consult the package insert (section 3) regarding what to do if you're unsure if you've received the full dose.
To avoid clogging the needle, always mix the medication well and inject it immediately after mixing.
Bydureon only needs to be administered once a week.
Make a note that you have administered your Bydureontoday and mark on your calendar when you should administer your next injection.
Where to learn more about Bydureon
- Consult your doctor or diabetes nurse.
- Read the Package Insert carefully.
INSTRUCTIONS FOR USE
Before using, read these instructions carefully
Bydureon 2 mg powder and solvent for prolonged-release injectable suspension in a pre-filled pen
How to use the Bydureon pre-filled pen
Before using the pen, it is recommended that a doctor or diabetes nurse teach you how to use it correctly.
In the case of blind or visually impaired individuals, it is not recommended to self-inject this medication unless a trained person can assist you.
Step 1: Prepare your pen
A. | Let the pen warm up. |
|
Remove a pen from the refrigerator and let it reach room temperature for at least 15 minutes. DO NOTuse a pen after its expiration date. | ||
Wash your hands while the pen is warming up. | ||
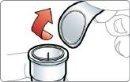
B. | Open the container, |
|
by pulling on the tab at the corner. Then, remove the pen and needle. DO NOTuse your pen or needle if any parts are missing or broken. | ||
C. | Check the liquid, |
|
inside the inspection window. It should be clear and particle-free. It's normal if you see air bubbles in the liquid. | ||
D. | Peel off the paper tab, |
|
from the needle guard. | ||
E. | Put the needle on the pen, |
|
by pressing and screwing it onto the top of the pen until it is secure. DO NOTremove the needle guard yet. | ||
| DO NOT continue unless the needle is in place |


Step 2: Mix your dose
A. | Mix the medication. |
| |
While holding the pen upright with the needle guard facing up, slowly turn the dial counterclockwise. STOPwhen you hear a click and the green label disappears. | |||
B. | Firmly tap the pen to mix. |
| |
| |||
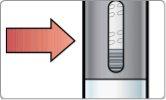
C. | Check the suspension. | ||
Hold the pen upright and look through both sides of the mixing window. The solution SHOULD NOThave CLUMPSand should have a uniform cloudiness. | |||
Poorly mixed CLUMPS, uneven solution | Well mixed NO CLUMPS, uniform cloudiness | ||
|
To get the full dose, the medication must be well mixed.
If it's not well mixed, continue tapping and do it more firmly.
| DO NOT continue if the medication is not well mixed. |

To get the full dose, the medication must be well mixed. If it's not well mixed, continue tapping for a longer time and more firmly. It's normal if you see air bubbles in the liquid; they won't harm you.
- Compare both sides of the mixing window with the photos shown below by placing the pen on the paper. Pay attention to the background. If you don't see clumps, it's ready for injection.
Step 3: Inject your dose
IMPORTANT Once the medication is well mixed, you must inject the dose immediately.You cannot save it for later use.
A. | Choose your injection site, |
|
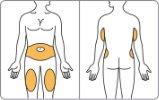
either the abdomen, thigh, or back of the arm. You can inject each week in the same area of the body, but choose a different injection site within that area. Gently clean the areawith water and soap or with a cotton ball moistened with alcohol. | ||
B. | Turn the dial to release the injection button. |
|
While holding the pen upright, turn the dial until the orange label disappears and the injection button is released. DO NOTpush the injection button yet. | ||
C. | Remove the needle guard, |
|
by pulling it straight off. DO NOTtwist it. You may see a few drops of liquid on the needle or on the cover. | ||
D. | Inject the medication. |
|
Insert the needle into your skin (subcutaneously). Press the injection button with your thumb until you hear a click. HOLD IT FOR 10 SECONDSto ensure the full dose is administered. | ||
E. | Dispose of the pen, |
|
with the needle in place, in a puncture-resistant container. DO NOTtry to recap or reuse the needle. |


Frequently Asked Questions and Answers
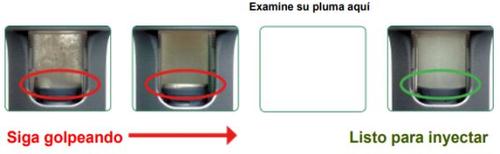
- How do I know the medication is well mixed?
The medication is well mixed when the liquid appears cloudy from both sides of the inspection window. No clumps should be visible in the liquid. It may be helpful to hold the pen up to the light to look through the inspection window. If you see clumps of any size, tap the pen firmly against the palm of your hand until they mix.
- I'm having trouble mixing the dose. What should I do?
Remember, before preparing your dose, let the pen sit at room temperature for at least 15 minutes. This will allow it to warm up to room temperature. The medication will mix more easily if the pen is at room temperature.
Make sure to hold the pen by the end that contains the dial and the orange label. This will allow you to screw the pen better and tap it more firmly against the palm of your hand.
It may also be helpful to tap the mixing window on both sides against the palm of your hand. If you see any clumps, continue tapping.
- After mixing the medication, how long can I wait before injecting?
You should administer your dose immediately after mixing. If you do not administer your dose immediately, small clumps of the medication may form in the pen and you may not get the full dose.
- I'm ready to inject. What should I do if I see air bubbles in the pen?
It's normal to have air bubbles in the pen. The medication is injected under your skin (subcutaneously). With this type of injection, air bubbles won't harm you or affect your dose.
- What should I do if I'm unable to push the injection button all the way down when trying to administer my dose?
Check if you have screwed the needle onto the pen all the way. Make sure you have turned the dial all the way to the top, the orange label has disappeared, and the injection button has appeared.
If you still can't push the button, it may be that the needle is clogged. Remove the needle from your skin and replace it with the spare needle from the package. Review how to put the needle on.
Then, choose a different injection site and finish injecting.
If you still can't push the button all the way, remove the needle from your skin. Use a puncture-resistant container to dispose of the pen with the needle still in place.
- How do I know if I've injected the full dose?
To ensure you receive the full dose, press the injection button with your thumb until you hear a click. After the click, continue to hold the needle in your skin for 10 seconds. This will give enough time for all the medication to be delivered under your skin.
- How can I dispose of the Bydureon pen?
You will need a puncture-resistant container that is large enough to hold the entire pen with the used needle in place. Make sure the container has a lid. You can use a biological waste container, a hard plastic container, or a metal container. The container is not included in the package.
Ask your pharmacist how to dispose of the container with the used pens and needles. Do not throw the container in the trash.
INSTRUCTIONS FOR USE
Before using, read these instructions carefully
Also, read the Package Insert of your package
Bydureon 2 mg prolonged-release injectable suspension in a pre-filled pen exenatide
Once a week
For subcutaneous use only
Single-dose pre-filled pen
BCise is the name of the pre-filled pen device used to inject your Bydureon medication.

Before Starting
The Bydureon BCise pen:
- Is a fixed-dose, single-use pen that automatically injects your medication.
- Comes in a locked position before you use it. Do not unlock the pen until you are ready to inject.
- The needle is hidden. You do not need to see it before, during, or after using the pen.
- Do not usethe pen if any of its parts appear to be broken or damaged.
- Store lying down in the refrigerator between 2 °C and 8 °C.
- The Bydureon BCise pen should notbe used by blind or visually impaired individuals unless a trained person can assist them.
- Keep the pen, and all medications, out of the reach of children.
Before Using
Your doctor or diabetes nurse should teach you how to inject this medication before you use it for the first time
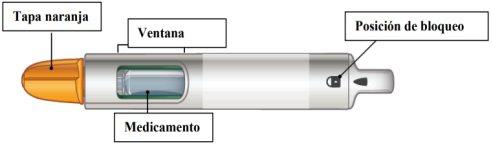
Figure A
Supplies needed to administer your injection:
? Bydureon BCise pen ? Alcohol swab ? Clean, flat surface ? Puncture-resistant container (see "Disposal" instructions at the end of these instructions)
STEP 1: Preparation for Injection
The Bydureon BCise pen can be stored at room temperature for up to 4 weeks. |
Figure B |
|
Figure C |


- Wash your hands.
- Choose the injection site.
Either in the abdomen, thigh, or back of the arm, see Figure D.
Each week, you can use the same area of the body, but choose a different injection site within that area.
Clean the area with an alcohol swab.
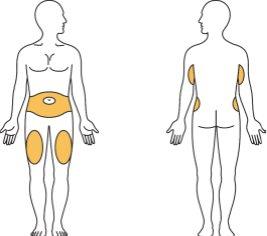

Figure D
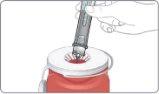
STEP 2: Mix the Medication
You may see white medication residue along the sides, top, or bottom. This means that your medication is not mixed homogeneously. |
Figure E |
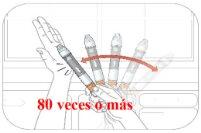
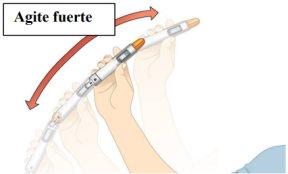
with up and down movements, until the medication is mixed homogeneously and you do not see any white medication residue on the sides, top, or bottom. Shake for at least 15 seconds. |
Figure F |
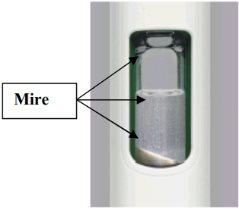
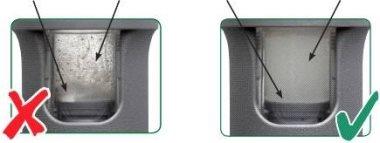
- Check the mixture.
Hold the pen up to the light and look through both sides and the bottom of the viewer. If it is not well mixed, repeat Step 2 and check again.
| Not Mixed Non-homogeneous mixture White medication in bottom, top, or sides
|
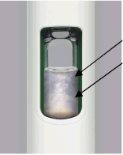

Figure G
| Well Mixed Homogeneous mixture Turbid It is normal to see bubbles
|
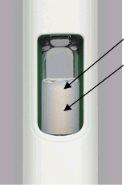

Figure H

Do not continueto the next steps until your medication is well mixed. For a complete dose, the medication must be well mixed and turbid.
If it is not well mixed, continue shaking firmly.
STEP 3: Prepare the Pen
Important:Once the medication is well mixed, you must complete the preparation steps immediately, and inject to obtain a complete dose. Do not store it for later use.
Only unlock the pen when you are ready for injection.
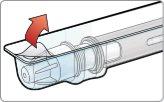
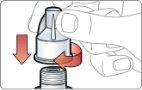
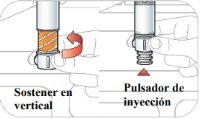
- Unlock the pen.
Hold the pen vertically with the orange cap pointing towards the ceiling. Turn the wheel from the Lock position to the Unlock position until you hear a click.
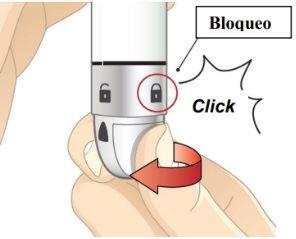
Figure I
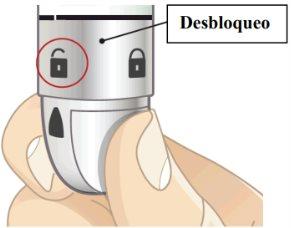
Figure J
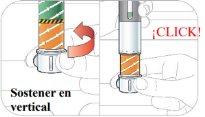
While still holding the pen in a vertical position, unscrew the orange cap firmly.
- You may need to turn the cap a few times before it comes loose (if you hear clicks, you are turning it in the wrong direction).
- Continue holding the pen in a vertical position to prevent the medication from accidentally spilling out.
- A green shield will appear once you remove the orange cap. The green shield hides the needle.
It is normal to see a few drops inside the cap. Do notput the cap back on the pen.
Discard the cap.
Keep verticaland unscrewfirmly | ||
|
| |
Figure K | Figure L |
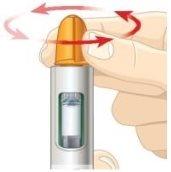
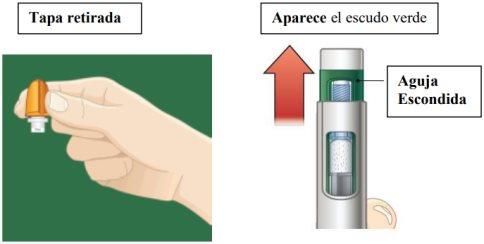
Figure MFigure N
STEP 4: Inject the Dose
- Inject and hold:
- Push the pen against your skin. You will hear a "click" when the injection starts.
- Continue holding the pen against your skin for 15 seconds. This is to ensure that you receive the complete dose.
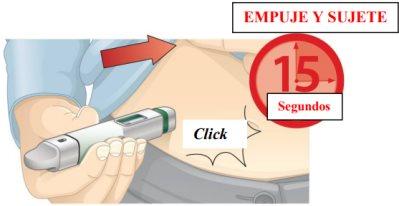
Figure O
- Make sure you have received your complete dose.
Once you have administered your injection, you will see an orange bar in the viewer. When you remove the injection from your skin, the green shield will move back to close over the needle. See Frequently Asked Questions about what to do if you do not see the orange bar in the viewer after injection.
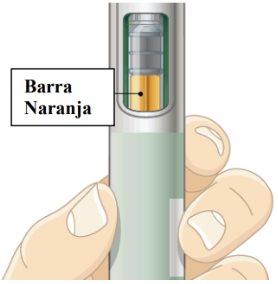
Figure P
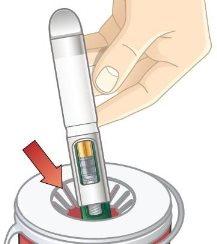
Dispose of your pen properly immediately after use,as instructed by your doctor, pharmacist, or diabetes nurse. You will need a sharps container that:
You can use a biological waste container, a hard plastic container, or a metal container. |
Figure Q |
Frequently Asked Questions
- Where is the needle?
The needle is attached to the pen and covered with the orange cap.
When you unscrew the orange cap, the green shield keeps the needle covered until you proceed to inject.
For more information, please see Figure N in Step 3B of the User Instructions.
- How do I know if the medication is completely mixed?
After shaking the pen, look through both sides of the viewer. You should not see any white medication residue on the bottom, top, or sides. If you see white medication residue, it is not mixed. To mix, shake the pen firmly until you do not see any white medication residue on the bottom, top, or sides. The medication should appear completely homogeneous (see Figure G and Figure H, Step 2C).
- Why do I need to keep the pen vertical while removing the orange cap?
Keeping the pen vertical with the orange cap on top prevents medication from spilling out. It is normal to see a few drops inside the orange cap once you unscrew it.
- Why do I need to inject the medication immediately after mixing it?
If you do not inject the medication immediately after mixing it, the medication may separate and you may not receive a complete dose. You can re-mix your medication if your pen is in the locked position. However, once you unlock it, you must complete the preparation steps immediately and inject to obtain a complete dose. You cannot store it for later use.
- How do I know if I have administered the complete dose of medication?
To ensure that you have received your complete dose, press and hold the pen against your skin.
You will feel the needle enter your skin. Hold the needle against your skin for 15 seconds. This will be enough time for all the medication in the pen to be delivered under your skin. After removing the needle, look for the orange bar in the viewer, as a way to check that the dose has been administered. If the orange bar does not appear, contact the local representative of the Marketing Authorization (see the list of contacts in your country in section 6 of the Prospectus).
- Why do I need to store my Bydureon BCise pen lying down in the refrigerator?
Pens stored vertically (needle up or down) are more difficult to mix. The medication can be mixed completely, but it will require more shaking and for a longer time.
- How can I dispose of my Bydureon BCise pen?
Do notthrow the pen in the trash. You will need a sharps container that is large enough to hold the entire pen. Make sure the container has a lid. You can use a biological waste container, a hard plastic container, or a metal container. The container is not included in the packaging.
Do not recycle the container with used pens and needles. Ask your pharmacist how to dispose of the container with used pens and needles. Do not throw the container in the trash.
- What if the device does not work and I cannot unlock it?
Review the User Instructions, Step 3 to confirm the order of the steps, and then contact the local representative of the Marketing Authorization (see the list of contacts in your country in section 6 of the Prospectus). Do not attempt to unlock using excessive force or tools.
- What if the device fails and I cannot remove the orange cap?
Review the User Instructions, Step 3 to confirm the order of the steps, and also confirm that the wheel is fully turned to the unlock position, then contact the local representative of the Marketing Authorization (see the list of contacts in your country in section 6 of the Prospectus). Do not use tools or attempt to force the cap.
- Where can I learn more about the Bydureon BCise pen
- Talk to your doctor, pharmacist, or diabetes nurse
- Read the prospectus carefully.
How to store the Bydureon BCise pen
- Store lying down in the refrigerator between 2 °C and 8 °C.
- Each pen can be stored at room temperature not exceeding 30 °C for no more than a total of 4 weeks, if necessary.
- Store in the provided packaging to protect it from light until you are ready to use your dose.
- Do not use after the expiration date. The expiration date is indicated with EXP.
- Keep the pen clean and protected from spills.
- Country of registration
- Active substance
- Prescription requiredYes
- Manufacturer
- This information is for reference only and does not constitute medical advice. Always consult a doctor before taking any medication. Oladoctor is not responsible for medical decisions based on this content.
- Alternatives to BYDUREON 2 mg PROLONGED-RELEASE INJECTABLE SUSPENSION IN PRE-FILLED PENDosage form: INJECTABLE, 2 mgActive substance: exenatideManufacturer: Astrazeneca AbPrescription requiredDosage form: INJECTABLE, 2 mg exenatideActive substance: exenatideManufacturer: Astrazeneca AbPrescription requiredDosage form: INJECTABLE, 0.25 mgActive substance: exenatideManufacturer: Astrazeneca AbPrescription required
Online doctors for BYDUREON 2 mg PROLONGED-RELEASE INJECTABLE SUSPENSION IN PRE-FILLED PEN
Discuss questions about BYDUREON 2 mg PROLONGED-RELEASE INJECTABLE SUSPENSION IN PRE-FILLED PEN, including use, safety considerations and prescription review, subject to medical assessment and local regulations.


Frequently Asked Questions
