

RYSTIGGO 140 MG/ML SOLUCION INYECTABLE


Cómo usar RYSTIGGO 140 MG/ML SOLUCION INYECTABLE
Traducción generada por IA
Este contenido ha sido traducido automáticamente y se ofrece solo con fines informativos. No sustituye la consulta con un profesional sanitario.
Ver originalContenido del prospecto
Introducción
Prospecto: información para el paciente
Rystiggo 140 mg/ml solución inyectable
rozanolixizumab
Este medicamento está sujeto a seguimiento adicional, lo que agilizará la detección de nueva información sobre su seguridad. Puede contribuir comunicando los efectos adversos que pudiera usted tener. La parte final de la sección 4 incluye información sobre cómo comunicar estos efectos adversos.
Lea todo el prospecto detenidamente antes de empezar a usar este medicamento, porque contiene información importante para usted.
- Conserve este prospecto, ya que puede tener que volver a leerlo.
- Si tiene alguna duda, consulte a su médico, farmacéutico o enfermero.
- Este medicamento se le ha recetado solamente a usted, y no debe dárselo a otras personas, aunque tengan los mismos síntomas que usted, ya que puede perjudicarles.
- Si experimenta efectos adversos, consulte a su médico, farmacéutico o enfermero, incluso si se trata de posibles efectos adversos que no aparecen en este prospecto. Ver sección 4.
Contenido del prospecto
- Qué es Rystiggo y para qué se utiliza
- Qué necesita saber antes de empezar a usar Rystiggo
- Cómo usar Rystiggo
- Posibles efectos adversos
- Conservación de Rystiggo
- Contenido del envase e información adicional
1. Qué es Rystiggo y para qué se utiliza
Qué es Rystiggo
Rystiggo contiene el principio activo rozanolixizumab. Rozanolixizumab es un anticuerpo monoclonal (un tipo de proteína) diseñado para reconocer y unirse al FcRn, una proteína que mantiene los anticuerpos de tipo inmunoglobulina G (IgG) en el organismo durante más tiempo.
Rystiggo se utiliza junto con el tratamiento estándar en adultos para tratar la miastenia gravis generalizada (MGg), una enfermedad autoinmunitaria que provoca debilidad muscular y afecta a múltiples grupos musculares del cuerpo. La afección también puede provocar dificultad para respirar, fatiga extrema y dificultar para tragar. Rystiggo se utiliza en adultos con MGg que produce autoanticuerpos IgG contra los receptores de la acetilcolina o la cinasa específica del músculo.
En la miastenia gravis generalizada (MGg), estos autoanticuerpos IgG (proteínas del sistema inmunitario que atacan partes del propio cuerpo de una persona) atacan y dañan las proteínas que participan en la comunicación entre los nervios y el músculo, que se denominan receptores de la acetilcolina o cinasa específica del músculo.
Al unirse al FcRn, Rystiggo reduce la cantidad de anticuerpos IgG, incluidos los autoanticuerpos (anticuerpos contra el propio organismo) IgG, contribuyendo así a mejorar los síntomas de la enfermedad.

2. Qué necesita saber antes de empezar a usar Rystiggo
No use Rystiggo
- Si es alérgico a rozanolixizumab o a alguno de los demás componentes de este medicamento (incluidos en la sección 6).
Advertencias y precauciones
Consulte a su médico, farmacéutico o enfermero antes de empezar a usar este medicamento si se encuentra en alguna de las siguientes situaciones:
Crisis miasténica
Es posible que su médico no le recete este medicamento si está utilizando un respirador, o es probable que lo haga, a causa de la debilidad muscular provocada por la MGg (crisis miasténica).
Inflamación de las membranas que rodean el cerebro y la médula espinal (meningitis aséptica)
Se ha observado meningitis aséptica en asociación con este medicamento. Busque atención médica inmediata si desarrolla síntomas de meningitis aséptica, como dolor de cabeza intenso, fiebre, rigidez del cuello, náuseas, vómitos y/o intolerancia a la luz brillante.
Infecciones
Este medicamento puede reducir su resistencia natural frente a las infecciones. Antes de comenzar el tratamiento con este medicamento o durante este, informe a su médico si padece algún síntoma de infección (sensación de calor, fiebre, escalofríos o temblores, tos, dolor de garganta o calenturas labiales pueden ser signos de una infección).
Hipersensibilidad (reacciones alérgicas)
Este medicamento contiene una proteína que puede causar reacciones como erupción cutánea, hinchazón o picor en algunas personas. Se le supervisará para detectar signos de una reacción a la perfusión durante el tratamiento y 15 minutos después de este.
Vacunaciones (vacunas)
Informe a su médico si ha recibido una vacuna en las últimas 4 semanas o tiene previsto vacunarse en un futuro próximo.
Niños y adolescentes
No administre este medicamento a niños menores de 18 años, ya que el uso de Rystiggo no se ha estudiado en este grupo de edad.
Otros medicamentos y Rystiggo
Informe a su médico o farmacéutico si está utilizando, ha utilizado recientemente o pudiera tener que utilizar cualquier otro medicamento.
El uso de Rystiggo con otros medicamentos puede disminuir la eficacia de esos medicamentos, incluidos anticuerpos terapéuticos (como rituximab) o inmunoglobulinas subcutáneas o intravenosas. Otros medicamentos, incluidas inmunoglobulinas subcutáneas o intravenosas, o intervenciones como la plasmaféresis (un proceso en el que la parte líquida de la sangre, o plasma, se separa de la sangre extraída de una persona), pueden afectar al efecto de Rystiggo. Informe a su médico si está tomando o tiene intención de tomar cualquier otro medicamento.
Antes de vacunarse, informe a su médico sobre su tratamiento con Rystiggo. Este medicamento puede afectar al efecto de las vacunas. No se recomienda la vacunación con las llamadas vacunas de microorganismos vivos o atenuados durante el tratamiento con Rystiggo.
Embarazo y lactancia
Si está embarazada o en periodo de lactancia, cree que podría estar embarazada o tiene intención de quedarse embarazada, consulte a su médico o farmacéutico antes de utilizar este medicamento.
Se desconocen los efectos de este medicamento en el embarazo. No debe utilizar este medicamento si está embarazada o cree que podría estarlo, a menos que su médico se lo haya recomendado específicamente.
Se desconoce si este medicamento pasa a la leche materna. Su médico la ayudará a decidir si debe amamantar y utilizar Rystiggo.
Conducción y uso de máquinas
Es improbable que Rystiggo afecte a su capacidad para conducir y usar máquinas.
Rystiggo contiene prolina
Este medicamento contiene 29 mg de prolina por cada mililitro de medicamento.
La prolina puede ser perjudicial para los pacientes con hiperprolinemia, un trastorno genético raro en el que un exceso del aminoácido prolina se acumula en el organismo.
Si tiene hiperprolinemia, informe a su médico y no utilice este medicamento a menos que se lo haya recomendado.
Rystiggo contiene polisorbato 80
Este medicamento contiene 0,3 mg de polisorbato 80 en cada ml de medicamento. Los polisorbatos pueden causar reacciones alérgicas. Informe a su médico si tiene cualquier alergia conocida.
3. Cómo usar Rystiggo
El tratamiento con Rystiggo lo iniciará y supervisará un médico especialista con experiencia en el tratamiento de trastornos neuromusculares o neuroinflamatorios.
Cuánto Rystiggo se administra y durante cuánto tiempo
Se le administrará Rystiggo en ciclos de 1 perfusión por semana durante 6 semanas.
Su médico calculará la dosis correcta para usted en función de su peso:
- si pesa al menos 100 kg, la dosis recomendada es de 840 mg por perfusión (necesita 6 ml por administración)
- si pesa de 70 kg a menos de 100 kg, la dosis recomendada es de 560 mg por perfusión (necesita 4 ml por administración)
- si pesa de 50 kg a menos de 70 kg, la dosis recomendada es de 420 mg por perfusión (necesita 3 ml por administración)
- si pesa de 35 kg a menos de 50 kg, la dosis recomendada es de 280 mg por perfusión (necesita 2 ml por administración)
La frecuencia de los ciclos de tratamiento varía para cada paciente y su médico considerará si es adecuado que usted reciba un nuevo ciclo de tratamiento y, en tal caso, en qué momento.
Su médico le indicará durante cuánto tiempo debe recibir tratamiento con este medicamento.
Cómo se administra Rystiggo
Un médico o enfermero le administrará Rystiggo.
Usted también se puede inyectar Rystiggo. Usted y su médico o enfermero decidirán si, después de recibir entrenamiento por parte de un profesional sanitario, se puede inyectar usted mismo este medicamento. También le puede poner las inyecciones otra persona después de recibir entrenamiento. No se inyecte usted Rystiggo ni permita que se lo inyecte nadie hasta que no se le haya enseñado a hacerlo.
Si usted o su cuidador ponen inyecciones de Rystiggo, deben leer atentamente y seguir las Instrucciones de administración que se encuentran al final de este prospecto (ver “Instrucciones de uso”).
Recibirá este medicamento en perfusión bajo la piel (vía subcutánea). Se suele inyectar en la parte inferior de la barriga, debajo del ombligo. Las inyecciones no se deben administrar en zonas donde la piel esté dolorida, con hematomas, roja o endurecida.
La administración se realiza utilizando una bomba de perfusión a un flujo de hasta 20 ml/h.
También se puede administrar manualmente (mediante inyección lenta manual, es decir, sin bomba de perfusión) a una velocidad que sea cómoda para usted.
Si recibe más Rystiggo del que debe
Si sospecha que ha recibido accidentalmente una dosis de Rystiggo superior a la recetada, pida consejo a su médico.
Si olvidó o se saltó una cita para recibir Rystiggo
Si se salta una dosis, póngase en contacto con su médico inmediatamente para recibir asesoramiento y programar otra cita para recibir Rystiggo en los siguientes 4 días. A continuación, la siguiente dosis debe administrarse de acuerdo con el calendario de administración original hasta que se complete el ciclo de tratamiento.
Si interrumpe el tratamiento con Rystiggo
No deje de utilizar este medicamento sin hablar antes con su médico. La interrupción o suspensión del tratamiento con Rystiggo puede hacer que los síntomas de la miastenia gravis generalizada reaparezcan.
Si tiene cualquier otra duda sobre el uso de este medicamento, pregunte a su médico, farmacéutico o enfermero.

4. Posibles efectos adversos
Al igual que todos los medicamentos, este medicamento puede producir efectos adversos, aunque no todas las personas los sufran.
Los siguientes efectos adversos, presentados en orden decreciente de frecuencia, se han observado con Rystiggo:
Muy frecuentes:pueden afectar a más de 1 de cada 10 personas
- Dolor de cabeza (incluida la migraña)
- Diarrea
- Fiebre (pirexia)
Frecuentes:pueden afectar a hasta 1 de cada 10 personas
- Inflamación rápida bajo la piel en zonas como la cara, la garganta, los brazos y las piernas (angioedema)
- Dolor articular (artralgia)
- Erupción cutánea, a veces con bultos rojos (erupción cutánea papulosa)
- Reacción en el lugar de la inyección, como erupción cutánea en el lugar de la inyección, enrojecimiento de la piel (eritema), inflamación, molestias y dolor en el lugar de la perfusión
- Infecciones de nariz y garganta
- Náuseas
- Vómitos
Frecuencia no conocida(no puede estimarse a partir de los datos disponibles):
- inflamación no infecciosa reversible de las membranas protectoras que rodean el cerebro y la médula espinal (meningitis aséptica):
- dolor de cabeza
- fiebre
- rigidez en el cuello
- náuseas
- vómitos
- y/o intolerancia a la luz intensa
- infecciones víricas (incluidos herpes zóster y herpes labial)
Comunicación de efectos adversos
Si experimenta cualquier tipo de efecto adverso, consulte a su médico, farmacéutico o enfermero, incluso si se trata de posibles efectos adversos que no aparecen en este prospecto. También puede comunicarlos directamente a través del sistema nacional de notificación incluido en el Apéndice V. Mediante la comunicación de efectos adversos usted puede contribuir a proporcionar más información sobre la seguridad de este medicamento.
5. Conservación de Rystiggo
Mantener este medicamento fuera de la vista y del alcance de los niños.
No utilice este medicamento después de la fecha de caducidad que aparece en la etiqueta del vial y el embalaje exterior después de la fecha de CAD. La fecha de caducidad es el último día del mes que se indica.
Conservar en nevera (entre 2 °C y 8 °C).
No congelar.
Conservar el vial en el embalaje original para protegerlo de la luz.
Cada vial de solución inyectable debe usarse solamente una vez (un solo uso). Se debe desechar todo producto o material no utilizado de acuerdo con la normativa local.
No utilice este medicamento si observa que el líquido tiene un aspecto turbio, contiene partículas extrañas o ha cambiado de color.
Los medicamentos no se deben tirar por los desagües ni a la basura. Pregunte a su farmacéutico cómo deshacerse de los envases y de los medicamentos que ya no necesita. De esta forma, ayudará a proteger el medio ambiente.
6. Contenido del envase e información adicional
Composición de Rystiggo
- El principio activoes rozanolixizumab. Cada ml de solución contiene 140 mg de rozanolixizumab. Cada vial de 2 ml contiene 280 mg de rozanolixizumab. Cada vial de 3 ml contiene 420 mg de rozanolixizumab. Cada vial de 4 ml contiene 560 mg de rozanolixizumab. Cada vial de 6 ml contiene 840 mg de rozanolixizumab.
- Los demás componentesson: histidina, hidrocloruro de histidina monohidrato, prolina, polisorbato 80 y agua para preparaciones inyectables. Consulte la sección 2 Rystiggo contiene prolina y Rystiggo contiene polisorbato 80.
Aspecto del producto y contenido del envase
Rystiggo es una solución inyectable. Cada envase contiene 1 vial de 2 ml, 3 ml, 4 ml o 6 ml de solución inyectable.
Puede que solamente estén comercializados algunos viales.
La solución es de incolora a amarillo parduzco pálido, de transparente a ligeramente opalescente (blanco perla).
Los materiales utilizados para la administración se deben adquirir por separado.
Titular de la autorización de comercialización
UCB Pharma S.A., Allée de la Recherche 60, B-1070 Bruselas, Bélgica
Responsable de la fabricación
UCB Pharma S.A., Chemin du Foriest, B-1420 Braine-l’Alleud, Bélgica.
Pueden solicitar más información respecto a este medicamento dirigiéndose al representante local del titular de la autorización de comercialización:
België/Belgique/Belgien UCB Pharma S.A./NV Tél/Tel: + 32 / (0)2 559 92 00 | Lietuva UAB Medfiles Tel: + 370 5 246 16 40 |
| Luxembourg/Luxemburg UCB Pharma S.A./NV Tél/Tel: + 32 / (0)2 559 92 00 (Belgique/Belgien) |
Ceská republika UCB s.r.o. Tel: + 420 221 773 411 | Magyarország UCB Magyarország Kft. Tel.: + 36-(1) 391 0060 |
Danmark UCB Nordic A/S Tlf.: + 45 / 32 46 24 00 | Malta Pharmasud Ltd. Tel: + 356 / 21 37 64 36 |
Deutschland UCB Pharma GmbH Tel: + 49 /(0) 2173 48 4848 | Nederland UCB Pharma B.V. Tel: + 31 / (0)76-573 11 40 |
Eesti OÜ Medfiles Tel: + 372 730 5415 | Norge UCB Nordic A/S Tlf: + 47 / 67 16 5880 |
Ελλáδα UCB Α.Ε. Τηλ: + 30 / 2109974000 | Österreich UCB Pharma GmbH Tel: + 43-(0)1 291 80 00 |
España UCB Pharma, S.A. Tel: + 34 / 91 570 34 44 | Polska UCB Pharma Sp. z o.o. / VEDIM Sp. z o.o. Tel.: + 48 22 696 99 20 |
France UCB Pharma S.A. Tél: + 33 / (0)1 47 29 44 35 | Portugal UCB Pharma (Produtos Farmacêuticos), Lda Tel: + 351 21 302 5300 |
Hrvatska Medis Adria d.o.o. Tel: +385 (0) 1 230 34 46 | România UCB Pharma Romania S.R.L. Tel: + 40 21 300 29 04 |
Ireland UCB (Pharma) Ireland Ltd. Tel: + 353 / (0)1-46 37 395 | Slovenija Medis, d.o.o. Tel: + 386 1 589 69 00 |
Ísland Vistor hf. Sími: + 354 535 7000 | Slovenská republika UCB s.r.o., organizacná zložka Tel: + 421 (0) 2 5920 2020 |
Italia UCB Pharma S.p.A. Tel: + 39 / 02 300 791 | Suomi/Finland UCB Pharma Oy Finland Puh/Tel: + 358 9 2514 4221 |
Κúπρος Lifepharma (Z.A.M.) Ltd Τηλ: + 357 22 056300 | Sverige UCB Nordic A/S Tel: + 46 / (0) 40 294 900 |
Latvija Medfiles SIA Tel: + 371 67 370 250 |
Fecha de la última revisión de este prospecto:
Otras fuentes de información
La información detallada de este medicamento está disponible en la página web de la Agencia Europea de Medicamentos: https://www.ema.europa.eu. También existen enlaces a otras páginas web sobre enfermedades raras y medicamentos huérfanos.
-------------------------------------------------------------------------------------------------------------
INSTRUCCIONES DE USO
Rystiggo (rozanolixizumab)Rystiggo 140 mg/ml solución inyectable por vía subcutánea
Vial de un solo uso
Lea todas estas instrucciones antes de empezar a usar Rystiggo. Un médico o enfermero le mostrará cómo administrarse Rystiggo antes de utilizarlo por primera vez. También es posible que otra persona le administre las perfusiones, después de haber recibido la formación necesaria. No se administre Rystiggo ni se lo administre a otra persona hasta que le hayan enseñado a hacerlo. Esta información no sustituye a la consulta con su médico acerca de su enfermedad o tratamiento.
Si va a utilizar una bomba de perfusión (también llamada bomba de jeringa) para administrarse Rystiggo, lea las instrucciones para configurar la bomba facilitadas por su médico o enfermero.
 ! Información importante que debe conocer antes de administrarse Rystiggo o administrárselo a otra persona
- Para uso exclusivo por vía subcutánea (bajo la piel).
- Utilice cada vial una sola vez.
- Compruebe su dosis (puede que necesite más de 1 vial para
preparar la dosis recetada).
- Noutilice Rystiggo después de la fecha de caducidad.
 Antes de usar Rystiggo, compruebe que la dosis indicada en la(s) caja(s) coincide con la dosis que le han recetado. Nolo utilice si la dosis no es la misma que la recetada. Póngase en contacto con su médico o enfermero para que le indiquen qué debe hacer a continuación.
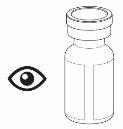
- Noutilice el vial si el líquido tiene partículas visibles. El medicamento debe ser de incoloro a color marrón claro amarillento, y de transparente a ligeramente opalescente (blanco perla).
- Noagite el vial.
- Noutilice el vial si le falta la tapa protectora o está defectuosa. Si alguno de los viales está roto o no tiene la tapa, notifíquelo y devuélvalo a la farmacia.
- Si va a utilizar una bomba no programable, siga las instrucciones de uso del fabricante y las indicaciones de su enfermero para llenar el tubo de perfusión y configurar la dosis.
 Conservación de Rystiggo
- Conservar en nevera (entre 2 °C y 8 °C).
- Nocongelar.
- Conservar Rystiggo en la caja original para protegerlo de la luz.
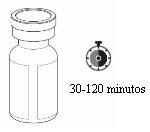
- Saque la caja de la nevera antes de la perfusión. Para que la perfusión sea más cómoda, deje que el vial alcance la temperatura ambiente antes de utilizar el medicamento. Esto puede tardar entre 30 y 120 minutos. No lo caliente de ninguna otra forma.
! Mantener este medicamento fuera de la vista y del alcance de los niños.
Contenido de la caja
- 1 vial de Rystiggo (2 ml, 3 ml, 4 ml o 6 ml dependiendo de la dosis que le hayan recetado).
- Prospecto de Rystiggo con las Instrucciones de Uso.
Instrucciones paso a paso
- Prepárese
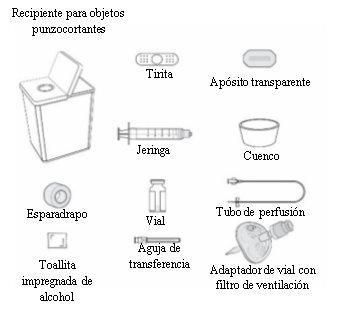
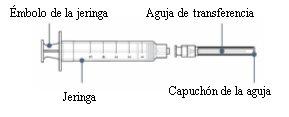
Paso1:Reúna todos los materiales que va a necesitar en una superficie de trabajo limpia y plana:
- Incluidoen la(s) caja(s) de Rystiggo:
- Vial de Rystiggo.
- Prospecto de Rystiggo.
! Compruebe su dosis (puede que necesite más de 1vial para
 preparar la dosis recetada).
- No incluidoen la caja de Rystiggo:
- Jeringa (5-10 ml, dependiendo de la dosis recetada).
- Aguja de transferencia de calibre 18 o de un diámetro mayor o un adaptador de vial con filtro de ventilación.
- Tubo de perfusión con aguja de calibre 26 o de un diámetro mayor. El tubo de perfusión debe tener una longitud de 61 cm o menos.
- Toallitas impregnadas de alcohol.
- Esparadrapo o apósito transparente.
- Tirita.
- Recipiente para objetos punzocortantes.
- Cuenco o papel absorbente para recoger el líquido sobrante al llenar el tubo de perfusión.
- Bomba de jeringa (si va a utilizar una bomba).
! Los materiales anteriores son solo con fines ilustrativos. Sus materiales específicos pueden tener un aspecto diferente.
Paso2:Limpie su superficie de trabajo y lávese las manos
- Limpie su superficie de trabajo con desinfectante y lávese bien las manos con agua y jabón, o utilice un desinfectante de manos. Séqueselas con una toalla limpia.
- Prepare el/los vial(es) y la jeringa
! Compruebe su dosis (puede que necesite más de 1vial para preparar la dosis recetada).
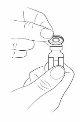
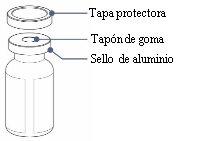
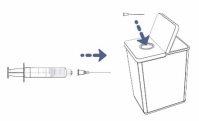
 Paso3:Retire la tapa protectora del/de los vial(es)
- Retire la tapa protectora del/de los vial(es) sujetando el borde y levantándolo hacia arriba.
- Limpie el tapón de goma con una toallita impregnada de alcohol. Deje secar al aire.
- Deje el sello de aluminio en su sitio.
- Compruebe su dosis (si necesita más de un vial para preparar la dosis recetada, retire todas las tapas y limpie los tapones).
! Si va a utilizar un adaptador de vial con filtro de ventilación en lugar de una aguja de transferencia, puede ir directamente al paso7.
Paso4: Conecte la aguja de transferencia a la jeringa
- Saque la jeringa y la aguja de transferencia de sus respectivos envases de plástico. No toque la punta de la jeringa ni la base de la aguja para evitar gérmenes.
 Con el capuchón de la aguja aún puesto, empuje suavemente o gire la aguja de transferencia para acoplarla a la jeringa hasta que quede firmemente conectada.
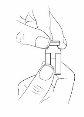
 Paso5:Introduzca aire en la jeringa
- Tire lentamente del émbolo para introducir aire en la jeringa.
- Llene la jeringa con aproximadamente la misma cantidad de aire que la cantidad de medicamento en el vial.
- Mantenga el capuchón de la aguja puesto mientras lo hace.
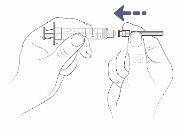
Paso6: Retire el capuchón de la aguja de transferencia
- Sostenga la jeringa con una mano.
- Con la otra mano, sujete el capuchón de la aguja de transferencia y tire de él hasta quitarlo.
- Coloque el capuchón sobre la mesa para desecharlo después.
- Notoque la punta de la aguja.
- Nodeje que la punta de la aguja toque ningún material después de haberle quitado el capuchón.
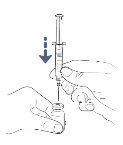
Paso7: Introduzca directamente en el vial la aguja de transferencia o el adaptador de vial con filtro de ventilación
 Siga las instrucciones correspondientes al método de perfusión que vaya a utilizar:
Con aguja de transferencia
- Coloque el vial sobre la mesa e introduzca la aguja de transferencia directamente a través del tapón de goma.
 Con adaptador de vial
- Coloque el vial sobre la mesa e introduzca el adaptador de vialdirectamente a través del tapón de goma.
- Conecte la jeringa al adaptador de vial con filtro de ventilación.

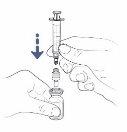
Paso8: Gire el vial y la jeringa
- Ahora coloque el vial y la jeringa boca abajo.
- Mantenga la aguja de transferencia o el adaptador de vial con filtro de ventilación dentro del vial.
! Si va a utilizar un adaptador de vial con filtro de ventilación, puede ir directamente al paso11.
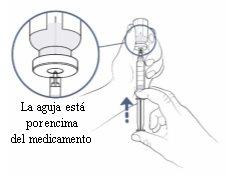 Paso9: Empuje el aire de la jeringa hacia el vial
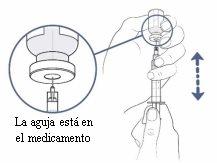
- Compruebe que la aguja de transferencia está apuntando hacia arriba y asegúrese de que la punta de la aguja se encuentra en el espacio situado por encima del medicamento.
- Empuje lentamente el émbolo de la jeringa hacia arriba para introducir todo el aire de la jeringa en el vial. Mantenga el pulgar empujando sobre el émbolo de la jeringa todo el tiempo para que no entre aire en la jeringa.
- Mantenga en todo momento la punta de la aguja en el espacio situado por encima del medicamento.
- Noempuje el aire hacia el medicamento, ya que se pueden formar burbujas.
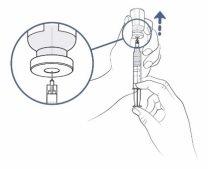
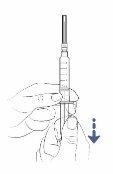
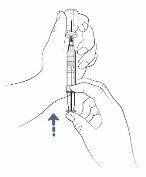
Paso10: Prepárese parallenar la jeringa
- Mantenga el pulgar presionando sobre el émbolo de la jeringa. Con la otra mano, tire del vial lenta y cuidadosamentehacia arriba para que la punta de la aguja quede completamente cubierta por el medicamento líquido.
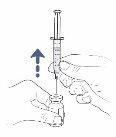
Paso11:Llene la jeringa con la mayor cantidad de medicamento posible
! Compruebe su dosis (puede que necesite más de 1vial para preparar la dosis recetada).
 Ahora tire lentamente del émbolo de la jeringa hacia abajo y llene la jeringa con el medicamento.
Si está utilizando una aguja de transferencia para llenar la jeringa, haga lo siguiente:
- Siga tirando del vial lenta y cuidadosamente hacia arriba para mantener la punta de la aguja completamente cubierta por el líquido.
- Ajuste la punta de la aguja para mantenerla en el líquido. Esto le ayudará a extraer la mayor cantidad de medicamento posible del/de los vial(es).
- Ahora debería tener en la jeringa una cantidad de medicamento superior a la dosis recetada. Esta diferencia se ajustará más adelante.
! También habrá una cantidad muy pequeña del medicamento que no podrá extraer del vial. Deberá desecharla junto con el vial más adelante.
! Si está utilizando un adaptador de vial con filtro de ventilación, desconecte la jeringa del adaptador. Deje el adaptador del vial con filtro de ventilación en el vial. Puede desecharlo al final de la perfusión. Ahora puede ir directamente al paso14.
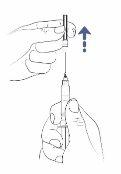
Paso12: Retire el aire de la jeringa
- Si queda algún espacio entre el líquido de la jeringa y la parte superior de la jeringa, empuje lentamente el émbolo para volver a introducir aire en el vial.
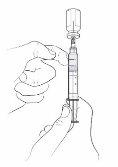
- Si observa burbujas de aire en la jeringa, puede eliminarlas golpeando suavemente la jeringa con el dedo índice. Ahora empuje lentamente el émbolo para que el aire vuelva al vial.
 Paso13: Retire la aguja de transferencia del vial y la jeringa
- Dele la vuelta al vial y la jeringa y coloque el vial sobre la superficie de trabajo.
- Retire la aguja de transferencia y la jeringa del vial tirando directamente de la jeringa hacia arriba.
 Retire la aguja de transferencia de la jeringa girando o tirando con cuidado de la base de la aguja.
- Notoque la aguja. Novuelva a ponerle el capuchón a la aguja.
- Tire la aguja en el recipiente para objetos punzocortantes.
- Si está utilizando un adaptador de vial con filtro de ventilación en lugar de una aguja, no es necesario retirar el adaptador del vial antes de desecharlo.
Paso14: Vuelva a comprobar su dosis
- Si necesita utilizar otro vial para preparar la dosis recetada, repita los pasos 4-13 con la misma jeringa y una nueva aguja de transferencia o un nuevo adaptador de vial con filtro de ventilación para evitar la contaminación.
- Prepárese para la perfusión
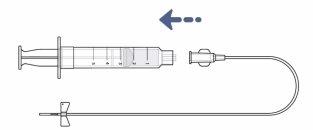 Paso 15: Conecte el tubo de perfusión a la jeringa
- Coloque la jeringa sobre la superficie de trabajo limpia mientras prepara el tubo de perfusión.
- Saque el tubo de perfusión de la bolsa protectora.
- Quite el tapón del extremo del tubo de perfusión girándolo. Coloque el tapón sobre la superficie de trabajo para desecharlo después.
- Conecte el tubo de perfusión a la jeringa hasta que queden firmemente unidos. Notoque la punta de la jeringa ni la base del tubo de perfusión para evitar gérmenes.
- Nole quite el capuchón a la aguja del tubo de perfusión.
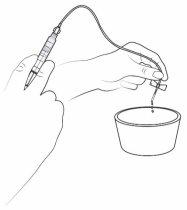
Paso 16: Llene el tubo de perfusión con el medicamento
- Asegúrese de tener a mano un cuenco o papel absorbente, que podrá utilizar para recoger el medicamento del tubo de perfusión que no necesite.
- Mantenga el capuchón en la aguja del tubo de perfusión y sujétela sobre el cuenco. A continuación, sostenga la jeringa en posición vertical y llene el tubo de perfusión con el medicamento empujando suavemente el émbolo de la jeringa.
- La cantidad de líquido que quede en la jeringa debe coincidir con la dosis recetada.
- Si va a utilizar una bomba de jeringa, lea las instrucciones del fabricante para configurar y utilizar la bomba y llene el tubo de perfusión.
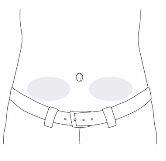
Paso 17: Elija y prepare el lugar de la perfusión
- Elija un lugar de perfusión en la parte inferior izquierda o derecha del vientre (el abdomen), por debajo del ombligo.
- Noutilice una zona de piel que:
- esté sensible, magullada, enrojecida o dura;
- tenga cicatrices o estrías.
- Prepare el lugar de la perfusión:
- Limpie la zona de perfusión con una toallita impregnada de alcohol y déjela secar al aire.
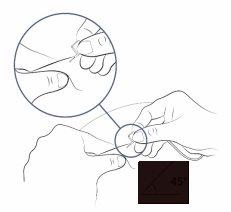 Paso 18: Introduzca la aguja del tubo de perfusión
- Retire con cuidado el capuchón a la aguja del tubo de perfusión.
- Doble las alas de mariposa para acercarlas y sujételas con el pulgar y el índice de una mano.
- Con la otra mano, pellízquese la piel con 2 dedos para crear un pliegue.
- Introduzca la aguja en el centro de la piel y empújela bajo la piel.
- La aguja debe entrar fácilmente. Si es difícil, puede extraer un poco la aguja.
- Puede que esté utilizando un tubo de perfusión sin una aguja de tipo mariposa en el extremo. Su enfermero o su médico le explicará cómo introducir la aguja.
 Paso 19: Asegure la aguja del tubo de perfusión
- Utilice un apósito transparente para mantener la aguja en su sitio. Algunos equipos de perfusión tienen un adhesivo incorporado.
- Puede utilizar esparadrapo para sujetar el tubo de perfusión a la piel.
- Perfunda y finalice
Paso 20:Inicie la perfusión
Siga las instrucciones correspondientes al método de perfusión que vaya a utilizar:
Inyección manual
- Siéntese cómodamente y empuje firmemente el émbolo de la jeringa para perfundir el medicamento.
- Debe perfundir el medicamento a una velocidad que le resulte cómoda. Siga empujando hasta que no quede medicamento en la jeringa.
- Antes y durante la perfusión, asegúrese de que el tubo de perfusión no se doble ni se retuerza. Si esto sucediera, podría interrumpirse el flujo del medicamento. En tal caso, corrija la curvatura del tubo de perfusión e inténtelo de nuevo.
- Si se siente incómodo o parte del medicamento fluye de vuelta al tubo de perfusión, puede empujar más despacio.
Bomba de jeringa
- Antes de utilizar una bomba de jeringa, asegúrese de que comprende lo siguiente:
- Cómo configurar la bomba de jeringa (establezca una velocidad de perfusión de 20 ml por hora como máximo).
- Cómo configurar la alarma de oclusión al máximo.
- Cómo iniciar la bomba de jeringa.
- Qué significan los diversos sonidos y alarmas de la bomba de jeringa y qué hacer en cada caso.
- Cómo detener la bomba de jeringa.
- Cuando esté listo para la perfusión:
- Coloque la jeringa en su soporte e inicie la bomba siguiendo sus instrucciones.
- Siéntese cómodamente mientras la bomba le administra el medicamento.
- Antes y durante la perfusión, asegúrese de que el tubo de perfusión no se doble ni se retuerza. Si esto sucediera, podría interrumpirse el flujo del medicamento. En tal caso, corrija la curvatura del tubo de perfusión e inténtelo de nuevo.
- Una vez que haya terminado, detenga la bomba siguiendo sus instrucciones.
- Saque la jeringa de la bomba.
! Nota: Quedará algo de medicamento en el tubo de perfusión. Esto es normal y puede desecharlo en el recipiente para objetos punzocortantes.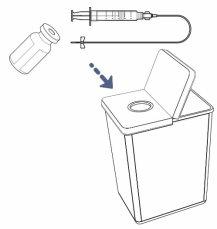
Paso 21: Finalice la perfusión y proceda a la limpiezaUna vez finalizada la perfusión, nointente retirar el apósito de la aguja. Quítese los dos juntos de la piel y tírelos junto con la jeringa al recipiente para objetos punzocortantes.
- Es posible que queden una o dos gotas de líquido en el lugar de la perfusión después de retirar la aguja. Es normal.
- Tire el/los vial(es) usado(s) y el medicamento sobrante en el recipiente para objetos punzocortantes.
- Cubra el lugar de la perfusión con un apósito limpio, por ejemplo, con una tirita.
- Tire cualquier otro material usado a la basura doméstica.
! Mantenga siempre el recipiente para objetos punzocortantes fuera de la vista y del alcance de los niños.
- País de registro
- Disponibilidad en farmacias
Problema de suministro reportado
Los datos de la Agencia Española de Medicamentos y Productos Sanitarios (AEMPS) indican un problema de suministro que afecta a este medicamento.<br><br>La disponibilidad puede ser limitada en algunas farmacias.<br><br>Para actualizaciones o alternativas, consulte a su farmacéutico. - Principio activo
- Requiere recetaSí
- Fabricante
- Esta información es de carácter general y no sustituye la consulta con un profesional sanitario.
- Alternativas a RYSTIGGO 140 MG/ML SOLUCION INYECTABLEForma farmacéutica: INYECTABLE PERFUSION, 120 mg (80 mg/kg) belimumabPrincipio activo: BelimumabFabricante: Glaxosmithkline (Ireland) LimitedRequiere recetaForma farmacéutica: INYECTABLE, 200 mgPrincipio activo: BelimumabFabricante: Glaxosmithkline (Ireland) LimitedRequiere recetaForma farmacéutica: INYECTABLE PERFUSION, 400 mg (80 mg/kg) belimumabPrincipio activo: BelimumabFabricante: Glaxosmithkline (Ireland) LimitedRequiere receta
Médicos online para RYSTIGGO 140 MG/ML SOLUCION INYECTABLE
Comenta la dosis, los posibles efectos secundarios, interacciones, contraindicaciones o la revisión de receta de RYSTIGGO 140 MG/ML SOLUCION INYECTABLE, sujeto a valoración médica y a la normativa local.

Preguntas frecuentes
