

ORENCIA 125 mg SOLUTION FOR INJECTION IN PRE-FILLED SYRINGE


How to use ORENCIA 125 mg SOLUTION FOR INJECTION IN PRE-FILLED SYRINGE
Translated with AI
This page provides general information and does not replace a doctor’s consultation. Always consult a doctor before taking any medication. Seek urgent medical care if symptoms are severe.
Show originalContents of the leaflet
Introduction
Package Leaflet: Information for the User
ORENCIA50mg solution for injection in pre-filled syringe
ORENCIA87.5mg solution for injection in pre-filled syringe
ORENCIA125mg solution for injection in pre-filled syringe
abatacept
Read all of this leaflet carefully before you start using this medicine because it contains important information for you.
- Keep this leaflet, you may need to read it again.
- If you have any further questions, ask your doctor or pharmacist.
- This medicine has been prescribed for you only. Do not pass it on to others. It may harm them, even if their signs of illness are the same as yours.
- If you experience any side effects, talk to your doctor, pharmacist or nurse. This includes any possible side effects not listed in this leaflet. See section 4.
Contents of the pack:
- What ORENCIA is and what it is used for
- What you need to know before you use ORENCIA
- How to use ORENCIA
- Possible side effects
- Storage of ORENCIA
- Contents of the pack and other information
1. What ORENCIA is and what it is used for
ORENCIA contains the active substance abatacept, a protein that is produced in cell cultures. ORENCIA reduces the attack of the immune system on normal tissues by interfering with immune cells (called T lymphocytes) that contribute to the development of rheumatoid arthritis. ORENCIA selectively modulates the activation of T lymphocytes that participate in the inflammatory response of the immune system.
ORENCIA is used to treat rheumatoid arthritis and psoriatic arthritis in adults and also polyarticular juvenile idiopathic arthritis in children from 2 years of age.
Rheumatoid Arthritis
Rheumatoid arthritis is a progressive disease of long duration that, if left untreated, can have serious consequences, such as destruction of joints, increased disability, and inability to perform daily activities. In people with rheumatoid arthritis, the body's own immune system attacks normal tissues, producing pain and swelling in the joints. This can damage the joints. Rheumatoid arthritis (RA) affects each person differently. In most people, joint symptoms develop gradually over several years. However, in some patients, RA can progress rapidly, and in others, it can occur for a limited period and then go into remission. RA is usually a chronic (long-term) disease, progressive. This means that, even if you receive treatment, you may still have symptoms or not, and RA could continue to damage your joints. With the best treatment plan for you, you may be able to delay this disease process, which could help reduce long-term joint damage, as well as pain and fatigue, and improve your overall quality of life.
ORENCIA is used to treat moderate to severe active rheumatoid arthritis when you have not responded sufficiently to treatment with other disease-modifying medicines or with another group of medicines called "tumor necrosis factor (TNF) inhibitors". It is used in combination with a medicine called methotrexate.
ORENCIA may also be used with methotrexate to treat rheumatoid arthritis that is progressive and has high activity without prior treatment with methotrexate.
ORENCIA is used to:
- delay damage to your joints
- improve your physical function
Psoriatic Arthritis
Psoriatic arthritis is an inflammatory disease of the joints, usually accompanied by psoriasis, an inflammatory disease of the skin. If you have active psoriatic arthritis, you will first be given other medicines. If you do not respond sufficiently well to these medicines, you may be given ORENCIA to:
- reduce the signs and symptoms of your disease
- reduce damage to your bones and joints
- improve your physical function and ability to perform daily activities
ORENCIA alone or in combination with methotrexate is used to treat psoriatic arthritis.
Polyarticular Juvenile Idiopathic Arthritis
Polyarticular juvenile idiopathic arthritis is a long-term inflammatory disease that affects one or more joints in children and adolescents.
ORENCIA solution for injection in pre-filled syringe is used in children and adolescents from 2 to 17 years of age when previous treatment with a disease-modifying medicine has not worked well or is not suitable for them. ORENCIA is usually used in combination with methotrexate, although ORENCIA may also be used alone if treatment with methotrexate is not appropriate.
ORENCIA is used to:
- delay damage to the joints
- improve physical function
- improve other signs and symptoms of polyarticular juvenile idiopathic arthritis

2. What you need to know before you use ORENCIA
Do not use ORENCIA
Warnings and precautions
Talk to your doctor, pharmacist, or nurse:
- if you, your partner, or your caregiver notice new onset or worsening of neurological symptoms, including general muscle weakness, vision changes, difficulty speaking, a change in the way you walkor problems with balance, changes in thinking, memory, and orientationleading to confusion and personality changes, contact your doctor immediatelybecause they may be symptoms of a rare, serious, and potentially life-threatening brain infection called progressive multifocal leukoencephalopathy (PML).
Your doctor may also perform blood tests to check your blood values.
Children and adolescents
ORENCIA solution for injection in pre-filled syringe has not been studied in children and adolescents under 2 years of age. Therefore, it is not recommended to use ORENCIA solution for injection in pre-filled syringe in this patient population.
Using ORENCIA with other medicines
Tell your doctor or pharmacist if you are using, have recently used, or might use any other medicines.
ORENCIA must not be usedwith biological medicines for rheumatoid arthritis, including TNF inhibitors such as adalimumab, etanercept, and infliximab; there is not enough evidence to recommend that it be given with anakinra and rituximab.
ORENCIA can be usedwith other medicines commonly used to treat rheumatoid arthritis, such as steroids or painkillers, including non-steroidal anti-inflammatory drugs like ibuprofen or diclofenac.
Ask your doctor or pharmacist for advice before taking any other medicine while using ORENCIA.
Pregnancy and breastfeeding
The effects of ORENCIA in pregnancy are not known, therefore, you should not use ORENCIA if you are pregnant unless your doctor recommends it.
- if you are a woman who could become pregnant, you must use reliable contraceptive methods (birth control) while you are using ORENCIA and for 14 weeks after the last dose. Your doctor will advise you on suitable methods.
- if you become pregnant during treatment with ORENCIA, inform your doctor.
If you received ORENCIA during your pregnancy, your baby may have a higher risk of getting an infection. It is essential that you inform your baby's doctors and other healthcare professionals about the use of ORENCIA during your pregnancy before any vaccine is given to your baby.
It is not known whether ORENCIA passes into breast milk. You must stop breastfeedingif you are being treated with ORENCIA, until 14 weeks after the last dose.
Driving and using machines
It is unlikely that the use of ORENCIA will affect your ability to drive, ride a bicycle, or use machines. However, if you feel tired or unwell after receiving ORENCIA, do not drive, ride a bicycle, or operate any machinery.
ORENCIA contains sodium
This medicine contains less than 1 mmol of sodium (23 mg) per dose, which is essentially "sodium-free".
3. How to use ORENCIA
Follow exactly the instructions for administration of this medicine given by your doctor or pharmacist. If you are unsure, consult your doctor or pharmacist again.
ORENCIA solution for injection is injected under the skin (subcutaneously).
Recommended dose in adults
The recommended dose of ORENCIA for adults with rheumatoid arthritis or psoriatic arthritis is 125 mg every week, regardless of weight.
Your doctor may start your treatment with ORENCIA with or without a single dose of powder for concentrate for solution for infusion (which is given into a vein, usually in the arm, over a period of 30 minutes). If you are given a single intravenous dose to start treatment, the first subcutaneous injection of ORENCIA should be given within a day of the intravenous infusion, followed by weekly subcutaneous injections of 125 mg.
ORENCIA can be used in adults over 65 years of age without the need to change the dose.
Use in children and adolescents
For patients from 2 to 17 years of age with polyarticular juvenile idiopathic arthritis, the recommended weekly dose of ORENCIA solution for injection in pre-filled syringe is based on body weight:
Weekly dose of ORENCIA
Patient's body weight | Dose |
10 kg to less than 25 kg | 50 mg |
25 kg to less than 50 kg | 87.5 mg |
50 kg or more | 125 mg |
If you are already receiving treatment with intravenous ORENCIA and want to switch to subcutaneous ORENCIA, you should receive a subcutaneous injection instead of your next intravenous infusion, followed by weekly subcutaneous injections of ORENCIA.
Your doctor will inform you about the duration of treatment and what other medicines, including other disease-modifying medicines, you can continue to take while being treated with ORENCIA.
Initially, your doctor or nurse may inject ORENCIA for you. However, you and your doctor may decide that you can inject ORENCIA yourself. In this case, you will be instructed on how to inject ORENCIA yourself.
Consult your doctor if you have any doubts about the administration of the injection. You will find detailed instructions for the preparation and administration of ORENCIA at the end of this leaflet (see “Important instructions for use”).
If you use more ORENCIA than you should
If this happens, contact your doctor immediately, who will monitor you for any signs or symptoms of adverse effects and treat them if necessary.
If you forget to use ORENCIA
Keep track of your next dose. It is very important to use ORENCIA exactly as your doctor tells you. If you forget your dose within 3 days of when it was due, give yourself the dose as soon as you remember, and then follow your original schedule on the designated day. If you forget your dose for more than 3 days, ask your doctor when you should give your next dose.
If you stop treatment with ORENCIA
The decision to stop treatment with ORENCIA should be discussed with your doctor.
If you have any further questions on the use of this medicine, ask your doctor, pharmacist, or nurse.

4. Possible Adverse Effects
Like all medicines, this medicine can cause adverse effects, although not all people suffer from them. The most frequent adverse effects that occur with ORENCIA are upper respiratory tract infections (including nose and throat infections), headache, and nausea. ORENCIA may cause serious adverse effects that may require treatment.
Possible Serious Adverse Effectsinclude serious infections, malignant neoplasms (cancer), and allergic reactions, as listed below.
Inform your doctor immediatelyif you notice any of the following symptoms:
- severe rash, hives, or other symptoms of allergic reaction
- swelling of the face, hands, or feet
- difficulty breathing or swallowing
- fever, persistent cough, weight loss, fatigue
Inform your doctor immediatelyif you notice any of the following:
- general malaise, dental problems, burning sensation while urinating, painful skin rash, painful blisters on the skin, cough
The symptoms described above may be signs of the adverse effects listed below, which have been observed with ORENCIA in clinical trials in adults:
List of Adverse Effects:
Very Common(may affect more than 1 in 10 patients):
- upper respiratory tract infections (including nose, throat, and sinus infections)
Common(may affect up to 1 in 10 patients):
- lung infections, urinary tract infections, painful blisters on the skin (herpes), flu
- headache, dizziness
- high blood pressure
- cough
- abdominal pain, diarrhea, nausea, stomach upset, mouth ulcers, vomiting
- skin rash
- fatigue, weakness, injection site reactions
- abnormal liver function tests
Uncommon(may affect up to 1 in 100 patients):
- dental infection, fungal nail infection, muscle infection, bloodstream infection, pus accumulation under the skin, kidney infection, ear infection
- low white blood cell count
- skin cancer, warts
- low platelet count
- allergic reactions
- depression, anxiety, sleep disturbance
- migraines
- numbness
- dry eye, decreased vision
- eye inflammation
- palpitations, rapid heartbeat, slow heartbeat
- low blood pressure, hot flashes, blood vessel inflammation, flushing
- difficulty breathing, wheezing, shortness of breath, acute worsening of a lung disease called chronic obstructive pulmonary disease (COPD)
- throat tightness
- rhinitis
- increased tendency to bruise, dry skin, psoriasis, skin redness, excessive sweating, acne
- alopecia, pruritus, hives
- joint pain
- limb pain
- absence of menstruation, heavy menstrual bleeding
- pseudogrip syndrome, weight gain
Rare(may affect up to 1 in 1000 patients):
- tuberculosis
- inflammation of the uterus, fallopian tubes, and/or ovaries
- gastrointestinal infection
- leukemia, lung cancer
Children and Adolescents with Juvenile Idiopathic Polyarticular Arthritis
The adverse effects in children and adolescents with juvenile idiopathic arthritis are similar to those experienced in adults described above, with the following differences:
Common(may affect up to 1 in 10 patients):
- upper respiratory tract infection (including nose, sinus, and throat infections)
- fever
Uncommon(may affect up to 1 in 100 patients):
- blood in urine
- ear infection
Reporting Adverse Effects
If you experience any adverse effects, consult your doctor or pharmacist, even if they are possible adverse effects not listed in this leaflet. You can also report them directly through the national reporting system included in Appendix V. By reporting adverse effects, you can contribute to providing more information on the safety of this medicine.
5. Storage of ORENCIA
Keep this medicine out of the sight and reach of children.
Do not use this medicine after the expiry date stated on the label after EXP and on the carton after CAD. The expiry date is the last day of the month indicated.
Store in a refrigerator (between 2°C and 8°C). Do not freeze.
Store in the original packaging to protect from light.
Do not use this medicine if the liquid is cloudy or discolored, or has large particles. The liquid should be colorless to pale yellow.
Medicines should not be disposed of via wastewater or household waste. Ask your pharmacist how to dispose of the packaging and any unused medicines. This will help protect the environment.
6. Container Contents and Additional Information
ORENCIA Composition
ORENCIA 50 mg injectable solution in a pre-filled syringe
- The active ingredient is abatacept.
- Each pre-filled syringe contains 50 mg of abatacept in 0.4 ml.
ORENCIA 87.5 mg injectable solution in a pre-filled syringe
- The active ingredient is abatacept.
- Each pre-filled syringe contains 87.5 mg of abatacept in 0.7 ml.
ORENCIA 125 mg injectable solution in a pre-filled syringe
- The active ingredient is abatacept.
- Each pre-filled syringe contains 125 mg of abatacept in 1 ml.
- The other components are sucrose, poloxamer 188, sodium dihydrogen phosphate monohydrate, disodium phosphate anhydrous, and water for injectable preparations (see section 2 "ORENCIA contains sodium").
Product Appearance and Container Contents
ORENCIA injectable solution (injection) is a clear, colorless to pale yellow solution.
ORENCIA is available in the following presentations:
ORENCIA 50 mg injectable solution in a pre-filled syringe with a white plunger
- Pack of 4 pre-filled syringes with a needle guard.
ORENCIA 87.5 mg injectable solution in a pre-filled syringe with a light blue plunger
- Pack of 4 pre-filled syringes with a needle guard.
ORENCIA 125 mg injectable solution in a pre-filled syringe with an orange plunger
- Packs of 1 or 4 pre-filled syringes and a multiple pack of 12 pre-filled syringes (3 packs of 4).
- Packs of 1, 3, or 4 pre-filled syringes with a needle guard and a multiple pack of 12 pre-filled syringes with a needle guard (3 packs of 4).
Only some pack sizes may be marketed.
Marketing Authorization Holder
Bristol-Myers Squibb Pharma EEIG
Plaza 254
Blanchardstown Corporate Park 2
Dublin 15, D15 T867
Ireland
Manufacturer
CATALENT ANAGNI S.R.L.
Loc. Fontana del Ceraso snc
Strada Provinciale 12 Casilina, 41
03012 Anagni (FR)
Italy
Swords Laboratories Unlimited Company t/a Bristol-Myers Squibb Cruiserath Biologics
Cruiserath Road, Mulhuddart
Dublin 15
Ireland
Date of Last Revision of this Leaflet:
Other Sources of Information
Detailed information on this medicinal product is available on the European Medicines Agency website http://www.ema.europa.eu.
Important Instructions for Use. Read Carefully.
HOW TO USE
ORENCIA 50 mg
ORENCIA 87.5 mg
ORENCIA 125 mg
injectable solution in a pre-filled syringe with a needle guard
Abatacept
Subcutaneous route
Read these instructions before using the ORENCIA pre-filled syringe.
Before using the pre-filled syringe for the first time, make sure your doctor, nurse, or pharmacist has shown you the correct way to use it.
Keep the pre-filled syringe refrigerated until you are ready to use it.DO NOT FREEZE.
If you have any questions about this product, please read the Leaflet.
BEFORE STARTING:
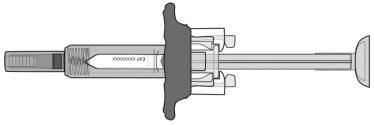
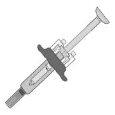
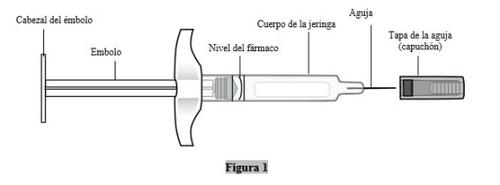
Get to know the pre-filled syringe
There are 3typesof pre-filled syringes:
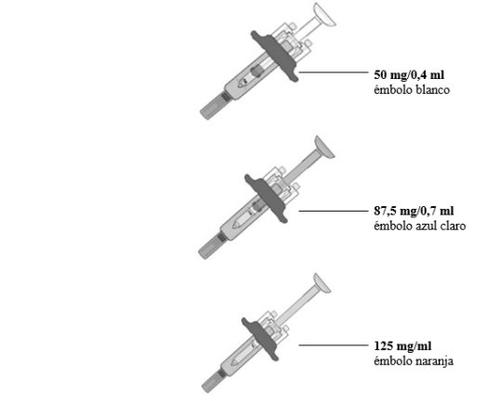
The type of pre-filled syringe you will receive depends on the dose prescribed by your doctor. The 125 mg/ml pre-filled syringe is shown below.
Before use
After use
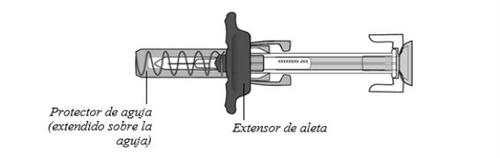
The pre-filled syringe has a wing extensionthat facilitates handling and injection, and a needle guardthat automatically covers the needle after completing the injection.

DO NOTremove the needle cap until you are ready to inject.
DO NOTpull the plunger back at any time.
DO NOTrecap the pre-filled syringe at any time, as this may damage, bend, or break the needle.
Always hold the syringe by the body.
Proceed to Step 1
Step1: Preparation for ORENCIA injection
Gather all necessary items for your injection on a clean and flat surface.
The pack contains only the pre-filled syringe:
- Alcohol swab
- Plaster
- Cotton ball or swab
- Pre-filled syringe with passive needle safety guard
- Sharps container
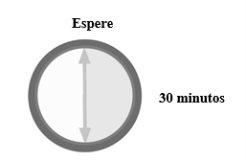
Let your pre-filled syringe reach room temperature.
Remove a pre-filled syringe from the refrigerator and wait 30minutesfor it to reach room temperature.
- Do notaccelerate the warming-up process in any way, for example, by using the microwave or warming the syringe in warm water.
- Do notremove the needle cap while letting the pre-filled syringe reach room temperature.
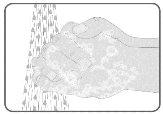
Wash your hands thoroughly with water and soap to prepare for the injection.
Proceed to Step 2
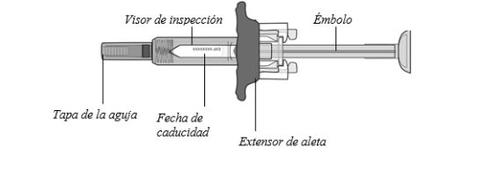
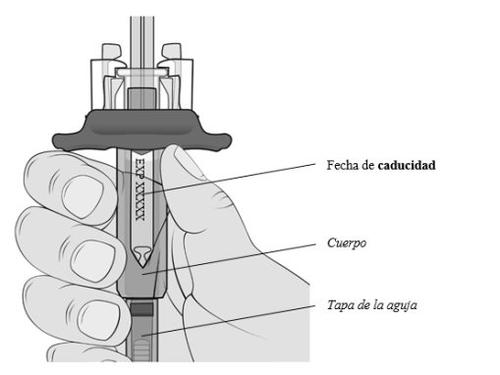
Step2: Examine the pre-filled syringe
Hold the pre-filled syringe by the body with the needle cap pointing downwards as shown.
- Check the expiration date printed on the label.
Do notuse it if the expiration date has passed.
- Check if the pre-filled syringe is damaged.
Do notuse it if it is cracked or broken.
Check the liquid
Check the liquidin the pre-filled syringe through the inspection window. It should be clear and colorless to pale yellow.
You may see a small air bubble. Do nottry to remove it.
Do not inject if the liquid is cloudy, has changed color, or has visible particles.
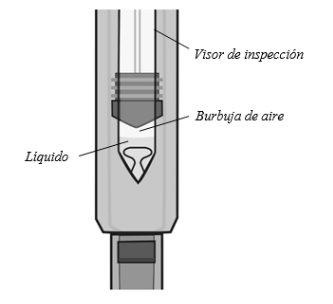
Note: The figure shows the 50 mg pre-filled syringe
Proceed to Step 3
Step3: Check the dose on the pre-filled syringe
Hold the syringe at eye level. Look carefully to make sure the amount of liquid in the pre-filled syringe is at or just above the fill linefor your prescribed dose.
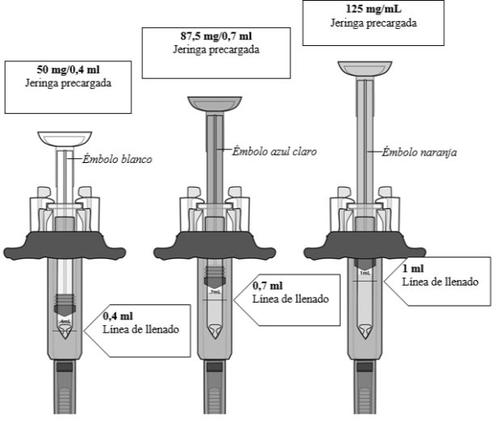
Do notuse it if the pre-filled syringe does not have the correct amount of liquid. Contact your doctor, nurse, or pharmacist for further instructions.
Proceed to Step 4
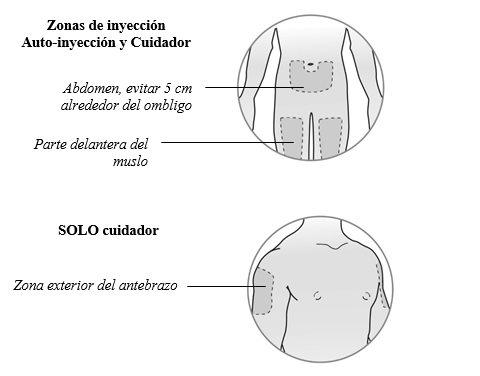
Step4: Choose and prepare the injection site
Choose the injection siteon the abdomen, front of the thighs, or the outer aspect of the upper arm(only if administered by a caregiver).
Change the injection site
- You can use the same area of the body each week, but choose a different injection site in that area.
- Do notinject into areas where the skin is soft, bruised, red, scaly, or hard.
Do notadminister the injection in any area with scars or stretch marks.
- Record the date, time, and injection site.
Gently clean the injection site
- Clean the injection site gently with a cotton swab and let the skin dry.
- Do nottouch the injection site again before administering the injection.
- Do notfan or blow on the cleaned area.
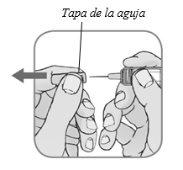
Remove the needle capby holding the pre-filled syringe body with one hand and pulling the cap straight off with your other hand.
Do notreplace the needle cap after removal. You can discard the cap in the household trash after the injection.
- Do notuse the pre-filled syringe if it leaks after removing the needle cap.
- Do notuse the pre-filled syringe if the needle is damaged or bent.
Note: It is normal to see a drop of liquid coming out of the needle.
 DO NOTrecap the pre-filled syringe, as this may damage the needle.
Proceed to Step 5
Step5: Inject your dose of ORENCIA
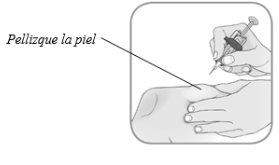
Hold the bodyof the pre-filled syringe in your hand using your thumb and index finger. With your other hand, pinch the skinthat you have cleaned.
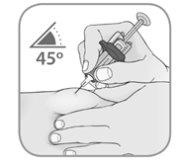
Insert the needle
Gently insertthe needle into the pinched skin at a 45-degree angle.
Complete ALL the steps to administer your full dose of medication
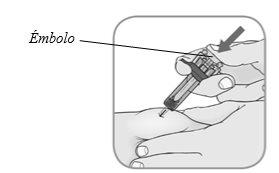
Inject: press the plungerwith your thumb until the end
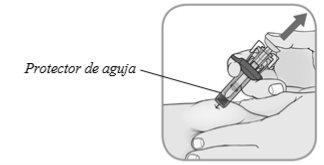
Remove the needle guard: slowly lift your thumb off the plungerto activate the needle guard.
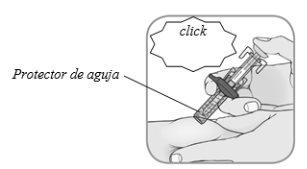
Confirm:after completing the injection, the needle guard will cover the needleand you will hear a click.
Remove the pre-filled syringefrom the injection site and release the pinched skin.
Proceed to Step 6
Step6: After the injection
Take care of the injection site:
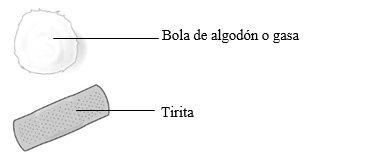
- You may see a small amount of bleeding at the injection site. You can press on the injection site with a cotton ball or swab.
- Do notrub the injection site.
- If necessary, you can cover the injection site with a plaster.
Dispose of the used pre-filled syringein the sharps container immediately after use. If you have any questions, ask your pharmacist.
For more information on disposal, see the Leaflet.
If the injection is administered by a caregiver, this person should also handle the syringe with care to avoid accidental needlestick injuries and possible infection transmission.
Keep this medication and the sharps container out of the sight and reach of children.
Important Instructions for Use
Read these instructions carefully and follow them step by step.
You will receive instructions from your doctor or nurse on how to self-inject ORENCIA using the pre-filled syringe.
Do not attempt to self-inject until you are sure you understand how to prepare and administer the injection. After proper training, you can administer the injection yourself or have it administered by another person, such as a family member or friend.
Before starting–things to do and not to do
Do
- Always handle the ORENCIA syringe carefully, especially when you are with other people or near children.
- Always hold the syringe by the body.
- Keep unused syringes in the refrigerator in the original carton.
- Have additional injection supplies ready before injecting yourself.
- Injection supply checklist:alcohol swabs, cotton ball or swab, plaster, sharps container.
Sharps containers are puncture-resistant disposal boxes that can be purchased at many stores.
Do not
- Do notremove the needle cap (cover) until you are ready to inject.
- Do notpull the plunger back at any time.
- Do notshake the syringe, as this may damage the ORENCIA medication.
- DO NOTrecap the syringe.
STEP1: Have the syringe ready
- Check the expiration date and batch number on the carton
- The expiration date can be found on the ORENCIA carton and on each syringe.
- If the expiration date has passed, do not use the syringes. Contact your doctor or pharmacist if you need help.
- Let the syringe warm up
- Find a comfortable place with a clean and flat work surface.
- Remove the syringe from the refrigerator. Keep any remaining unused syringes in their original carton, in the refrigerator.
- Check that the expiration date and batch number match those on the carton.
- Inspect the syringe for any obvious defects, but do not remove the needle cap.
- Let the syringe sit at room temperature for 30 to 60 minutes before injecting.
- Do notaccelerate the warming-up process in any way, for example, by using the microwave or warming the syringe in warm water.
- Check the liquid in the syringe
- Hold the syringe by the body, with the needle cap pointing downwards.
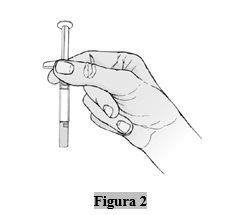
- Look at the liquid in the syringe (Figure 2). The liquid should be clear and colorless to pale yellow.
- Do notinject if the liquid is cloudy or has changed color or has visible particles.
- It is normal to see an air bubble and there is no reason to remove it. You should inject the entire contents of the syringe.
- Gather your additional injection supplies and keep them within reach.
- Wash your hands thoroughly with warm water and soap.
STEP2: Choose and prepare the injection site
Have the syringe ready for use immediately after preparing the injection site.
- Choose an injection site (injection area)
- You can use:
- The front of the thigh
- The abdomen, except for the area around the navel (Figure 3).
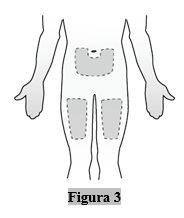
- Choose a different injection site for each new injection. You can use the same thigh for weekly injections, as long as each injection site is at least 2.5 cm away from the previous injection site.
- Do notinject into areas where the skin is sore, bruised, red, scaly, or hard. Avoid areas with scars or stretch marks.
- Prepare the injection site
- Clean the injection site with an alcohol swab using a circular motion.
- Let the skin dry before injecting.
- Do nottouch the injection site again before administering the injection.
- Do notfan or blow on the cleaned area.
STEP3: Inject ORENCIA
- Remove the needle cap (cover) only when you are ready to administer the injection.
- Hold the syringe by the body with one hand and pull the needle cap straight off with your other hand (Figure 4).
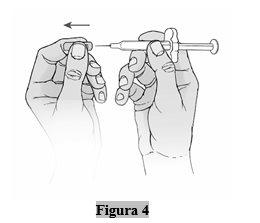
An air bubble in the liquid of the syringe. It is not necessary to remove the air bubble.
You may notice a drop of liquid coming out of the needle. This is normal and will not affect the dose.
- Do nottouch the plunger while removing the needle cap.
- Do not removethe needle cap until you are ready to inject ORENCIA.
- Do nottouch the needle or let it touch any surface.
- Do notuse the syringe if it falls without the needle cap in place.
- Do notput the needle cap back on the needle once it has been removed.
- Do notuse the syringe if there are visible signs that the needle is damaged or bent.
- Place the syringe and inject ORENCIA
- Hold the syringe by the body in one hand between the thumb and index finger (Figure 5).
- Do notpress on the plunger head until the injection begins.
- Do notpull the plunger back at any time.
- Using your other hand, gently pinch the area of skin you have cleaned. Hold firmly.
- Insert the needle with a quick motion into the pinched skin at a 45-degree angle (Figure 5).
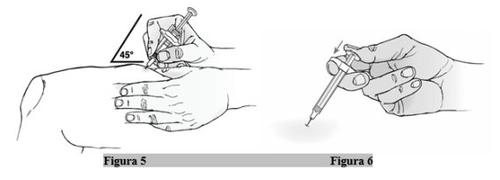
- Use your thumb to push the plunger down, pressing firmly until the plunger no longer moves and all the medication has been injected (Figure 6).
- Remove the needle from the skin and release the surrounding skin.
- Do notrecap the needle.
- Press a cotton ball over the injection site and hold pressure for 10 seconds.
- Do notrub the injection site. Mild bleeding is normal.
- If necessary, you can apply a small bandage to the injection site.
STEP4: Disposal of the syringe and recording
- Discard the used syringe in a sharp objects container.
- Ask your doctor, nurse, or pharmacist about national and local laws regarding the proper disposal of medical products containing needles.
- Alwayskeep your sharp objects container out of the reach of children and animals.
- Do notthrow used syringes in household trash or recycling bins.
- Keep a record of the injection
- Write the date, time, and specific part of the body where the injection was given. You may also find it useful to write down any questions or concerns about the injection, so you can ask your doctor, nurse, or pharmacist.
Medicines should not be disposed of via wastewater or household waste. Ask your pharmacist how to dispose of the packaging and any unused medications. This will help protect the environment.
- Country of registration
- Active substance
- Prescription requiredYes
- Manufacturer
- This information is for reference only and does not constitute medical advice. Always consult a doctor before taking any medication. Oladoctor is not responsible for medical decisions based on this content.
- Alternatives to ORENCIA 125 mg SOLUTION FOR INJECTION IN PRE-FILLED SYRINGEDosage form: INJECTABLE, Each pre-filled pen contains 125 mg of abatacept in 1 mlActive substance: abataceptManufacturer: Bristol-Myers Squibb Pharma EeigPrescription requiredDosage form: INJECTABLE INFUSIONActive substance: abataceptManufacturer: Bristol-Myers Squibb Pharma EeigPrescription requiredDosage form: TABLET, 180 mgActive substance: mycophenolic acidManufacturer: Laboratorio Stada S.L.Prescription required
Online doctors for ORENCIA 125 mg SOLUTION FOR INJECTION IN PRE-FILLED SYRINGE
Discuss questions about ORENCIA 125 mg SOLUTION FOR INJECTION IN PRE-FILLED SYRINGE, including use, safety considerations and prescription review, subject to medical assessment and local regulations.

Frequently Asked Questions
