

ELIGARD TRIMESTRAL 22.5 mg POWDER AND SOLVENT FOR INJECTABLE SOLUTION


How to use ELIGARD TRIMESTRAL 22.5 mg POWDER AND SOLVENT FOR INJECTABLE SOLUTION
Translated with AI
This page provides general information and does not replace a doctor’s consultation. Always consult a doctor before taking any medication. Seek urgent medical care if symptoms are severe.
Show originalContents of the leaflet
Introduction
Package Leaflet: Information for the User
Eligard Trimestral 22.5 mg
Powder and Solvent for Solution for Injection
Leuprorelin, acetate.
Read all of this leaflet carefully before you start using this medicine because it contains important information for you.
|
Contents of the Package Leaflet:
- What is Eligard Trimestral and what is it used for
- What you need to know before you use Eligard Trimestral
- How to use Eligard Trimestral
- Possible side effects
- Storage of Eligard Trimestral
- Contents of the pack and further information
1. What is Eligard Trimestral and what is it used for
The active substance of Eligard Trimestral belongs to the group of gonadotropin-releasing hormone analogues. These medicines are used to reduce the production of certain sex hormones (testosterone).
Eligard Trimestral is used to treat hormone-dependent metastatic prostate cancerin adult men and in the treatment of high-risk non-metastatic hormone-dependent prostate cancer in combination with radiotherapy.

2. What you need to know before you use Eligard Trimestral
Do not use Eligard Trimestral
- If you are a woman or a child.
- If you are hypersensitive (allergic)to the active substance leuprorelin acetate, to medicines with a similar activity to natural gonadotropin-releasing hormone or to any of the other components of Eligard Trimestral (listed in section 6).
- After surgical removal of your testicles, as in this case Eligard Trimestral will not lead to a further decrease in serum testosterone concentrations.
- As sole treatment if you are suffering from symptoms related to pressure on the spinal cord or with a tumor in the spinal column. In this case, Eligard Trimestral may only be used in combination with other medicines for prostate cancer.
Warnings and precautions
Consult your doctor, pharmacist, or nurse before you start using Eligard Trimestral
- If you suffer from: any heart or blood vessel disorder, including heart rhythm problems (arrhythmias), or if you are being treated with medicines to correct these disorders. The risk of heart rhythm problems may be increased with the use of Eligard Trimestral.
- If you have difficulty urinating. You should be closely monitored during the first weeks of treatment.
- If you start to suffer from pressure on the spinal cord or difficulty urinating. As serious cases (related to other medicines with a similar mechanism of action to Eligard Trimestral) of pressure on the spinal cord and narrowing of the ducts between the kidneys and the urinary bladder that can contribute to the appearance of similar symptoms to paralysis have been reported. If these complications occur, the usual treatment for these cases should be initiated.
- If you experience, within two weeks of taking Eligard Trimestral, sudden severe headache, vomiting, altered mental status, and sometimes heart collapse, inform your doctor or medical team. Rarely, these cases have been reported with OTHER MEDICINES that have a similar mechanism to Eligard Trimestral, and are known as hypophysial apoplexy.
- If you suffer from diabetes mellitus(high blood sugar levels). You should be frequently monitored during treatment.
- Treatment with Eligard Trimestral may increase the risk of fractures due to osteoporosis (decrease in bone density).
- Cases of depression have been reported in patients using Eligard Trimestral. If you are using Eligard Trimestral and start to have a depressive mood, inform your doctor.
- Cases of cardiovascular effects have been reported in patients using similar medicines to Eligard Trimestral, which are not known to be related to these medicines. If you are using Eligard Trimestral and start to suffer from cardiovascular signs or symptoms, inform your doctor.
- Cases of epileptic seizures have been reported after the administration of Eligard Trimestral. If you are using Eligard Trimestral and start to suffer from epileptic seizures, inform your doctor.
- Contact your doctor immediately if you suffer from severe or recurrent headaches, visual problems, or tinnitus.
- You have fatty liver.
Severe skin reactions, including Stevens-Johnson syndrome/toxic epidermal necrolysis (SJS/TEN), have been reported in association with leuprorelin. Discontinue the use of leuprorelin and seek medical attention immediately if you notice any of the symptoms related to these severe skin reactions described in section 4.
Complications at the start of treatment
During the first week of treatment, a brief increase in the male sex hormone, testosterone, in the blood usually occurs. This may lead to a temporary worseningof the symptoms related to the disease and also to the appearance of new symptoms that had not been experienced until then. These symptoms include, in particular, bone pain, urinary disorders, pressure on the spinal cord, or the presence of blood in the urine. These symptoms usually subside as treatment continues. If the symptoms do not subside, you should contact your doctor.
If you do not improve with Eligard Trimestral
A proportion of patients will have tumors that are not sensitive to the decrease in serum testosterone concentrations. If you have the impression that the effect of Eligard Trimestral is not as expected, inform your doctor.
Use of Eligard Trimestral with other medicines
This medicine may interfere with some medicines used to treat heart rhythm problems (e.g., quinidine, procainamide, amiodarone, and sotalol) or may increase the risk of heart rhythm problems when used with certain medicines (e.g., methadone (used for pain relief and as part of drug detoxification), moxifloxacin (an antibiotic), antipsychotics used for severe mental illnesses).
Inform your doctor or pharmacist if you are using or have recently used any other medicines, including those obtained without a prescription.
Pregnancy and breastfeeding
This medicine is contraindicated in women.
Driving and using machines
Fatigue, dizziness, and vision disturbances are possible side effects of treatment with Eligard Trimestral or may appear due to the disease. If you suffer from these side effects, be careful when driving or using machines.
3. How to use Eligard Trimestral
Dose
Follow exactly the administration instructions of this medicine indicated by your doctor or pharmacist. In case of doubt, consult your doctor or pharmacist again.
Unless your doctor prescribes otherwise, this medicine is administered once every three months.
The injected solution forms a deposit of the active substance from which there is a continuous release of the active substance, leuprorelin acetate, over a period of three months.
Additional tests
The response to treatment with this medicine should be reviewed by your doctor by checking specific clinical values and determining the blood concentrations of the so-called prostate-specific antigen (PSA).
Method of administration
This medicine should only be administered by your doctoror nurse. They will be responsible for its preparation.
After preparation, Eligard Trimestral is administered as a subcutaneous injection (injection into the tissue under the skin). Intra-arterial (into an artery) or intravenous (into a vein) injection should be totally avoided. As with other active substances that are injected subcutaneously, the injection site should be changed periodically.
If you receive more Eligard Trimestral than you should
Since the injection is usually administered by your doctor or qualified personnel, it is not expected that an overdose will occur.
If, however, a larger amount than planned has been administered, contact your doctor so that they can monitor you especially and administer additional treatment as necessary or consult the Toxicology Information Service. Telephone 91 562 04 20.
If you forget to use Eligard Trimestral
Talk to your doctor if you think you have forgotten your trimestral administration of the medicine.
Effects when stopping treatment with Eligard Trimestral
As a general rule, treatment of prostate cancer with this medicine is prolonged. Therefore, treatment should not be interrupted even if there is an improvement in symptoms or if they disappear completely.
If treatment with this medicine is interrupted prematurely, a worsening of the symptoms related to the disease may occur.
Do not interrupt treatment prematurely without consulting your doctor first.
If you have any further questions on the use of this medicine, ask your doctor, pharmacist, or nurse.

4. Possible side effects
Like all medicines, Eligard Trimestral can cause side effects, although not everybody gets them.
The side effects that have been observed during treatment with Eligard Trimestral are mainly attributed to the specific effect of the active substance, leuprorelin acetate, in particular the increase and decrease of certain hormones. The most frequently described side effects are hot flashes (approximately 58% of patients), nausea, general malaise, and fatigue, as well as temporary local irritation at the injection site.
Side effects at the start of treatment
During the first weeks of treatment with Eligard Trimestral, the specific symptoms of the disease may worsen because there is a brief increase in the male sex hormone, testosterone, in the blood. Therefore, your doctor may administer an appropriate anti-androgen (a substance that inhibits the effect of testosterone) in the initial phase of treatment to reduce the possible undesirable effects. (See also Section 2 Before using Eligard Trimestral, Complications at the start of treatment).
Local side effects
The local side effects that have been described after the injection of Eligard Trimestral are typically those that are often associated with similar preparations that are injected subcutaneously (preparations that are injected into the tissue under the skin). Mild burning immediately after the injection is very common. Stinging and pain after the injection, as well as bruising at the injection site, are common. Redness of the skin at the injection site has been frequently reported. Hardening of the tissues and ulceration are uncommon.
These local side effects after subcutaneous injection are mild and have been described as being of short duration. They do not recur between individual injections.
Very common side effects (may affect more than 1 in 10 people)
- Hot flashes
- Spontaneous bleeding in the skin or mucous membrane, redness of the skin
- Fatigue, injection-related side effects (See also local side effects above)
Common side effects (may affect up to 1 in 10 people)
- Nasopharyngitis (common cold symptoms)
- Nausea, general malaise, diarrhea, inflammation of the stomach and intestines (gastroenteritis/colitis)
- Itching, night sweats
- Pain in the joints
- Irregular urination (also at night), difficulty starting to urinate, pain when urinating, reduced urine volume
- Breast tenderness, breast inflammation, decreased testicle size, testicular pain, infertility, erectile dysfunction, reduced penis size
- Stiffness (episodes of exaggerated tremors with high fever), weakness
- Prolonged bleeding time, changes in blood values, decrease in red blood cells/low red blood cell count
Uncommon side effects (may affect up to 1 in 100 people)
- Urinary tract infection, local skin infection
- Worsening of diabetes mellitus
- Abnormal dreams, depression, decreased libido
- Dizziness, headache, disorders of skin sensitivity, insomnia, taste disorders, smell disorders
- Hypertension (high blood pressure), hypotension (low blood pressure)
- Shortness of breath
- Constipation, dry mouth, dyspepsia (indigestion, symptoms of having a full stomach, stomach pain, belching, nausea, vomiting, sensation of heartburn in the stomach), vomiting
- Feeling of warmth, increased sweating
- Lower back pain, muscle cramps
- Hematuria (presence of blood in urine)
- Bladder spasms, frequent urination, inability to urinate
- Increased breast tissue in men, impotence
- Lethargy (drowsiness), pain, fever
- Weight gain
- Loss of balance, dizziness
- Muscle mass loss/muscle tissue loss after prolonged use
Rare side effects (may affect up to 1 in 1,000 people)
- Abnormal involuntary movements
- Sudden loss of consciousness, fainting
- Flatulence, belching
- Hair loss, skin rash (pimples on the skin)
- Chest pain
- Ulceration at the injection site
Very rare side effects (may affect up to 1 in 10,000 people)
- Necrosis at the injection site
Not known (frequency cannot be estimated from the available data)
- Changes in the electrocardiogram (QT interval prolongation)
- Lung inflammation, lung disease
- Idiopathic intracranial hypertension (increased pressure around the brain characterized by headaches, double vision, and other visual symptoms, tinnitus or ringing in one or both ears).
- If you notice circular or target-shaped, reddish-colored patches on your trunk, often with central blisters, skin peeling, ulcers in the mouth, throat, nose, genitals, and eyes. These severe skin reactions may be preceded by fever and flu-like symptoms (Stevens-Johnson syndrome/toxic epidermal necrolysis).
- Redness of the skin and rash with itching (Toxic skin rash).
- A skin reaction that causes pimples or red spots on the skin, which may look like a target, with a dark red center surrounded by lighter red rings (erythema multiforme).
Other side effects
Other side effects reported in relation to treatment with leuprorelin, the active substance of Eligard Trimestral, are edema (fluid accumulation in the tissue, appearing as swelling of hands and feet), pulmonary embolism (causing symptoms such as shortness of breath, difficulty breathing, and chest pain), palpitations (perception of heartbeats), muscle weakness, chills, skin rash, memory loss, and vision impairment. An increase in bone tissue loss (osteoporosis) can be expected after prolonged treatment with Eligard Trimestral. Due to osteoporosis, the risk of fractures increases.
Severe allergic reactions that cause difficulty breathing or a feeling of dizziness after the administration of products of the same class as Eligard Trimestral have been rarely reported.
Epileptic seizures have been reported after the administration of products of the same class as Eligard Trimestral.
Reporting of side effects
If you experience any side effects, talk to your doctor, pharmacist, or nurse. This includes any possible side effects not listed in this leaflet. You can also report side effects directly through the Spanish Pharmacovigilance System for Human Use Medicines: www.notificaRAM.es. By reporting side effects, you can help provide more information on the safety of this medicine.
5. Storage of Eligard Trimestral
Keep this medicine out of the sight and reach of children.
Do not use this medicine after the expiry date which is stated on the carton after EXP. The expiry date is the last day of the month shown.
Storage instructions
Store in a refrigerator (between 2°C and 8°C).
Store in the original packaging to protect from moisture.
This product should be at room temperature before injection. Remove from the refrigerator approximately 30 minutes before use. Once removed from the refrigerator, this product can be stored in its original packaging at room temperature (below 25°C) for up to 4 weeks.
Once the tray is opened, the product should be prepared immediately and used immediately. For single use only.
Instructions for disposal of unused or expired Eligard Trimestral packaging
Medicines should not be disposed of via wastewater or household waste. Return the packaging and any unused medicines to the pharmacy's SIGRE point. If in doubt, ask your pharmacist how to dispose of the packaging and any unused medicines. This will help protect the environment.
6. Container Contents and Additional Information
Composition of Eligard Trimestral
The active ingredient is leuprolide acetate.
A preloaded syringe (syringe B) contains 22.5 mg of leuprolide acetate.
The other components are poly (DL-lactic-co-glycolic) acid (75:25) and N-methyl-2-pyrrolidone in the preloaded syringe with injectable solution (syringe A).
Appearance of Eligard Trimestral and Container Contents
Powder and solvent for injectable solution.
It is available in the following packages:
- A thermoformed tray-type package and a sterile 20-gauge needle inserted into a cardboard support. The tray contains a bag with a desiccant and a preconnected syringe system consisting of:
- syringe A preloaded with the solvent
- syringe B preloaded with the powder
a connector with a latch button for syringe A and B.
- A multiple package containing 2 syringe system packages with preconnected syringes.
Only some package sizes may be marketed.
Marketing Authorization Holder
Recordati Industria Chimica e Farmaceutica S.p.A.
Via Matteo Civitali, 1
20148 Milan
Italy
Manufacturer
Recordati Industria Chimica e Farmaceutica S.p.A.
Via Matteo Civitali, 1
20148 Milan
Italy
You can request more information about this medication by contacting the local representative of the marketing authorization holder:
Casen Recordati, S.L.
Autovía de Logroño, km 13,300
50180 Utebo - Zaragoza
Spain
This medication is authorized in the Member States of the European Economic Area under the following names:
Austria: Eligard Depot 22.5 mg
Belgium: Depo-Eligard 22.5 mg
Cyprus: Eligard
Czech Republic: Eligard
Denmark: Eligard
Estonia: Eligard
Finland: Eligard
France: Eligard 22.5 mg
Germany: Eligard 22.5 mg
Hungary: Eligard 22.5 mg
Iceland: Eligard
Ireland: Eligard 22.5 mg
Italy: Eligard
Latvia: Eligard 22.5 mg
Lithuania: Eligard 22.5 mg
Luxembourg: Depo-Eligard 22.5 mg
Netherlands: Eligard 22.5 mg
Norway: Eligard
Poland: Eligard 22.5 mg
Portugal: Eligard 22.5 mg
Slovakia: Eligard 22.5 mg
Slovenia: Eligard 22.5 mg
Spain: Eligard Trimestral 22.5 mg
Sweden: Eligard
Date of the last revision of this prospectus:10/2024
Detailed and updated information on this medication is available on the website of the Spanish Agency for Medicines and Health Products (AEMPS) http://www.aemps.es/
This information is intended only for healthcare professionals:
Wait for the medication to reach room temperature by taking it out of the refrigerator approximately 30 minutes before use.
Please first prepare the patient for the injection, then prepare the medication by following the instructions indicated below. If the medication is not prepared using the correct technique, it should not be administered, as clinical efficacy may be lacking due to its incorrect reconstitution.
Step 1
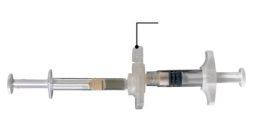
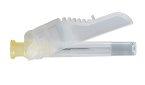
In a clean area, open the tray by removing the aluminum from the corner to remove the contents. Discard the desiccant bag. Remove the preconnected syringe system (Figure 1.1) from the tray. Open the safety needle package (Figure 1.2) by removing the paper tab Note:syringe A and syringe B should not be aligned yet.
Figure 1.1 Tray contents: preconnected syringe system | Figure 1.2 Under the tray: safety needle and cap |
|
|

Step 2
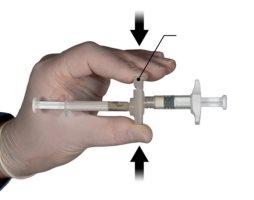
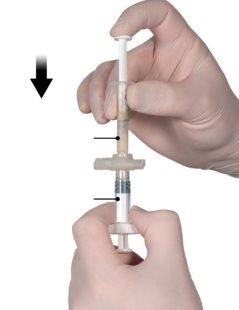
Hold the latch button of the connector with your index finger and thumb and press (Figure 2) until you hear a click. The two syringes will be aligned. No particular orientation of the syringe system is required to activate the connector. Do not bend the syringe system (please note that some medication may leak out if the syringes are partially unscrewed).
Figure 2 |
|

Step 3
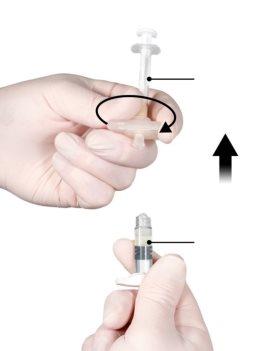
Hold the syringes in a horizontal position, transfer the liquid contents of syringe A to the leuprolide acetate powder contained in syringe B. Mix the product well for 60 cycles by gently pressing the contents of both syringes forward and backward between the two syringes (one cycle is a plunger push for syringe A and a plunger push for syringe B) in a horizontal position to obtain a homogeneous and viscous solution (Figure 3). Do not bend the syringe system (please note that some medication may leak out if the syringes are partially unscrewed).
Figure 3 |
|

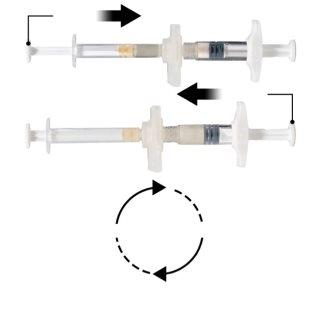
When thoroughly mixed, the viscous solution will have a color within the range of colorless to pale yellow (which may include shades from white to pale yellow).
Important: after mixing, proceed immediately to the next step, as the viscosity of the product increases over time. Do not refrigerate the medication once reconstituted.
Please note: The medication must be mixed as described; shaking will not produce an adequate mixture.
Step 4
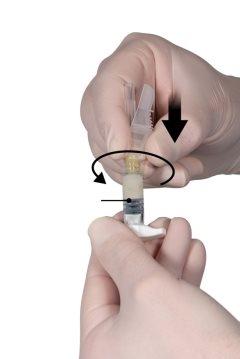
After mixing, hold the syringes vertically with syringe B at the bottom. The syringes must remain well connected. Transfer all the contents to syringe B (short, wide syringe) by pressing the plunger of syringe A and slightly retracting the plunger of syringe B (Figure 4).
Figure 4 |
|
Step 5
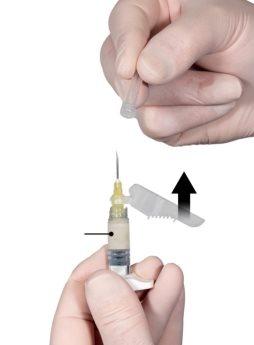
While ensuring that the plunger of syringe A is completely pressed down, hold the connector and unscrew it from syringe B. Syringe A will remain attached to the connector (Figure 5). Make sure that no contents leak out, as the needle will not fit properly when attached.
Please note: During preparation, a large air bubble or several small ones may remain - this is acceptable. Do not purge the air bubbles from syringe B at this time, as medication will be lost!
Figure 5 |
|


Step 6
- Hold syringe B in a vertical position and keep the white plunger back to avoid losing medication.
- Attach the safety needle to syringe B by holding syringe B and gently turning the needle clockwise, approximately three-quarters of a turn, until the needle is secured (Figure 6).
Do not overtighten, as the needle cone may crack and medication may leak during injection. The safety cap may also be damaged if the needle is screwed on too tightly.
The medication should not be used if the needle cone is cracked, damaged, or if the contents leak out. The damaged needle should not be replaced, and the medication should not be injected. All elements of the administration device should be discarded safely.
If the needle cone is damaged, the medication should be replaced with a new one.
Figure 6 |
|
Step 7
Immediately before administration, move the safety cap away from the needle and remove the protective cap from the needle (Figure 7).
Important: Do not manipulate the safety needle mechanism before administration. If the needle appears to be damaged or has leaks, the product should not be used. The damaged needle should not be replaced, and the medication should not be injected. In case of needle damage, use another ELIGARD kit.
Figure 7 |
|
Step 8
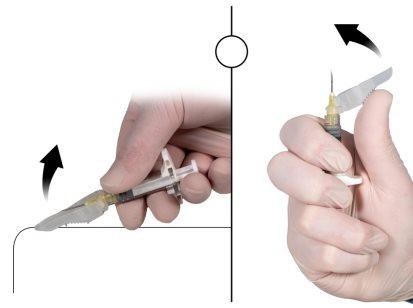
Before administration, purge any large air bubbles from syringe B. Administer the medication subcutaneously while keeping the safety cap away from the needle.
Administration procedure:
- Select an injection site on the abdomen, upper buttocks, or other area with adequate subcutaneous tissue that does not have excess pigmentation, nodules, lesions, or hair and has not been recently used.
- Clean the injection area with an alcohol swab (not included).
- Using your thumb and index finger, pinch and gather the skin around the injection site.
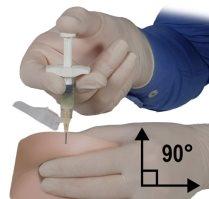
- Using your dominant hand, quickly insert the needle at a 90-degree angle to the skin surface. The depth of penetration will depend on the amount and width of subcutaneous tissue and the length of the needle. After inserting the needle, release the skin.
- Inject the medication slowly and steadily, pressing the plunger until the syringe is empty. Make sure to inject the total amount of medication from syringe B before removing the needle.
- Remove the needle quickly at the same 90-degree angle used for insertion while maintaining pressure on the plunger.
Figure 8

Step 9
After injection, block the safety mechanism using one of the activation methods mentioned below.
- Closing on a flat surface
Press the safety cap down with the slider against a flat surface (Figure 9a) to cover the needle and block the cap.
Verify the locked position with an audible and tactile "click". The locked position will completely cover the needle tip.
- Closing with your thumb
Place your thumb on the safety cap (Figure 9b) to cover the needle tip and block the cap.
Verify the locked position with an audible and tactile "click". The locked position will completely cover the needle tip.
Figure 9a Closing on a flat surface | Figure 9b Closing with your thumb |
|
Once the safety cap is locked, immediately discard the needle and syringe in an authorized container for sharp objects.
- Country of registration
- Average pharmacy price301.02 EUR
- Active substance
- Prescription requiredYes
- Manufacturer
- This information is for reference only and does not constitute medical advice. Always consult a doctor before taking any medication. Oladoctor is not responsible for medical decisions based on this content.
- Alternatives to ELIGARD TRIMESTRAL 22.5 mg POWDER AND SOLVENT FOR INJECTABLE SOLUTIONDosage form: INJECTABLE, 42 mgActive substance: leuprorelinManufacturer: Accord Healthcare S.L.U.Prescription requiredDosage form: INJECTABLE, 45 mgActive substance: leuprorelinManufacturer: Recordati Industria Chimica E Farmaceutica S.P.A.Prescription requiredDosage form: IMPLANT, 5 mgActive substance: leuprorelinManufacturer: Sandoz Farmaceutica S.A.Prescription required
Online doctors for ELIGARD TRIMESTRAL 22.5 mg POWDER AND SOLVENT FOR INJECTABLE SOLUTION
Discuss questions about ELIGARD TRIMESTRAL 22.5 mg POWDER AND SOLVENT FOR INJECTABLE SOLUTION, including use, safety considerations and prescription review, subject to medical assessment and local regulations.


Frequently Asked Questions
