

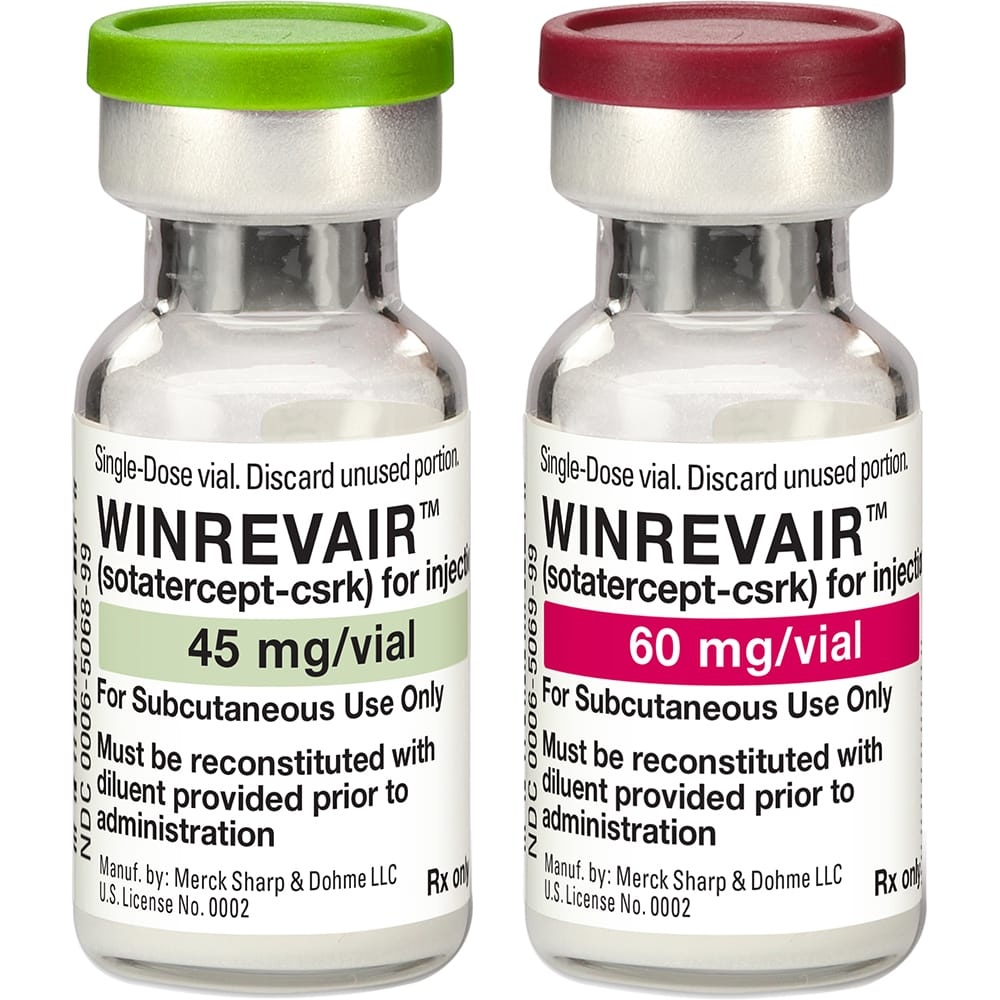
WINREVAIR 45 mg POWDER AND SOLVENT FOR INJECTABLE SOLUTION


How to use WINREVAIR 45 mg POWDER AND SOLVENT FOR INJECTABLE SOLUTION
Translated with AI
This page provides general information and does not replace a doctor’s consultation. Always consult a doctor before taking any medication. Seek urgent medical care if symptoms are severe.
Show originalContents of the leaflet
Introduction
Package Leaflet: Information for the Patient
Winrevair 45mg powder and solvent for solution for injection
Winrevair 60mg powder and solvent for solution for injection
sotatercept
This medicinal product is subject to additional monitoring, which will allow for the quick identification of new safety information. You can help by reporting any side effects you may get. The last section of this leaflet includes information on how to report side effects.
Read all of this leaflet carefully before you start using this medicine, because it contains important information for you.
- Keep this leaflet, you may need to read it again.
- If you have any further questions, ask your doctor, pharmacist, or nurse.
- This medicine has been prescribed for you only. Do not pass it on to others. It may harm them, even if their signs of illness are the same as yours.
- If you get any side effects, talk to your doctor, pharmacist, or nurse. This includes any possible side effects not listed in this leaflet. See section 4.
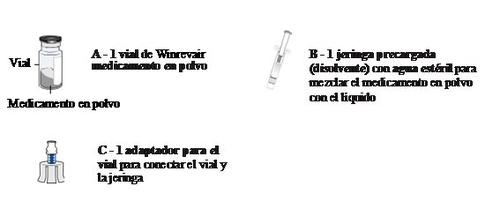
Contents of the pack
- What is Winrevair and what is it used for
- What you need to know before you use Winrevair
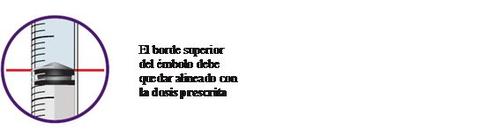
- How to use Winrevair
- Possible side effects
- Storage of Winrevair
- Contents of the pack and other information
1. What is Winrevair and what is it used for
Winrevair contains the active substance sotatercept.
It is used in combination with other treatments for pulmonary arterial hypertension (PAH) in adults. PAH is a type of high blood pressure that affects the arteries of your lungs. In PAH, these arteries narrow, making it difficult for your heart to pump blood through them, causing symptoms such as fatigue, dizziness, and difficulty breathing.
Winrevair works on the causes of PAH that are responsible for the narrowing of the lung arteries. This makes it easier for your heart to pump blood to your lungs and improves your ability to perform physical activities.

2. What you need to know before you use Winrevair
Do not use Winrevair
- if you are allergic to sotatercept or any of the other ingredients of this medicine (listed in section 6).
- if you have a very low platelet count in your blood on a continuous basis.
Warnings and precautions
Winrevair may increase the levels of hemoglobin in your blood, decrease the number of platelets in your blood, or increase the risk of severe bleeding.
Talk to your doctor or pharmacist before starting and during treatment with Winrevair if you have:
- high levels of hemoglobin in your blood(a protein in red blood cells that carries oxygen).
This may increase the likelihood of a blood clot forming that can block a blood vessel. Your doctor will check your hemoglobin levels with periodic blood tests before each of your first 5 doses of Winrevair, or before each subsequent dose if necessary, and periodically while you are using this medicine.
- a low platelet count in your blood(cells that help your blood to clot).
This can cause easy bruising, prolonged bleeding from cuts, and nosebleeds. Your doctor will check your platelet count with periodic blood tests before each of your first 5 doses of Winrevair, or before each subsequent dose if necessary, and periodically while you are using this medicine. If your platelet count is very low on a continuous basis, your doctor will not start treatment.
- signs and symptoms of severe bleeding:
|
|
|
|
|
|
|
|
|
These are signs and symptoms of severe bleeding, which can occur if you use Winrevair and are more likely to occur if you use Winrevair with certain medicines. Your doctor will inform you about how to recognize them. Talk to your doctor if you notice any of these signs or symptoms. Severe bleeding could lead to hospitalization, the need for a blood transfusion, or other treatments, and could be life-threatening.
Children and adolescents
Do not give this medicine to children and adolescents under 18 years of age. It is not known if this medicine is safe and effective in children under 18 years of age.
Other medicines and Winrevair
Tell your doctor or pharmacist if you are using, have recently used, or might use any other medicines.
Pregnancy, breastfeeding, and fertility
If you are pregnant or breastfeeding, think you may be pregnant, or are planning to have a baby, ask your doctor or pharmacist for advice before using this medicine.
Pregnancy:
Winrevair may harm your unborn baby.
This medicine is not recommended during pregnancy. Your doctor must perform a pregnancy test before you start treatment and you must use an effective method of contraception during treatment and for at least four months after receiving the last dose of Winrevair. Ask your doctor or pharmacist about the contraceptive methods that may be suitable for you.
Tell your doctor immediately if you become pregnant or think you may be pregnant while using this medicine.
Breastfeeding:
It is not known if Winrevair passes into breast milk. Do not breastfeed during treatment and for at least four months after receiving the last dose of Winrevair. Ask your doctor or pharmacist for advice on the best way to feed your baby.
Fertility:
Winrevair may reduce female and male fertility.
Driving and using machines
This medicine is unlikely to affect your ability to drive or use machines.
Winrevair contains sodium
This medicine contains less than 1 mmol of sodium (23 mg) per dose, which is essentially "sodium-free".
Winrevair contains polysorbate 80
This medicine contains 0.20 mg of polysorbate 80 in each ml of reconstituted solution. Polysorbates may cause allergic reactions. Tell your doctor if you have any known allergies.
3. How to use Winrevair
Follow the instructions for administration of this medicine exactly as told by your doctor, pharmacist, or nurse. If you are unsure, talk to your doctor, pharmacist, or nurse again.
The recommended dosing schedule is one injection every 3 weeks.
Your dose
- Your dose of Winrevair depends on your body weight and blood tests. You will start treatment with a dose of 0.3 mg/kg, which will be increased to 0.7 mg/kg.
- Your doctor will tell you how much Winrevair to use and when to use it. It is very important that you follow your doctor's instructions.
- Do not use Winrevair more frequently than your doctor has told you. If you are unsure when to use Winrevair, talk to your doctor or pharmacist.
Your doctor will monitor your dose
- Before each of your first 5 doses, or before each subsequent dose if necessary, and periodically during treatment with Winrevair, your doctor will perform blood tests. This will allow your doctor to monitor and determine the most suitable dose for you.
- Your doctor may adjust the dose, delay, or stop treatment depending on how you respond to Winrevair.
How to use Winrevair
You will use Winrevair as an injection just under the skin (subcutaneously (SC)) only in these injection sites:
- Abdomen,at a minimum distance of 5 cm from the navel, or
- upper thigh
Note: If your doctor or nurse administers the injection, they may also use the upper arm as an injection site, as they have received training on how to do it correctly.
Before using Winrevair
- If your doctor decides that you or your caregiver can administer the Winrevair injections at home, you or your caregiver will receive training. You will be taught the correct way to prepare and inject Winrevair. Do not attempt to inject Winrevair until your doctor has taught you how to do it correctly.
- Your doctor will tell you how much Winrevair to administer and when to administer it.
- Read theseparate "Instructions for use"leaflet that comes with Winrevair.
If you use less or more Winrevair than you should
If you use less or more Winrevair than you should, talk to your doctor or pharmacist.
If you forget to use Winrevair
If you forget to administer the prescribed dose of Winrevair and it has been less than three days since you should have administered it, administer it immediately and follow the original schedule for the next dose. If you forget to administer the prescribed dose of Winrevair and it has been more than three days since you should have administered it, your injection schedule should be modified, talk to your doctor or pharmacist.
If you stop treatment with Winrevair
Do not change the dose or stop using Winrevair without talking to your doctor first.
If you have any further questions on the use of this medicine, ask your doctor, pharmacist, or nurse.

4. Possible side effects
Like all medicines, this medicine can cause side effects, although not everybody gets them.
Serious side effects:
Talk to your doctor or pharmacist immediatelyif you notice:
- Easy bruising, prolonged bleeding from cuts, and nosebleeds. These could be signs of a low platelet count (thrombocytopenia). This will be detected in your blood tests.
In addition, your doctor will perform periodic blood tests to check if you have:
- High levels of hemoglobin.
The serious side effect described above may affect up to 1 in 10 people.
Other possible side effects:
Talk to your doctor or pharmacist if you notice any of the following side effects:
Very common (may affect more than 1 in 10 people):
- Headache
- Nosebleeds (epistaxis)
- Spider-like veins or small blood vessels with a reddish or red appearance on the skin (telangiectasia)
- Diarrhea
- Dizziness
- Rash
Common (may affect up to 1 in 10 people):
- High blood pressure
- Redness of the skin
- Bleeding gums
- Itching at the injection site
Reporting of side effects
If you experience any side effects, talk to your doctor, pharmacist, or nurse. This includes any possible side effects not listed in this leaflet. You can also report side effects directly via the national reporting system listed in Appendix V. By reporting side effects, you can help provide more information on the safety of this medicine.
5. Storage of Winrevair
Keep this medicine out of the sight and reach of children.
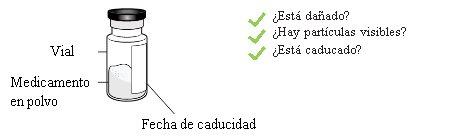
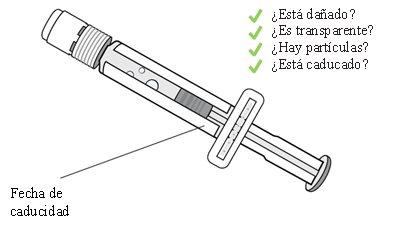
Do not use this medicine after the expiry date which is stated on the vial and carton after "EXP". The expiry date refers to the last day of that month.
Store in a refrigerator (2°C to 8°C). Do not freeze. Store in the original package to protect from light.
This medicine should be injected immediately after mixing the powder with the water for injection, but no later than 4 hours after mixing.
Medicines should not be disposed of via wastewater or household waste. Ask your pharmacist how to dispose of medicines no longer required. This will help protect the environment.
6. Container Contents and Additional Information
Composition of Winrevair
- The active substance is sotatercept. Each vial contains 45 mg or 60 mg of sotatercept. After reconstitution, each ml of solution contains 50 mg of sotatercept.
- The other components are:
- In the powder: citric acid monohydrate (E330), sodium citrate (E331) (see section 2 "Winrevair contains sodium"), polysorbate 80 (E433) (see section 2 "Winrevair contains polysorbate 80") and sucrose.
- In the solvent: water for injectable preparations.
Appearance of the Product and Container Contents
Winrevair is a powder and solvent for injectable solution (powder for injection). The white to off-white powder is presented in a 2 ml glass vial containing 45 mg or 60 mg of sotatercept. The solvent is clear and colorless water for injectable preparations in a 1 or 1.3 ml pre-filled syringe.
Winrevair 45 mg is available in:
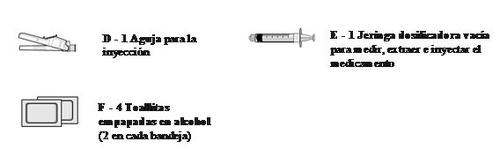
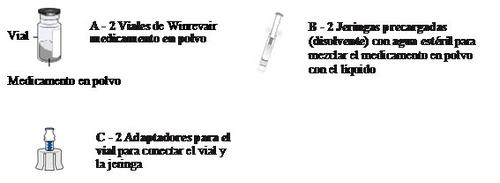
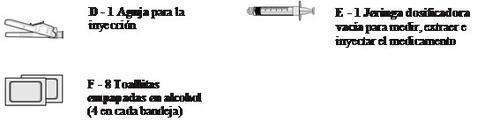
- A container containing 1 vial of 45 mg (powder), 1 pre-filled syringe of 1.0 ml (solvent), 1 vial adapter, 1 dosing syringe, 1 needle and 4 alcohol swabs.
- A container containing 2 vials of 45 mg (powder), 2 pre-filled syringes of 1.0 ml (solvent), 2 vial adapters, 1 dosing syringe, 1 needle and 8 alcohol swabs.
Winrevair 60 mg is available in:
- A container containing 1 vial of 60 mg (powder), 1 pre-filled syringe of 1.3 ml (solvent), 1 vial adapter, 1 dosing syringe, 1 needle and 4 alcohol swabs.
- A container containing 2 vials of 60 mg (powder), 2 pre-filled syringes of 1.3 ml (solvent), 2 vial adapters, 1 dosing syringe, 1 needle and 8 alcohol swabs.
Marketing Authorization Holder and Manufacturer
Merck Sharp & Dohme B.V.
Waarderweg 39
2031 BN Haarlem
Netherlands
You can request more information about this medicinal product by contacting the local representative of the marketing authorization holder:
Belgium MSD Belgium Tel: +32(0)27766211 | Lithuania UAB Merck Sharp & Dohme Tel: + 370 5 2780 247 |
Bulgaria MSD Bulgaria EOOD Tel: +359 2 819 3737 | Luxembourg MSD Belgium Tel: +32(0)27766211 |
Czech Republic Merck Sharp & Dohme s.r.o. Tel: +420 233 010 111 | Hungary MSD Pharma Hungary Kft. Tel: +36 1 888 5300 |
Denmark MSD Danmark ApS Tel: + 45 4482 4000 | Malta Merck Sharp & Dohme Cyprus Limited Tel: 8007 4433 (+356 99917558) |
Germany MSD Sharp & Dohme GmbH Tel: +49 (0) 89 20 300 4500 | Netherlands Merck Sharp & Dohme B.V. Tel: 0800 9999000 (+31 23 5153153) |
Estonia Merck Sharp & Dohme OÜ Tel: +372 614 4200 | Norway MSD (Norge) AS Tel: +47 32 20 73 00 |
Greece MSD Α.Φ.Ε.Ε. Tel: +30 210 98 97 300 | Austria Merck Sharp & Dohme Ges.m.b.H. Tel: +43 (0) 1 26 044 |
Spain Merck Sharp & Dohme de España, S.A. Tel: +34 91 321 06 00 | Poland MSD Polska Sp. z o.o. Tel: +48 22 549 51 00 |
France MSD France Tel: + 33 (0) 1 80 46 40 40 | Portugal Merck Sharp & Dohme, Lda Tel: +351 21 4465700 |
Croatia Merck Sharp & Dohme d.o.o. Tel: + 385 1 6611 333 | Romania Merck Sharp & Dohme Romania S.R.L. Tel: +40 21 529 29 00 |
Ireland Merck Sharp & Dohme Ireland (Human Health) Limited Tel: +353 (0)1 2998700 | Slovenia Merck Sharp & Dohme, inovativna zdravila d.o.o. Tel: +386 1 5204 201 |
Iceland Vistor hf. Tel: + 354 535 7000 | Slovakia Merck Sharp & Dohme, s. r. o. Tel: +421 2 58282010 |
Italy MSD Italia S.r.l. Tel: 800 23 99 89 (+39 06 361911) | Finland MSD Finland Oy Tel: +358 (0)9 804 650 |
Cyprus Merck Sharp & Dohme Cyprus Limited Tel: 800 00 673 (+357 22866700) | Sweden Merck Sharp & Dohme (Sweden) AB Tel: +46 77 5700488 |
Latvia SIA Merck Sharp & Dohme Latvija Tel: + 371 67025300 |
Date of Last Revision of this Leaflet:{MM/AAAA}.
Detailed information on this medicinal product is available on the European Medicines Agency website: https://www.ema.europa.eu.
-----
This information is intended solely for healthcare professionals:
Winrevair powder and solvent for injectable solution should be reconstituted before use and administered as a single injection according to the patient's weight (see section 4.2 of the Summary of Product Characteristics for the recommended dosage regimen).
Consult the separate Instructions for Use leaflet provided with this leaflet for detailed step-by-step instructions on how to prepare and administer Winrevair powder and solvent for injectable solution. The following is a general description of the reconstitution and administration instructions.
Reconstitution Instructions
- Remove the kit from the refrigerator and wait 15 minutes for the pre-filled syringe(s) and the medicinal product to reach room temperature before preparation.
- Check the vial to ensure that the medicinal product is not expired. The powder should be white to off-white and its appearance may be that of a whole or broken cake.
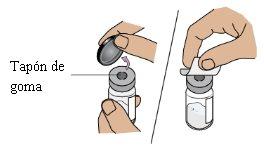
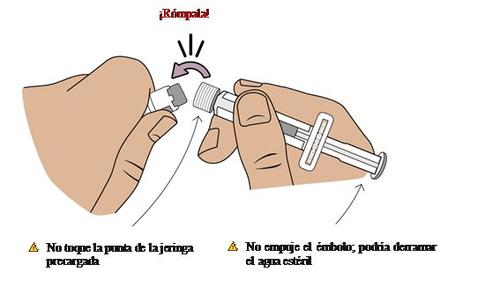
- Remove the cap from the vial containing the powder and clean the rubber stopper with an alcohol swab.
- Connect the vial adapter to the vial itself.
- Visually inspect the pre-filled syringe for damage or leaks and inspect the sterile water inside for any visible particles.
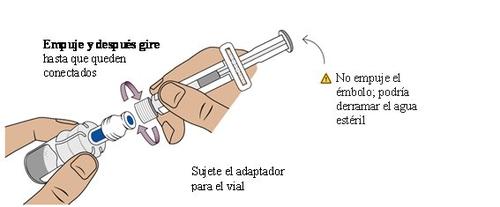
- Break and remove the cap from the pre-filled syringe and attach the syringe to the vial adapter.
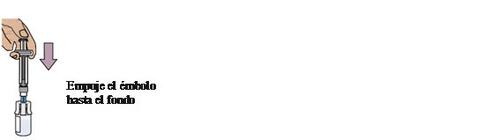
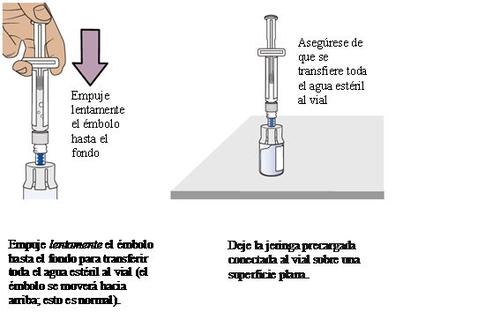
- Inject all the sterile water from the attached syringe into the vial containing the powder:
- The pre-filled syringe provided with the 45 mg vial contains 1.0 ml of sterile water.
- The pre-filled syringe provided with the 60 mg vial contains 1.3 ml of sterile water.
After reconstitution, the 45 mg vial can only provide a dose of up to 0.9 ml of medicinal product and the 60 mg vial can only provide a dose of up to 1.2 ml of medicinal product. The final concentration after reconstitution is 50 mg/ml.
- Gently rotate the vial in circles to reconstitute the medicinal product. Do not shake vigorously.
- Let the vial stand for 3 minutes to allow any bubbles to disappear.
- Visually inspect the reconstituted solution. When mixed correctly, the reconstituted solution should be clear to opalescent and colorless to slightly yellowish-brown and should not contain lumps or powder.
- Unscrew the syringe from the vial adapter and discard the empty syringe.
- If a 2-vial kit has been prescribed, repeat the steps in this section to prepare the second vial.
- Use the reconstituted solution as soon as possible, but no later than 4 hours after reconstitution.
Preparation of the Dosing Syringe
- Before preparing the dosing syringe, visually inspect the reconstituted solution. The reconstituted solution should be clear to opalescent and colorless to slightly yellowish-brown and should not contain lumps or powder.
- Clean the vial adapter with an alcohol swab.
- Remove the dosing syringe from its packaging and attach the syringe to the vial adapter.
- Invert the syringe and vial and withdraw the appropriate volume for injection based on the patient's weight.
- If the dose requires the use of two vials, withdraw the entire contents of the first vial and slowly transfer the entire contents to the second vial to ensure dose accuracy.
- Invert the syringe and vial and withdraw the required amount of medicinal product.
- If necessary, push the plunger to eliminate any excess medicinal product or air from the syringe.
- Remove the syringe from the vial adapter and attach the needle.
Administration Instructions
Winrevair should be administered as a single subcutaneous injection.
- Choose the injection site on the abdomen (at a minimum distance of 5 cm from the navel), the upper thigh or the upper arm and clean it with an alcohol swab. Choose a new site for each injection that does not have scars, is not painful or has bruises.
- In the event of administration by the patient or caregiver, teach them to inject only in the abdomen or upper thigh (see the "Instructions for Use" leaflet).
- Administer the subcutaneous injection.
- Discard the empty syringe. Do not reuse the syringe.
Disposal of unused medicinal product and all materials that have come into contact with it will be carried out in accordance with local regulations.
See section 4.4 of the Summary of Product Characteristics for instructions on the traceability of biological medicinal products.
Instructions for Use
Winrevair 45 mg powder and solvent for injectable solution (1 vial container)
Winrevair 60 mg powder and solvent for injectable solution (1 vial container)
sotatercept
IMPORTANT: Read this leaflet before using the medicinal product
Instructions for Use
Winrevair 45 mg powder and solvent for injectable solution (1 vial container)
Winrevair 60 mg powder and solvent for injectable solution (1 vial container)
This leaflet contains instructions on how to prepare and inject Winrevair powder and solvent for injectable solution. The summary of product characteristics, also included in the container, contains all the important information for you.
Dose according to patient weight.
For subcutaneous injection (SC) only (injection directly under the skin)
Contents of this Leaflet: (Important)
Before you start 4
Important information for healthcare professionals 5
Get to know the parts of the container 6
Important information you should know before injection 8
How to store the container 9
Pre-injection steps 10
- Mixthe medicinal product 12
- Withdrawthe prescribed dose 24
- Injectthe medicinal product 34
How to dispose of Winrevair 36
Frequently asked questions 38
Before you start
Read this leaflet
Read these instructions from start to finish before using Winrevair for the first time and before each administration, as the information may have been updated.
Start with your doctor or nurse
Do not use Winrevair until your doctor or nurse has taught you or your caregiver the correct way to prepare and inject it. Your doctor or nurse should teach you how to inject Winrevair before you administer it for the first time.
Questions?
If you have any questions about the correct way to administer Winrevair or need more information, consult your doctor, pharmacist, or nurse.

Important information for healthcare professionals
The healthcare professional will teach the correct preparation and administration of Winrevair step by step, following this "Instructions for Use" leaflet, and will decide whether the patient or caregiver is able to prepare and administer Winrevair autonomously.
Ensure that the patient or caregiver can do the following correctly:
- Reconstitute the medicinal product
- Measure the correct amount of medicinal product according to the patient's prescription
- Choose and prepare a suitable injection site
- Inject the medicinal product subcutaneously
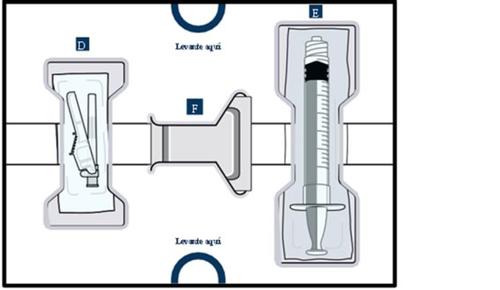
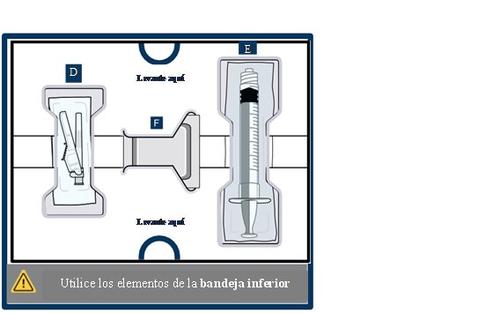
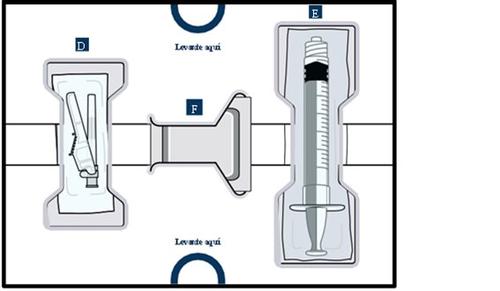
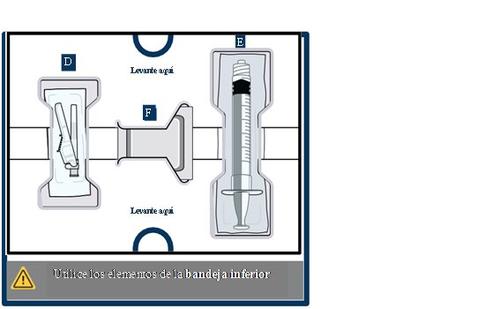
Get to know the parts of the container
Upper tray:used to mixthe medicinal product
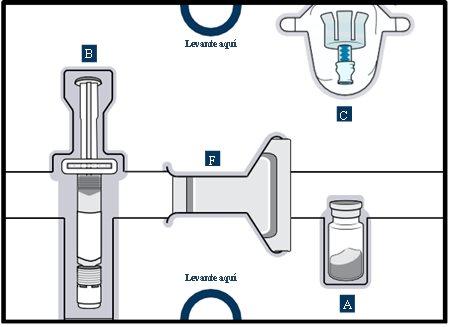
Lower tray:used to injectthe medicinal product
Important information you should know before injection
- You must mix this medicinal product before using it. Ensure that the powder in the vial is completely dissolved before injecting.
- Check the prescribed dose (amount in "ml") each time you use the medicinal product. The prescribed dose may change.
- Use only the materials provided in the container to prepare the prescribed dose.
- Do not open the container or mix the medicinal product until you are ready to use it.
- Do not reuse any of the provided materials.After injection, discard the unused medicinal product and the used materials provided, in accordance with local regulations. See more information on pages 36-37.
How to store the container
- Keep the complete container in the refrigerator, but do not freeze it.
- Keep the medicinal product and the provided materials inside the container and protected from light.
- Keep the container out of sight and reach of children and pets.
Pre-injection steps
Any patient or caregiver who is going to prepare and inject Winrevair must first receive training and be considered, by a healthcare professional, capable of administering Winrevair autonomously.
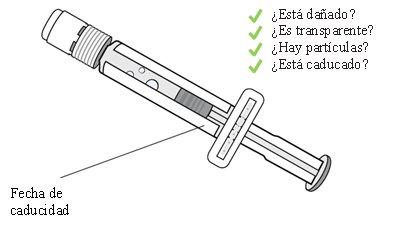
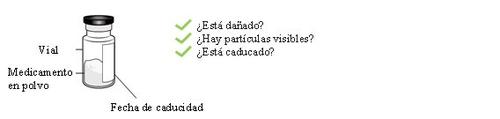
1 Check the Winrevair medicinal product and expiration date
Remove the Winrevair container from the refrigerator.
Check the expiration date and look for any signs of damageto the container or the provided materials.
Do not use it if it is expired or damaged. Immediately consult your doctor or pharmacist to obtain a new container.
Check that you have the medicinal productthat your doctor has prescribed.
2 Let the container reach room temperature, gather the provided materials and wash your hands
Wait 15 minutes for the container to reach room temperature.
The injection is more painful if the medicinal product is cold.

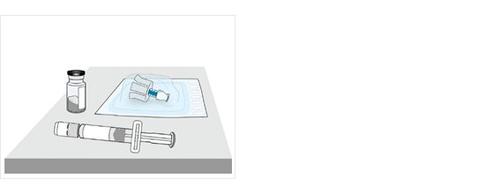
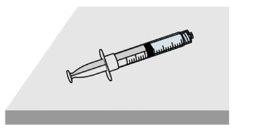
Along with the container, gather the following items and find a clean and flat surface to prepare and inject the dose.
Wash your hands with water and soap.

Mix the medicinal product in powder with the liquid (Mix)
Start with the upper tray
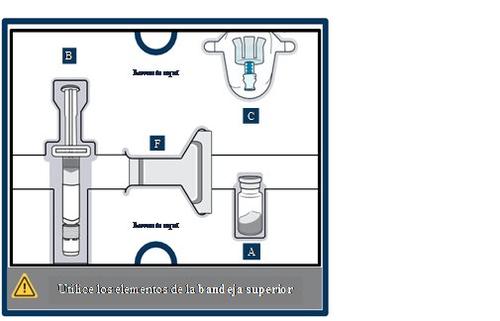
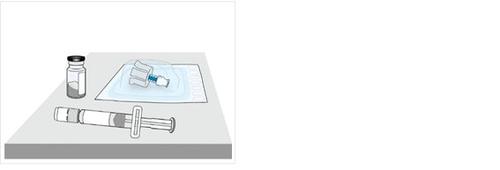
3 Remove the vial, pre-filled syringe and vial adapter from the container
4a Check the vial and medicinal product
Check the vial label to confirm that the medicinal product is not expired.
Visually inspect the medicinal product in powder. It should be white to off-white and its appearance may be that of a whole or broken cake.
Do not use it if it is expired, damaged or you can see particles in it.
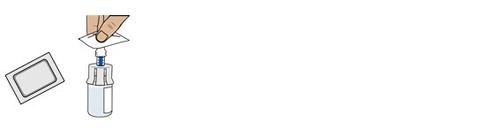
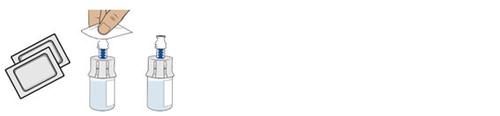
4b Remove the plastic cap and clean the vial
Remove the plastic cap and clean the rubber stopper on top of the vialwith an alcohol swab.
Do not use it if the vial cap is missing
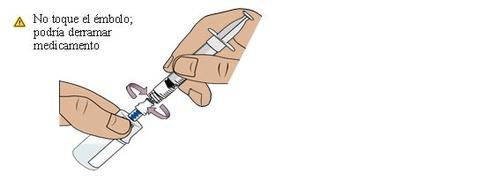
Do not touch the rubber stopper
Put the vial aside on a clean and flat surface.
5a Adjust the vial adapter to the vial
Open the vial adapter packaging and remove it from its packaging

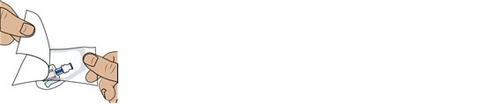
To attach the vial adapter:
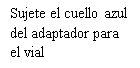


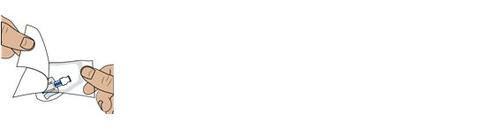
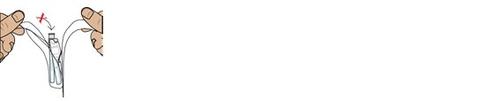
Hold the blue neck of the adapterand adjust the vial adapter to the top of the vial.
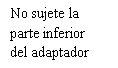
Do not touch the inside of the vial adapter to keep it clean and avoid sharp objects
5b Connect the vial adapter to the vial itself
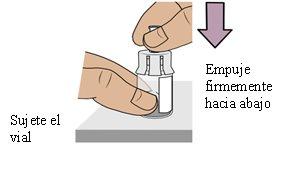
Hold the vial with one hand. Push the vial adapterfirmly downwardsuntil it clicks into place (you may feel some resistance).
5c Clean the vial adapter
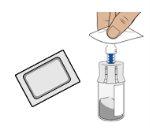
Clean the top of the vial adapter with an alcohol swab.
6 Check the pre-filled syringe
Confirm that the product is not expired. Visually inspect that the sterile water contained in the pre-filled syringe is clear.
Do not use it if you observe lumps, particles, color changes, or if the product is expired.
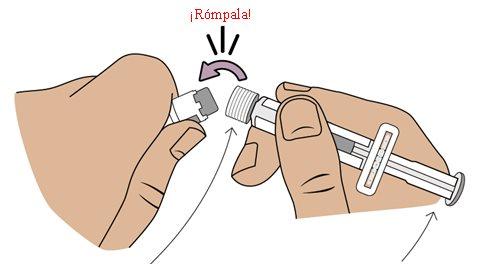
7 Break and remove the white cap of the pre-filled syringe
Break and remove the cap of the pre-filled syringe through the perforation.

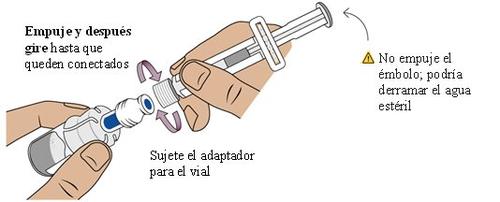
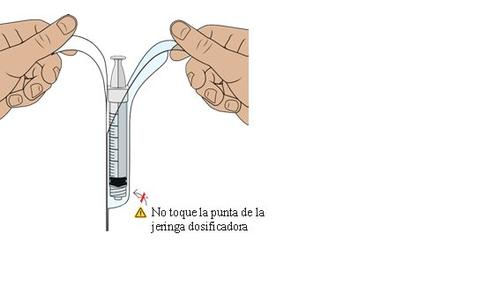
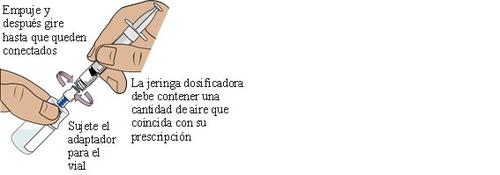
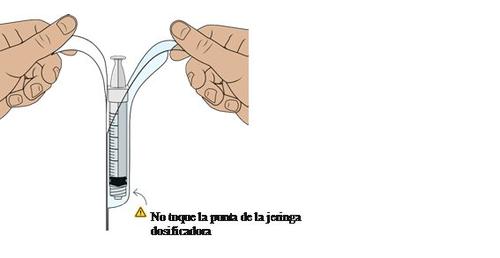
8 Connect the pre-filled syringe to the vial adapter
Next, take the medication vial with the vial adapter attached.
Adjust the tip of the pre-filled syringe with the blue circle of the vial adapter.
Push and turn the pre-filled syringe onto the vial adapter until it cannot turn anymore.While turning, make sure to hold the vial adapter.
9 Transfer sterile water from the pre-filled syringe to the vial
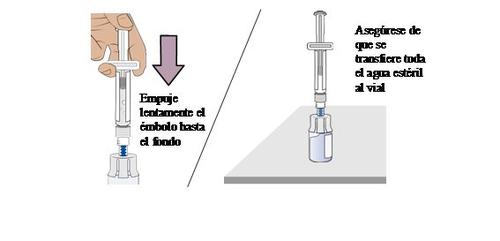
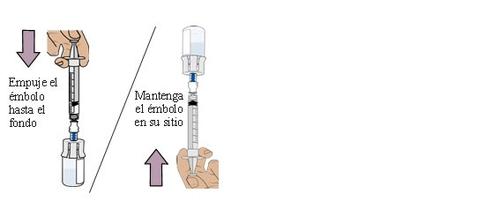
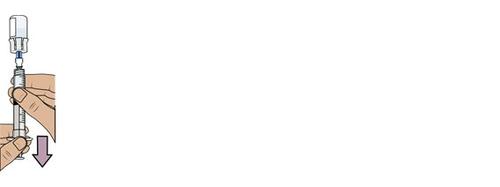
Push slowlythe plunger all the way down to transfer all the sterile water to the vial (the plunger will move upwards; this is normal).
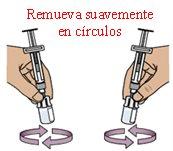
10 Gently swirl in circles to mix the medication

Do not shake vigorously the vial
Hold the pre-filled syringe and gentlyswirlthe vial with circular movementsuntil the powder is completely dissolved. This may take up to 2minutes. Do not shake vigorously.

If the medication is well mixed, it should be transparent. If not, repeat this step until it becomes transparent.
Pushthe plunger again to ensure all the liquid enters the vial since some liquid may have returned to the syringe (the plunger will move upwards; this is normal).
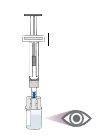
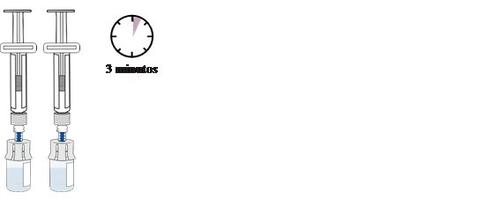
11 Wait for the bubbles to disappear
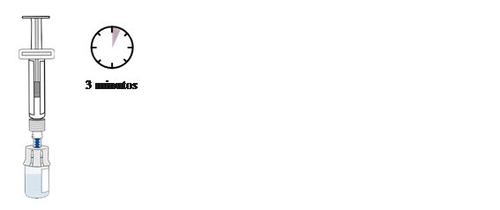
Set the vial aside to let the bubbles disappear.
This may take up to 3 minutes.
Before proceeding, ensure that the medication in the vial:
Is transparent to opalescent and colorless to slightly yellowish-brown.
Has no lumps or powder.
Has no large bubbles.
It is normal for a slight foam (small bubbles) to form around the edges of the vial.
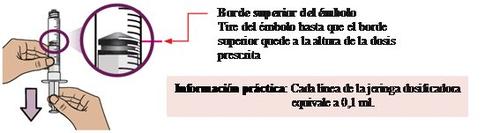
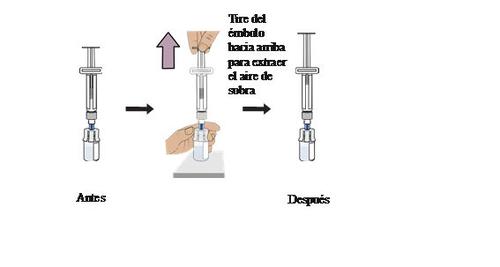
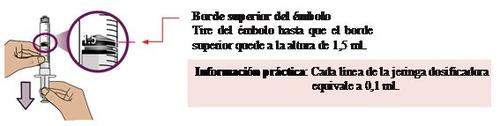
12 Prepare the vial by removing excess air
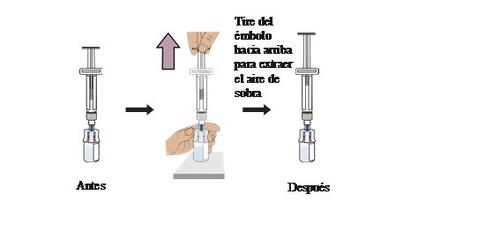
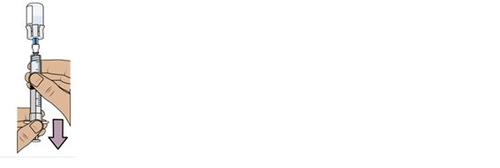
With the vial upright, gentlypullthe plunger upwardsto the top of the cylinder, but be careful not to pull the plunger out of the syringe.
Practical information:In this step, only excess air from the vial is removed to reduce pressure in the vial and prevent the medication from spilling during syringe extraction.
13 Remove the pre-filled syringe from the vial
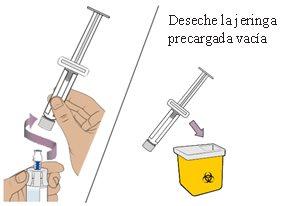
Hold the vial adapter and unscrew the syringe from the vial.
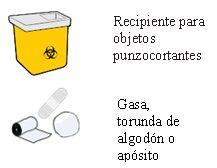
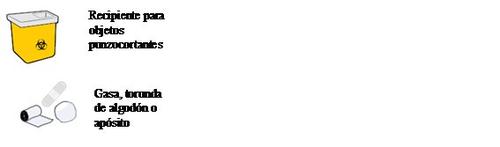
Dispose of the syringe in the sharps container.

You should now have a prepared medication vial ready to use in the following steps.
Extract the prescribed dose (Extract)
For the next steps, you will need:
- Mixed medication vial
- Items from the lower tray
14 Clean the top of the vial adapter
With a new alcohol swab from the lower tray, clean the top of the vial adapter.
15 Remove the empty dosing syringe from its packaging
Find the empty dosing syringe in the lower tray and remove it from its packaging.
You will use this dosing syringe to measure the medication you need (according to the prescribed dose).
16 Introduce air into the dosing syringe
You must do this to ensure that the pressure in the vial is uniform and that you receive an exact dose.
Hold the dosing syringe vertically and pull the plunger downwards to introduce air into the dosing syringe. Stop when you reach the amount in “ml” indicated on the prescription.
17 Connect the dosing syringe to the vial
While holding the vial adapter, screw the dosing syringe until it stops.
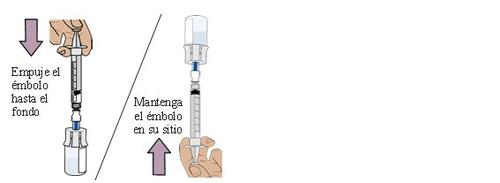
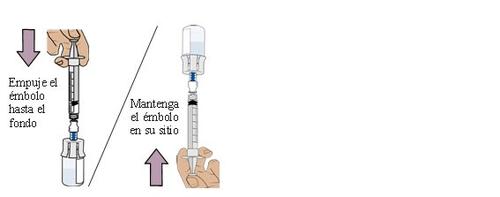
18 Introduce air into the vial and then invert it
Push the plunger all the way down to transfer all the air into the vial.
Then, keep the plunger in placewith your thumb and invert the vial.
19 Pull the plunger to extract the dose
With the vial and dosing syringe inverted, slowly pull the plungerbackwards.
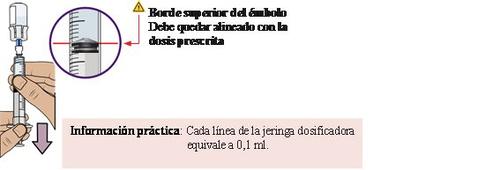
Stop when you reach the amount in “ml” indicated on the prescription.
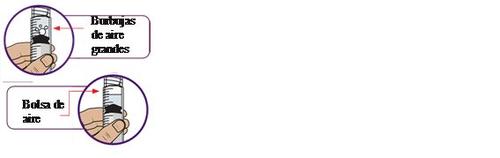
20 Check for bubbles and air pockets
Check for large air bubbles or an air pocket in the syringe. You will eliminate excess air in the next steps.
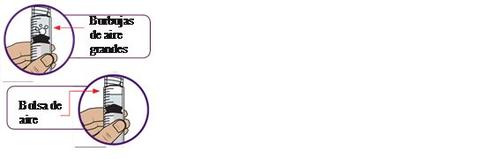
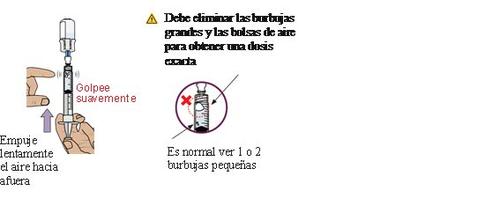
21 Remove bubbles and air pockets
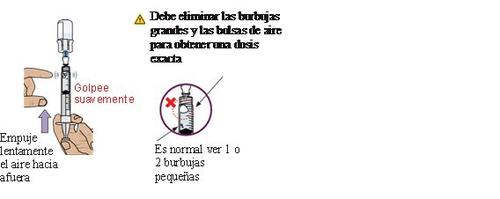
If you see bubbles or an air pocket, gently tap the side of the dosing syringe to displace the air to the top.
Pushslowlythe plunger upwardsto eliminate excess air.
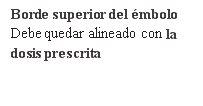
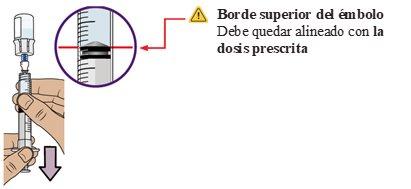
22 Compare the amount with the prescribed dose
Once all excess air is removed, compare the amount with the prescribed dose.
If you do not have the prescribed amount in the syringe,pull slowlythe plunger backwards to extract more medication.
Repeat steps 19 to 21 until you reach the prescribed doseand no large bubbles are observed.
23 Confirm the prescribed dose
Before proceeding, ensure that you have the prescribed dose in the dosing syringe.

If the amount does not match the prescribed dose, repeat steps 19 to 22.
24 Remove the dosing syringe from the vial and set it aside
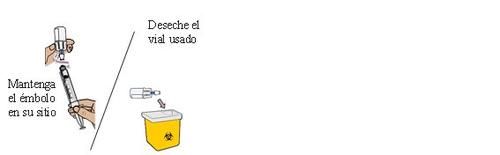
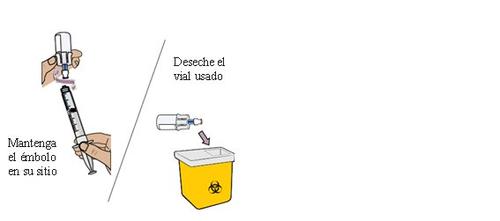
Keep the plunger in place with one hand. With the other hand, hold the vial adapter and unscrew the loaded dosing syringe from the vial.
Discard the vial in the sharps container.
Place the loaded dosing syringe on a clean and flat surface.
Do not touch the tip of the dosing syringe or let it touch any surface.
25 Attach the injection needle
Do not touch the needle connector

Find the needle in the lower tray and open its packaging.

With the needle still in its packaging, hold the base of the needleand turn it onto the dosing syringeuntil it stops. Remove the needle packaging.
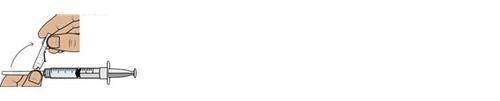
Remove the safety protector from the needletowards the syringe at the indicated angle. Place the dosing syringe on a clean and flat surface.
Do not uncover the needle
26 Choose and clean the injection site

Choose an injection siteon the abdomen or the top of the thigh. If you are injecting into the abdomen, avoid a 5 cm area around the navel.
Choose a different site each time you inject.
Do not inject into damaged, painful, bruised, or red skin
Do not inject through clothing

Clean the injection sitewith a new alcohol swab.
Do not touch the cleaned injection site again
You are now ready to inject the medication.
Inject the medication(Inject)
27 Inject the medication

Remove the needle cap.
Discard the cap.
Do not touch the plunger until you are ready to inject to avoid losing medication

Pinchthe skin gently and hold a skin foldwhere you will inject. Insert the needle with a dart-like movement at a 45° to 90° angle.This will help you inject directly under the skin (subcutaneous injection).

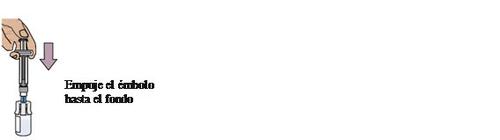
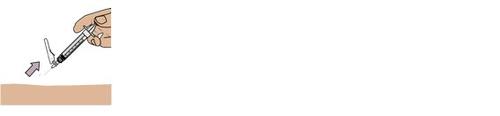
Pushthe plunger all the way down with slow and uniform pressure until the dosing syringe is empty. Confirm that all the medication has been injected.
You can now release the skin fold
Keep your fingers away from the needle at all times.
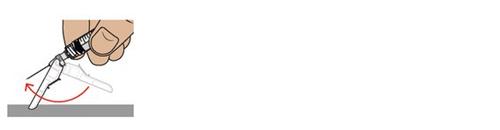
While keeping the plunger pressed, remove the needle from the skinat the same angle it was inserted.
To reapply the safety protector, push the protector against a flat surface until you hear a “click” and see that the needle is covered.

Dispose of the dosing syringe and used items in a sharps container.
Do not remove the needle from the dosing syringe
How to dispose of Winrevair
Ask your pharmacist how to dispose of packaging and medications that are no longer needed. This will help protect the environment. Make sure to follow local regulations for disposal, as they may differ from the general recommendations indicated below
 Dispose of used vials (including leftover Winrevair liquid), needles, vial caps and plugs, and used syringes in a sharps container.
- Do not throw away Winrevair vials, syringes, or needles in household trash.
- Do not reuse any of the supplied materials.This product is disposable and should only be used once.
- Important:Always keep the sharps container out of the reach of children and pets.
If you do not have a sharps container, you can use a household container that:
- is made of heavy-duty plastic,
- can be closed with a tight-fitting, puncture-resistant lid that prevents sharps from sticking out,
- stands upright and stable during use,
- is leak-resistant,
- is properly labeled with a warning that it contains hazardous waste.
When the container is almost full, you will need to follow local guidelines for the correct way to dispose of it.
Do not recycle the used container.
Frequently Asked Questions
What should I do if I bleed from the injection site?
Apply a cotton swab or bandage to the skin immediately and press gently. If the bleeding does not stop, call your doctor or pharmacist immediately.
Where can I find the amount of medication I have been prescribed?
The amount of medication you have been prescribed in “ml” is found on your prescription. Consult your doctor or pharmacist if you cannot find the amount of medication you have been prescribed.
What should I do if I accidentally spill medication on my skin or work surface?
Wash the area well with soap and water immediately.
What should I do if I am not sure I have administered the prescribed dose correctly?
Call your doctor or pharmacist.
What should I do if the plunger of the dosing syringe moves automatically when I try to extract the medication from the vial?
Do not worry if the plunger moves slightly on its own when filling the dosing syringe with the medication.
With one hand, hold the plunger in place to prevent it from moving.
With the other hand,
Unscrew the vial from the dosing syringe. Once unscrewed, you can safely release the plunger.
You can avoid this automatic plunger movement by introducing air into the vial before filling the dosing syringe with the medication. Refer to steps 16 to 23 for detailed instructions.
What should I do if the parts contained in the packaging (e.g., show an abnormal color, are cloudy, or have particles) are damaged or altered?
Do not use the parts contained in the packaging if they are damaged or altered. Call your doctor or pharmacist to obtain a new packaging.
What should I do if the medication does not become transparent after mixing and gently shaking in circles?
Do not use the medication if you have gently shaken the medication vial in circles for approximately 2 minutes and let it stand for another 3 minutes, but the vial remains cloudy or contains lumps, dust, or foreign particles. Call your doctor or pharmacist to obtain a new packaging.
What should I do if the sterile water does not come out of the pre-filled syringe?
Check that the vial adapter is securely connected to the vial. If not, hold the vial and firmly press the vial adapter to ensure it punctures the vial's rubber stopper.
What should I do if I drop the packaging components?
Do not use the damaged items. If you are unsure, call your doctor or pharmacist to obtain a new packaging.
Can I use a packaging that has been out of the refrigerator?
If the unused packaging has been out of the refrigerator for an extended period, consult your doctor or pharmacist before proceeding.
Do I need to use the mixed medication immediately?
We recommend that you inject the medication immediately after mixing, but no later than 4 hours after mixing. If more than 4 hours have passed, discard the unused mixed medication. If you have any doubts or are unsure about the process, please consult your doctor or pharmacist.
How can I get help with preparing and administering the injection?
If you have any questions about the correct way to administer Winrevair or need more information, you can call your doctor or pharmacist.
To obtain any other information about this medication, consult your doctor or pharmacist or the local representative of the marketing authorization holder. You will find the representative's details in the leaflet: Patient Information
Date of last revision of this leaflet: {MM/AAAA}
Instructions for use
Winrevair 45mg powder and solvent for injectable solution (packaging of 2vials)
Winrevair 60mg powder and solvent for injectable solution (packaging of 2vials)
sotatercept
IMPORTANT: read this leaflet before using the medication
Instructions for use
Winrevair 45 mg powder and solvent for injectable solution (packaging of 2 vials)
Winrevair 60 mg powder and solvent for injectable solution (packaging of 2 vials)
This leaflet contains instructions on how to prepare and inject Winrevair powder and solvent for injectable solution. The prospectus, also included in the packaging, contains all the important information for you.
Dose according to patient weight.
Exclusively for subcutaneous injection (SC) (injection directly under the skin)
Content of this leaflet: (Important)
Important information for healthcare professionals 3
Before starting 4
Know the parts of the packaging 6
Important information you should know before injection 8
How to store the packaging 9
Preliminary steps 10
- Mixthe medication with the liquid 12
- Combinethe medication from the two vials 24
- Extractthe prescribed dose 30
- Injectthe medication 36
How to dispose of Winrevair 38
Frequently asked questions 40

Important information for healthcare professionals
The healthcare professional will teach the correct preparation and administration of Winrevair step by step, following this "Instructions for use" leaflet, and will decide if the patient or caregiver is able to prepare and administer Winrevair autonomously.
Make sure the patient or caregiver can do the following correctly:
- Reconstitute the medication
- Combine the medication from the two vials
- Measure the correct amount of medication according to the patient's prescription
- Choose and prepare a suitable injection site
- Inject the medication subcutaneously
Before starting
Read this leaflet
Read these instructions from start to finish before using Winrevair for the first time and before each administration; the information may have been updated.
Start with your doctor or nurse
Do not use Winrevair until your doctor or nurse has taught you or your caregiver the correct way to prepare and inject it. Your doctor or nurse must teach you how to inject Winrevair before you can administer it for the first time.
Questions?
If you have any questions about the correct way to administer Winrevair or need more information, consult your doctor, pharmacist, or nurse.

 How to use this product?
Before injecting, make sure to read all the instructions in this leaflet to obtain the correct dose of the medication.
- Mixthe medication in vial 1
- Mixthe medication in vial 2
- Combinethe medication from the two vials
- Extractthe prescribed dose from vial 2
- You are now ready to injectthe medication
In the following pages, you will find step-by-step instructions.
Know the parts of the packaging
Upper tray:used to mixthe medication
Lower tray:used to injectthe medication
Important information you should know before injection
- You must mix this medication before using it. Make sure the powdered medication in the vial is completely dissolved when injecting.
- Check the prescribed dose (amount in "ml") each time you use the medication. The prescribed dose may change.
- Use only the materials provided in the packaging to prepare the prescribed dose.
- Do not open the packaging or mix the medication until you are ready to use it.
- Do not reuse any of the provided materials.After injection, discard the unused medication and the used provided materials according to local regulations. See more information on pages 38-39.
How to store the packaging
- Keep the complete packaging in the refrigerator, but do not freeze it.
- Keep the medication and provided materials inside the packaging and protected from light.
- Keep the packaging out of sight and reach of children and pets.
Preliminary steps
Any patient or caregiver who is going to prepare and inject Winrevair must first receive training and be considered, by a healthcare professional, capable of administering Winrevair autonomously.
1 Check the Winrevair medication and expiration date
Remove the Winrevair packaging from the refrigerator.
Check the expiration date and look for any signs of damageto the packaging or provided materials.
Do not use it if it is expired or damaged. Immediately consult your doctor or pharmacist to obtain a new packaging.
Check that you have the prescribed medication.
2 Let the packaging reach room temperature, gather the provided materials, and wash your hands
Wait 15 minutes to let the packaging reach room temperature.
The injection is more painful if the medication is cold.

Along with the packaging, gather the following elements and find a clean and flat surface to prepare and inject the dose.
Wash your hands with water and soap.

Mix the powdered medication with the liquid (Mix)
Start with the upper tray
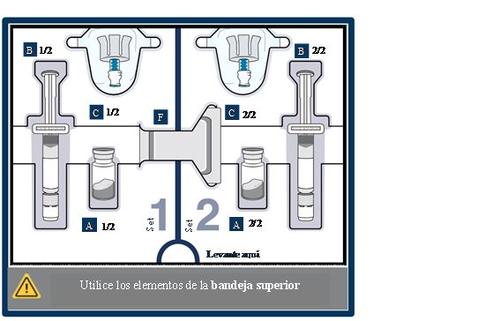
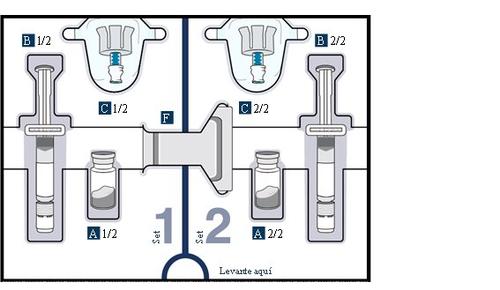
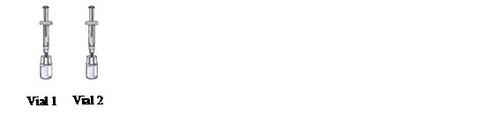
3 Remove vial 1, pre-filled syringe 1, and vial adapter 1 from the packaging
4a Check the vial and medication
Check the vial label to confirm that the medication is not expired.
Visually inspect the powdered medication. It should be white to off-white and may appear as a whole or broken cake.
Do not use it if it is expired, damaged, or you can see particles in it
4b Remove the plastic cap and clean the vial

Remove the plastic cap and clean the rubber stopper on top of the vialwith an alcohol swab.
Do not use it if the vial cap is missing
Do not touch the cleaned rubber stopper
Set the vial aside on a clean and flat surface.
5a Adjust the vial adapter with the vial
Open the vial adapter packaging and remove it from its packaging.

To attach the vial adapter:


Hold the blue neck of the adapterand adjust the vial adapter with the top of the vial.
Do not touch the inside of the vial adapter to keep it clean and avoid sharp objects
5b Connect the vial adapter to the vial

Hold the vial with one hand. Push the vial adapterfirmly downto secure it in place (you may feel some resistance).
5c Clean the vial adapter

Clean the top of the vial adapter with an alcohol swab.
6 Check the pre-filled syringe
Confirm that the product is not expired. Visually inspect that the sterile water in the pre-filled syringe is transparent.
Do not use it if you observe lumps, particles, color changes, or if the product is expired.
7 Break and remove the white cap from the pre-filled syringe
Break and remove the cap from the pre-filled syringe through the perforation.
8 Connect the pre-filled syringe to the vial adapter
Next, take the medication vial with the vial adapter attached.
Adjust the tip of the pre-filled syringe with the blue circle of the vial adapter.
Push and turn the pre-filled syringe onto the vial adapter until it cannot turn anymore.While turning, make sure to hold the vial adapter.
9 Transfer sterile water from the pre-filled syringe to the vial
10 Prepare vial 2, pre-filled syringe 2, and vial adapter 2
Remove vial 2, pre-filled syringe 2, and vial adapter 2from the packaging.
Important:
Go back to page 13 and repeat steps 4to 9to prepare vial 2.

Stop and check if you have vial 1 and vial 2 prepared.
You must have both vials prepared before proceeding to step 11.
11 Gently swirl in circles to mix the medication
Do not shake vigorously.
Hold a pre-filled syringe with each hand and gentlyswirlthe two vials with circular motionsuntil the powder is completely dissolved. This may take up to 2minutes. Do not shake vigorously.
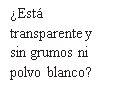

If the medication is well mixed, it should be transparent. If not, repeat this step until it becomes transparent.
For each vial, pushthe plungerback to ensure all the liquid enters the vial, as some liquid may have returned to the syringe (the plunger will move up; this is normal).
12 Wait for the bubbles to disappear
Set the twovials aside to allow the bubbles to disappear.
This may take up to 3 minutes.
Before continuing, make sure the medication in the vial:
Is transparent to opalescent and colorless to slightly yellowish-brown.
Has no lumps or dust.
Has no large bubbles.
It is normal for a slight foam (small bubbles) to form around the edges of the vial.
13 Prepare the vial by removing excess air
Start with either vial. With the vial upright, gently pullthe plunger upto the top of the cylinder, but be careful not to remove the plunger from the syringe.
Practical information:In this step, only excess air is removed from the vial to reduce pressure in the vial and prevent the medication from spilling during syringe extraction.
Important:
Perform this step with bothvials. Stop and check that you have bothvials prepared before continuing.

14Remove the pre-filled syringe from the vial

Hold the adapters of the vials and unscrew bothsyringes from the vials.
Discard bothsyringes in the container for sharp objects.
You should have the two vials of the medication prepared and ready to combine them in the following steps.
Combine the medication from both vials (Combine)
For the next steps, you will need:
- Vial 1 and vial 2 mixed.
- Elements from the lower tray.
15 Clean the top of both vial adapters
With two new alcohol swabs from the lower tray, clean the top of the vial adapters.
16 Remove the empty dosing syringe from its packaging
Find the empty dosing syringe in the lower tray and remove it from its packaging.
You will use this dosing syringe to measure the medication you need (according to the prescribed dose).
17 Introduce air into the dosing syringe
You must do this to ensure that the pressure in the vial is uniform and that you receive an exact dose.
Hold the dosing syringe in a vertical position and pull the plunger down to introduce 1.5ml of air.
18 Connect the dosing syringe to one of the vials
While holding the vial adapter, screw the dosing syringe until it stops.

19 Introduce air into the vial and then, invert it
Push the plunger to the bottom to transfer all the air into the vial.
Then, hold the plunger in placewith your thumb and invert the vial.
20 Empty all the medication from the first vial
Slowly pull the plunger back. Stop when you reach 1.5ml.
This will ensure that all the medication from the vial is in the dosing syringe.
Do not pull the plunger further than 1.5 ml. Stop when you reach 1.5ml.
Be careful not to pull the plunger out of the dosing syringe.
21 Remove the first vial from the dosing syringe
Hold the vial adapter and unscrew the loaded dosing syringe from the vial.
Discard the emptyvial in the container for sharp objects.

22 Connect the dosing syringe to the second vial
While holding the adapter of the second vial, screw the partially loaded dosing syringe into the vial adapter until it stops.
23 Introduce all the medication into the second vial and then, invert it
Push the plunger slowlyto the bottom to transfer all the medication to the vialto ensure accuracy in the dose. This combines the medication from the two vials.
Then, hold the plunger in placewith your thumb and invert the vial.
Extract the prescribed dose (Extract)
24 Pull the plunger to extract the dose
With the vial and dosing syringe inverted, slowly pull the plungerbackwards.
Stop when you reach the amount in “ml” indicated on the prescription.

25 Check for bubbles and air pockets
Check for large air bubbles or an air pocket in the syringe. You will remove excess air in the next steps.
26 Extract bubbles and air pockets
If you see bubbles or an air pocket, gently tap the side of the dosing syringe to displace the air to the top.
Pushslowlythe plunger upwardsto remove excess air.
27 Compare the amount with the prescribed dose
Once all excess air has been removed, compare the amount with the prescribed dose.
If you do not have the prescribed amount in the syringe,pull the plunger slowlyback again to extract more medication.
Repeat steps 24 to 26 until you reach the prescribed doseand no large bubbles are observed.
28 Confirm the prescribed dose
Before proceeding, check that you have the prescribed dose in the dosing syringe.
If the amount does not match the prescribed dose, repeat steps 24 to 27.
29 Remove the dosing syringe from the vial and set it aside
Hold the plunger in place with one hand. With the other hand, hold the vial adapter and unscrew the loaded dosing syringe from the vial. Discard the vial in the container for sharp objects.
Place the loaded dosing syringe on a clean and flat surface.
Do not touch the tip of the dosing syringe or let it touch any surface.
30 Attach the injection needle
Do not touch the needle connection cone.
Find the needle in the lower tray and open its packaging.

With the needle still in the packaging, grasp the base of the needleand twist it onto the dosing syringeuntil it stops. Remove the needle packaging.

Remove the needle safety protectorin the direction of the syringe at the indicated angle. Place the dosing syringe on a clean and flat surface.
Do not remove the needle cap.
31 Choose and clean the injection site
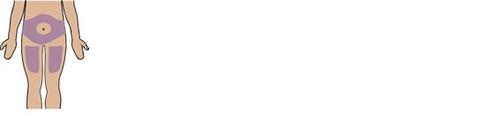
Choose an injection siteon the abdomen or the top of the thigh. If you are injecting into the abdomen, avoid an area of 5 cm around the navel.
Choose a different site each time you inject.
Do not inject into damaged, painful, bruised, or red skin.
Do not inject through clothing.

Clean the injection sitewith a new alcohol swab.
Do not touch the cleaned injection site again.
You are now ready to inject the medication.
Inject the medication
32 Inject the medication (Inject)

Remove the needle cap.
Discard the cap.
Do not touch the plunger until you are ready to inject to avoid losing medication.
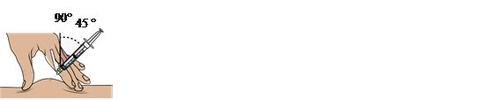
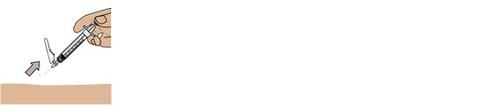
Pinchthe skin gently and hold a skin foldwhere you will inject. Insert the needle with a dart-like motion at a 45° to 90° angle.This will help you inject directly under the skin (subcutaneous injection).

Pushthe plunger to the bottom with slow and uniform pressure until the dosing syringe is empty. Confirm that all the medication has been injected.
You can now release the skin fold.
Keep your fingers away from the needle at all times.
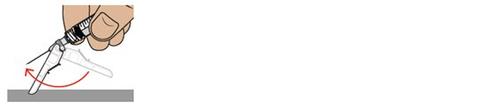
While keeping the plunger pressed, remove the needle from the skinat the same angle you inserted it.
To reapply the safety protector, push the protector against a flat surface until you hear a “click” and see that the needle is covered.
Discard the dosing syringe and used elements in a container for sharp objects.
Do not remove the needle from the dosing syringe.
How to dispose of Winrevair
Ask your pharmacist how to dispose of the packaging and medication you no longer need. This will help protect the environment. Make sure to follow local regulations for disposal, as they may be different from the general recommendations indicated below.
 Discard used vials (including leftover Winrevair liquid), needles, vial and needle caps, and used syringes in a container for sharp objects.
- Do not throw away Winrevair vials, syringes, or needles in household trash.
- Do not reuse any of the supplied materials.This product is disposable and should only be used once.
- Important:Always keep the container for sharp objects out of the reach of children and pets.
If you do not have a container for sharp objects, you can use a household container that:
- is made of heavy-duty plastic,
- can be closed with a tight-fitting, puncture-resistant lid that prevents sharp objects from coming out,
- remains upright and stable during use,
- is leak-resistant,
- is properly labeled with a warning that it contains hazardous waste.
When the container is almost full, you will need to follow local guidelines for proper disposal.
Do not recycle the used container.
Frequently Asked Questions
What should I do if I bleed from the injection site?
Apply a cotton ball or bandage to the skin immediately and press gently. If the bleeding does not stop, call your doctor or pharmacist immediately.
Where can I find the amount of medication I have been prescribed?
The amount of medication you have been prescribed in “ml” is on your prescription. Consult your doctor or pharmacist if you cannot find the amount of medication you have been prescribed.
What should I do if I accidentally spill medication on my skin or work surface?
Wash the area well with soap and water immediately.
What should I do if I am not sure I have administered the dose correctly?
Call your doctor or pharmacist.
What should I do if the plunger of the dosing syringe moves automatically when I try to extract the medication from the vial?
Do not worry if the plunger moves slightly on its own when filling the dosing syringe with medication.
With one hand, hold the plunger in place to prevent it from moving.
With the other hand, unscrew the vial from the dosing syringe. Once unscrewed, you can safely release the plunger.
You can avoid this automatic plunger movement by introducing air into the vial before filling the dosing syringe with medication. Refer to steps 17 to 28 for detailed instructions.
What should I do if the parts in the packaging are damaged or altered (e.g., show abnormal color, are cloudy, or have particles)?
Do not use the parts in the packaging if they are damaged or altered. Call your doctor or pharmacist to obtain a new packaging.
What should I do if the medication does not become transparent after mixing and gently swirling it in circles?
Do not use the medication if you have gently swirled the medication vial in circles for about 2 minutes and let it sit for another 3 minutes, but the vial remains cloudy or contains lumps, dust, or foreign particles. Call your doctor or pharmacist to obtain a new packaging.
What should I do if the sterile water does not come out of the pre-filled syringe?
Check that the vial adapter is securely connected to the vial. If not, hold the vial and firmly press the vial adapter to ensure it perforates the vial's rubber stopper.
What should I do if I drop the packaging components?
Do not use damaged elements. If you are unsure, call your doctor or pharmacist to obtain a new packaging.
Can I use packaging that has been out of the refrigerator?
If the unused packaging has been out of the refrigerator for an extended period, consult your doctor or pharmacist before proceeding.
Do I need to use the mixed medication immediately?
We recommend that you inject the medication immediately after mixing, but no later than 4 hours after mixing. If more than 4 hours have passed, discard the unused mixed medication. If you have any doubts or are unsure about the process, please consult your doctor or pharmacist.
How can I get help with preparing and administering the injection?
If you have any questions about the correct way to administer Winrevair or need more information, you can call your doctor or pharmacist.
For any other information about this medication, consult your doctor or pharmacist or the local representative of the marketing authorization holder. You will find the representative's contact information in the patient information leaflet:
Date of the last revision of this leaflet: {MM/YYYY}
- Country of registration
- Active substance
- Prescription requiredYes
- Manufacturer
- This information is for reference only and does not constitute medical advice. Always consult a doctor before taking any medication. Oladoctor is not responsible for medical decisions based on this content.
- Alternatives to WINREVAIR 45 mg POWDER AND SOLVENT FOR INJECTABLE SOLUTIONDosage form: INJECTABLE, 60 mgActive substance: Antihypertensives for pulmonary arterial hypertensionManufacturer: Merck Sharp & Dohme B.V.Prescription required
Online doctors for WINREVAIR 45 mg POWDER AND SOLVENT FOR INJECTABLE SOLUTION
Discuss questions about WINREVAIR 45 mg POWDER AND SOLVENT FOR INJECTABLE SOLUTION, including use, safety considerations and prescription review, subject to medical assessment and local regulations.


Frequently Asked Questions
