

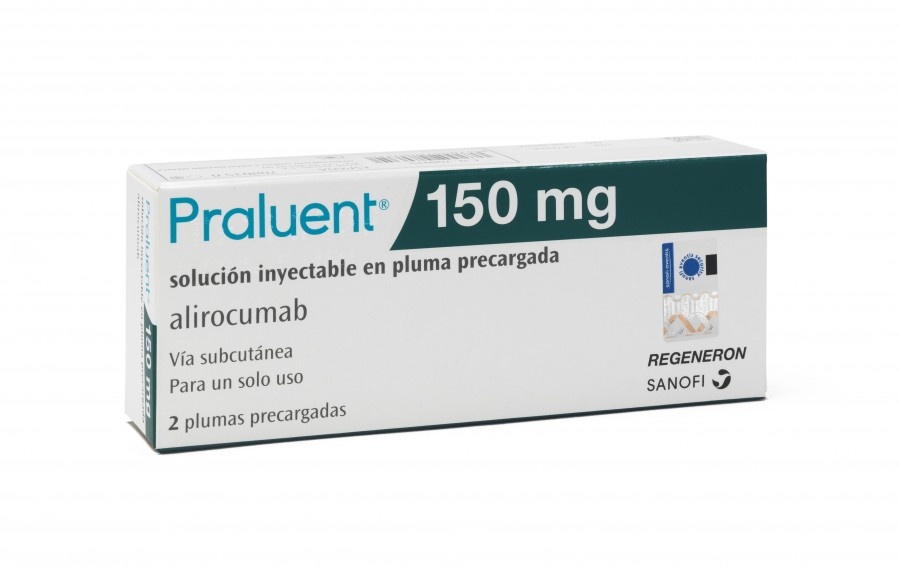
PRALUENT 150 mg SOLUTION FOR INJECTION IN A PRE-FILLED PEN
Ask a doctor about a prescription for PRALUENT 150 mg SOLUTION FOR INJECTION IN A PRE-FILLED PEN


How to use PRALUENT 150 mg SOLUTION FOR INJECTION IN A PRE-FILLED PEN
Introduction
Package Leaflet: Information for the User
Praluent 75mg solution for injection in pre-filled pen
Praluent 150mg solution for injection in pre-filled pen
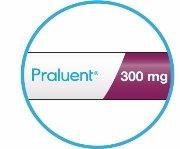
Praluent 300mg solution for injection in pre-filled pen
alirocumab
Read all of this leaflet carefully before you start using this medicine because it contains important information for you.
- Keep this leaflet, you may need to read it again.
- If you have any further questions, ask your doctor, pharmacist, or nurse.
- This medicine has been prescribed for you only. Do not pass it on to others. It may harm them, even if their signs of illness are the same as yours.
- If you get any side effects, talk to your doctor, pharmacist, or nurse. This includes any possible side effects not listed in this leaflet. See section 4.
Contents of the pack
- What is Praluent and what is it used for
- What you need to know before you use Praluent
- How to use Praluent
- Possible side effects
- Storage of Praluent
- Contents of the pack and further information
1. What is Praluent and what is it used for
What is Praluent
- The active substance of Praluent is alirocumab.
- Praluent is a monoclonal antibody (a type of specialized protein designed to bind to a target substance in the body). Monoclonal antibodies are proteins that recognize and bind to other unique proteins. Alirocumab binds to PCSK9.
How Praluent works
Praluent helps to reduce your levels of "bad" cholesterol (also called "LDL cholesterol"). Praluent blocks a protein called PCSK9.
- PCSK9 is a protein secreted by liver cells.
- Normally, "bad" cholesterol is removed from the blood by binding to specific "receptors" (docking stations) in the liver.
- PCSK9 reduces the number of these receptors in the liver, causing "bad" cholesterol levels to be higher than they should be.
- By blocking PCSK9, Praluent increases the number of available receptors to help remove "bad" cholesterol and thus reduces "bad" cholesterol levels.
What Praluent is used for
- In adults with high cholesterol levels in their blood (heterozygous and non-familial hypercholesterolemia or mixed dyslipidemia) and children and adolescents aged 8 years and older with heterozygous familial hypercholesterolemia (HeFH).
- To reduce the risk of cardiovascular events in adults with high cholesterol levels in the blood and with established cardiovascular disease.
It is given:
- in combination with a statin (a medicine commonly used to treat high cholesterol) or with other medicines to lower cholesterol, if the maximum dose of a statin does not sufficiently lower cholesterol levels, or
- alone or with another cholesterol-lowering medicine when statins are not tolerated or cannot be used.
- Continue with your cholesterol-lowering diet while taking this medicine.
2. What you need to know before you use Praluent
Do not use Praluent
- if you are allergic to alirocumab or any of the other ingredients of this medicine (listed in section 6).
Warnings and precautions
Consult your doctor, pharmacist, or nurse before starting treatment with Praluent.
If you experience a severe allergic reaction, stop treatment with Praluent and seek medical attention immediately. Severe allergic reactions have sometimes occurred, including hypersensitivity (difficulty breathing), angioedema (swelling of the face, lips, throat, or tongue), eczema (red patches on the skin, sometimes with blisters), and hypersensitivity vasculitis (a specific type of hypersensitivity reaction with symptoms such as diarrhea, with a skin rash, or purple spots on the skin). For a list of allergic reactions that may occur while taking Praluent, see section 4.
Tell your doctor before using this medicine if you have any kidney or liver disease, as Praluent has been studied in few patients with severe kidney disease and in no patients with severe liver disease.
Children and adolescents
Praluent must not be given to children under 8 years of age because there is no experience with the use of this medicine in this age group.
Using Praluent with other medicines
Tell your doctor, pharmacist, or nurse if you are using, have recently used, or might use any other medicines.
Pregnancy and breastfeeding
If you are pregnant or breastfeeding, think you may be pregnant, or are planning to have a baby, ask your doctor or pharmacist for advice before taking this medicine.
Praluent is not recommended during pregnancy or breastfeeding.
Driving and using machines
This medicine is not expected to affect your ability to drive or use machines.
3. How to use Praluent
Follow the instructions for administration of this medicine exactly as told by your doctor, pharmacist, or nurse. If you are not sure, ask your doctor, pharmacist, or nurse again.
How much to inject
Your doctor will tell you what dose is right for you and how often you should inject it (75 mg or 150 mg every 2 weeks or 300 mg every 4 weeks/monthly). Your doctor will check your cholesterol levels and may adjust the dose (increase or decrease) during treatment.
Always check the name and concentration of the medicine on the pen label.
When to inject
Adults
Inject Praluent every 2 weeks (for 75 mg or 150 mg doses) or every 4 weeks/monthly (for 300 mg dose). To administer the 300 mg dose, give one 300 mg injection or two consecutive 150 mg injections at two different injection sites.
Children and adolescents aged 8 years and older with HeFH:
Inject Praluent every 2 weeks (for 75 mg or 150 mg doses) or every 4 weeks/monthly (for 150 mg or 300 mg doses).
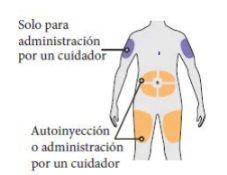
In adolescents aged 12 years and older, Praluent should be administered by an adult or under their supervision.
In children under 12 years, Praluent should be administered by a caregiver.
Before injecting
Praluent should be left at room temperature before use.
Read the detailed instructions for use in the package leaflet before injecting Praluent.
Where to inject
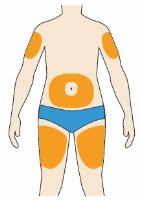
Praluent is injected under your skin in the thigh, abdomen, or upper arm.
Read the detailed instructions for use in the package leaflet on where to inject.
How to use the pre-filled pen
Before using the pen for the first time, your doctor, pharmacist, or nurse will show you how to inject Praluent.
- Always read the "Instructions for use"that come with the pack.
- Always use the pen as described in the "Instructions for use".
If you use more Praluent than you should
If you use more Praluent than you should, talk to your doctor, pharmacist, or nurse.
If you forget to use Praluent
If you miss a dose of Praluent, inject the missed dose as soon as possible. Then, inject the next dose at the usual scheduled time. This will keep you on your original schedule. If you are not sure when to inject Praluent, ask your doctor, pharmacist, or nurse.
If you stop treatment with Praluent
Do not stop treatment with Praluent without talking to your doctor first. If you stop treatment with Praluent, your cholesterol levels may increase.
If you have any further questions on the use of this medicine, ask your doctor, pharmacist, or nurse.
4. Possible side effects
Like all medicines, this medicine can cause side effects, although not everybody gets them.
If you experience a severe allergic reaction, stop treatment with Praluent and seek medical attention immediately. Severe allergic reactions have sometimes occurred, including hypersensitivity (difficulty breathing), angioedema (swelling of the face, lips, throat, or tongue), eczema (red patches on the skin, sometimes with blisters), and hypersensitivity vasculitis (a specific type of hypersensitivity reaction with symptoms such as diarrhea, with a skin rash, or purple spots on the skin) (may affect up to 1 in 1,000 people).
Other side effects are:
Common(may affect up to 1 in 10 people)
- redness, itching, swelling, pain/tenderness at the injection site (local reactions at the injection site)
- signs or symptoms of the upper respiratory tract such as sore throat, nasal secretion, sneezing
- itching (pruritus).
Rare(may affect up to 1 in 1,000 people)
- red, itchy, swollen hives (urticaria).
Frequency not known
Since the marketing of Praluent, the following side effects have been reported, with a frequency not known:
- flu-like illness.
- difficulty breathing, or swelling of the face, lips, throat, or tongue (angioedema).
Reporting of side effects
If you experience any side effects, talk to your doctor, pharmacist, or nurse. This includes any possible side effects not listed in this leaflet. You can also report side effects directly through the national reporting system listed in Appendix V. By reporting side effects, you can help provide more information on the safety of this medicine.
5. Storage of Praluent
Keep this medicine out of the sight and reach of children.
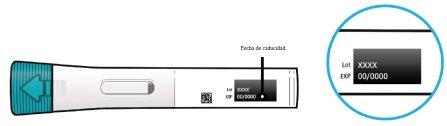
Do not use this medicine after the expiry date which is stated on the label and on the carton after EXP. The expiry date is the last day of the month shown.
Store in a refrigerator (between 2°C and 8°C). Do not freeze.
Keep the pen in the outer carton to protect it from light.
If necessary, individual pre-filled pens may be kept at room temperature (below 25°C) for a maximum of 30 days. Protected from light. After removal from the refrigerator, Praluent should be used within 30 days or discarded.
Do not use this medicine if it has changed color, is cloudy, or contains visible particles.
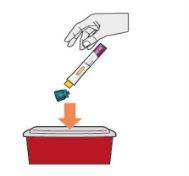
After use, put the pen in a puncture-resistant container. Ask your doctor, pharmacist, or nurse how to dispose of the container. Do not recycle the container.
Medicines should not be disposed of via wastewater or household waste. Ask your pharmacist how to dispose of medicines no longer required. This will help protect the environment.
6. Container Contents and Additional Information
Composition of Praluent
- The active substance is alirocumab.
Praluent 75 mg solution for injection in a pre-filled pen
Each pre-filled pen contains 75 milligrams of alirocumab
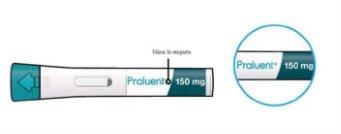
Praluent 150 mg solution for injection in a pre-filled pen
Each pre-filled pen contains 150 milligrams of alirocumab.
Praluent 300 mg solution for injection in a pre-filled pen
Each pre-filled pen contains 300 milligrams of alirocumab
- The other components are histidine, sucrose, polysorbate 20, and water for injectable preparations.
Product Appearance and Container Contents
Praluent is a clear, colorless to pale yellow injectable solution presented in a pre-filled pen.
Praluent 75 mg solution for injection in a pre-filled pen
Each pre-filled pen with a green push button contains 1 ml of solution that delivers a single dose of 75 milligrams of alirocumab.
It is available in packs of 1, 2, or 6 pre-filled pens.
Each pre-filled pen without an activation button contains 1 ml of solution that delivers a single dose of 75 milligrams of alirocumab.
It is available in packs of 1, 2, 3 pre-filled pens without an activation button or a multiple pack containing 6 (2 packs of 3) pre-filled pens without an activation button.
Praluent 150 mg solution for injection in a pre-filled pen
Each pre-filled pen with a gray push button contains 1 ml of solution that delivers a single dose of 150 milligrams of alirocumab.
It is available in packs of 1, 2, or 6 pre-filled pens.
Each pre-filled pen without an activation button contains 1 ml of solution that delivers a single dose of 150 milligrams of alirocumab.
It is available in packs of 1, 2, 3 pre-filled pens without an activation button or a multiple pack containing 6 (2 packs of 3) pre-filled pens without an activation button.
Praluent 300 mg solution for injection in a pre-filled pen
Each pre-filled pen without an activation button contains 2 ml of solution that delivers a single dose of 300 milligrams of alirocumab.
It is available in packs of 1 or 3 pre-filled pens without an activation button.
Not all pack sizes and presentations may be marketed.
Marketing Authorization Holder
Sanofi Winthrop Industrie
82 avenue Raspail
94250 Gentilly
France
Manufacturer
Sanofi-Aventis Deutschland GmbH
Industriepark Höchst
Brüningstraße 50
65926 Frankfurt am Main
Germany
Genzyme Ireland Ltd
IDA Industrial Park
Old Kilmeaden Road
Waterford
Ireland
You can request more information about this medicinal product from the local representative of the Marketing Authorization Holder listed in the package leaflet.
België/Belgique/Belgien Sanofi Belgium Tél/Tel: +32 (0)2 710 54 00 | Lietuva Swixx Biopharma UAB Tel: +370 5 236 91 40 |
| Luxembourg/Luxemburg Sanofi Belgium Tél/Tel: +32 (0)2 710 54 00 (Belgique/Belgien) |
Ceská republika Sanofi s.r.o. Tel: +420 233 086 111 | Magyarország SANOFI-AVENTIS Zrt., Magyarország Tel.: +36 1 505 0050 |
Danmark Sanofi A/S Tlf: +45 45 16 70 00 | Malta Sanofi S.r.l. Tel: +39 02 39394275 |
Deutschland Sanofi-Aventis Deutschland GmbH Tel.: 0800 52 52 010 Tel. from abroad: +49 69 305 21 131 | Nederland Sanofi B.V. Tel: +31 20 245 4000 |
Eesti Swixx Biopharma OÜ Tel: +372 640 10 30 | Norge sanofi-aventis Norge AS Tlf: +47 67 10 71 00 |
Ελλάδα Sanofi-Aventis Μονοπρóσωπη AEBE Τηλ: +30 210 900 16 00 | Österreich sanofi-aventis GmbH Tel: +43 1 80 185 – 0 |
España sanofi-aventis, S.A Tel: +34 93 485 94 00 | Polska Sanofi Sp. z o.o. Tel.: +48 22 280 00 00 |
France Sanofi Winthrop Industrie Tél: 0 800 222 555 Appel depuis l’étranger : +33 1 57 63 23 23 | Portugal Sanofi - Produtos Farmacêuticos, Lda. Tel: +351 21 35 89 400 |
Hrvatska Swixx Biopharma d.o.o. Tel: +385 1 2078 500 | România Sanofi Romania SRL Tel: +40 (0) 21 317 31 36 |
Ireland sanofi-aventis Ireland Ltd. T/A SANOFI Tel: +353 (0) 1 403 56 00 | Slovenija Swixx Biopharma d.o.o. Tel: +386 1 235 51 00 |
Ísland Vistor hf. Sími: +354 535 7000 | Slovenská republika Swixx Biopharma s.r.o. Tel: +421 2 208 33 600 |
Italia Sanofi S.r.l. Tel: 800 131212 (technical questions) 800 536389 (other questions) | Suomi/Finland Sanofi Oy Puh/Tel: +358 (0) 201 200 300 |
Κύπρος C.A. Papaellinas Ltd. Τηλ: +357 22 741741 | Sverige Sanofi AB Tel: +46 (0)8 634 50 00 |
Latvija Swixx Biopharma SIA Tel: +371 6 616 47 50 | United Kingdom(Northern Ireland) sanofi-aventis Ireland Ltd. T/A SANOFI Tel: +44 (0) 800 035 2525 |
Date of the last revision of this leaflet:
Detailed information on this medicinal product is available on the European Medicines Agency website: http://www.ema.europa.eu.
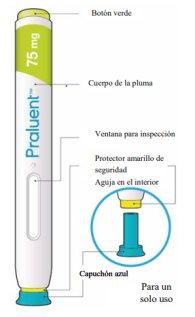
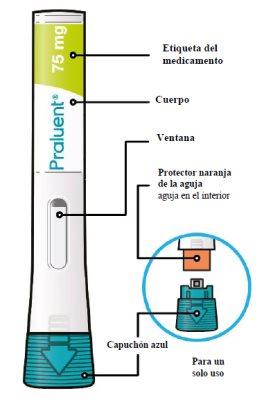
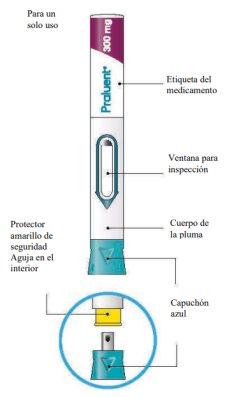
Praluent pre-filled pen
Instructions for use
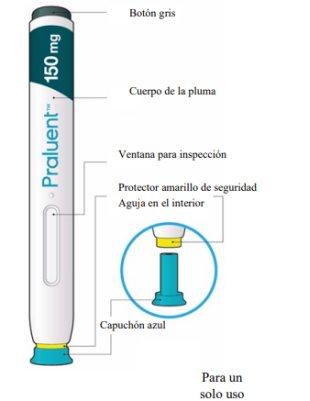
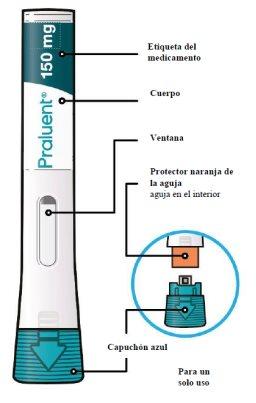
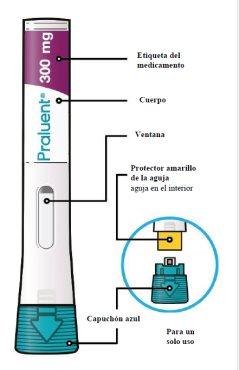
The following image shows the parts of the Praluent pen.
Important Information
- The medicine is injected under the skin and can be administered by yourself or another person (caregiver).
- This pen should only be used for one injection and then discarded.
- In adolescents from 12 years of age, Praluent should be administered by an adult or under their supervision.
- In children under 12 years of age, Praluent should be administered by a caregiver.
What to Do
- Keep the Praluent pen out of sight and reach of children.
- Read all the instructions carefully before using the Praluent pen.
- Follow these instructions each time you use a Praluent pen.
What Not to Do
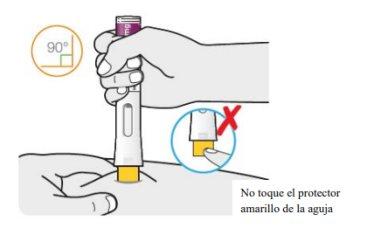
- Do not touch the yellow safety protector.
- Do not use the pen if it has been dropped on the floor or is damaged.
- Do not use the pen if the blue cap is missing or not firmly attached.
- Do not reuse the pen.
- Do not shake the pen.
- Do not freeze the pen.
- Do not expose the pen to direct sunlight.
Keep this leaflet. If you have any further questions, ask your doctor, pharmacist, or nurse or contact the local representative of the Marketing Authorization Holder listed in the leaflet.
STEP A: Injection Preparation
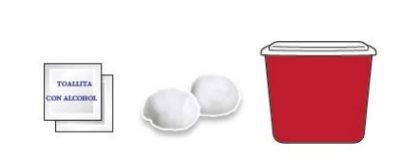
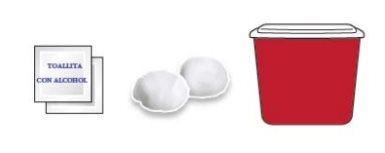
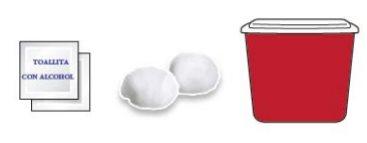
Before you start, you will need:
- The Praluent pen
- Alcohol swabs
- A cotton ball or gauze
- A sharps container (see Step B, 8).
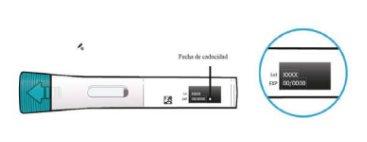
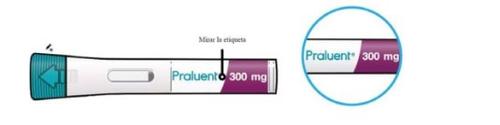
- Check the pen label.
- Make sure it contains the correct medicine and dose.
- Check the expiration date of the pen; do not use it if it is expired.
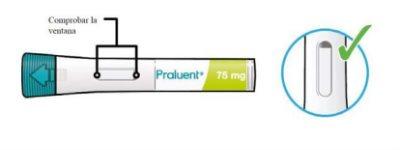
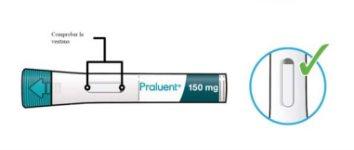
- Check the inspection window.
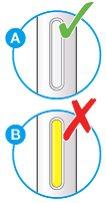
- Make sure the liquid is clear, colorless to pale yellow, and does not contain particles; otherwise, do not use the pen (see Image A).
- You may see air bubble(s). This is normal.
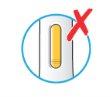
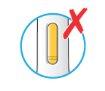
- Do not use the pen if the inspection window is solid yellow (see Image B).

- Let the pen warm up to room temperature for 30 to 40 minutes.
- Let the pen warm up on its own; do not try to heat it up.
- Do not put the pen back in the refrigerator.

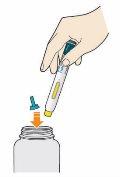
- Prepare the injection site.
- Wash your hands with water and soap and dry them with a towel.
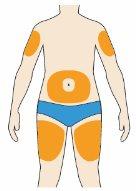
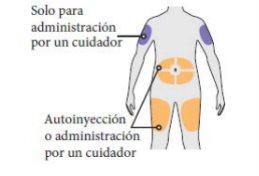
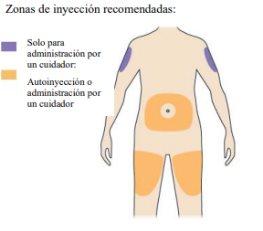
- You can inject into:
- the thigh
- the abdomen (except for the area 5 cm around the navel)
- the upper outer part of your arm
(See image).
- You can inject while standing or sitting.
- Clean the skin at the injection site with an alcohol swab.
- Do not choose an area of skin that is painful, hardened, red, or inflamed.
- Do not choose an area close to a visible vein.
- Inject each time in a different area.
- Do not inject Praluent together with other injectable medicines in the same area.
STEP B: How to Inject
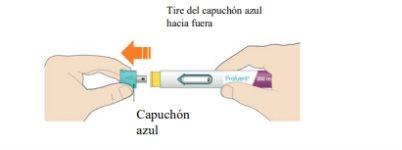
- After completing all the steps of "Step A: Injection Preparation", remove the blue cap.
- Do not remove the cap until you are ready to inject.
- Do not put the blue cap back on.

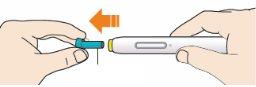
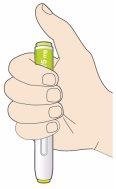
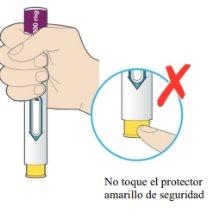
- Hold the Praluent pen as follows.
- Do not touch the yellow safety protector.
- Make sure the inspection window is visible.
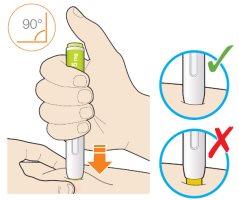
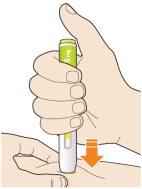
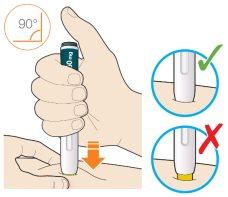
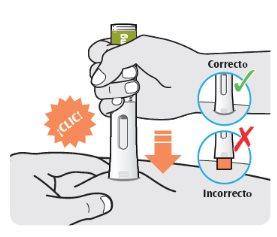
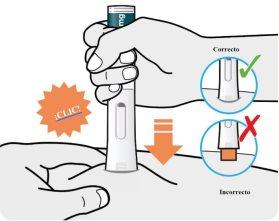
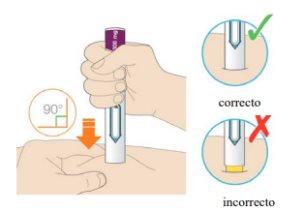
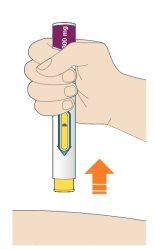
- Press the yellow safety protector against the skin at an angle of approximately 90 degrees.
- In children under 12 years of age, it is necessary to pinch the skin before and during the injection.
- In adolescents over 12 years of age and adults, it may be necessary to pinch the skin so that the injection site is firm.
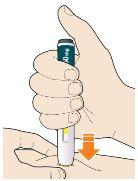
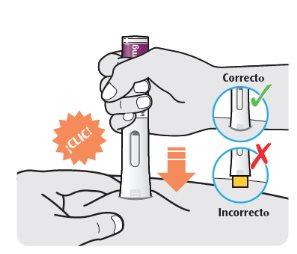
- Press and hold the pen firmly against the body until the yellow safety protector is no longer visible. The pen will not work if the yellow safety protector is not pressed all the way.
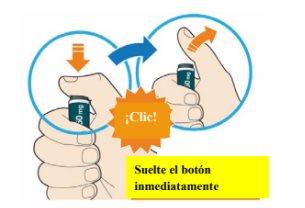
- Press and immediately release the green push button with your thumb.
- You will hear a click. At this point, the injection will have started.
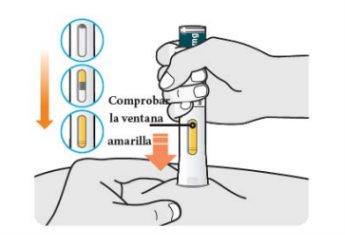
- The inspection window will start to turn yellow.

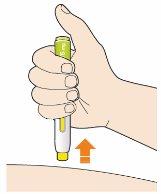
- Keep the pen against the skin after releasing the push button.
- The injection may take up to 20 seconds.
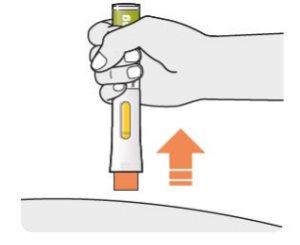
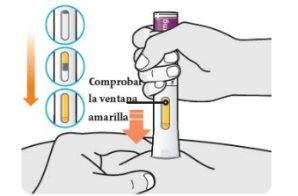
- Check if the inspection window is yellow before removing the pen.
- Do not remove the pen until the entire inspection window is yellow.
- The injection will be complete when the inspection window has turned completely yellow, and you may hear a second click.
- If the inspection window does not turn completely yellow, contact the local representative of the Marketing Authorization Holder for assistance. Do not administer a second dose without talking to your doctor, pharmacist, or nurse first.

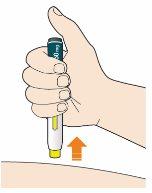
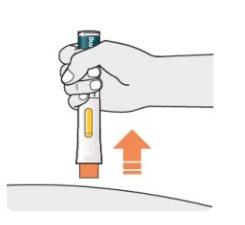
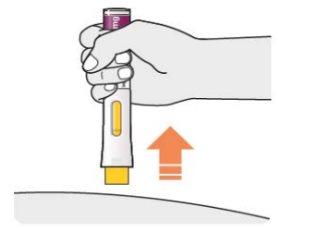
- Remove the pen from the skin.
- Do not rub the skin surface after the injection.
- If bleeding occurs, press the injection site with a cotton ball or gauze until it stops bleeding.
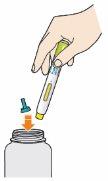
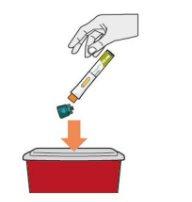
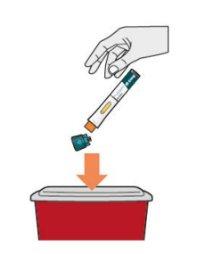
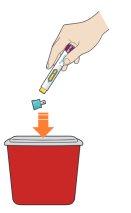
- Dispose of the pen and cap.
- Do not put the blue cap back on.
- Dispose of the pen and cap in a sharps container immediately after use.
- Ask your doctor, pharmacist, or nurse how to dispose of the container.
- Always keep the container out of sight and reach of children.
Praluent pre-filled pen
Instructions for use
The following image shows the parts of the Praluent pen.

Important Information
- The medicine is injected under the skin and can be administered by yourself or another person (caregiver).
- This pen should only be used for one injection and then discarded.
- In adolescents from 12 years of age, Praluent should be administered by an adult or under their supervision.
- In children under 12 years of age, Praluent should be administered by a caregiver.
What to Do
- Keep the Praluent pen out of sight and reach of children.
- Read all the instructions carefully before using the Praluent pen.
- Follow these instructions each time you use a Praluent pen.
What Not to Do
- Do not touch the yellow safety protector.
- Do not use the pen if it has been dropped on the floor or is damaged.
- Do not use the pen if the blue cap is missing or not firmly attached.
- Do not reuse the pen.
- Do not shake the pen.
- Do not freeze the pen.
- Do not expose the pen to direct sunlight.
Keep this leaflet. If you have any further questions, ask your doctor, pharmacist, or nurse or contact the local representative of the Marketing Authorization Holder listed in the leaflet.
STEP A: Injection Preparation
Before you start, you will need:
- The Praluent pen
- Alcohol swabs
- A cotton ball or gauze
- A sharps container (see Step B, 8).
- Check the pen label.
- Make sure it contains the correct medicine and dose.
- Check the expiration date of the pen; do not use it if it is expired.
- Check the inspection window.
- Make sure the liquid is clear, colorless to pale yellow, and does not contain particles; otherwise, do not use the pen (see Image A).
- You may see air bubble(s). This is normal.
- Do not use the pen if the inspection window is solid yellow (see Image B).
- Let the pen warm up to room temperature for 30 to 40 minutes.
- Let the pen warm up on its own; do not try to heat it up.
- Do not put the pen back in the refrigerator.

- Prepare the injection site.
- Wash your hands with water and soap and dry them with a towel.
- You can inject into:
- the thigh
- the abdomen (except for the area 5 cm around the navel)
- the upper outer part of your arm
(See image).
- You can inject while standing or sitting.
- Clean the skin at the injection site with an alcohol swab.
- Do not choose an area of skin that is painful, hardened, red, or inflamed.
- Do not choose an area close to a visible vein.
- Inject each time in a different area.
- Do not inject Praluent together with other injectable medicines in the same area.
STEP
B: How to Inject
- After completing all the steps of "Step A: Injection Preparation", remove the blue cap.
- Do not remove the cap until you are ready to inject.
- Do not put the blue cap back on.


- Hold the Praluent pen as follows.
- Do not touch the yellow safety protector.
- Make sure the inspection window is visible.
- Press the yellow safety protector against the skin at an approximate angle of 90°.
- In children under 12 years of age, it is necessary to pinch the skin before and during injection.
- In adolescents over 12 years of age and adults, it may be necessary to pinch the skin so that the injection site is firm.
- Press and hold the pen firmly against the body until the yellow safety protector is no longer visible. The pen will not work if the yellow safety protector is not pressed all the way.
- Press and immediately release the gray push button with your thumb.
- You will hear a click. At that moment, the injection will have started.
- The inspection window will begin to turn yellow.
- Keep the pen against the skin after releasing the push button.
- The injection may take up to 20 seconds.
- Check if the inspection window is yellow before removing the pen.
- Do not remove the pen until the entire inspection window is yellow.
- The injection will be complete when the inspection window has turned completely yellow and you may hear a second click.
- If the inspection window does not turn completely yellow, contact the local representative of the Marketing Authorization Holder for assistance. Do not administer a second dose without first talking to your doctor, pharmacist, or nurse.

- Remove the pen from the skin.
- Do not rub the skin surface after injection.
- If bleeding occurs, press the injection site with a cotton ball or gauze until it stops bleeding.
- Dispose of the pen and cap.
- Do not put the blue cap back on.
- Dispose of the pen and cap in a puncture-proof container immediately after use.
- Ask your doctor, pharmacist, or nurse how to dispose of the container.
- Always keep the container out of sight and reach of children.
Praluent Pre-filled Pen
Instructions for Use
The following image shows the parts of the Praluent pen.
Important Information
- This device is a pre-filled, disposable pen for single use. It contains 75 mg of Praluent (alirocumab) in 1 ml. The Praluent pen contains the medication prescribed by your doctor.
- The medication is injected under the skin and can be administered by you or another person (caregiver).
- It is important that you do not attempt to administer it yourself or have another person administer it unless you have been trained by a healthcare professional.
- This pen should only be used for a single injection and then discarded.
What to Do
- Keep the Praluent pen out of sight and reach of children.
- Read all the instructions carefully before using the Praluent pen.
- Follow these instructions each time you use a Praluent pen.
- Store in the refrigerator (2°C to 8°C).
- Keep the pen in the outer packaging to protect it from light.
What Not to Do
- Do nottouch the orange needle protector.
- Do notuse the pen if it has been dropped or is damaged.
- Do notuse the pen if the blue cap is missing or not firmly attached.
- Do notreuse the pen.
- Do notshake the pen.
- Do notfreeze the pen.
- Do notexpose the pen to extreme heat.
- Do notexpose the pen to direct sunlight.
Keep this leaflet. If you have any doubts, consult your doctor, pharmacist, or nurse orcontact the local representative of the Marketing Authorization Holderlisted in the leaflet.
STEPA: Injection Preparation
- Look at the pen label.
- Check that it contains the correct medication and dose.

- Check the expiration date of the pen; do not use if it is expired.

Do notuse the Praluent pen if it has been dropped on a hard surface or is damaged.
- Look at the window
- Check that the liquid is transparent, colorless to pale yellow, and does not contain particles.
You may see air bubbles(s). This is normal
 Do notuse this medication if the solution is discolored or cloudy, or if it contains visible flakes or particles.
Do notuse if the window appears solid yellow.
Solid yellow in the window means that the device has been used.
- Let the pen and other items come to room temperature
- Let the pen come to room temperature for 45 minutes.

Do notheat the pen. Let the pen come to room temperature on its own.
Do notput the pen in direct sunlight.
Do notput the pen back in the refrigerator.
- While waiting for the pen to reach room temperature, get the following items:
- Alcohol wipes
- Cotton ball or gauze
- A puncture-proof container (see Step B9 Dispose).
- Prepare the injection site
- Wash your hands with water and soap and dry them with a towel.
- You can inject into (see IMAGE):
- the top of your thighs
- your stomach (except for the area within 5 cm around the navel)
- the upper outer part of your arm (only for administration by a caregiver)
- Clean the skin at the injection site with an alcohol wipe.
- You can inject yourself standing or sitting.
- Use a different area each time you inject.
- Do notchoose a skin area that is painful, hardened, red, or inflamed.
- Do notchoose a skin area close to a visible vein.
- Do notinject Praluent with other injectable medications in the same area.
STEP B: How to Inject
- Remove the blue cap
- Pull the blue cap off and discard it.
Do nottwist the blue cap.
Do notremove the blue cap until you are ready to inject.
Do nottouch the orange needle protector. The needle is inside the orange needle protector.
Do notput the blue cap back on.
Do notuse the pen if the blue cap is missing or not firmly attached.
- Pinch the skin and place the pen
- Pinch the skin to make sure the injection site is firm. This is necessary in children under 12 years of age.
- When you place the orange needle protector on your skin, hold the pen so that you can see the window.
- Place the orange needle protector on your skin at an approximate angle of 90 degrees.
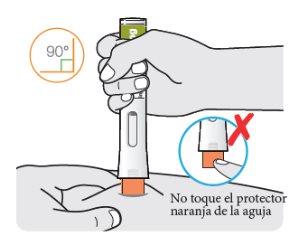
Do notpress the pen against your skin until you are ready to inject.
Do nottouch the orange needle protector. The needle is inside the orange needle protector.
- Administer the injection (press? hold? check)
- Press the pen down against the skin until the orange needle protector is inside the pen and hold it.
The injection will not start until the orange needle protector is fully pressed.
There will be a click when the injection starts. The window will begin to turn yellow.
- Hold the pen against your skin. You may hear a second click.
- Check that the window is completely yellow.

If the window does not turn completely yellow, remove the pen and contact the local representative of the Marketing Authorization Holder listed in the leaflet.
Do notadminister a second dose without first talking to your doctor, pharmacist, or nurse.
- Remove
- Remove the pen from your skin
Do notrub the skin surface after injection.
- If bleeding occurs, press the injection site with a cotton ball or gauze until it stops bleeding.
- Dispose of
- Dispose of the pen and cap in a puncture-proof container immediately after use.
Do notput the blue cap back on
- Ask your doctor, pharmacist, or nurse how to dispose of the container.
- Always keep the container out of sight and reach of children.
Praluent Pre-filled Pen
Instructions for Use
The following image shows the parts of the Praluent pen.
Important Information
- This device is a pre-filled, disposable pen for single use. It contains 150 mg of Praluent (alirocumab) in 1 ml. The Praluent pen contains the medication prescribed by your doctor.
- The medication is injected under the skin and can be administered by you or another person (caregiver).
- It is important that you do not attempt to administer it yourself or have another person administer it unless you have been trained by a healthcare professional.
- This pen should only be used for a single injection and then discarded.
What to Do
- Keep the Praluent pen out of sight and reach of children.
- Read all the instructions carefully before using the Praluent pen.
- Follow these instructions each time you use a Praluent pen.
- Store in the refrigerator (2°C to 8°C).
- Keep the pen in the outer packaging to protect it from light.
What Not to Do
- Do nottouch the orange needle protector.
- Do notuse the pen if it has been dropped or is damaged.
- Do notuse the pen if the blue cap is missing or not firmly attached.
- Do notreuse the pen.
- Do notshake the pen.
- Do notfreeze the pen.
- Do notexpose the pen to extreme heat.
- Do notexpose the pen to direct sunlight.
Keep this leaflet. If you have any doubts, consult your doctor, pharmacist, or nurse orcontact the local representative of the Marketing Authorization Holderlisted in the leaflet.
STEPA: Injection Preparation
- Look at the pen label.
- Check that it contains the correct medication and dose.
- Check the expiration date of the pen; do not use if it is expired.
Do notuse the Praluent pen if it has been dropped on a hard surface or is damaged.
- Look at the window
- Check that the liquid is transparent, colorless to pale yellow, and does not contain particles.
You may see air bubbles(s). This is normal
 Do notuse this medication if the solution is discolored or cloudy, or if it contains visible flakes or particles.
Do notuse if the window appears solid yellow.
Solid yellow in the window means that the device has been used.
- Let the pen and other items come to room temperature
- Let the pen come to room temperature for 45 minutes.

Do notheat the pen. Let the pen come to room temperature on its own.
Do notput the pen in direct sunlight.
Do notput the pen back in the refrigerator.
- While waiting for the pen to reach room temperature, get the following items:
- Alcohol wipes
- Cotton ball or gauze
- A puncture-proof container (see Step B9 Dispose).
- Prepare the injection site
- Wash your hands with water and soap and dry them with a towel.
- You can inject into (see IMAGE):
- the top of your thighs
- your stomach (except for the area within 5 cm around the navel)
- the upper outer part of your arm (only for administration by a caregiver)
- Clean the skin at the injection site with an alcohol wipe.
- You can inject yourself standing or sitting.
- Use a different area each time you inject.
- Do notchoose a skin area that is painful, hardened, red, or inflamed.
- Do notchoose a skin area close to a visible vein.
- Do notinject Praluent with other injectable medications in the same area.
STEP B: How to Inject
- Remove the blue cap
- Pull the blue cap off and discard it.
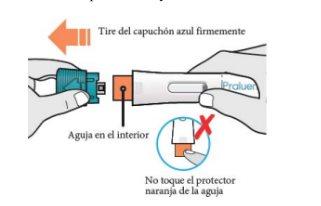
Do nottwist the blue cap
Do notremove the blue cap until you are ready to inject
Ready for injection.
Donot touch the orange needle protector. The needle is inside the orange needle protector.
Donot put the blue cap back on.
Donot use the pen if the blue cap is not on or not firmly attached.
- Pinch the skin and place the pen
- Pinch the skin to make sure the injection site is firm. This is necessary in children under 12 years of age.
- When you place the orange needle protector on your skin, hold the pen so you can see the window.
- Place the orange needle protector on your skin at an approximate angle of 90 degrees.
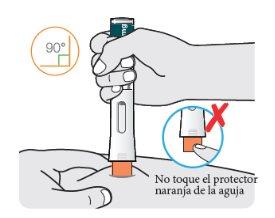
Donot press the pen against your skin until you are ready to inject.
Donot touch the orange needle protector. The needle is inside the orange needle protector.
- Administer the injection (press? hold? check)
- Press the pen down against the skin until the orange needle protector is inside the pen and hold it down.
The injection will not start until the orange needle protector is fully pressed down.
There will be a click when the injection starts. The window will start to turn yellow.
- Hold the pen down against your skin. You may hear a second click.
- Check that the window is completely yellow.
If the window does not turn completely yellow, remove the pen and contact the local representative of the Marketing Authorization Holder listed in the package leaflet.
Donot administer a second dose without talking to your doctor, pharmacist, or nurse first.
- Remove
- Remove the pen from your skin
Donot rub the skin surface after injection.
- If bleeding occurs, press the injection site with a cotton ball or gauze until it stops bleeding.
- Dispose
a. Dispose of the pen and cap in a puncture-resistant container immediately after use.
Donot put the blue cap back on
- Ask your doctor, pharmacist, or nurse how to dispose of the container.
- Always keep the container out of sight and reach of children.
Praluent pre-filled pen
Instructions for use
The following image shows the parts of the Praluent pen.
Important information
- The medicine is injected under the skin and can be administered by you or another person (caregiver).
- It is important that you do not attempt to administer it yourself or have another person administer it unless you have been trained by a healthcare professional.
- This pen should only be used for one injection and then discarded.
What to do
- Keep the Praluent pen out of sight and reach of children.
- Read all the instructions carefully before using the Praluent pen.
- Follow these instructions each time you use a Praluent pen.
What not to do
- Donot touch the yellow safety protector.
- Donot use the pen if it has been dropped on the floor or is damaged.
- Donot use the pen if the blue cap is missing or not firmly attached.
- Donot reuse the pen.
- Donot shake the pen.
- Donot expose the pen to extreme heat.
- Donot expose the pen to direct sunlight.
Keep this leaflet. If you have any questions, consult your doctor, pharmacist, or nurse orcontact the local representative of the Marketing Authorization Holderlisted in the leaflet.
STEPA: Preparation for injection
Before starting, you will need:
- the Praluent pen
- alcohol swabs
- a cotton ball or gauze
- a puncture-resistant container (see Step B7 Dispose).
- Look at the pen label.
- Check that it contains the correct medicine and dose.
- Check the expiration date of the pen; do not use it if it is expired.
- Do not use the Praluent pen if it has been dropped on a hard surface or is damaged.
- Look at the inspection window.
- Check that the liquid is clear, colorless to pale yellow, and does not contain particles (see Image A).
- Do not use this medicine if the solution is discolored or cloudy, or if it contains flakes or visible particles.
- You may see air bubble(s). This is normal.
- Do not use the pen if the inspection window is solid yellow (see Image B).
- Let the pen come to room temperature for 45minutes.
- This is important to administer the full dose and help minimize discomfort.
- Let the pen come to room temperature on its own; do not try to warm it up.
- Do not put the pen back in the refrigerator.

- Prepare the injection site.
- Wash your hands with soap and water and dry them with a towel.
- You can inject into (see IMAGE):
- the top of your thighs
- your stomach (except for the area 5 cm around the navel)
- the upper outer part of your arm (only for administration by a caregiver)
- You can inject yourself while standing or sitting.
- Clean the skin at the injection site with an alcohol swab.
- Do not choose a skin area that is painful, hardened, red, or inflamed.
- Do not choose a skin area close to a visible vein.
- Change (rotate) your injection site; make sure it is not the same area on the same side you used last time.
- Do not inject Praluent together with other injectable medicines in the same area.
STEPB: How to inject
- After completing all the steps of “StepA: Preparation for injection”, remove the blue cap.
- Do not remove the cap until you are ready to inject.
- Do not put the blue cap back on.
- Do not use the pen if the blue cap is not on or not firmly attached.
- Hold the Praluent pen as follows.
- Do not touch the yellow safety protector. The needle is inside the yellow safety protector.
- Make sure you can see the inspection window.
- Do not press the pen against the skin until you are ready to inject.
- Press the yellow safety protector against the skin at an approximate angle of 90°.
- Pinch the skin to make sure the injection site is firm
- Press the pen down against the skin until the yellow safety protector is inside the pen and hold it down (see image).
- The injection will not start until the yellow safety protector is fully pressed down.
- There will be a click when the injection starts. The window will start to turn yellow.
?Hold the pen down against your skin
- You may hear a second click.
- Check that the window is completely yellow.
- Then, count slowly to 5.
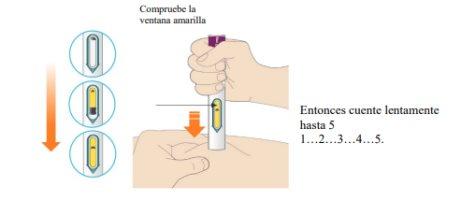
- Check again that the inspection window is yellow before removing the pen.
- If the inspection window does not turn completely yellow, contact the local representative of the Marketing Authorization Holder for assistance.
- Do not administer a second dose without talking to your doctor, pharmacist, or nurse first.
- Remove the pen from your skin.
- Do not rub the skin surface after injection.
- If bleeding occurs, press the injection site with a cotton ball or gauze until it stops bleeding.
7.Dispose of the pen and cap.
- Do not put the blue cap back on.
- Dispose of the pen and cap in a puncture-resistant container immediately after use.
- Ask your doctor, pharmacist, or nurse how to dispose of the container.
- Always keep the container out of sight and reach of children.
Praluent pre-filled pen
Instructions for use
The following image shows the parts of the Praluent pen.
Important information
- This device is a single-use, pre-filled pen. It contains 300 mg of Praluent (alirocumab) in 2 ml. The Praluent pen contains the medicine prescribed by your doctor.
- The medicine is injected under the skin and can be administered by you or another person (caregiver).
- It is important that you do not attempt to administer it yourself or have another person administer it unless you have been trained by a healthcare professional.
- This pen should only be used for one injection and then discarded.
What to do
- Keep the Praluent pen out of sight and reach of children.
- Read all the instructions carefully before using the Praluent pen.
- Follow these instructions each time you use a Praluent pen.
- Store in the refrigerator (2°C to 8°C).
- Keep the pen in the outer packaging to protect it from light.
What not to do
- Donot touch the yellow needle protector.
- Donot use the pen if it has been dropped on the floor or is damaged.
- Donot use the pen if the blue cap is missing or not firmly attached.
- Donot reuse the pen.
- Donot shake the pen.
- Donot freeze the pen.
- Donot expose the pen to extreme heat.
- Donot expose the pen to direct sunlight.
Keep this leaflet. If you have any questions, consult your doctor, pharmacist, or nurse orcontact the local representative of the Marketing Authorization Holderlisted in the leaflet.
STEPA: Preparation for injection
- Look at the pen label.
- Check that it contains the correct medicine and dose.
- Check the expiration date of the pen; do not use it if it is expired.
Donot use the Praluent pen if it has been dropped on a hard surface or is damaged.
- Look at the
- Check that the liquid is clear, colorless to pale yellow, and does not contain particles.
It is possible to see air bubble(s). This is normal
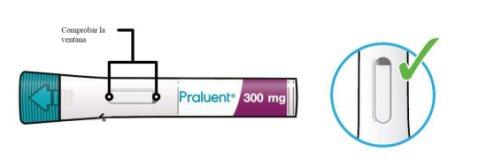
Donot use this medicine if the solution is discolored or cloudy, or if it contains flakes or visible particles.

Donot use if the window appears solid yellow.
Solid yellow in the window means that the device has been used.
- Bring the pen and other items to room temperature
- Let the pen come to room temperature for 45 minutes.

Donot warm up the pen. Let the pen come to room temperature on its own.
Donot put the pen in direct sunlight.
Donot put the pen back in the refrigerator.
- While waiting for the pen to reach room temperature, get the following items:
- Alcohol swabs
- Cotton ball or gauze
- A puncture-resistant container (see Step B9 Dispose).
- Prepare the injection site
- Wash your hands with soap and water and dry them with a towel.
- You can inject into (see IMAGE):
- the top of your thighs
- your stomach (except for the area 5 cm around the navel)
- the upper outer part of your arm (only for administration by a caregiver)
- Clean the skin at the injection site with an alcohol swab.

- You can inject yourself while standing or sitting.
- Use a different area each time you inject.
- Donot choose a skin area that is painful, hardened, red, or inflamed.
- Donot choose a skin area close to a visible vein.
- Donot inject Praluent together with other injectable medicines in the same area.
STEP B: How to inject
- Remove the blue cap
- Pull the blue cap off and discard it.
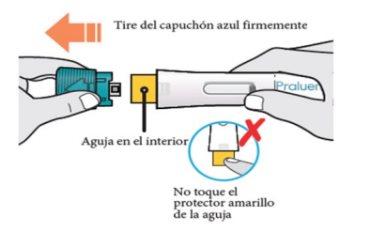
Donot twist the blue cap.
Donot remove the blue cap until you are ready to inject.
Donot touch the yellow needle protector. The needle is inside the yellow needle protector.
Donot put the blue cap back on.
Donot use the pen if the blue cap is not on or not firmly attached.
- Pinch the skin and place the pen
- Pinch the skin to make sure the injection site is firm. This is necessary in children under 12 years of age.
- When you place the yellow needle protector on your skin, hold the pen so you can see the window.
- Place the yellow needle protector on your skin at an approximate angle of 90 degrees.
Donot press the pen against your skin until you are ready to inject.
Donot touch the yellow needle protector. The needle is inside the yellow needle protector.
- Administer the injection (press? hold? check)
- Press the pen down against the skin until the yellow needle protector is inside the pen and hold it down.
The injection will not start until the yellow needle protector is fully pressed down.
There will be a click when the injection starts. The window will start to turn yellow.
- Hold the pen down against your skin. You may hear a second click.
- Check that the window is completely yellow.
If the window does not turn completely yellow, remove the pen and contact the local representative of the Marketing Authorization Holder listed in the package leaflet.
Do notadminister a second dose without speaking to your doctor, pharmacist, or nurse first.
- Remove
- Remove the pen from your skin
Do notrub the skin surface after injection.
- If bleeding occurs, press the injection site with a cotton ball or gauze until it stops bleeding.
- Dispose of
- Dispose of the pen and cap in a sharps container immediately after use.
Do notreplace the blue cap
- Ask your doctor, pharmacist, or nurse how to dispose of the container.
- Always keep the container out of sight and reach of children.
- Country of registration
- Active substance
- Prescription requiredYes
- Manufacturer
- This information is for reference only and does not constitute medical advice. Always consult a licensed doctor before taking any medication. Oladoctor is not responsible for medical decisions based on this content.
- Alternatives to PRALUENT 150 mg SOLUTION FOR INJECTION IN A PRE-FILLED PENDosage form: INJECTABLE, 150 mg/mL (1 prefilled syringe)Active substance: alirocumabManufacturer: Sanofi Winthrop IndustriePrescription requiredDosage form: INJECTABLE, 150 mg/mL (2 prefilled syringes)Active substance: alirocumabManufacturer: Sanofi Winthrop IndustriePrescription requiredDosage form: INJECTABLE, 150 mg/mL (2 prefilled pens)Active substance: alirocumabManufacturer: Sanofi Winthrop IndustriePrescription required
Alternatives to PRALUENT 150 mg SOLUTION FOR INJECTION IN A PRE-FILLED PEN in other countries
The best alternatives with the same active ingredient and therapeutic effect.
Alternative to PRALUENT 150 mg SOLUTION FOR INJECTION IN A PRE-FILLED PEN in Украина
Online doctors for PRALUENT 150 mg SOLUTION FOR INJECTION IN A PRE-FILLED PEN
Discuss dosage, side effects, interactions, contraindications, and prescription renewal for PRALUENT 150 mg SOLUTION FOR INJECTION IN A PRE-FILLED PEN – subject to medical assessment and local rules.


Get updates and exclusive offers
Be the first to know about new services, marketplace updates, and subscriber-only promos.

