

CRYSVITA 10 mg INJECTABLE SOLUTION


How to use CRYSVITA 10 mg INJECTABLE SOLUTION
Translated with AI
This page provides general information and does not replace a doctor’s consultation. Always consult a doctor before taking any medication. Seek urgent medical care if symptoms are severe.
Show originalContents of the leaflet
Introduction
Package Leaflet: Information for the User
CRYSVITA 10mg solution for injection
CRYSVITA 20mg solution for injection
CRYSVITA 30mg solution for injection
burosumab
Read all of this leaflet carefully before you start using this medicine because it contains important information for you.
- Keep this leaflet, you may need to read it again.
- If you have any further questions, ask your doctor, pharmacist or nurse.
- This medicine has been prescribed for you only. Do not pass it on to others. It may harm them, even if their signs of illness are the same as yours.
- If you get any side effects, talk to your doctor. This includes any possible side effects not listed in this leaflet. See section 4.
Contents of the pack
- What is CRYSVITA and what is it used for
- What you need to know before you use CRYSVITA
- How to use CRYSVITA
- Possible side effects
- Storage of CRYSVITA
- Contents of the pack and other information
1. What is CRYSVITA and what is it used for
What is CRYSVITA
CRYSVITA contains the active substance burosumab. It is a type of medicine called a human monoclonal antibody.
What CRYSVITA is used for
CRYSVITA is used to treat X-linked hypophosphataemia (XLH). It is used in children and adolescents from 1 to 17 years of age and in adults.
CRYSVITA is used to treat tumour-induced osteomalacia (TIO) when the tumour that causes it cannot be removed or found, in children and adolescents from 1 to 17 years of age and in adults.
What is X-linked hypophosphataemia (XLH)
X-linked hypophosphataemia is a genetic disease.
- People with XLH have higher levels of a hormone called fibroblast growth factor 23 (FGF23).
- FGF23 reduces the amount of phosphate in the blood.
- Low phosphate levels can:
- cause bones not to harden properly and, in children and adolescents, not to grow properly;
- cause pain and stiffness in bones and joints.
What is tumour-induced osteomalacia (TIO)
- People with TIO have higher levels of a hormone called FGF23 produced by certain types of tumours.
- FGF23 reduces the amount of phosphate in the blood.
- Low phosphate levels can cause softening of the bones, muscle weakness, tiredness, bone pain and fractures.
How CRYSVITA works
CRYSVITA binds to FGF23 in the blood, preventing FGF23 from working and increasing phosphate levels in the blood to normal levels.

2. What you need to know before you use CRYSVITA
Do not use CRYSVITA
- if you are allergic to burosumab or any of the other ingredients of this medicine (listed in section 6);
- if you are taking phosphate supplements or certain vitamin D supplements (which contain the so-called active vitamin D [e.g. calcitriol]);
- if you already have high phosphate levels in your blood (hyperphosphataemia);
- if you have severe kidney disease or kidney failure.
Allergic reactions
Stop using CRYSVITA and contact your doctor immediately if you get any of the following side effects, as they could be signs of an allergic reaction:
- rash and itching all over the body;
- severe swelling of the eyelids, mouth or lips (angioedema);
- shortness of breath;
- fast heartbeat;
- sweating.
Do not use CRYSVITA if any of the above applies to you. If you are unsure, consult your doctor before using CRYSVITA.
Warnings and precautions
Skin reactions
You may get skin reactions at the injection site, see section 4 for more information. If these reactions are severe, tell your doctor.
Tests and checks
Your doctor will check your phosphate and calcium levels in your blood and urine and may also do an ultrasound of your kidneys during treatment to reduce the risk of hyperphosphataemia (too much phosphate in the blood) and ectopic mineralization (calcium build-up in tissues such as the kidneys). Your doctor will also check your parathyroid hormone level in your blood from time to time.
Children under 1 year
CRYSVITA should not be given to children under 1 year of age, as its safety and effects in this age group have not been studied.
Other medicines and CRYSVITA
Tell your doctor if you are taking, have recently taken or might take any other medicines.
Do not use CRYSVITA and tell your doctor if you are taking:
- phosphate supplements;
- certain vitamin D supplements (which contain the so-called active vitamin D [e.g. calcitriol]). There are some vitamin D supplements that you can continue to take or start taking, and your doctor will tell you which ones.
Consult your doctor before using CRYSVITA:
- if you are taking medicines that work in the same way as calcium in the body (calcimimetics). If used together, they may lower calcium levels in the blood;
- if you are a TIO patient and are about to receive treatment for the underlying tumour (i.e. radiotherapy or surgical removal). In this case, CRYSVITA treatment will not be started until after tumour treatment and if serum phosphate levels are low.
Pregnancy and breast-feeding
If you are pregnant or breast-feeding, think you may be pregnant or are planning to have a baby, ask your doctor or pharmacist for advice before using this medicine. This is because it is not known if CRYSVITA affects the baby.
CRYSVITA is not recommended during pregnancy.
If you can become pregnant, you must use an effective method of contraception while using CRYSVITA and for at least 14 weeks after the last dose. You should discuss this with your doctor.
It is not known if CRYSVITA passes into breast milk and a risk to newborns/infants cannot be excluded. You should discuss this with your doctor.
Driving, cycling and using machines
CRYSVITA may cause dizziness and affect your ability to cycle, use tools or machines or drive. If you feel affected, do not cycle, do not use tools or machines and do not drive. Tell your doctor.
CRYSVITA contains sorbitol
This medicine contains 45.91 mg of sorbitol in each vial, equivalent to 45.91 mg/ml.
3. How to use CRYSVITA
CRYSVITA should be given by injection under the skin (subcutaneously) in the upper arm, abdomen, buttock or thigh. A healthcare professional will give you this medicine or your child. Alternatively, your doctor may recommend that you or your child injects it yourself. A healthcare professional will show you how to do this. The first self-injection after starting treatment or after any dose change should be done in front of them. At the end of this leaflet, there is a detailed section on "Instructions for use". Always follow these instructions carefully when giving the CRYSVITA injection to yourself or your child.
Follow the instructions for administration of this medicine given by your doctor, nurse or pharmacist. If you are unsure, consult your doctor, nurse or pharmacist again.
How much CRYSVITA you will need
The dose is determined based on body weight. Your doctor will calculate the correct dose for you.
Dose for XLH and TIO
You will need to inject your dose of CRYSVITA:
- every 2 weeks in children and adolescents from 1 to 17 years of age;
- every 4 weeks in adults.
Your doctor will do checks to make sure you are getting the right dose and may change the dose or how often you get it if needed.
Maximum dose for patients with XLH
The maximum dose you will get for the treatment of XLH is 90 mg.
Maximum dose for patients with TIO
The maximum dose you will get for the treatment of TIO:
- for children from 1 to 12 years of age is 90 mg;
- for adolescents from 13 to 17 years of age and for adults is 180 mg.
Patients with TIO
If you are a TIO patient who needs treatment for the underlying tumour (i.e. radiotherapy or surgical removal), your doctor will stop CRYSVITA treatment. Once tumour treatment is finished, your doctor will check your phosphate levels and restart CRYSVITA treatment if serum phosphate levels are low.
If you are given too much CRYSVITA
If you think you have been given too much CRYSVITA, tell your doctor immediately.
If you miss a dose of CRYSVITA
If you miss a dose, consult your doctor immediately. The missed dose should be given as soon as possible and your doctor will reschedule the next doses as needed.
If you have any further questions on the use of this medicine, ask your doctor.

4. Possible side effects
Like all medicines, this medicine can cause side effects, although not everybody gets them.
Side effects in children and adolescents with XLH
Very common (may affect more than 1 in 10 children and adolescents)
- Dental abscess (infection)
- Cough
- Headache
- Dizziness
- Vomiting
- Nausea
- Diarrhoea
- Constipation
- Dental caries
- Rash
- Muscle pain (myalgia) and pain in hands and feet
- Injection site reactions, which can include:
- redness or rash
- pain or itching
- swelling
- bleeding or bruising
These injection site reactions are usually mild and occur within 1 day of injection and usually improve within 1 to 3 days.
- Fever
- Low vitamin D levels in the blood
Frequency not known (cannot be estimated from the available data)
- High phosphate levels in the blood
Side effects in children and adolescents with TIO
Side effects in children and adolescents are not known, as no clinical studies have been done.
Side effects in adults with XLH and TIO
Very common (may affect more than 1 in 10 adults)
- Dental abscess (infection)
- Headache
- Dizziness
- Restless legs syndrome (an irresistible urge to move the legs to stop uncomfortable sensations, painful or strange feelings in the legs, especially before sleeping or during the night)
- Constipation
- Back pain
- Muscle spasms
- Injection site reactions, which can include pain or swelling
- Low vitamin D levels in the blood
Common (may affect up to 1 in 10 adults)
- Rash
- High phosphate levels in the blood
Reporting of side effects
If you get any side effects, talk to your doctor or nurse. This includes any possible side effects not listed in this leaflet. You can also report side effects directly via the national reporting system listed in Appendix V. By reporting side effects you can help provide more information on the safety of this medicine.
5. Storage of CRYSVITA
Keep CRYSVITA out of the sight and reach of children.
Do not use CRYSVITA after the expiry date which is stated on the carton and label after EXP. The expiry date is the last day of the month shown.
Store in a refrigerator (2°C to 8°C). Do not freeze.
Keep the vial in the outer carton in order to protect from light.
Do not use CRYSVITA if it contains visible particles.
Medicines should not be disposed of via wastewater or household waste. This will help protect the environment.
If you self-inject, see step 5 of the "Instructions for use" at the end of this leaflet for disposal of unused medicines and materials. If you are unsure about how to dispose of medicines that are no longer needed, ask your healthcare professional or pharmacist.
6. Container Contents and Additional Information
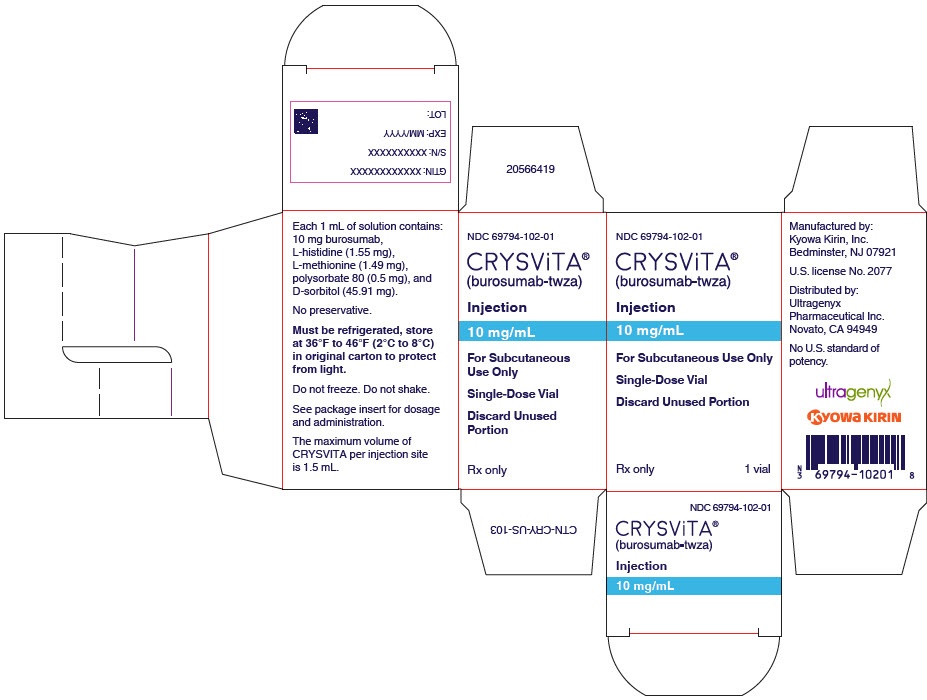
Composition of CRYSVITA
The active ingredient is burosumab. Each vial contains 10, 20, or 30 mg of burosumab.
The other components are L-histidine, D-sorbitol (E 420), polysorbate 80, L-methionine, 10% hydrochloric acid, and water for injectable preparations. (See "CRYSVITA contains sorbitol" in section 2 for more information).
Appearance of the Product and Container Contents
CRYSVITA is presented as a clear to slightly opalescent and colorless to pale brown-yellow injectable solution in a small glass vial. Each container contains 1 vial.
Marketing Authorization Holder
Kyowa Kirin Holdings B.V.
Bloemlaan 2
2132NP Hoofddorp
Netherlands
Manufacturer
allphamed PHARBIL Arzneimittel GmbH
Hildebrandstr. 10-12
37081 Göttingen
Germany
Kyowa Kirin Holdings B.V.
Bloemlaan 2
2132NP Hoofddorp
Netherlands
Date of Last Revision of this Leaflet:June 2025
Other Sources of Information
Detailed information on this medicinal product is available on the European Medicines Agency website: https://www.ema.europa.eu. There are also links to other websites on rare diseases and orphan medicines.
INSTRUCTIONSFORUSE
Read these instructions for use carefully before using CRYSVITA:
- Inject yourself or your child only if your doctor has instructed you to do so.
- It should only be injected after you have received training on the injection technique. The first self-injection after starting treatment or after any dose change should be performed in front of a healthcare professional.
- Follow exactly the administration instructions of this medicine indicated by your doctor, pharmacist, or nurse (healthcare professional). In case of doubt, consult your healthcare professional again.
- Your doctor will prescribe the correct dose. Your dose is measured in milligrams (mg). CRYSVITA is available in vials of three different concentrations: 10 mg, 20 mg, and 30 mg. Each vial is for single use. Always use a new vial of CRYSVITA for each injection, see step 5 on how to dispose of used vials and other materials.
- Your healthcare professional will indicate the amount of CRYSVITA to be administered to yourself or your child. You or your child may receive more than one vial to obtain the correct dose.
- If your healthcare professional indicates that more than one injection is necessary to administer the required dose, you must repeat steps 2 to 5 for each injection. Use new materials and a different part of the body for each injection.
- Use only the syringe and needles provided or prescribed by your healthcare professional to administer the injection.
- Always use the large needle to extract the liquid and remember to change to the small needle to inject the liquid.
- Using an incorrect syringe or needle can lead to a dosing error or make the injection more painful.
- When administering CRYSVITA to a small child, it may be helpful for another person to be present to calm them.
- Do not use CRYSVITA if you are allergic to any of the components of this medicine. Stop using CRYSVITA if you have any allergic reaction during or after the injection and contact your healthcare professional immediately. See section 2 of the leaflet for more information.
Step1.GatherandInspecttheMaterials
Remove the required CRYSVITA vials from the refrigerator.
Check the concentration on the label of each vial.
Make sure you have the correct number of vials to match the dose in mg advised by your healthcare professional.
If you are unsure, ask your healthcare professional.
Let the vials reach room temperature for 30 minutes. Do not heat the vials in any other way, such as with hot water or in a microwave. Do not expose the vials to direct sunlight.
Check the expiration date (indicated after EXP) on the vial label. Inspect the liquid in the vial. Do not shake it.
Do not use the vial if:
- it is expired;
- it has changed color, is cloudy, or contains particles. The CRYSVITA liquid should be clear to slightly opalescent and colorless to pale brown-yellow.
| Place all the materials you will need on a clean and flat surface. For each injection, you will need:
Contact your healthcare professional if you do not have these materials. Your healthcare professional will explain the use of the different needles. |
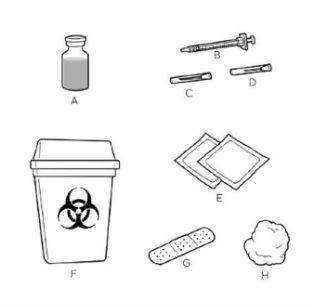
The largeneedleis used to extract CRYSVITA from the vial.
The smallneedleis used to inject CRYSVITA.
If you are unsure, ask your healthcare professional before use.
Do not use any material that is missing parts or is damaged in any way.
Do not remove the needle caps until you are ready to use them.
Wash your hands thoroughly with water and soap before proceeding to step 2.
Step2.ExtractCRYSVITAandPreparetheInjection
Remove the cap from the vial to expose the rubber stopper.
Clean the rubber stopper with an alcohol wipe and let it dry. Do not touch the rubber stopper after cleaning it.
| Select the largeneedle and remove it from the sterile packaging, but do not remove the cap that covers the needle. To attach the needle to the syringe, hold the largeneedle by the protective cap in one hand and the syringe by the cylinder in the other. Depending on the materials you have been given:
Do not touch the needle itself or the end of the syringe where the needle is attached. |

Once the needle is securely attached, hold the syringe by the cylinder with the needle pointing upwards.
Remove the needle cap by pulling it off.
Do not throw the needle cap away.
Do not touch the needle or allow it to come into contact with any surface once the cap is removed.
Do not use the syringe if it is dropped after the cap is removed or if the needle appears to be damaged.
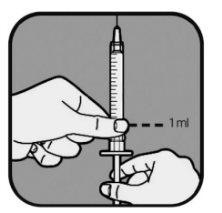
| Your healthcare professional will indicate the amount of liquid to be injected. It is usually 1 ml per injection. Your healthcare professional will indicate which mark to use if you need to inject less than 1 ml. Always use the mark that corresponds to your dose. If you are unsure, ask your healthcare professional before use. Pull the syringe plunger until the end of the plunger aligns with the mark corresponding to your dose. This fills the syringe with air. |
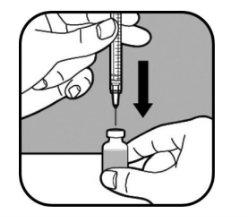
| Keep the vial on a flat surface. Slowly insert the large needle through the rubber stopper and into the vial. Do not let the needle tip touch the liquid in the vial. If the needle tip touches the liquid, slowly pull the needle out until it no longer touches the liquid. Slowly push the plunger in the syringe. This pushes the air from the syringe into the vial. |
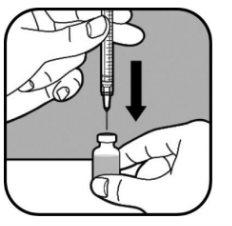
| Keep the vial on a flat surface. Slowly insert the large needle through the rubber stopper and into the vial. Do not let the needle tip touch the liquid in the vial. If the needle tip touches the liquid, slowly pull the needle out until it no longer touches the liquid. Slowly push the plunger in the syringe. This pushes the air from the syringe into the vial. |
| Keep the needle in the vial and turn it upside down. Make sure the needle tip is in the liquid. |
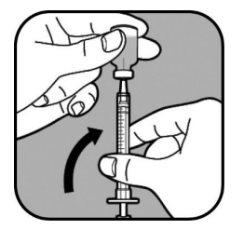
| Slowly pull the plunger to fill the syringe until the end of the plunger aligns with the mark corresponding to your dose. Keep the needle tip in the liquid at all times. |
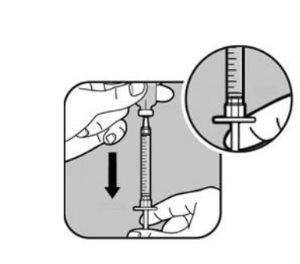
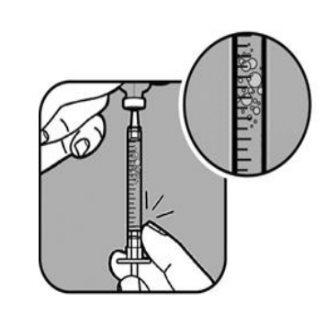
| Check for air bubbles in the liquid in the syringe. If you see bubbles,
Check the dose again with the syringe marks. If necessary, extract a little more liquid to align it with the mark corresponding to your dose. Check again for air bubbles and repeat the process if necessary. |
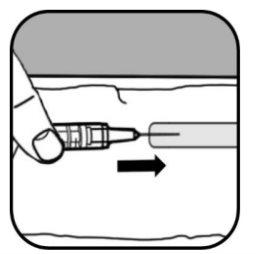
When there are no air bubbles in the syringe, remove the syringe and needle directly from the vial by pulling downwards.
| Remove the large needle from the syringe.
|
Select the smallneedle and remove it from the sterile packaging, but do not remove the cap that covers the needle.
To attach the needle to the syringe, hold the smallneedle by the protective cap in one hand and the syringe by the cylinder in the other.
Depending on the materials you have been given,
- you will need to push the needle down and twist it clockwise in the syringe until it is secure;
- or push the needle down until it is fully attached.
Do not touch the needle itself or the end of the syringe where the needle is attached.
Step3.PreparetheInjectionSite
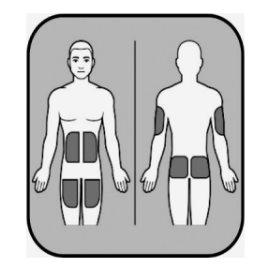
| The injection should be administered into the fat layer just under the skin. You will need to choose the injection site. If you are administering the injection to yourself, the suitable areas are:
If you are administering the injection to another person, the suitable areas are:
Do not administer the injection in:
|
If you are going to administer more than one injection, use a different site for each injection. Clean each injection site with a new alcohol wipe and let the skin dry.
CRYSVITA should be injected into clean and dry skin.
Step4.AdministertheCRYSVITAInjection
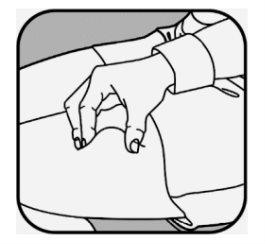
| Remove the cap from the small needle by pulling it off. Firmly pinch the skin using your thumb and other fingers, creating an area about 5 cm wide. Hold the syringe between your thumb and index finger of your dominant hand. The needle should be inserted into the skin at an angle of 45º or 90º. Your healthcare professional will indicate which angle to use. |
|
|
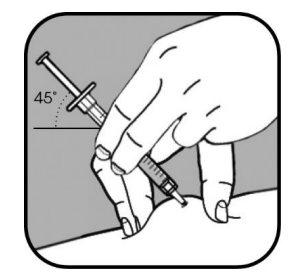
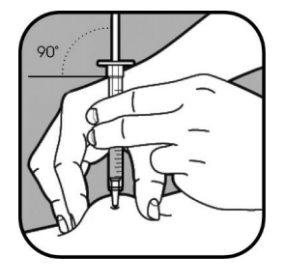
Use a quick motion, like a dart, to insert the needle into the pinched skin.
Do not push the plunger when inserting the needle.
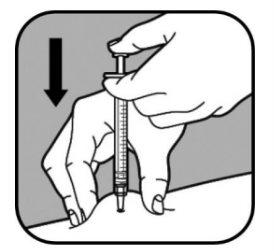
| When the needle is inserted, do not move it. Continue pinching the skin. Slowly push the syringe plunger, for a maximum of 30 seconds, until the syringe is empty. |
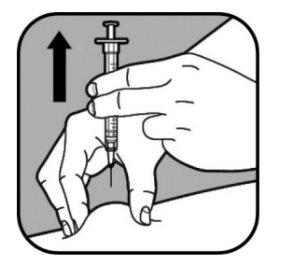
| When you have administered the complete dose, remove the syringe by gently pulling it outwards. Release the pinched skin. Press the injection site with a cotton ball or gauze pad for a few seconds to stop the bleeding. Apply a band-aid if necessary. Do not rub the injection site. To avoid any injury, do not put the cap back on the small needle. Place the uncovered needle in the sharps container. |
Step5.AfterEachInjection
Place the used needles, caps, and syringes in the sharps container. The vials should be disposed of according to local guidelines.
Do not throw the needles or syringes in the trash.
Do not store vials with leftover medicine for future use or give them to other people.
When your sharps container is almost full, you should follow local guidelines to request another container and dispose of it correctly.
Reminder:If you are going to administer more than one injection, repeat steps 2 to 5 for each one.
Use new materials for each injection.
Record the injection date and all the areas where you have injected, so you can use different areas for the next injection.
There is a video at the following link that shows how to prepare and administer the injection: www.myinject.eu.
- Country of registration
- Active substance
- Prescription requiredYes
- Manufacturer
- This information is for reference only and does not constitute medical advice. Always consult a doctor before taking any medication. Oladoctor is not responsible for medical decisions based on this content.
- Alternatives to CRYSVITA 10 mg INJECTABLE SOLUTIONDosage form: NULL, 10 mgActive substance: burosumabManufacturer: Kyowa Kirin Holdings B.V.Prescription requiredDosage form: NULL, 20 mgActive substance: burosumabManufacturer: Kyowa Kirin Holdings B.V.Prescription requiredDosage form: INJECTABLE, 20 mg/mlActive substance: burosumabManufacturer: Kyowa Kirin Holdings B.V.Prescription required
Online doctors for CRYSVITA 10 mg INJECTABLE SOLUTION
Discuss questions about CRYSVITA 10 mg INJECTABLE SOLUTION, including use, safety considerations and prescription review, subject to medical assessment and local regulations.


Frequently Asked Questions
